Let's see what's so special about JavaScript, what we can achieve with it and which other technologies play well with it.
What is JavaScript?
JavaScript was initially created to “make webpages alive”.
The programs in this language are called scripts. They can be written right in the HTML and execute automatically as the page loads.
Scripts are provided and executed as a plain text. They don't need a special preparation or a compilation to run.
In this aspect, JavaScript is very different from another language called
Java.
Why JavaScript?
When JavaScript was created, it initially had another name: “LiveScript”. But Java language was very popular at that time, so it was decided that positioning a new language as a “younger brother” of Java would help.
But as it evolved, JavaScript became a fully independent language, with its own specification called
ECMAScript, and now it has no relation to Java at all.
At present, JavaScript can execute not only in the browser, but also on the server, or actually on any device where there exists a special program called
the JavaScript engine.
The browser has an embedded engine, sometimes it's also called a “JavaScript virtual machine”.
Different engines have different “codenames”, for example:
…There are other codenames like “Trident”, “Chakra” for different versions of IE, “ChakraCore” for Microsoft Edge, “Nitro” and “SquirrelFish” for Safari etc.
The terms above are good to remember, because they are used in developer articles on the internet. We'll use them too. For instance, if “a feature X is supported by V8”, then it probably works in Chrome and Opera.
How engines work?
Engines are complicated. But the basics are easy.
The engine (embedded if it's a browser) reads (“parses”) the script.
Then it converts (“compiles”) the script to the machine language.
And then the machine code runs, pretty fast.
The engine applies optimizations on every stage of the process. It even watches the compiled script as it runs, analyzes the data that flows through it and applies optimizations to the machine code based on that knowledge. At the end, scripts are quite fast.
What can in-browser JavaScript do?
The modern JavaScript is a “safe” programming language. It does not provide low-level access to memory or CPU, because it was initially created for browsers which do not require it.
The capabilities greatly depend on the environment that runs JavaScript. For instance,
Node.JS supports functions that allow JavaScript to read/write arbitrary files, perform network requests etc.
In-browser JavaScript can do everything related to webpage manipulation, interaction with the user and the webserver.
For instance, in-browser JavaScript is able to:
Add new HTML to the page, change the existing content, modify styles.
React to user actions, run on mouse clicks, pointer movements, key presses.
Send requests over the network to remote servers, download and upload files (so-called
AJAX and
COMET technologies).
Get and set cookies, ask questions to the visitor, show messages.
Remember the data on the client-side (“local storage”).
What CAN'T in-browser JavaScript do?
JavaScript's abilities in the browser are limited for the sake of the user's safety. The aim is to prevent an evil webpage from accessing private information or harming the user's data.
The examples of such restrictions are:
JavaScript on a webpage may not read/write arbitrary files on the hard disk, copy them or execute programs. It has no direct access to OS system functions.
Modern browsers allow it to work with files, but the access is limited and only provided if the user does certain actions, like “dropping” a file into a browser window or selecting it via an <input> tag.
There are ways to interact with camera/microphone and other devices, but they require a user's explicit permission. So a JavaScript-enabled page may not sneakily enable a web-camera, observe the surroundings and send the information to the
NSA.
Different tabs/windows generally do not know about each other. Sometimes they do, for example when one window uses JavaScript to open the other one. But even in this case, JavaScript from one page may not access the other if they come from different sites (from a different domain, protocol or port).
This is called the “Same Origin Policy”. To work around that, both pages must contain a special JavaScript code that handles data exchange.
The limitation is again for user's safety. A page from http://anysite.com which a user has opened must not be able to access another browser tab with the URL http://gmail.com and steal information from there.
JavaScript can easily communicate over the net to the server where the current page came from. But its ability to receive data from other sites/domains is crippled. Though possible, it requires explicit agreement (expressed in HTTP headers) from the remote side. Once again, that's safety limitations.
Such limits do not exist if JavaScript is used outside of the browser, for example on a server. Modern browsers also allow installing plugin/extensions which may get extended permissions.
What makes JavaScript unique?
There are at least three great things about JavaScript:
Full integration with HTML/CSS.
Simple things done simply.
Supported by all major browsers and enabled by default.
Combined, these three things exist only in JavaScript and no other browser technology.
That's what makes JavaScript unique. That's why it's the most widespread tool to create browser interfaces.
While planning to learn a new technology, it's beneficial to check its perspectives. So let's move on to the modern trends that include new languages and browser abilities.
Languages “over” JavaScript
The syntax of JavaScript does not suit everyone's needs. Different people want different features.
That's to be expected, because projects and requirements are different for everyone.
So recently a plethora of new languages appeared, which are transpiled (converted) to JavaScript before they run in the browser.
Modern tools make the transpilation very fast and transparent, actually allowing developers to code in another language and autoconverting it “under the hood”.
Examples of such languages:
CoffeeScript is a “syntactic sugar” for JavaScript, it introduces shorter syntax, allowing to write more precise and clear code. Usually Ruby devs like it.
TypeScript is concentrated on adding “strict data typing”, to simplify development and support of complex systems. It is developed by Microsoft.
Dart is a standalone language that has its own engine that runs in non-browser environments (like mobile apps). It was initially offered by Google as a replacement for JavaScript, but as of now, browsers require it to be transpiled to JavaScript just like the ones above.
There are more. Of course even if we use one of those languages, we should also know JavaScript, to really understand what we're doing.
Summary
JavaScript was initially created as a browser-only language, but now it is used in many other environments as well.
At this moment, JavaScript has a unique position as the most widely-adopted browser language with full integration with HTML/CSS.
There are many languages that get “transpiled” to JavaScript and provide certain features. It is recommended to take a look at them, at least briefly, after mastering JavaScript.
Code editors
A code editor is the place where a programmer spends most of his time.
There are two archetypes: IDE and lightweight editors. Many people feel comfortable choosing one tool of each type.
IDE
The term
IDE (Integrated Development Environment) means a powerful editor with many features that usually operates on a “whole project”. As said, that's not just an editor, but a full-scale “development environment”.
An IDE loads the project (can be many files), and then allows navigation between files, provides autocompletion based on the whole project, integrates with a version management system (like
git), a testing environment and other “project-level” stuff.
If you haven't considered selecting an IDE yet, look at the following variants:
All of the IDEs listed above are available on both Windows and Mac, and the IDEs other than Visual Studio are also available on Linux.
Most IDEs are paid, but have a trial period. Their cost is usually negligible compared to a qualified developer's salary, so just choose the best one for you.
Lightweight editors
“Lightweight editors” are not as powerful as IDEs, but they're fast, elegant and simple.
They are mainly used to instantly open and edit a file.
The main difference between a “lightweight editor” and an “IDE” is that an IDE works on a project-level, so it loads much more data on start, analyzes the project structure if needed and so on. A lightweight editor is much faster if we need only one file.
In practice, lightweight editors may have a lot of plugins including directory-level syntax analyzers and autocompleters, so there's no strict border between a lightweight editor and an IDE.
Vim and Emacs are also cool, if you know how to use them.
My favorites
The personal preference of the author is to have both an IDE for projects and a lightweight editor for quick and easy file editing.
I'm using:
WebStorm for JS, and if there is one more language in the project, then I switch to other Jetbrains editors like
PHPStorm (PHP),
IDEA (Java),
RubyMine (Ruby). There are editors for other languages too, but I haven't used them.
If you don't know what to choose, you can consider these ones.
Let's not argue
The editors in the lists above are those that either I or my friends who I consider good developers have been using for a long time and are happy with.
There are other great editors in our big world. Please choose the one you like the most.
The choice of an editor, like any other tool, is individual and depends on your projects, habits, personal preferences.
Developer console
Code is prone to errors. You are quite likely to make errors… Oh, what am I talking about? You are absolutely going to make errors, at least if you're a human, not a
robot.
But in the browser, a user doesn't see the errors by default. So, if something goes wrong in the script, we won't see what's broken and can't fix it.
To see errors and get a lot of other useful information about scripts, browsers have embedded “developer tools”.
Most often developers lean towards Chrome or Firefox for development, because those browsers have the best developer tools. Other browsers also provide developer tools, sometimes with special features, but are usually playing “catch-up” to Chrome or Firefox. So most people have a “favorite” browser and switch to others if a problem is browser-specific.
Developer tools are really powerful, there are many features. To start, we'll learn how to open them, look at errors and run JavaScript commands.
There's an error in the JavaScript code on it. It's hidden from a regular visitor's eyes, so let's open developer tools to see it.
Press F12 or, if you're on Mac, then Cmd+Opt+J.
The developer tools will open on the Console tab by default.
It looks somewhat like this:
The exact look of developer tools depends on your version of Chrome. It changes from time to time, but should be similar.
Here we can see the red-colored error message. In this case the script contains an unknown “lalala” command.
On the right, there is a clickable link to the source bug.html:12 with the line number where the error has occurred.
Below the error message there is a blue > symbol. It marks a “command line” where we can type JavaScript commands and press Enter to run them (Shift+Enter to input multi-line commands).
Now we can see errors and that's enough for the start. We'll be back to developer tools later and cover debugging more in-depth in the chapter
Debugging in Chrome.
Firefox, Edge and others
Most other browsers use F12 to open developer tools.
The look & feel of them is quite similar. Once you know how to use one of them (you can start with Chrome), you can easily switch to another.
Safari
Safari (Mac browser, not supported by Windows/Linux) is a little bit special here. We need to enable the “Develop menu” first.
Open Preferences and go to “Advanced” pane. There's a checkbox at the bottom:
Now Cmd+Opt+C can toggle the console. Also note that the new top menu item named “Develop” has appeared. It has many commands and options.
Summary
Developer tools allow us to see errors, run commands, examine variables and much more.
They can be opened with F12 for most browsers under Windows. Chrome for Mac needs Cmd+Opt+J, Safari: Cmd+Opt+C (need to enable first).
Now we have the environment ready. In the next section we'll get down to JavaScript.
The tutorial that you're reading is about core JavaScript, which is platform-independent. Further on, you will learn Node.JS and other platforms that use it.
But, we need a working environment to run our scripts, and, just because this book is online, the browser is a good choice. We'll keep the amount of browser-specific commands (like alert) to a minimum, so that you don't spend time on them if you plan to concentrate on another environment like Node.JS. On the other hand, browser details are explained in detail in the
next part of the tutorial.
So first, let's see how to attach a script to a webpage. For server-side environments, you can just execute it with a command like "node my.js" for Node.JS.
The “script” tag
JavaScript programs can be inserted in any part of an HTML document with the help of the <script> tag.
For instance:
<!DOCTYPE HTML>
<html>

<body>

  <p>Before the script...</p>

  <script>
    alert( 'Hello, world!' );
  </script>

  <p>...After the script.</p>

</body>

</html>
You can run the example by clicking on the “Play” button in its right-top corner.
The <script> tag contains JavaScript code which is automatically executed when the browser meets the tag.
The modern markup
The <script> tag has a few attributes that are rarely used nowadays, but we can find them in old code:
The type attribute: <script type=…>
The old standard HTML4 required a script to have a type. Usually it was type="text/javascript". The modern HTML standard assumes this type by default. No attribute is required.
The language attribute: <script language=…>
This attribute was meant to show the language of the script. As of now, this attribute makes no sense, the language is JavaScript by default. No need to use it.
Comments before and after scripts.
In really ancient books and guides, one may find comments inside <script>, like this:
These comments were supposed to hide the code from an old browser that didn't know about a <script> tag. But all browsers born in the past 15+ years don't have any issues. We mention it here, because such comments serve as a sign. If you see that somewhere – that code is probably really old and not worth looking into.
External scripts
If we have a lot of JavaScript code, we can put it into a separate file.
The script file is attached to HTML with the src attribute:
<script src="/path/to/script.js"></script>
Here /path/to/script.js is an absolute path to the file with the script (from the site root).
It is also possible to provide a path relative to the current page. For instance, src="script.js" would mean a file "script.js" in the current folder.
We can use a <script> tag to add JavaScript code to the page.
The type and language attributes are not required.
A script in an external file can be inserted with <script src="path/to/script.js"></script>.
There is much more to learn about browser scripts and their interaction with the web-page. But let's keep in mind that this part of the tutorial is devoted to the JavaScript language, so we shouldn't distract ourselves from it. We'll be using a browser as a way to run JavaScript, which is very convenient for online reading, but yet one of many.
Take the solution of the previous task
Show an alert. Modify it by extracting the script content into an external file alert.js, residing in the same folder.
The first thing to study is the building blocks of the code.
Statements
Statements are syntax constructs and commands that perform actions.
We've already seen a statement alert('Hello, world!'), which shows the message.
We can have as many statements in the code as we want. Another statement can be separated with a semicolon.
For example, here we split the message into two:
alert('Hello');
alert('World');
Usually each statement is written on a separate line – thus the code becomes more readable:
alert('Hello');
alert('World');
Semicolons
A semicolon may be omitted in most cases when a line break exists.
This would also work:
alert('Hello')
alert('World')
Here JavaScript interprets the line break as an “implicit” semicolon. That's also called an
automatic semicolon insertion.
In most cases a newline implies a semicolon. But “in most cases” does not mean “always”!
There are cases when a newline does not mean a semicolon, for example:
alert(3 +
1
+ 2);
The code outputs 6, because JavaScript does not insert semicolons here. It is intuitively obvious that if the line ends with a plus "+", then it is an “incomplete expression”, no semicolon required. And in this case that works as intended.
But there are situations where JavaScript “fails” to assume a semicolon where it is really needed.
Errors which occur in such cases are quite hard to find and fix.
An example of an error
If you're curious to see a concrete example of such an error, check this code out:
[1, 2].forEach(alert)
No need to think about the meaning of the brackets [] and forEach yet. We'll study them later, for now it does not matter. Let's just remember the result: it shows 1, then 2.
Now let's add an alert before the code and not finish it with a semicolon:
alert("There will be an error")

[1, 2].forEach(alert)
Now if we run it, only the first alert is shown, and then we have an error!
But everything is fine again if we add a semicolon after alert:
alert("All fine now");

[1, 2].forEach(alert)
Now we have the “All fine now” message and then 1 and 2.
The error in the no-semicolon variant occurs because JavaScript does not imply a semicolon before square brackets [...].
So, because the semicolon is not auto-inserted, the code in the first example is treated as a single statement. That's how the engine sees it:
alert("There will be an error")[1, 2].forEach(alert)
But it should be two separate statements, not a single one. Such a merging in this case is just wrong, hence the error. There are other situations when such a thing happens.
It's recommended to put semicolons between statements even if they are separated by newlines. This rule is widely adopted by the community. Let's note once again – it is possible to leave out semicolons most of the time. But it's safer – especially for a beginner – to use them.
Comments
As time goes on, the program becomes more and more complex. It becomes necessary to add comments which describe what happens and why.
Comments can be put into any place of the script. They don't affect the execution, because the engine simply ignores them.
One-line comments start with the two forward slash characters //.
The rest of the line is a comment. It may occupy a full line of its own or follow a statement.
Like here:
// This comment occupies a line of its own
alert('Hello');

alert('World'); // This comment follows the statement
Multiline comments start with a forward slash and an asterisk /* and end with an asterisk and a forward slash */.
Like this:
/* An example with two messages.
This is a multiline comment.
*/
alert('Hello');
alert('World');
The content of comments is ignored, so if we put code inside /* … */ it won't execute.
Sometimes it comes in handy to temporarily disable a part of code:
/* Commenting out the code
alert('Hello');
*/
alert('World');
Use hotkeys!
In most editors a line of code can be commented out by Ctrl+/ hotkey for a single-line comment and something like Ctrl+Shift+/ – for multiline comments (select a piece of code and press the hotkey). For Mac try Cmd instead of Ctrl.
Nested comments are not supported!
There may not be /*...*/ inside another /*...*/.
Such code will die with an error:
/*
  /* nested comment ?!? */
*/
alert( 'World' );
Please, don't hesitate to comment your code.
Comments increase the overall code footprint, but that's not a problem at all. There are many tools which minify the code before publishing to the production server. They remove comments, so they don't appear in the working scripts. Therefore comments do not have any negative effects on production at all.
Further in the tutorial, there will be a chapter
Coding style that also explains how to write better comments.
The modern mode, "use strict"
For a long time JavaScript was evolving without compatibility issues. New features were added to the language, but the old functionality did not change.
That had the benefit of never breaking existing code. But the downside was that any mistake or an imperfect decision made by JavaScript creators got stuck in the language forever.
It had been so until 2009 when ECMAScript 5 (ES5) appeared. It added new features to the language and modified some of the existing ones. To keep the old code working, most modifications are off by default. One needs to enable them explicitly with a special directive "use strict".
“use strict”
The directive looks like a string: "use strict" or 'use strict'. When it is located on the top of the script, then the whole script works the “modern” way.
For example
"use strict";

// this code works the modern way
...
We will learn functions (a way to group commands) soon.
Looking ahead let's just note that "use strict" can be put at the start of a function (most kinds of functions) instead of the whole script. Then strict mode is enabled in that function only. But usually people use it for the whole script.
Ensure that “use strict” is at the top
Please make sure that "use strict" is on the top of the script, otherwise the strict mode may not be enabled.
There is no strict mode here:
alert("some code");
// "use strict" below is ignored, must be on the top

"use strict";

// strict mode is not activated
Only comments may appear above "use strict".
There's no way to cancel use strict
There is no directive "no use strict" or alike, that would return the old behavior.
Once we enter the strict mode, there's no return.
Always “use strict”
The differences of "use strict" versus the “default” mode are still to be covered.
In the next chapters, as we learn language features, we'll make notes about the differences of the strict mode. Luckily, there are not so many. And they actually make our life better.
At this point in time it's enough to know about it in general:
The "use strict" directive switches the engine to the “modern” mode, changing the behavior of some built-in features. We'll see the details as we study.
The strict mode is enabled by "use strict" at the top. Also there are several language features like “classes” and “modules” that enable strict mode automatically.
The strict mode is supported by all modern browsers.
It's always recommended to start scripts with "use strict". All examples in this tutorial assume so, unless (very rarely) specified otherwise.
Variables
Most of the time, a JavaScript application needs to work with information. Here are 2 examples:
An online-shop – the information might include goods being sold and a shopping cart.
A chat application – the information might include users, messages, and much more.
Variables are used to store this information.
A variable
A
variable is a “named storage” for data. We can use variables to store goodies, visitors and other data.
To create a variable in JavaScript, we need to use the let keyword.
The statement below creates (in other words: declares or defines) a variable with the name “message”:
let message;
Now we can put some data into it by using the assignment operator =:
let message;

message = 'Hello'; // store the string
The string is now saved into the memory area associated with the variable. We can access it using the variable name:
let message;
message = 'Hello!';

alert(message); // shows the variable content
To be concise we can merge the variable declaration and assignment into a single line:
let message = 'Hello!'; // define the variable and assign the value

alert(message); // Hello!
We can also declare multiple variables in one line:
let user = 'John', age = 25, message = 'Hello';
That might seem shorter, but it's not recommended. For the sake of better readability, please use a single line per variable.
The multiline variant is a bit longer, but easier to read:
let user = 'John';
let age = 25;
let message = 'Hello';
Some people also write many variables like that:
let user = 'John',
  age = 25,
  message = 'Hello';
…Or even in the “comma-first” style:
let user = 'John'
  , age = 25
  , message = 'Hello';
Technically, all these variants do the same. So, it's a matter of personal taste and aesthetics.
var instead of let
In older scripts you may also find another keyword: var instead of let:
var message = 'Hello';
The var keyword is almost the same as let. It also declares a variable, but in a slightly different, “old-school” fashion.
There are subtle differences between let and var, but they do not matter for us yet. We'll cover them in detail later, in the chapter
The old "var".
A real-life analogy
We can easily grasp the concept of a “variable” if we imagine it as a “box” for data, with a uniquely-named sticker on it.
For instance, the variable message can be imagined as a box labelled "message" with the value "Hello!" in it:
We can put any value into the box.
Also we can change it. The value can be changed as many times as needed:
let message;

message = 'Hello!';

message = 'World!'; // value changed

alert(message);
When the value is changed, the old data is removed from the variable:
We can also declare two variables and copy data from one into the other.
let hello = 'Hello world!';

let message;

// copy 'Hello world' from hello into message
message = hello;

// now two variables hold the same data
alert(hello); // Hello world!
alert(message); // Hello world!
Functional languages
It may be interesting to know that there also exist
functional programming languages that forbid changing a variable value. For example,
Scala or
Erlang.
In such languages, once the value is stored “in the box”, it's there forever. If we need to store something else, the language forces us to create a new box (declare a new variable). We can't reuse the old one.
Though it may seem a little bit odd at first sight, these languages are quite capable of serious development. More than that, there are areas like parallel computations where this limitation confers certain benefits. Studying such a language (even if not planning to use it soon) is recommended to broaden the mind.
Variable naming
There are two limitations for a variable name in JavaScript:
The name must contain only letters, digits, symbols $ and _.
The first character must not be a digit.
Valid names, for instance:
let userName;
let test123;
When the name contains multiple words,
camelCase is commonly used. That is: words go one after another, each word starts with a capital letter: myVeryLongName.
What's interesting – the dollar sign '$' and the underscore '_' can also be used in names. They are regular symbols, just like letters, without any special meaning.
These names are valid:
let $ = 1; // declared a variable with the name "$"
let _ = 2; // and now a variable with the name "_"

alert($ + _); // 3
Examples of incorrect variable names:
let 1a; // cannot start with a digit

let my-name; // a hyphen '-' is not allowed in the name
Case matters
Variables named apple and AppLE – are two different variables.
Non-english letters are allowed, but not recommended
It is possible to use any language, including cyrillic letters or even hieroglyphs, like this:
let имя = '...';
let 我 = '...';
Technically, there is no error here, such names are allowed, but there is an international tradition to use English in variable names. Even if we're writing a small script, it may have a long life ahead. People from other countries may need to read it some time.
Reserved names
There is a list of reserved words, which cannot be used as variable names, because they are used by the language itself.
For example, words let, class, return, function are reserved.
The code below gives a syntax error:
let let = 5; // can't name a variable "let", error!
let return = 5; // also can't name it "return", error!
An assignment without use strict
Normally, we need to define a variable before using it. But in the old times, it was technically possible to create a variable by a mere assignment of the value, without let. This still works now if we don't put use strict. The behavior is kept for compatibility with old scripts.
// note: no "use strict" in this example

num = 5; // the variable "num" is created if didn't exist

alert(num); // 5
That's a bad practice, it gives an error in the strict mode:
"use strict";

num = 5; // error: num is not defined
Constants
To declare a constant (unchanging) variable, one can use const instead of let:
const myBirthday = '18.04.1982';
Variables declared using const are called “constants”. They cannot be changed. An attempt to do it would cause an error:
When a programmer is sure that the variable should never change, he can use const to guarantee it, and also to clearly show that fact to everyone.
Uppercase constants
There is a widespread practice to use constants as aliases for difficult-to-remember values that are known prior to execution.
Such constants are named using capital letters and underscores.
Like this:
const COLOR_RED = "#F00";
const COLOR_GREEN = "#0F0";
const COLOR_BLUE = "#00F";
const COLOR_ORANGE = "#FF7F00";

// ...when we need to pick a color
let color = COLOR_ORANGE;
alert(color); // #FF7F00
Benefits:
COLOR_ORANGE is much easier to remember than "#FF7F00".
It is much easier to mistype in "#FF7F00" than in COLOR_ORANGE.
When reading the code, COLOR_ORANGE is much more meaningful than #FF7F00.
When should we use capitals for a constant, and when should we name them normally? Let's make that clear.
Being a “constant” just means that the value never changes. But there are constants that are known prior to execution (like a hexadecimal value for red), and there are those that are calculated in run-time, during the execution, but do not change after the assignment.
For instance:
const pageLoadTime = /* time taken by a webpage to load */;
The value of pageLoadTime is not known prior to the page load, so it's named normally. But it's still a constant, because it doesn't change after assignment.
In other words, capital-named constants are only used as aliases for “hard-coded” values.
Name things right
Talking about variables, there's one more extremely important thing.
Please name the variables sensibly. Take time to think if needed.
Variable naming is one of the most important and complex skills in programming. A quick glance at variable names can reveal which code is written by a beginner and which by an experienced developer.
In a real project, most of the time is spent on modifying and extending the existing code base, rather than writing something completely separate from scratch. And when we return to the code after some time of doing something else, it's much easier to find information that is well-labelled. Or, in other words, when the variables have good names.
Please spend some time thinking about the right name for a variable before declaring it. That will repay you a lot.
Some good-to-follow rules are:
Use human-readable names like userName or shoppingCart.
Stay away from abbreviations or short names like a, b, c, unless you really know what you're doing.
Make the name maximally descriptive and concise. Examples of bad names are data and value. Such a name says nothing. It is only ok to use them if it's exceptionally obvious from the context which data or value is meant.
Agree on terms within your team and in your own mind. If a site visitor is called a “user” then we should name related variables like currentUser or newUser, but not currentVisitor or a newManInTown.
Sounds simple? Indeed it is, but creating good descriptive-and-concise names in practice is not. Go for it.
Reuse or create?
And the last note. There are some lazy programmers who, instead of declaring a new variable, tend to reuse the existing ones.
As a result, the variable is like a box where people throw different things without changing the sticker. What is inside it now? Who knows… We need to come closer and check.
Such a programmer saves a little bit on variable declaration, but loses ten times more on debugging the code.
An extra variable is good, not evil.
Modern JavaScript minifiers and browsers optimize code well enough, so it won't create performance issues. Using different variables for different values can even help the engine to optimize.
Summary
We can declare variables to store data. That can be done using var or let or const.
let – is a modern variable declaration. The code must be in strict mode to use let in Chrome (V8).
var – is an old-school variable declaration. Normally we don't use it at all, but we'll cover subtle differences from let in the chapter
The old "var", just in case you need them.
const – is like let, but the value of the variable can't be changed.
Variables should be named in a way that allows us to easily understand what's inside.
Create the variable with the name of our planet. How would you name such a variable?
Create the variable to store the name of the current visitor. How would you name that variable?
First, the variable for the name of our planet.
That's simple:
let ourPlanetName = "Earth";
Note, we could use a shorter name planet, but it might be not obvious what planet it refers to. It's nice to be more verbose. At least until the variable isNotTooLong.
Second, the name of the current visitor:
let currentUserName = "John";
Again, we could shorten that to userName if we know for sure that the user is current.
Modern editors and autocomplete make long variable names easy to write. Don't save on them. A name with 3 words in it is fine.
And if your editor does not have proper autocompletion, get
a new one.
const birthday = '18.04.1982';

const age = someCode(birthday);
Here we have a constant birthday date and the age is calculated from birthday with the help of some code (it is not provided for shortness, and because details don't matter here).
Would it be right to use upper case for birthday? For age? Or even for both?
const BIRTHDAY = '18.04.1982'; // make uppercase?

const AGE = someCode(BIRTHDAY); // make uppercase?
We generally use upper case for constants that are “hard-coded”. Or, in other words, when the value is known prior to execution and directly written into the code.
In this code, birthday is exactly like that. So we could use the upper case for it.
In contrast, age is evaluated in run-time. Today we have one age, a year after we'll have another one. It is constant in a sense that it does not change through the code execution. But it is a bit “less of a constant” than birthday, it is calculated, so we should keep the lower case for it.
Data types
A variable in JavaScript can contain any data. A variable can at one moment be a string and later receive a numeric value:
// no error
let message = "hello";
message = 123456;
Programming languages that allow such things are called “dynamically typed”, meaning that there are data types, but variables are not bound to any of them.
There are seven basic data types in JavaScript. Here we'll study the basics, and in the next chapters we'll talk about each of them in detail.
A number
let n = 123;
n = 12.345;
The number type serves both for integer and floating point numbers.
There are many operations for numbers, e.g. multiplication *, division /, addition +, subtraction - and so on.
Besides regular numbers, there are so-called “special numeric values” which also belong to that type: Infinity, -Infinity and NaN.
Infinity represents the mathematical
Infinity ∞. It is a special value that's greater than any number.
We can get it as a result of division by zero:
alert( 1 / 0 ); // Infinity
Or just mention it in the code directly:
alert( Infinity ); // Infinity
NaN represents a computational error. It is a result of an incorrect or an undefined mathematical operation, for instance:
alert( "not a number" / 2 ); // NaN, such division is erroneous
NaN is sticky. Any further operation on NaN would give NaN:
alert( "not a number" / 2 + 5 ); // NaN
So, if there's NaN somewhere in a mathematical expression, it propagates to the whole result.
Mathematical operations are safe
Doing maths is safe in JavaScript. We can do anything: divide by zero, treat non-numeric strings as numbers, etc.
The script will never stop with a fatal error (“die”). At worst we'll get NaN as the result.
Special numeric values formally belong to the “number” type. Of course they are not numbers in a common sense of this word.
We'll see more about working with numbers in the chapter
Numbers.
A string
A string in JavaScript must be quoted.
let str = "Hello";
let str2 = 'Single quotes are ok too';
let phrase = `can embed ${str}`;
In JavaScript, there are 3 types of quotes.
Double quotes: "Hello".
Single quotes: 'Hello'.
Backticks: `Hello`.
Double and single quotes are “simple” quotes. There's no difference between them in JavaScript.
Backticks are “extended functionality” quotes. They allow us to embed variables and expressions into a string by wrapping them in ${…}, for example:
let name = "John";

// embed a variable
alert( `Hello, ${name}!` ); // Hello, John!

// embed an expression
alert( `the result is ${1 + 2}` ); // the result is 3
The expression inside ${…} is evaluated and the result becomes a part of the string. We can put anything there: a variable like name or an arithmetical expression like 1 + 2 or something more complex.
Please note that this can only be done in backticks. Other quotes do not allow such embedding!
alert( "the result is ${1 + 2}" ); // the result is ${1 + 2} (double quotes do nothing)
We'll cover strings more thoroughly in the chapter
Strings.
There is no character type.
In some languages, there is a special “character” type for a single character. For example, in the C language and in Java it is char.
In JavaScript, there is no such type. There's only one type: string. A string may consist of only one character or many of them.
A boolean (logical type)
The boolean type has only two values: true and false.
This type is commonly used to store yes/no values: true means “yes, correct”, and false means “no, incorrect”.
For instance:
let nameFieldChecked = true; // yes, name field is checked
let ageFieldChecked = false; // no, age field is not checked
Boolean values also come as a result of comparisons:
let isGreater = 4 > 1;

alert( isGreater ); // true (the comparison result is "yes")
We'll cover booleans more deeply later in the chapter
Logical operators.
The “null” value
The special null value does not belong to any type of those described above.
It forms a separate type of its own, which contains only the null value:
let age = null;
In JavaScript null is not a “reference to a non-existing object” or a “null pointer” like in some other languages.
It's just a special value which has the sense of “nothing”, “empty” or “value unknown”.
The code above states that the age is unknown or empty for some reason.
The “undefined” value
The special value undefined stands apart. It makes a type of its own, just like null.
The meaning of undefined is “value is not assigned”.
If a variable is declared, but not assigned, then its value is exactly undefined:
let x;

alert(x); // shows "undefined"
Technically, it is possible to assign undefined to any variable:
let x = 123;

x = undefined;

alert(x); // "undefined"
…But it's not recommended to do that. Normally, we use null to write an “empty” or an “unknown” value into the variable, and undefined is only used for checks, to see if the variable is assigned or similar.
Objects and Symbols
The object type is special.
All other types are called “primitive”, because their values can contain only a single thing (be it a string or a number or whatever). In contrast, objects are used to store collections of data and more complex entities. We'll deal with them later in the chapter
Objects after we know enough about primitives.
The symbol type is used to create unique identifiers for objects. We have to mention it here for completeness, but it's better to study them after objects.
The typeof operator
The typeof operator returns the type of the argument. It's useful when we want to process values of different types differently, or just want to make a quick check.
It supports two forms of syntax:
As an operator: typeof x.
Function style: typeof(x).
In other words, it works both with parentheses or without them. The result is the same.
The call to typeof x returns a string with the type name:
The last three lines may need additional explanations:
Math is a built-in object that provides mathematical operations. We will learn it in the chapter
Numbers. Here it serves just as an example of an object.
The result of typeof null is "object". That's wrong. It is an officially recognized error in typeof, kept for compatibility. Of course, null is not an object. It is a special value with a separate type of its own. So, again, that's an error in the language.
The result of typeof alert is "function", because alert is a function of the language. We'll study functions in the next chapters, and we'll see that there's no special “function” type in the language. Functions belong to the object type. But typeof treats them differently. Formally, it's incorrect, but very convenient in practice.
Summary
There are 7 basic types in JavaScript.
number for numbers of any kind: integer or floating-point.
string for strings. A string may have one or more characters, there's no separate single-character type.
boolean for true/false.
null for unknown values – a standalone type that has a single value null.
undefined for unassigned values – a standalone type that has a single value undefined.
object for more complex data structures.
symbol for unique identifiers.
The typeof operator allows us to see which type is stored in the variable.
Two forms: typeof x or typeof(x).
Returns a string with the name of the type, like "string".
For null returns "object" – that's an error in the language, it's not an object in fact.
In the next chapters we'll concentrate on primitive values and once we're familiar with them, then we'll move on to objects.
Backticks embed the expression inside ${...} into the string.
let name = "Ilya";

// the expression is a number 1
alert( `hello ${1}` ); // hello 1

// the expression is a string "name"
alert( `hello ${"name"}` ); // hello name

// the expression is a variable, embed it
alert( `hello ${name}` ); // hello Ilya
Type Conversions
Most of the time, operators and functions automatically convert a value to the right type. That's called “type conversion”.
For example, alert automatically converts any value to a string to show it. Mathematical operations convert values to numbers.
There are also cases when we need to explicitly convert a value to put things right.
Not talking about objects yet
In this chapter we don't cover objects yet. Here we study primitives first. Later, after we learn objects, we'll see how object conversion works in the chapter
Object to primitive conversion.
ToString
String conversion happens when we need the string form of a value.
For example, alert(value) does it to show the value.
We can also use a call String(value) function for that:
let value = true;
alert(typeof value); // boolean

value = String(value); // now value is a string "true"
alert(typeof value); // string
String conversion is mostly obvious. A false becomes "false", null becomes "null" etc.
ToNumber
Numeric conversion happens in mathematical functions and expressions automatically.
For example, when division / is applied to non-numbers:
alert( "6" / "2" ); // 3, strings are converted to numbers
We can use a Number(value) function to explicitly convert a value:
let str = "123";
alert(typeof str); // string

let num = Number(str); // becomes a number 123

alert(typeof num); // number
Explicit conversion is usually required when we read a value from a string-based source like a text form, but we expect a number to be entered.
If the string is not a valid number, the result of such conversion is NaN, for instance:
let age = Number("an arbitrary string instead of a number");

alert(age); // NaN, conversion failed
Numeric conversion rules:
Value
Becomes…
undefined
NaN
null
0
true and false
1 and 0
string
Whitespaces from the start and the end are removed. Then, if the remaining string is empty, the result is 0. Otherwise, the number is “read” from the string. An error gives NaN.
Examples:
alert( Number("   123   ") ); // 123
alert( Number("123z") );      // NaN (error reading a number at "z")
alert( Number(true) );        // 1
alert( Number(false) );       // 0
Please note that null and undefined behave differently here: null becomes a zero, while undefined becomes NaN.
Addition ‘+' concatenates strings
Almost all mathematical operations convert values to numbers. With a notable exception of the addition +. If one of the added values is a string, then another one is also converted to a string.
Then it concatenates (joins) them:
alert( 1 + '2' ); // '12' (string to the right)
alert( '1' + 2 ); // '12' (string to the left)
That only happens when one of the arguments is a string. Otherwise, values are converted to numbers.
ToBoolean
Boolean conversion is the simplest one.
It happens in logical operations (later we'll meet condition tests and other kinds of them), but also can be performed manually with the call of Boolean(value).
The conversion rule:
Values that are intuitively “empty”, like 0, an empty string, null, undefined and NaN become false.
Some languages (namely PHP) treat "0" as false. But in JavaScript a non-empty string is always true.
alert( Boolean("0") ); // true
alert( Boolean(" ") ); // spaces, also true (any non-empty string is true)
Summary
There are three most widely used type conversions: to string, to number and to boolean.
ToString – Occurs when we output something, can be performed with String(value). The conversion to string is usually obvious for primitive values.
ToNumber – Occurs in math operations, can be performed with Number(value).
The conversion follows the rules:
Value
Becomes…
undefined
NaN
null
0
true / false
1 / 0
string
The string is read “as is”, whitespaces from both sides are ignored. An empty string becomes 0. An error gives NaN.
ToBoolean – Occurs in logical operations, or can be performed with Boolean(value).
Follows the rules:
Value
Becomes…
0, null, undefined, NaN, ""
false
any other value
true
Most of these rules are easy to understand and memorize. The notable exceptions where people usually make mistakes are:
undefined is NaN as a number, not 0.
"0" and space-only strings like " " are true as a boolean.
Objects are not covered here, we'll return to them later in the chapter
Object to primitive conversion that is devoted exclusively to objects, after we learn more basic things about JavaScript.
The addition with a string "" + 1 converts 1 to a string: "" + 1 = "1", and then we have "1" + 0, the same rule is applied.
The subtraction "-" (like most math operations) only works with numbers, it converts an empty string "" to 0.
null becomes 0 after the numeric conversion.
undefined becomes NaN after the numeric conversion.
Operators
Many operators are known to us from school. They are addition +, a multiplication *, a subtraction - and so on.
In this chapter we concentrate on aspects that are not covered by school arithmetic.
Terms: “unary”, “binary”, “operand”
Before we move on, let's grasp the common terminology.
An operand – is what operators are applied to. For instance in multiplication 5 * 2 there are two operands: the left operand is 5, and the right operand is 2. Sometimes people say “arguments” instead of “operands”.
An operator is unary if it has a single operand. For example, the unary negation "-" reverses the sign of the number:
let x = 1;

x = -x;
alert( x ); // -1, unary negation was applied
An operator is binary if it has two operands. The same minus exists in the binary form as well:
let x = 1, y = 3;
alert( y - x ); // 2, binary minus subtracts values
Formally, we're talking about two different operators here: the unary negation (single operand, reverses the sign) and the binary subtraction (two operands, subtracts).
Strings concatenation, binary +
Now let's see special features of JavaScript operators that are beyond school arithmetics.
Usually the plus operator '+' sums numbers.
But if the binary + is applied to strings, it merges (concatenates) them:
let s = "my" + "string";
alert(s); // mystring
Note that if any of operands is a string, then the other one is converted to a string too.
See, it doesn't matter whether the first operand is a string or the second one. The rule is simple: if either operand is a string, then convert the other one into a string as well.
String concatenation and conversion is a special feature of the binary plus "+". Other arithmetic operators work only with numbers. They always convert their operands to numbers.
For instance, subtraction and division:
alert( 2 - '1' ); // 1
alert( '6' / '2' ); // 3
Numeric conversion, unary +
The plus + exist in two forms. The binary form that we used above and the unary form.
The unary plus or, in other words, the plus operator + applied to a single value, doesn't do anything with numbers, but if the operand is not a number, then it is converted into it.
For example:
// No effect on numbers
let x = 1;
alert( +x ); // 1

let y = -2;
alert( +y ); // -2

// Converts non-numbers
alert( +true ); // 1
alert( +"" );   // 0
It actually does the same as Number(...), but shorter.
A need to convert string to number arises very often. For example, if we are getting values from HTML form fields, then they are usually strings.
What if we want to sum them?
The binary plus would add them as strings:
let apples = "2";
let oranges = "3";

alert( apples + oranges ); // "23", the binary plus concatenates strings
If we want to treat them as numbers, then we can convert and then sum:
let apples = "2";
let oranges = "3";

// both values converted to numbers before the binary plus
alert( +apples + +oranges ); // 5

// the longer variant
// alert( Number(apples) + Number(oranges) ); // 5
From a mathematician's standpoint the abundance of pluses may seem strange. But from a programmer's standpoint, there's nothing special: unary pluses are applied first, they convert strings to numbers, and then the binary plus sums them up.
Why are unary pluses applied to values before the binary one? As we're going to see, that's because of their higher precedence.
Operators precedence
If an expression has more than one operator, the execution order is defined by their precedence, or, in other words, there's an implicit priority order among the operators.
From school we all know that the multiplication in the expression 1 + 2 * 2 should be calculated before the addition. That's exactly the precedence thing. The multiplication is said to have a higher precedence than the addition.
Parentheses override any precedence, so if we're not satisfied with the order, we can use them, like: (1 + 2) * 2.
There are many operators in JavaScript. Every operator has a corresponding precedence number. The one with the bigger number executes first. If the precedence is the same, the execution order is from left to right.
An extract from the
precedence table (you don't need to remember this, but note that unary operators are higher than corresponding binary ones):
Precedence
Name
Sign
…
…
…
16
unary plus
+
16
unary negation
-
14
multiplication
*
14
division
/
13
addition
+
13
subtraction
-
…
…
…
3
assignment
=
…
…
…
As we can see, the “unary plus” has a priority of 16, which is higher than 13 for the “addition” (binary plus). That's why in the expression "+apples + +oranges" unary pluses work first, and then the addition.
Assignment
Let's note that an assignment = is also an operator. It is listed in the precedence table with the very low priority of 3.
That's why when we assign a variable, like x = 2 * 2 + 1, then the calculations are done first, and afterwards the = is evaluated, storing the result in x.
let x = 2 * 2 + 1;

alert( x ); // 5
It is possible to chain assignments:
let a, b, c;

a = b = c = 2 + 2;

alert( a ); // 4
alert( b ); // 4
alert( c ); // 4
Chained assignments evaluate from right to left. First the rightmost expression 2 + 2 is evaluated then assigned to the variables on the left: c, b and a. At the end, all variables share a single value.
The assignment operator "=" returns a value
An operator always returns a value. That's obvious for most of them like an addition + or a multiplication *. But the assignment operator follows that rule too.
The call x = value writes the value into xand then returns it.
Here's the demo that uses an assignment as part of a more complex expression:
let a = 1;
let b = 2;

let c = 3 - (a = b + 1);

alert( a ); // 3
alert( c ); // 0
In the example above, the result of (a = b + 1) is the value which is assigned to a (that is 3). It is then used to subtract from 3.
Funny code, isn't it? We should understand how it works, because sometimes we can see it in 3rd-party libraries, but shouldn't write anything like that ourselves. Such tricks definitely don't make the code clearer and readable.
Remainder %
The remainder operator % despite its look does not have a relation to percents.
The result of a % b is the remainder of the integer division of a by b.
For instance:
alert( 5 % 2 ); // 1 is a remainder of 5 divided by 2
alert( 8 % 3 ); // 2 is a remainder of 8 divided by 3
alert( 6 % 3 ); // 0 is a remainder of 6 divided by 3
Exponentiation **
The exponentiation operator ** is a recent addition to the language.
For a natural number b, the result of a ** b is a multiplied by itself b times.
The operator works for non-integer numbers of a and b as well, for instance:
alert( 4 ** (1/2) ); // 2 (power of 1/2 is the same as a square root, that's maths)
alert( 8 ** (1/3) ); // 2 (power of 1/3 is the same as a cubic root)
Increment/decrement
Increasing or decreasing a number by one is among the most common numerical operations.
So, there are special operators for that:
Increment++ increases a variable by 1:
let counter = 2;
counter++;      // works same as counter = counter + 1, but shorter
alert( counter ); // 3
Decrement-- decreases a variable by 1:
let counter = 2;
counter--;      // works same as counter = counter - 1, but shorter
alert( counter ); // 1
Important:
Increment/decrement can be applied only to a variable. An attempt to use it on a value like 5++ will give an error.
Operators ++ and -- can be placed both after and before the variable.
When the operator goes after the variable, it is called a “postfix form”: counter++.
The “prefix form” is when the operator stands before the variable: ++counter.
Both of these records do the same: increase counter by 1.
Is there any difference? Yes, but we can only see it if we use the returned value of ++/--.
Let's clarify. As we know, all operators return a value. Increment/decrement is not an exception here. The prefix form returns the new value, while the postfix form returns the old value (prior to increment/decrement).
To see the difference, here's the example:
let counter = 1;
let a = ++counter; // (*)

alert(a); // 2
Here in the line (*) the prefix call ++counter increments counter and returns the new value that is 2. So the alert shows 2.
Now let's use the postfix form:
let counter = 1;
let a = counter++; // (*) changed ++counter to counter++

alert(a); // 1
In the line (*) the postfix form counter++ also increments counter, but returns the old value (prior to increment). So the alert shows 1.
To summarize:
If the result of increment/decrement is not used, then there is no difference in which form to use:
let counter = 0;
counter++;
++counter;
alert( counter ); // 2, the lines above did the same
If we'd like to increase the value and use the result of the operator right now, then we need the prefix form:
let counter = 0;
alert( ++counter ); // 1
If we'd like to increment, but use the previous value, then we need the postfix form:
let counter = 0;
alert( counter++ ); // 0
Increment/decrement among other operators
Operators ++/-- can be used inside an expression as well. Their precedence is higher than most other arithmetical operations.
For instance:
let counter = 1;
alert( 2 * ++counter ); // 4
Compare with:
let counter = 1;
alert( 2 * counter++ ); // 2, because counter++ returns the "old" value
Though technically allowable, such notation usually makes the code less readable. One line does multiple things – not good.
While reading the code, a fast “vertical” eye-scan can easily miss such counter++, and it won't be obvious that the variable increases.
The “one line – one action” style is advised:
let counter = 1;
alert( 2 * counter );
counter++;
Bitwise operators
Bitwise operators treat arguments as 32-bit integer numbers and work on the level of their binary representation.
These operators are not JavaScript-specific. They are supported in most programming languages.
The list of operators:
AND ( & )
OR ( | )
XOR ( ^ )
NOT ( ~ )
LEFT SHIFT ( << )
RIGHT SHIFT ( >> )
ZERO-FILL RIGHT SHIFT ( >>> )
These operators are used very rarely. To understand them, we should delve into low-level number representation, and it would not be optimal to do that right now. Especially because we won't need them any time soon. If you're curious, you can read the
Bitwise Operators article in MDN. It would be more practical to do that when a real need arises.
Modify-in-place
We often need to apply an operator to a variable and store the new result in it.
For example:
let n = 2;
n = n + 5;
n = n * 2;
This notation can be shortened using operators += and *=:
let n = 2;
n += 5; // now n = 7 (same as n = n + 5)
n *= 2; // now n = 14 (same as n = n * 2)

alert( n ); // 14
Short “modify-and-assign” operators exist for all arithmetical and bitwise operators: /=, -= etc.
Such operators have the same precedence as a normal assignment, so they run after most other calculations:
let n = 2;

n *= 3 + 5;

alert( n ); // 16  (right part evaluated first, same as n *= 8)
Comma
The comma operator ',' is one of most rare and unusual operators. Sometimes it's used to write shorter code, so we need to know it in order to understand what's going on.
The comma operator allows us to evaluate several expressions, dividing them with a comma ','. Each of them is evaluated, but the result of only the last one is returned.
For example:
let a = (1 + 2, 3 + 4);

alert( a ); // 7 (the result of 3 + 4)
Here, the first expression 1 + 2 is evaluated, and its result is thrown away, then 3 + 4 is evaluated and returned as the result.
Comma has a very low precedence
Please note that the comma operator has very low precedence, lower than =, so parentheses are important in the example above.
Without them: a = 1 + 2, 3 + 4 evaluates + first, summing the numbers into a = 3, 7, then the assignment operator = assigns a = 3, and then the number after the comma 7 is not processed anyhow, so it's ignored.
Why do we need such an operator which throws away everything except the last part?
Sometimes people use it in more complex constructs to put several actions in one line.
For example:
// three operations in one line
for (a = 1, b = 3, c = a * b; a < 10; a++) {
 ...
}
Such tricks are used in many JavaScript frameworks, that's why we mention them. But usually they don't improve the code readability, so we should think well before writing like that.
What are the final values of all variables a, b, c and d after the code below?
let a = 1, b = 1;

let c = ++a; // ?
let d = b++; // ?
The answer is:
a = 2
b = 2
c = 2
d = 1
let a = 1, b = 1;

alert( ++a ); // 2, prefix form returns the new value
alert( b++ ); // 1, postfix form returns the old value

alert( a ); // 2, incremented once
alert( b ); // 2, incremented once
If the first one is greater(or less), then the first string is greater(or less) than the second. We're done.
Otherwise if first characters are equal, compare the second characters the same way.
Repeat until the end of any string.
If both strings ended simultaneously, then they are equal. Otherwise the longer string is greater.
In the example above, the comparison 'Z' > 'A' gets the result at the first step.
Strings "Glow" and "Glee" are compared character-by-character:
G is the same as G.
l is the same as l.
o is greater than e. Stop here. The first string is greater.
Not a real dictionary, but Unicode order
The comparison algorithm given above is roughly equivalent to the one used in book dictionaries or phone books. But it's not exactly the same.
For instance, case matters. A capital letter "A" is not equal to the lowercase "a". Which one is greater? Actually, the lowercase "a" is. Why? Because the lowercase character has a greater index in the internal encoding table (Unicode). We'll get back to specific details and consequences in the chapter
Strings.
Comparison of different types
When compared values belong to different types, they are converted to numbers.
For example:
alert( '2' > 1 ); // true, string '2' becomes a number 2
alert( '01' == 1 ); // true, string '01' becomes a number 1
For boolean values, true becomes 1 and false becomes 0, that's why:
One of them is true as a boolean and the other one is false as a boolean.
For example:
let a = 0;
alert( Boolean(a) ); // false

let b = "0";
alert( Boolean(b) ); // true

alert(a == b); // true!
From JavaScript's standpoint that's quite normal. An equality check converts using the numeric conversion (hence "0" becomes 0), while Boolean conversion uses another set of rules.
Strict equality
A regular equality check "==" has a problem. It cannot differ 0 from false:
alert( 0 == false ); // true
The same thing with an empty string:
alert( '' == false ); // true
That's because operands of different types are converted to a number by the equality operator ==. An empty string, just like false, becomes a zero.
What to do if we'd like to differentiate 0 from false?
A strict equality operator === checks the equality without type conversion.
In other words, if a and b are of different types, then a === b immediately returns false without an attempt to convert them.
Let's try it:
alert( 0 === false ); // false, because the types are different
There also exists a “strict non-equality” operator !==, as an analogy for !=.
The strict equality check operator is a bit longer to write, but makes it obvious what's going on and leaves less space for errors.
Comparison with null and undefined
Let's see more edge cases.
There's a non-intuitive behavior when null or undefined are compared with other values.
For a strict equality check ===
These values are different, because each of them belong to a separate type of it's own.
alert( null === undefined ); // false
For a non-strict check ==
There's a special rule. These two are a “sweet couple”: they equal each other (in the sense of ==), but not any other value.
alert( null == undefined ); // true
For maths and other comparisons < > <= >=
Values null/undefined are converted to a number: null becomes 0, while undefined becomes NaN.
Now let's see funny things that happen when we apply those rules. And, what's more important, how to not fall into a trap with these features.
Yeah, mathematically that's strange. The last result states that "null is greater than or equal to zero". Then one of the comparisons above must be correct, but they are both false.
The reason is that an equality check == and comparisons > < >= <= work differently. Comparisons convert null to a number, hence treat it as 0. That's why (3) null >= 0 is true and (1) null > 0 is false.
On the other hand, the equality check == for undefined and null works by the rule, without any conversions. They equal each other and don't equal anything else. That's why (2) null == 0 is false.
An incomparable undefined
The value undefined shouldn't participate in comparisons at all:
Comparisons (1) and (2) return false because undefined gets converted to NaN. And NaN is a special numeric value which returns false for all comparisons.
The equality check (3) returns false, because undefined only equals null and no other value.
Evade problems
Why did we observe these examples? Should we remember these peculiarities all the time? Well, not really. Actually, these tricky things will gradually become familiar over time, but there's a solid way to evade any problems with them.
Just treat any comparison with undefined/null except the strict equality === with exceptional care.
Don't use comparisons >= > < <= with a variable which may be null/undefined, unless you are really sure what you're doing. If a variable can have such values, then check for them separately.
Summary
Comparison operators return a logical value.
Strings are compared letter-by-letter in the “dictionary” order.
When values of different types are compared, they get converted to numbers (with the exclusion of a strict equality check).
Values null and undefined equal == each other and do not equal any other value.
Be careful when using comparisons like > or < with variables that can occasionally be null/undefined. Making a separate check for null/undefined is a good idea.
Again, dictionary comparison, first char of "2" is greater than the first char of "1".
Values null and undefined equal each other only.
Strict equality is strict. Different types from both sides lead to false.
See (4).
Strict equality of different types.
Interaction: alert, prompt, confirm
This part of the tutorial aims to cover JavaScript “as is”, without environment-specific tweaks.
But still we use a browser as the demo environment. So we should know at least a few user-interface functions. In this chapter we'll get familiar with the browser functions alert, prompt and confirm.
alert
Syntax:
alert(message);
This shows a message and pauses the script execution until the user presses “OK”.
For example:
alert("Hello");
The mini-window with the message is called a modal window. The word “modal” means that the visitor can't interact with the rest of the page, press other buttons etc, until they have dealt with the window. In this case – until they press “OK”.
prompt
Function prompt accepts two arguments:
result = prompt(title[, default]);
It shows a modal window with a text message, an input field for the visitor and buttons OK/CANCEL.
title
The text to show to the visitor.
default
An optional second parameter, the initial value for the input field.
The visitor may type something in the prompt input field and press OK. Or they can cancel the input by pressing the CANCEL button or hitting the Esc key.
The call to prompt returns the text from the field or null if the input was canceled.
For instance:
let age = prompt('How old are you?', 100);

alert(`You are ${age} years old!`); // You are 100 years old!
IE: always supply a default
The second parameter is optional. But if we don't supply it, Internet Explorer would insert the text "undefined" into the prompt.
Run this code in Internet Explorer to see that:
let test = prompt("Test");
So, to look good in IE, it's recommended to always provide the second argument:
let test = prompt("Test", ''); // <-- for IE
confirm
The syntax:
result = confirm(question);
Function confirm shows a modal window with a question and two buttons: OK and CANCEL.
The result is true if OK is pressed and false otherwise.
For example:
let isBoss = confirm("Are you the boss?");

alert( isBoss ); // true if OK is pressed
Summary
We covered 3 browser-specific functions to interact with the visitor:
alert
shows a message.
prompt
shows a message asking the user to input text. It returns the text or, if CANCEL or Esc is clicked, all browsers return null.
confirm
shows a message and waits for the user to press “OK” or “CANCEL”. It returns true for OK and false for CANCEL/Esc.
All these methods are modal: they pause the script execution and don't allow the visitor to interact with the rest of the page until the message has been dismissed.
There are two limitations shared by all the methods above:
The exact location of the modal window is determined by the browser. Usually it's in the center.
The exact look of the window also depends on the browser. We can't modify it.
That is the price for simplicity. There are other ways to show nicer windows and richer interaction with the visitor, but if “bells and whistles” do not matter much, these methods work just fine.
let name = prompt("What is your name?", "");
alert(name);
The full page:
<!DOCTYPE html>
<html>
<body>

  <script>
    'use strict';

    let name = prompt("What is your name?", "");
    alert(name);
  </script>

</body>
</html>
Conditional operators: if, '?'
Sometimes we need to perform different actions based on a condition.
There is the if statement for that and also the conditional (ternary) operator for conditional evaluation which we will be referring as the “question mark” operator: "?" for simplicity.
The “if” statement
The “if” statement gets a condition, evaluates it and, if the result is true, executes the code.
For example:
let year = prompt('In which year was ECMAScript-2015 specification published?', '');

if (year == 2015) alert( 'You are right!' );
In the example above, the condition is a simple equality check: year == 2015, but it can be much more complex.
If there is more than one command to execute, we can use a code block in figure brackets:
if (year == 2015) {
  alert( "That's correct!" );
  alert( "You're so smart!" );
}
It is recommended to use figure brackets every time with if, even if there is only one command. That improves readability.
Boolean conversion
The if (…) statement evaluates the expression in parentheses and converts it to the boolean type.
Let's recall the conversion rules from the chapter
Type Conversions:
A number 0, an empty string "", null, undefined and NaN become false. Because of that they are called “falsy” values.
Other values become true, so they are called “truthy”.
So, the code under this condition would never execute:
if (0) { // 0 is falsy
  ...
}
…And inside this condition – always works:
if (1) { // 1 is truthy
  ...
}
We can also pass a pre-evaluated boolean value to if, like here:
let cond = (year == 2015); // equality evaluates to true or false

if (cond) {
  ...
}
The “else” clause
The if statement may contain an optional “else” block. It executes when the condition is wrong.
For example:
let year = prompt('In which year was ECMAScript-2015 specification published?', '');

if (year == 2015) {
  alert( 'You guessed it right!' );
} else {
  alert( 'How can you be so wrong?' ); // any value except 2015
}
Several conditions: “else if”
Sometimes we'd like to test several variants of a condition. There is an else if clause for that.
For example:
let year = prompt('In which year was ECMAScript-2015 specification published?', '');

if (year < 2015) {
  alert( 'Too early...' );
} else if (year > 2015) {
  alert( 'Too late' );
} else {
  alert( 'Exactly!' );
}
In the code above JavaScript first checks year < 2015. If it is falsy it then goes to the next condition year > 2015, and otherwise shows the last alert.
There can be more else if blocks. The ending else is optional.
Ternary operator ‘?'
Sometimes we need to assign a variable depending on a condition.
For instance:
let accessAllowed;
let age = prompt('How old are you?', '');

if (age > 18) {
  accessAllowed = true;
} else {
  accessAllowed = false;
}

alert(accessAllowed);
The so-called “ternary” or “question mark” operator lets us do that shorter and simpler.
The operator is represented by a question mark "?". The formal term “ternary” means that the operator has three operands. It is actually the one and only operator in JavaScript which has that many.
The syntax is:
let result = condition ? value1 : value2
The condition is evaluated, if it's truthy then value1 is returned, otherwise – value2.
For example:
let accessAllowed = (age > 18) ? true : false;
Technically, we can omit parentheses around age > 18. The question mark operator has a low precedence. It executes after the comparison >, so that'll do the same:
// the comparison operator "age > 18" executes first anyway
// (no need to wrap it into parentheses)
let accessAllowed = age > 18 ? true : false;
…But parentheses make the code more readable. So it's recommended to use them.
Please note:
In the example above it's possible to evade the question mark operator, because the comparison by itself returns true/false:
// the same
let accessAllowed = age > 18;
Multiple ‘?'
A sequence of question mark "?" operators allows returning a value that depends on more than one condition.
For instance:
let age = prompt('age?', 18);

let message = (age < 3) ? 'Hi, baby!' :
  (age < 18) ? 'Hello!' :
  (age < 100) ? 'Greetings!' :
  'What an unusual age!';

alert( message );
It may be difficult at first to grasp what's going on. But after a closer look we can see that it's just an ordinary sequence of tests.
The first question mark checks whether age < 3.
If true – returns 'Hi, baby!', otherwise – goes after the colon ":" and checks for age < 18.
If that's true – returns 'Hello!', otherwise – goes after the next colon ":" and checks for age < 100.
If that's true – returns 'Greetings!', otherwise – goes after the last colon ":" and returns 'What an unusual age!'.
The same logic using if..else:
if (age < 3) {
  message = 'Hi, baby!';
} else if (a < 18) {
  message = 'Hello!';
} else if (age < 100) {
  message = 'Greetings!';
} else {
  message = 'What an unusual age!';
}
Non-traditional use of ‘?'
Sometimes the question mark '?' is used as a replacement for if:
let company = prompt('Which company created JavaScript?', '');

(company == 'Netscape') ?
   alert('Right!') : alert('Wrong.');
Depending on the condition company == 'Netscape', either the first or the second part after "?" gets executed and shows the alert.
We don't assign a result to a variable here. The idea is to execute different code depending on the condition.
It is not recommended to use the question mark operator in this way.
The notation seems to be shorter than if, which appeals to some programmers. But it is less readable.
Here is the same code with if for comparison:
let company = prompt('Which company created JavaScript?', '');

if (company == 'Netscape') {
  alert('Right!');
} else {
  alert('Wrong.');
}
Our eyes scan the code vertically. The constructs which span several lines are easier to understand than a long horizontal instruction set.
The idea of a question mark '?' is to return one or another value depending on the condition. Please use it for exactly that. There is if to execute different branches of the code.
<!DOCTYPE html>
<html>

<body>
  <script>
    'use strict';

    let value = prompt('What is the "official" name of JavaScript?', '');

    if (value == 'ECMAScript') {
      alert('Right!');
    } else {
      alert("You don't know? ECMAScript!");
    }
  </script>


</body>

</html>
Write the code which asks for a login with prompt.
If the visitor enters "Admin", then prompt for a password, if the input is an empty line or Esc – show “Canceled.”, if it's another string – then show “I don't know you”.
The password is checked as follows:
If it equals “TheMaster”, then show “Welcome!”,
Another string – show “Wrong password”,
For an empty string or cancelled input, show “Canceled.”
The schema:
Please use nested if blocks. Mind the overall readability of the code.
There are three logical operators in JavaScript: || (OR), && (AND), ! (NOT).
Although they are called “logical”, they can be applied to values of any type, not only boolean. The result can also be of any type.
Let's see the details.
|| (OR)
The “OR” operator is represented with two vertical line symbols:
result = a || b;
In classical programming, logical OR is meant to manipulate boolean values only. If any of its arguments are true, then it returns true, otherwise it returns false.
In JavaScript the operator is a little bit more tricky and powerful. But first let's see what happens with boolean values.
As we can see, the result is always true except for the case when both operands are false.
If an operand is not boolean, then it's converted to boolean for the evaluation.
For instance, a number 1 is treated as true, a number 0 – as false:
if (1 || 0) { // works just like if( true || false )
  alert( 'truthy!' );
}
Most of the time, OR || is used in an if statement to test if any of the given conditions is correct.
For example:
let hour = 9;

if (hour < 10 || hour > 18) {
  alert( 'The office is closed.' );
}
We can pass more conditions:
let hour = 12;
let isWeekend = true;

if (hour < 10 || hour > 18 || isWeekend) {
  alert( 'The office is closed.' ); // it is the weekend
}
OR seeks the first truthy value
The logic described above is somewhat classical. Now let's bring in the “extra” features of JavaScript.
The extended algorithm works as follows.
Given multiple OR'ed values:
result = value1 || value2 || value3;
The OR "||" operator does the following:
Evaluate operands from left to right.
For each operand, convert it to boolean. If the result is true, then stop and return the original value of that operand.
If all other operands have been assessed (i.e. all were falsy), return the last operand.
A value is returned in its original form, without the conversion.
In other words, a chain of OR "||" returns the first truthy value or the last one if no such value is found.
For instance:
alert( 1 || 0 ); // 1 (1 is truthy)
alert( true || 'no matter what' ); // (true is truthy)

alert( null || 1 ); // 1 (1 is the first truthy value)
alert( null || 0 || 1 ); // 1 (the first truthy value)
alert( undefined || null || 0 ); // 0 (all falsy, returns the last value)
That leads to some interesting usages compared to a “pure, classical, boolean-only OR”.
Getting the first truthy value from the list of variables or expressions.
Imagine we have several variables, which can either contain the data or be null/undefined. And we need to choose the first one with data.
We can use OR || for that:
let currentUser = null;
let defaultUser = "John";

let name = currentUser || defaultUser || "unnamed";

alert( name ); // selects "John" – the first truthy value
If both currentUser and defaultUser were falsy then "unnamed" would be the result.
Short-circuit evaluation.
Operands can be not only values, but arbitrary expressions. OR evaluates and tests them from left to right. The evaluation stops when a truthy value is reached, and the value is returned. The process is called “a short-circuit evaluation”, because it goes as short as possible from left to right.
This is clearly seen when the expression given as the second argument has a side effect. Like a variable assignment.
If we run the example below, x would not get assigned:
let x;

true || (x = 1);

alert(x); // undefined, because (x = 1) not evaluated
…And if the first argument is false, then OR goes on and evaluates the second one thus running the assignment:
let x;

false || (x = 1);

alert(x); // 1
An assignment is a simple case, other side effects can be involved.
As we can see, such a use case is a "shorter way to do if". The first operand is converted to boolean and if it's false then the second one is evaluated.
Most of time it's better to use a “regular” if to keep the code easy to understand, but sometimes that can be handy.
&& (AND)
The AND operator is represented with two ampersands &&:
result = a && b;
In classical programming AND returns true if both operands are truthy and false otherwise:
let hour = 12;
let minute = 30;

if (hour == 12 && minute == 30) {
  alert( 'Time is 12:30' );
}
Just as for OR, any value is allowed as an operand of AND:
if (1 && 0) { // evaluated as true && false
  alert( "won't work, because the result is falsy" );
}
AND seeks the first falsy value
Given multiple AND'ed values:
result = value1 && value2 && value3;
The AND "&&" operator does the following:
Evaluate operands from left to right.
For each operand, convert it to a boolean. If the result is false, stop and return the original value of that operand.
If all other operands have been assessed (i.e. all were truthy), return the last operand.
In other words, AND returns the first falsy value or the last value if none were found.
The rules above are similar to OR. The difference is that AND returns the first falsy value while OR returns the first truthy one.
Examples:
// if the first operand is truthy,
// AND returns the second operand:
alert( 1 && 0 ); // 0
alert( 1 && 5 ); // 5

// if the first operand is falsy,
// AND returns it. The second operand is ignored
alert( null && 5 ); // null
alert( 0 && "no matter what" ); // 0
We can also pass several values in a row. See how the first falsy one is returned:
alert( 1 && 2 && null && 3 ); // null
When all values are truthy, the last value is returned:
alert( 1 && 2 && 3 ); // 3, the last one
AND && executes before OR ||
The precedence of the AND && operator is higher than OR ||, so it executes before OR.
In the code below 1 && 0 is calculated first:
alert( 5 || 1 && 0 ); // 5
Just like OR, the AND && operator can sometimes replace if.
For instance:
let x = 1;

(x > 0) && alert( 'Greater than zero!' );
The action in the right part of && would execute only if the evaluation reaches it. That is: only if (x > 0) is true.
So we basically have an analogue for:
let x = 1;

if (x > 0) {
  alert( 'Greater than zero!' );
}
The variant with && appears to be shorter. But if is more obvious and tends to be a little bit more readable.
So it is recommended to use every construct for its purpose. Use if if we want if. And use && if we want AND.
! (NOT)
The boolean NOT operator is represented with an exclamation sign "!".
The syntax is pretty simple:
result = !value;
The operator accepts a single argument and does the following:
Converts the operand to boolean type: true/false.
Returns an inverse value.
For instance:
alert( !true ); // false
alert( !0 ); // true
A double NOT !! is sometimes used for converting a value to boolean type:
That is, the first NOT converts the value to boolean and returns the inverse, and the second NOT inverses it again. At the end we have a plain value-to-boolean conversion.
There's a little more verbose way to do the same thing – a built-in Boolean function:
The call to alert returns undefined (it just shows a message, so there's no meaningful return).
Because of that, && evaluates the left operand (outputs 1), and immediately stops, because undefined is a falsy value. And && looks for a falsy value and returns it, so it's done.
What will be the results of the expressions inside if(...)?
if (-1 || 0) alert( 'first' );
if (-1 && 0) alert( 'second' );
if (null || -1 && 1) alert( 'third' );
The answer: the first and the third will execute.
Details:
// Runs.
// The result of -1 || 0 = -1, truthy
if (-1 || 0) alert( 'first' );

// Doesn't run
// -1 && 0 = 0, falsy
if (-1 && 0) alert( 'second' );

// Executes
// Operator && has a higher precedence than ||
// so -1 && 1 executes first, giving us the chain:
// null || -1 && 1  ->  null || 1  ->  1
if (null || -1 && 1) alert( 'third' );
Loops: while and for
We often have a need to perform similar actions many times in a row.
For example, when we need to output goods from a list one after another. Or just run the same code for each number from 1 to 10.
Loops are a way to repeat the same part of code multiple times.
The “while” loop
The while loop has the following syntax:
while (condition) {
  // code
  // so-called "loop body"
}
While the condition is true, the code from the loop body is executed.
For instance, the loop below outputs i while i < 3:
let i = 0;
while (i < 3) { // shows 0, then 1, then 2
  alert( i );
  i++;
}
A single execution of the loop body is called an iteration. The loop in the example above makes three iterations.
If there were no i++ in the example above, the loop would repeat (in theory) forever. In practice, the browser provides ways to stop such loops, and for server-side JavaScript we can kill the process.
Any expression or a variable can be a loop condition, not just a comparison. They are evaluated and converted to boolean by while.
For instance, the shorter way to write while (i != 0) could be while (i):
let i = 3;
while (i) { // when i becomes 0, the condition becomes falsy, and the loop stops
  alert( i );
  i--;
}
Brackets are not required for a single-line body
If the loop body has a single statement, we can omit the brackets {…}:
let i = 3;
while (i) alert(i--);
The “do…while” loop
The condition check can be moved below the loop body using the do..while syntax:
do {
  // loop body
} while (condition);
The loop will first execute the body, then check the condition and, while it's truthy, execute it again and again.
For example:
let i = 0;
do {
  alert( i );
  i++;
} while (i < 3);
This form of syntax is rarely used except when you want the body of the loop to execute at least once regardless of the condition being truthy. Usually, the other form is preferred: while(…) {…}.
The “for” loop
The for loop is the most often used one.
It looks like this:
for (begin; condition; step) {
  // ... loop body ...
}
Let's learn the meaning of these parts by example. The loop below runs alert(i) for i from 0 up to (but not including) 3:
for (let i = 0; i < 3; i++) { // shows 0, then 1, then 2
  alert(i);
}
Let's examine the for statement part by part:
part
begin
i = 0
Executes once upon entering the loop.
condition
i < 3
Checked before every loop iteration, if fails the loop stops.
step
i++
Executes after the body on each iteration, but before the condition check.
body
alert(i)
Runs again and again while the condition is truthy
The general loop algorithm works like this:
Run begin
→ (if condition → run body and run step)
→ (if condition → run body and run step)
→ (if condition → run body and run step)
→ ...
If you are new to loops, then maybe it would help if you go back to the example and reproduce how it runs step-by-step on a piece of paper.
Here's what exactly happens in our case:
// for (let i = 0; i < 3; i++) alert(i)

// run begin
let i = 0
// if condition → run body and run step
if (i < 3) { alert(i); i++ }
// if condition → run body and run step
if (i < 3) { alert(i); i++ }
// if condition → run body and run step
if (i < 3) { alert(i); i++ }
// ...finish, because now i == 3
Inline variable declaration
Here the “counter” variable i is declared right in the loop. That's called an “inline” variable declaration. Such variables are visible only inside the loop.
for (let i = 0; i < 3; i++) {
  alert(i); // 0, 1, 2
}
alert(i); // error, no such variable
Instead of defining a variable, we can use an existing one:
let i = 0;

for (i = 0; i < 3; i++) { // use an existing variable
  alert(i); // 0, 1, 2
}

alert(i); // 3, visible, because declared outside of the loop
Skipping parts
Any part of for can be skipped.
For example, we can omit begin if we don't need to do anything at the loop start.
Like here:
let i = 0; // we have i already declared and assigned

for (; i < 3; i++) { // no need for "begin"
  alert( i ); // 0, 1, 2
}
We can also remove the step part:
let i = 0;

for (; i < 3;) {
  alert( i++ );
}
The loop became identical to while (i < 3).
We can actually remove everything, thus creating an infinite loop:
for (;;) {
  // repeats without limits
}
Please note that the two for semicolons ; must be present, otherwise it would be a syntax error.
Breaking the loop
Normally the loop exits when the condition becomes falsy.
But we can force the exit at any moment. There's a special break directive for that.
For example, the loop below asks the user for a series of numbers, but “breaks” when no number is entered:
let sum = 0;

while (true) {

  let value = +prompt("Enter a number", '');

  if (!value) break; // (*)

  sum += value;

}
alert( 'Sum: ' + sum );
The break directive is activated in the line (*) if the user enters an empty line or cancels the input. It stops the loop immediately, passing the control to the first line after the loop. Namely, alert.
The combination “infinite loop + break as needed” is great for situations when the condition must be checked not in the beginning/end of the loop, but in the middle, or even in several places of the body.
Continue to the next iteration
The continue directive is a “lighter version” of break. It doesn't stop the whole loop. Instead it stops the current iteration and forces the loop to start a new one (if the condition allows).
We can use it if we're done on the current iteration and would like to move on to the next.
The loop below uses continue to output only odd values:
for (let i = 0; i < 10; i++) {

  // if true, skip the remaining part of the body
  if (i % 2 == 0) continue;

  alert(i); // 1, then 3, 5, 7, 9
}
For even values of i the continue directive stops body execution, passing the control to the next iteration of for (with the next number). So the alert is only called for odd values.
The directive continue helps to decrease nesting level
A loop that shows odd values could look like this:
for (let i = 0; i < 10; i++) {

  if (i % 2) {
    alert( i );
  }

}
From a technical point of view it's identical to the example above. Surely, we can just wrap the code in the if block instead of continue.
But as a side-effect we got one more figure brackets nesting level. If the code inside if is longer than a few lines, that may decrease the overall readability.
No break/continue to the right side of ‘?'
Please note that syntax constructs that are not expressions cannot be used in '?'. In particular, directives break/continue are disallowed there.
For example, if we take this code:
if (i > 5) {
  alert(i);
} else {
  continue;
}
…And rewrite it using a question mark:
(i > 5) ? alert(i) : continue; // continue not allowed here
…Then it stops working. The code like this will give a syntax error:
That's just another reason not to use a question mark operator '?' instead of if.
Labels for break/continue
Sometimes we need to break out from multiple nested loops at once.
For example, in the code below we loop over i and j prompting for coordinates (i, j) from (0,0) to (3,3):
for (let i = 0; i < 3; i++) {

  for (let j = 0; j < 3; j++) {

    let input = prompt(`Value at coords (${i},${j})`, '');

    // what if I want to exit from here to Done (below)?

  }
}

alert('Done!');
We need a way to stop the process if the user cancels the input.
The ordinary break after input would only break the inner loop. That's not sufficient. Labels come to the rescue.
A label is an identifier with a colon before a loop:
labelName: for (...) {
  ...
}
The break <labelName> statement in the loop breaks out to the label.
Like here:
outer: for (let i = 0; i < 3; i++) {

  for (let j = 0; j < 3; j++) {

    let input = prompt(`Value at coords (${i},${j})`, '');

    // if an empty string or canceled, then break out of both loops
    if (!input) break outer; // (*)

    // do something with the value...
  }
}
alert('Done!');
In the code above break outer looks upwards for the label named outer and breaks out of that loop.
So the control goes straight from (*) to alert('Done!').
We can also move the label onto a separate line:
outer:
for (let i = 0; i < 3; i++) { ... }
The continue directive can also be used with a label. In this case the execution jumps to the next iteration of the labeled loop.
Labels are not a “goto”
Labels do not allow us to jump into an arbitrary place of code.
For example, it is impossible to do this:
break label;  // jumps to label? No.

label: for (...)
The call to a break/continue is only possible from inside the loop, and the label must be somewhere upwards from the directive.
Summary
We covered 3 types of loops:
while – The condition is checked before each iteration.
do..while – The condition is checked after each iteration.
for (;;) – The condition is checked before each iteration, additional settings available.
To make an “infinite” loop, usually the while(true) construct is used. Such a loop, just like any other, can be stopped with the break directive.
If we don't want to do anything on the current iteration and would like to forward to the next one, the continue directive does it.
Break/continue support labels before the loop. A label is the only way for break/continue to escape the nesting and go to the outer loop.
Every loop iteration decreases i by 1. The check while(i) stops the loop when i = 0.
Hence, the steps of the loop form the following sequence (“loop unrolled”):
let i = 3;

alert(i--); // shows 3, decreases i to 2

alert(i--) // shows 2, decreases i to 1

alert(i--) // shows 1, decreases i to 0

// done, while(i) check stops the loop
For every loop, write down which values it shows, in your opinion. And then compare with the answer.
Both loops alert same values or not?
The prefix form ++i:
let i = 0;
while (++i < 5) alert( i );
The postfix form i++
let i = 0;
while (i++ < 5) alert( i );
The task demonstrates how postfix/prefix forms can lead to different results when used in comparisons.
From 1 to 4
let i = 0;
while (++i < 5) alert( i );
The first value is i=1, because ++i first increments i and then returns the new value. So the first comparison is 1 < 5 and the alert shows 1.
Then follow 2,3,4… – the values show up one after another. The comparison always uses the incremented value, because ++ is before the variable.
Finally, i=4 is incremented to 5, the comparison while(5 < 5) fails, and the loop stops. So 5 is not shown.
From 1 to 5
let i = 0;
while (i++ < 5) alert( i );
The first value is again i=1. The postfix form of i++ increments i and then returns the old value, so the comparison i++ < 5 will use i=0 (contrary to ++i < 5).
But the alert call is separate. It's another statement which executes after the increment and the comparison. So it gets the current i=1.
Then follow 2,3,4…
Let's stop on i=4. The prefix form ++i would increment it and use 5 in the comparison. But here we have the postfix form i++. So it increments i to 5, but returns the old value. Hence the comparison is actually while(4 < 5) – true, and the control goes on to alert.
The value i=5 is the last one, because on the next step while(5 < 5) is false.
An integer number greater than 1 is called a
prime if it cannot be divided without a remainder by anything except 1 and itself.
In other words, n > 1 is a prime if it can't be evenly divided by anything except 1 and n.
For example, 5 is a prime, because it cannot be divided without a remainder by 2, 3 and 4.
Write the code which outputs prime numbers in the interval from 2 to n.
For n = 10 the result will be 2,3,5,7.
P.S. The code should work for any n, not be hard-tuned for any fixed value.
There are many algorithms for this task.
Let's use a nested loop:
For each i in the interval {
  check if i has a divisor from 1..i
  if yes => the value is not a prime
  if no => the value is a prime, show it
}
The code using a label:
let n = 10;

nextPrime:
for (let i = 2; i <= n; i++) { // for each i...

  for (let j = 2; j < i; j++) { // look for a divisor..
    if (i % j == 0) continue nextPrime; // not a prime, go next i
  }

  alert( i ); // a prime
}
There's a lot of space to opimize it. For instance, we could look for the divisors from 2 to square root of i. But anyway, if we want to be really efficient for large intervals, we need change the approach and rely on advanced maths and complex algorithms like
Quadratic sieve,
General number field sieve etc.
The "switch" statement
A switch statement can replace multiple if checks.
It gives a more descriptive way to compare a value with multiple variants.
The syntax
The switch has one or more case blocks and an optional default.
It looks like this:
switch(x) {
  case 'value1':  // if (x === 'value1')
    ...
    [break]

  case 'value2':  // if (x === 'value2')
    ...
    [break]

  default:
    ...
    [break]
}
The value of x is checked for a strict equality to the value from the first case (that is, value1) then to the second (value2) and so on.
If the equality is found, switch starts to execute the code starting from the corresponding case, until the nearest break (or until the end of switch).
If no case is matched then the default code is executed (if it exists).
An example
An example of switch (the executed code is highlighted):
let a = 2 + 2;

switch (a) {
  case 3:
    alert( 'Too small' );
    break;
  case 4:
    alert( 'Exactly!' );
    break;
  case 5:
    alert( 'Too large' );
    break;
  default:
    alert( "I don't know such values" );
}
Here the switch starts to compare a from the first case variant that is 3. The match fails.
Then 4. That's a match, so the execution starts from case 4 until the nearest break.
If there is no break then the execution continues with the next case without any checks.
An example without break:
let a = 2 + 2;

switch (a) {
  case 3:
    alert( 'Too small' );
  case 4:
    alert( 'Exactly!' );
  case 5:
    alert( 'Too big' );
  default:
    alert( "I don't know such values" );
}
In the example above we'll see sequential execution of three alerts:
alert( 'Exactly!' );
alert( 'Too big' );
alert( "I don't know such values" );
Any expression can be a switch/case argument
Both switch and case allow arbitrary expressions.
For example:
let a = "1";
let b = 0;

switch (+a) {
  case b + 1:
    alert("this runs, because +a is 1, exactly equals b+1");
    break;

  default:
    alert("this doesn't run");
}
Here +a gives 1, that's compared with b + 1 in case, and the corresponding code is executed.
Grouping of “case”
Several variants of case which share the same code can be grouped.
For example, if we want the same code to run for case 3 and case 5:
let a = 2 + 2;

switch (a) {
  case 4:
    alert('Right!');
    break;

  case 3:                    // (*) grouped two cases
  case 5:
    alert('Wrong!');
    alert("Why don't you take a math class?");
    break;

  default:
    alert('The result is strange. Really.');
}
Now both 3 and 5 show the same message.
The ability to “group” cases is a side-effect of how switch/case works without break. Here the execution of case 3 starts from the line (*) and goes through case 5, because there's no break.
Type matters
Let's emphasize that the equality check is always strict. The values must be of the same type to match.
For example, let's consider the code:
let arg = prompt("Enter a value?")
switch (arg) {
  case '0':
  case '1':
    alert( 'One or zero' );
    break;

  case '2':
    alert( 'Two' );
    break;

  case 3:
    alert( 'Never executes!' );
    break;
  default:
    alert( 'An unknown value' )
}
For 0, 1, the first alert runs.
For 2 the second alert runs.
But for 3, the result of the prompt is a string "3", which is not strictly equal === to the number 3. So we've got a dead code in case 3! The default variant will execute.
Write the code using if..else which would correspond to the following switch:
switch (browser) {
  case 'Edge':
    alert( "You've got the Edge!" );
    break;

  case 'Chrome':
  case 'Firefox':
  case 'Safari':
  case 'Opera':
    alert( 'Okay we support these browsers too' );
    break;

  default:
    alert( 'We hope that this page looks ok!' );
}
To precisely match the functionality of switch, the if must use a strict comparison '==='.
For given strings though, a simple '==' works too.
if(browser == 'Edge') {
  alert("You've got the Edge!");
} else if (browser == 'Chrome'
 || browser == 'Firefox'
 || browser == 'Safari'
 || browser == 'Opera') {
  alert( 'Okay we support these browsers too' );
} else {
  alert( 'We hope that this page looks ok!' );
}
Please note: the construct browser == 'Chrome' || browser == 'Firefox' … is split into multiple lines for better readability.
But the switch construct is still cleaner and more descriptive.
Rewrite the code below using a single switch statement:
let a = +prompt('a?', '');

if (a == 0) {
  alert( 0 );
}
if (a == 1) {
  alert( 1 );
}

if (a == 2 || a == 3) {
  alert( '2,3' );
}
The first two checks turn into two case. The third check is split into two cases:
let a = +prompt('a?', '');

switch (a) {
  case 0:
    alert( 0 );
    break;

  case 1:
    alert( 1 );
    break;

  case 2:
  case 3:
    alert( '2,3' );
    break;
}
Please note: the break at the bottom is not required. But we put it to make the code future-proof.
In the future, there is a chance that we'd want to add one more case, for example case 4. And if we forget to add a break before it, at the end of case 3, there will be an error. So that's a kind of self-insurance.
Functions
Quite often we need to perform a similar action in many places of the script.
For example, we need to show a nice-looking message when a visitor logs in, logs out and maybe somewhere else.
Functions are the main “building blocks” of the program. They allow the code to be called many times without repetition.
We've already seen examples of built-in functions, like alert(message), prompt(message, default) and confirm(question). But we can create functions of our own as well.
Function Declaration
To create a function we can use a function declaration.
It looks like this:
function showMessage() {
  alert( 'Hello everyone!' );
}
The function keyword goes first, then goes the name of the function, then a list of parameters in the brackets (empty in the example above) and finally the code of the function, also named “the function body”.
Our new function can be called by its name: showMessage().
For instance:
function showMessage() {
  alert( 'Hello everyone!' );
}

showMessage();
showMessage();
The call showMessage() executes the code of the function. Here we will see the message two times.
This example clearly demonstrates one of the main purposes of functions: to evade code duplication.
If we ever need to change the message or the way it is shown, it's enough to modify the code in one place: the function which outputs it.
Local variables
A variable declared inside a function is only visible inside that function.
For example:
function showMessage() {
  let message = "Hello, I'm JavaScript!"; // local variable

  alert( message );
}

showMessage(); // Hello, I'm JavaScript!

alert( message ); // <-- Error! The variable is local to the function
Outer variables
A function can access an outer variable as well, for example:
let userName = 'John';

function showMessage() {
  let message = 'Hello, ' + userName;
  alert(message);
}

showMessage(); // Hello, John
The function has full access to the outer variable. It can modify it as well.
For instance:
let userName = 'John';

function showMessage() {
  userName = "Bob"; // (1) changed the outer variable

  let message = 'Hello, ' + userName;
  alert(message);
}

alert( userName ); // John before the function call

showMessage();

alert( userName ); // Bob, the value was modified by the function
The outer variable is only used if there's no local one. So an occasional modification may happen if we forget let.
If a same-named variable is declared inside the function then it shadows the outer one. For instance, in the code below the function uses the local userName. The outer one is ignored:
let userName = 'John';

function showMessage() {
  let userName = "Bob"; // declare a local variable

  let message = 'Hello, ' + userName; // Bob
  alert(message);
}

// the function will create and use it's own userName
showMessage();

alert( userName ); // John, unchanged, the function did not access the outer variable
Global variables
Variables declared outside of any function, such as the outer userName in the code above, are called global.
Global variables are visible from any function (unless shadowed by locals).
Usually, a function declares all variables specific to its task, and global variables only store project-level data, so important that it really must be seen from anywhere. Modern code has few or no globals. Most variables reside in their functions.
Parameters
We can pass arbitrary data to functions using parameters (also called function arguments) .
In the example below, the function has two parameters: from and text.
When the function is called in lines (*) and (**), the given values are copied to local variables from and text. Then the function uses them.
Here's one more example: we have a variable from and pass it to the function. Please note: the function changes from, but the change is not seen outside, because a function always gets a copy of the value:
function showMessage(from, text) {
from = '*' + from + '*'; // make "from" look nicer
alert( from + ': ' + text );
}
let from = "Ann";
showMessage(from, "Hello"); // *Ann*: Hello
// the value of "from" is the same, the function modified a local copy
alert( from ); // Ann
Default values
If a parameter is not provided, then its value becomes undefined.
For instance, the aforementioned function showMessage(from, text) can be called with a single argument:
showMessage("Ann");
That's not an error. Such a call would output "Ann: undefined". There's no text, so it's assumed that text === undefined.
If we want to use a “default” text in this case, then we can specify it after =:
function showMessage(from, text = "no text given") {
alert( from + ": " + text );
}
showMessage("Ann"); // Ann: no text given
Now if the text parameter is not passed, it will get the value "no text given"
Here "no text given" is a string, but it can be a more complex expression, which is only evaluated and assigned if the parameter is missing. So, this is also possible:
function showMessage(from, text = anotherFunction()) {
// anotherFunction() only executed if no text given
// its result becomes the value of text
}
Default parameters old-style
Old editions of JavaScript did not support default parameters. So there are alternative ways to support them, that you can find mostly in the old scripts.
For instance, an explicit check for being undefined:
function showMessage(from, text) {
if (text === undefined) {
text = 'no text given';
}
alert( from + ": " + text );
}
…Or the || operator:
function showMessage(from, text) {
// if text is falsy then text gets the "default" value
text = text || 'no text given';
...
}
Returning a value
A function can return a value back into the calling code as the result.
The simplest example would be a function that sums two values:
function sum(a, b) {
return a + b;
}
let result = sum(1, 2);
alert( result ); // 3
The directive return can be in any place of the function. When the execution reaches it, the function stops, and the value is returned to the calling code (assigned to result above).
There may be many occurrences of return in a single function. For instance:
function checkAge(age) {
if (age > 18) {
return true;
} else {
return confirm('Got a permission from the parents?');
}
}
let age = prompt('How old are you?', 18);
if ( checkAge(age) ) {
alert( 'Access granted' );
} else {
alert( 'Access denied' );
}
It is possible to use return without a value. That causes the function to exit immediately.
For example:
function showMovie(age) {
if ( !checkAge(age) ) {
return;
}
alert( "Showing you the movie" ); // (*)
// ...
}
In the code above, if checkAge(age) returns false, then showMovie won't proceed to the alert.
A function with an empty return or without it returns undefined
If a function does not return a value, it is the same as if it returns undefined:
For a long expression in return, it might be tempting to put it on a separate line, like this:
return
(some + long + expression + or + whatever * f(a) + f(b))
That doesn't work, because JavaScript assumes a semicolon after return. That'll work the same as:
return;
(some + long + expression + or + whatever * f(a) + f(b))
So, it effectively becomes an empty return. We should put the value on the same line instead.
Naming a function
Functions are actions. So their name is usually a verb. It should briefly, but as accurately as possible describe what the function does. So that a person who reads the code gets the right clue.
It is a widespread practice to start a function with a verbal prefix which vaguely describes the action. There must be an agreement within the team on the meaning of the prefixes.
For instance, functions that start with "show" usually show something.
Function starting with…
"get…" – return a value,
"calc…" – calculate something,
"create…" – create something,
"check…" – check something and return a boolean, etc.
Examples of such names:
showMessage(..) // shows a message
getAge(..) // returns the age (gets it somehow)
calcSum(..) // calculates a sum and returns the result
createForm(..) // creates a form (and usually returns it)
checkPermission(..) // checks a permission, returns true/false
With prefixes in place, a glance at a function name gives an understanding what kind of work it does and what kind of value it returns.
One function – one action
A function should do exactly what is suggested by its name, no more.
Two independent actions usually deserve two functions, even if they are usually called together (in that case we can make a 3rd function that calls those two).
A few examples of breaking this rule:
getAge – would be bad if it shows an alert with the age (should only get).
createForm – would be bad if it modifies the document, adding a form to it (should only create it and return).
checkPermission – would be bad if displays the access granted/denied message (should only perform the check and return the result).
These examples assume common meanings of prefixes. What they mean for you is determined by you and your team. Maybe it's pretty normal for your code to behave differently. But you should have a firm understanding of what a prefix means, what a prefixed function can and cannot do. All same-prefixed functions should obey the rules. And the team should share the knowledge.
Ultrashort function names
Functions that are used very often sometimes have ultrashort names.
For example,
jQuery framework defines a function $,
LoDash library has it's core function named _.
These are exceptions. Generally functions names should be concise, but descriptive.
Functions == Comments
Functions should be short and do exactly one thing. If that thing is big, maybe it's worth it to split the function into a few smaller functions. Sometimes following this rule may not be that easy, but it's definitely a good thing.
A separate function is not only easier to test and debug – its very existence is a great comment!
For instance, compare the two functions showPrimes(n) below. Each one outputs
prime numbers up to n.
The first variant uses a label:
function showPrimes(n) {
nextPrime: for (let i = 2; i < n; i++) {
for (let j = 2; j < i; j++) {
if (i % j == 0) continue nextPrime;
}
alert( i ); // a prime
}
}
The second variant uses an additional function isPrime(n) to test for primality:
function showPrimes(n) {
for (let i = 2; i < n; i++) {
if (!isPrime(i)) continue;
alert(i); // a prime
}
}
function isPrime(n) {
for (let i = 2; i < n; i++) {
if ( n % i == 0) return false;
}
return true;
}
The second variant is easier to understand isn't it? Instead of the code piece we see a name of the action (isPrime). Sometimes people refer to such code as self-describing.
So, functions can be created even if we don't intend to reuse them. They structure the code and make it readable.
Summary
A function declaration looks like this:
function name(parameters, delimited, by, comma) {
/* code */
}
Values passed to a function as parameters are copied to its local variables.
A function may access outer variables. But it works only from inside out. The code outside of the function doesn't see its local variables.
A function can return a value. If it doesn't then its result is undefined.
To make the code clean and easy to understand, it's recommended to use mainly local variables and parameters in the function, not outer variables.
It is always easier to understand a function which gets parameters, works with them and returns a result than a function which gets no parameters, but modifies outer variables as a side-effect.
Function naming:
A name should clearly describe what the function does. When we see a function call in the code, a good name instantly gives us an understanding what it does and returns.
A function is an action, so function names are usually verbal.
There exist many well-known function prefixes like create…, show…, get…, check… and so on. Use them to hint what a function does.
Functions are the main building blocks of scripts. Now we've covered the basics, so we actually can start creating and using them. But that's only the beginning of the path. We are going to return to them many times, going more deeply into their advanced features.
P.S. In this task the function should support only natural values of n: integers up from 1.
function pow(x, n) {
let result = x;
for (let i = 1; i < n; i++) {
result *= x;
}
return result;
}
let x = prompt("x?", '');
let n = prompt("n?", '');
if (n <= 1) {
alert(`Power ${n} is not supported,
use an integer greater than 0`);
} else {
alert( pow(x, n) );
}
Function expressions and arrows
In JavaScript, a function is not a “magical language structure”, but a special kind of value.
The syntax that we used before is called a Function Declaration:
function sayHi() {
alert( "Hello" );
}
There is another syntax for creating a function that is called a Function Expression.
It looks like this:
let sayHi = function() {
alert( "Hello" );
};
Here, the function is created and assigned to the variable explicitly, like any other value. No matter how the function is defined, it's just a value stored in the variable sayHi.
The meaning of these code samples is the same: "create a function and put it into the variable sayHi".
We can even print out that value using alert:
function sayHi() {
alert( "Hello" );
}
alert( sayHi ); // shows the function code
Please note that the last line does not run the function, because there are no parentheses after sayHi. There are programming languages where any mention of a function name causes its execution, but JavaScript is not like that.
In JavaScript, a function is a value, so we can deal with it as a value. The code above shows its string representation, which is the source code.
It is a special value of course, in the sense that we can call it like sayHi().
But it's still a value. So we can work with it like with other kinds of values.
We can copy a function to another variable:
function sayHi() { // (1) create
alert( "Hello" );
}
let func = sayHi; // (2) copy
func(); // Hello // (3) run the copy (it works)!
sayHi(); // Hello // this still works too (why wouldn't it)
Here's what happens above in detail:
The Function Declaration (1) creates the function and puts it into the variable named sayHi.
Line (2) copies it into the variable func.
Please note again: there are no parentheses after sayHi. If there were, then func = sayHi() would write the result of the callsayHi() into func, not the functionsayHi itself.
Now the function can be called as both sayHi() and func().
Note that we could also have used a Function Expression to declare sayHi, in the first line:
let sayHi = function() { ... };
let func = sayHi;
// ...
Everything would work the same. Even more obvious what's going on, right?
Why there's a semicolon at the end?
There might be a question, why does Function Expression have a semicolon ; at the end, and Function Declaration does not:
function sayHi() {
// ...
}
let sayHi = function() {
// ...
};
The answer is simple:
There's no need for ; at the end of code blocks and syntax structures that use them like if { ... }, for { }, function f { } etc.
A Function Expression is used inside the statement: let sayHi = ...;, as a value. It's not a code block. The semicolon ; is recommended at the end of statements, no matter what is the value. So the semicolon here is not related to the Function Expression itself in any way, it just terminates the statement.
Callback functions
Let's look at more examples of passing functions as values and using function expressions.
We'll write a function ask(question, yes, no) with three parameters:
question
Text of the question
yes
Function to run if the answer is “Yes”
no
Function to run if the answer is “No”
The function should ask the question and, depending on the user's answer, call yes() or no():
function ask(question, yes, no) {
if (confirm(question)) yes()
else no();
}
function showOk() {
alert( "You agreed." );
}
function showCancel() {
alert( "You canceled the execution." );
}
// usage: functions showOk, showCancel are passed as arguments to ask
ask("Do you agree?", showOk, showCancel);
Before we explore how we can write it in a much shorter way, let's note that in the browser (and on the server-side in some cases) such functions are quite popular. The major difference between a real-life implementation and the example above is that real-life functions use more complex ways to interact with the user than a simple confirm. In the browser, such a function usually draws a nice-looking question window. But that's another story.
The arguments of ask are called callback functions or just callbacks.
The idea is that we pass a function and expect it to be “called back” later if necessary. In our case, showOk becomes the callback for the “yes” answer, and showCancel for the “no” answer.
We can use Function Expressions to write the same function much shorter:
function ask(question, yes, no) {
if (confirm(question)) yes()
else no();
}
ask(
"Do you agree?",
function() { alert("You agreed."); },
function() { alert("You canceled the execution."); }
);
Here, functions are declared right inside the ask(...) call. They have no name, and so are called anonymous. Such functions are not accessible outside of ask (because they are not assigned to variables), but that's just what we want here.
Such code appears in our scripts very naturally, it's in the spirit of JavaScript.
A function is a value representing an “action”
Regular values like strings or numbers represent the data.
A function can be perceived as an action.
We can pass it between variables and run when we want.
Function Expression vs Function Declaration
Let's formulate the key differences between Function Declarations and Expressions.
First, the syntax: how to see what is what in the code.
Function Declaration: a function, declared as a separate statement, in the main code flow.
// Function Declaration
function sum(a, b) {
return a + b;
}
Function Expression: a function, created inside an expression or inside another syntax construct.
Here, the function is created at the right side of the “assignment expression =”:
// Function Expression
let sum = function(a, b) {
return a + b;
};
The more subtle difference is when a function is created by the JavaScript engine.
A Function Expression is created when the execution reaches it and is usable from then on.
Once the execution flow passes to the right side of the assignment let sum = function… – here we go, the function is created and can be used (assigned, called etc) from now on.
Function Declarations are different.
A Function Declaration is usable in the whole script/code block.
In other words, when JavaScript prepares to run the script or a code block, it first looks for Function Declarations in it and creates the functions. We can think of it as an “initialization stage”.
And after all of the Function Declarations are processed, the execution goes on.
As a result, a function declared as a Function Declaration can be called earlier than it is defined.
For example, this works:
sayHi("John"); // Hello, John
function sayHi(name) {
alert( `Hello, ${name}` );
}
The Function Declaration sayHi is created when JavaScript is preparing to start the script and is visible everywhere in it.
…If it was a Function Expression, then it wouldn't work:
sayHi("John"); // error!
let sayHi = function(name) { // (*) no magic any more
alert( `Hello, ${name}` );
};
Function Expressions are created when the execution reaches them. That would happen only in the line (*). Too late.
When a Function Declaration is made within a code block, it is visible everywhere inside that block. But not outside of it.
Sometimes that's handy to declare a local function only needed in that block alone. But that feature may also cause problems.
For instance, let's imagine that we need to declare a function welcome() depending on the age variable that we get in run time. And then we plan to use it some time later.
The code below doesn't work:
let age = prompt("What is your age?", 18);
// conditionally declare a function
if (age < 18) {
function welcome() {
alert("Hello!");
}
} else {
function welcome() {
alert("Greetings!");
}
}
// ...use it later
welcome(); // Error: welcome is not defined
That's because a Function Declaration is only visible inside the code block in which it resides.
Here's another example:
let age = 16; // take 16 as an example
if (age < 18) {
welcome(); // \ (runs)
// |
function welcome() { // |
alert("Hello!"); // | Function Declaration is available
} // | everywhere in the block where it's declared
// |
welcome(); // / (runs)
} else {
function welcome() { // for age = 16, this "welcome" is never created
alert("Greetings!");
}
}
// Here we're out of figure brackets,
// so we can not see Function Declarations made inside of them.
welcome(); // Error: welcome is not defined
What can we do to make welcome visible outside of if?
The correct approach would be to use a Function Expression and assign welcome to the variable that is declared outside of if and has the proper visibility.
Now it works as intended:
let age = prompt("What is your age?", 18);
let welcome;
if (age < 18) {
welcome = function() {
alert("Hello!");
};
} else {
welcome = function() {
alert("Greetings!");
};
}
welcome(); // ok now
Or we could simplify it even further using a question mark operator ?:
let age = prompt("What is your age?", 18);
let welcome = (age < 18) ?
function() { alert("Hello!"); } :
function() { alert("Greetings!"); };
welcome(); // ok now
When to choose Function Declaration versus Function Expression?
As a rule of thumb, when we need to declare a function, the first to consider is Function Declaration syntax, the one we used before. It gives more freedom in how to organize our code, because we can call such functions before they are declared.
It's also a little bit easier to look up function f(…) {…} in the code than let f = function(…) {…}. Function Declarations are more “eye-catching”.
…But if a Function Declaration does not suit us for some reason (we've seen an example above), then Function Expression should be used.
Arrow functions
There's one more very simple and concise syntax for creating functions, that's often better than Function Expressions. It's called “arrow functions”, because it looks like this:
let func = (arg1, arg2, ...argN) => expression
…This creates a function func that has arguments arg1..argN, evaluates the expression on the right side with their use and returns its result.
In other words, it's roughly the same as:
let func = function(arg1, arg2, ...argN) {
return expression;
}
…But much more concise.
Let's see an example:
let sum = (a, b) => a + b;
/* The arrow function is a shorter form of:
let sum = function(a, b) {
return a + b;
};
*/
alert( sum(1, 2) ); // 3
If we have only one argument, then parentheses can be omitted, making that even shorter:
// same as
// let double = function(n) { return n * 2 }
let double = n => n * 2;
alert( double(3) ); // 6
If there are no arguments, parentheses should be empty (but they should be present):
let sayHi = () => alert("Hello!");
sayHi();
Arrow functions can be used in the same way as Function Expressions.
For instance, here's the rewritten example with welcome():
let age = prompt("What is your age?", 18);
let welcome = (age < 18) ?
() => alert('Hello') :
() => alert("Greetings!");
welcome(); // ok now
Arrow functions may appear unfamiliar and not very readable at first, but that quickly changes as the eyes get used to the structure.
They are very convenient for simple one-line actions, when we're just too lazy to write many words.
Multiline arrow functions
The examples above took arguments from the left of => and evaluated the right-side expression with them.
Sometimes we need something a little bit more complex, like multiple expressions or statements. It is also possible, but we should enclose them in figure brackets. Then use a normal return within them.
Like this:
let sum = (a, b) => { // the figure bracket opens a multiline function
let result = a + b;
return result; // if we use figure brackets, use return to get results
};
alert( sum(1, 2) ); // 3
More to come
Here we praised arrow functions for brevity. But that's not all! Arrow functions have other interesting features. We'll return to them later in the chapter
Arrow functions revisited.
For now, we can already use them for one-line actions and callbacks.
Summary
Functions are values. They can be assigned, copied or declared in any place of the code.
If the function is declared as a separate statement in the main code flow, that's called a “Function Declaration”.
If the function is created as a part of an expression, it's called a “Function Expression”.
Function Declarations are processed before the code block is executed. They are visible everywhere in the block.
Function Expressions are created when the execution flow reaches them.
In most cases when we need to declare a function, a Function Declaration is preferable, because it is visible prior to the declaration itself. That gives us more flexibility in code organization, and is usually more readable.
So we should use a Function Expression only when a Function Declaration is not fit for the task. We've seen a couple of examples of that in this chapter, and will see more in the future.
Arrow functions are handy for one-liners. They come in two flavors:
Without figure brackets: (...args) => expression – the right side is an expression: the function evaluates it and returns the result.
With figure brackets: (...args) => { body } – brackets allow us to write multiple statements inside the function, but we need an explicit return to return something.
To fully enable all features of modern JavaScript, we should start scripts with "use strict".
'use strict';
...
The directive must be at the top of a script or at the beginning of a function.
Without "use strict", everything still works, but some features behave in the old-fashion, “compatible” way. We'd generally prefer the modern behavior.
Some modern features of the language (like classes that we'll study in the future) enable strict mode implicitly.
There is a simple assignment: a = b and combined ones like a *= 2.
Bitwise
Bitwise operators work with integers on bit-level: see the
docs when they are needed.
Ternary
The only operator with three parameters: cond ? resultA : result B. If cond is truthy, returns resultA, otherwise resultB.
Logical operators
Logical AND && and OR || perform short-circuit evaluation and then return the value where it stopped.
Comparisons
Equality check == for values of different types converts them to a number (except null and undefined that equal each other and nothing else), so these are equal:
Later we'll study more types of loops to deal with objects.
The “switch” construct
The “switch” construct can replace multiple if checks. It uses === for comparisons.
For instance:
let age = prompt('Your age?', 18);
switch (age) {
case 18:
alert("Won't work"); // the result of prompt is a string, not a number
case "18":
alert("This works!");
break;
default:
alert("Any value not equal to one above");
}
We covered three ways to create a function in JavaScript:
Function Declaration: the function in the main code flow
function sum(a, b) {
let result = a + b;
return result;
}
Function Expression: the function in the context of an expression
let sum = function(a, b) {
let result = a + b;
return result;
}
Function expression can have a name, like sum = function name(a, b), but that name is only visible inside that function.
Arrow functions:
// expression at the right side
let sum = (a, b) => a + b;
// or multi-line syntax with { ... }, need return here:
let sum = (a, b) => {
// ...
return a + b;
}
// without arguments
let sayHi = () => alert("Hello");
// with a single argument
let double = n => n * 2;
Functions may have local variables: those declared inside its body. Such variables are only visible inside the function.
Parameters can have default values: function sum(a = 1, b = 2) {...}.
Functions always return something. If there's no return statement, then the result is undefined.
That was a brief list of JavaScript features. As of now we've studied only basics. Further in the tutorial you'll find more specials and advanced features of JavaScript.
Code quality
This chapter explains coding practices that we'll use further in the development.
Before writing more complex code, let's talk about debugging.
All modern browsers and most other environments support “debugging” – a special UI in developer tools that makes finding and fixing errors much easier.
We'll be using Chrome here, because it's probably the most feature-rich in this aspect.
The “sources” pane
Your Chrome version may look a little bit different, but it still should be obvious what's there.
Turn on developer tools with F12 (Mac: Cmd+Opt+I).
Select the sources pane.
Here's what you should see if you are doing it for the first time:
The toggler button opens the tab with files.
Let's click it and select index.html and then hello.js in the tree view. Here's what should show up:
Here we can see three zones:
Resources zone lists html, javascript, css and other files including images that are attached to the page. Chrome extensions may appear here too.
Source zone shows the source code.
Information and control zone is for debugging, we'll explore it soon.
Now you could click the same toggler again to hide the resources list and give the code some space.
Console
If we press Esc, then a console opens below. We can type commands there and press Enter to execute.
After a statement is executed, its result is shown below.
For example, here 1+2 results in 3, and hello("debugger") returns nothing, so the result is undefined:
Breakpoints
Let's examine what's going on within the code of the
example page. In hello.js, click at the line number 4. Yes, right on the "4" digit, not on the code.
Congratulations! You've set a breakpoint. Please also click on the number for line 8.
It should look like this (blue is where you should click):
A breakpoint is a point of code where the debugger will automatically pause the JavaScript execution.
While the code is paused, we can examine current variables, execute commands in the console etc. In other words, we can debug it.
We can always find a list of breakpoints in the right pane. That's useful when we have many breakpoints in various files. It allows to:
Quickly jump to the breakpoint in the code (by clicking on it in the right pane).
Temporarily disable the breakpoint by unchecking it.
Remove the breakpoint by right-clicking and selecting Remove.
…And so on.
Conditional breakpoints
Right click on the line number allows to create a conditional breakpoint. It only triggers when the given expression is truthy.
That's handy when we need to stop only for a certain variable value or for certain function parameters.
Debugger command
We can also pause the code by using the debugger command, like this:
function hello(name) {
let phrase = `Hello, ${name}!`;
debugger; // <-- the debugger stops here
say(phrase);
}
That's very convenient when we are in a code editor and don't want to switch to the browser and look up the script in developer tools to set the breakpoint.
Pause and look around
In our example, hello() is called during the page load, so the easiest way to activate the debugger is to reload the page. So let's press F5 (Windows, Linux) or Cmd+R (Mac).
As the breakpoint is set, the execution pauses at the 4th line:
Please open the informational dropdowns to the right (labeled with arrows). They allow you to examine the current code state:
Watch – shows current values for any expressions.
You can click the plus + and input an expression. The debugger will show its value at any moment, automatically recalculating it in the process of execution.
Call Stack – shows the nested calls chain.
At the current moment the debugger is inside hello() call, called by a script in index.html (no function there, so it's called “anonymous”).
If you click on a stack item, the debugger jumps to the corresponding code, and all its variables can be examined as well.
Scope – current variables.
Local shows local function variables. You can also see their values highlighted right over the source.
Global has global variables (out of any functions).
There's also this keyword there that we didn't study yet, but we'll do that soon.
Tracing the execution
Now it's time to trace the script.
There are buttons for it at the top of the right pane. Let's engage them.
– continue the execution, hotkey F8.
Resumes the execution. If there are no additional breakpoints, then the execution just continues and the debugger looses the control.
Here's what we can see after a click on it:
The execution has resumed, reached another breakpoint inside say() and paused there. Take a look at the “Call stack” at the right. It has increased by one more call. We're inside say() now.
– make a step (run the next command), but don't go into the function, hotkey F10.
If we click it now, alert will be shown. The important thing is that alert can be any function, the execution “steps over it”, skipping the function internals.
– make a step, hotkey F11.
The same as the previous one, but “steps into” nested functions. Clicking this will step through all script actions one by one.
– continue the execution till the end of the current function, hotkey Shift+F11.
The execution would stop at the very last line of the current function. That's handy when we accidentally entered a nested call using , but it does not interest us, and we want to continue to its end as soon as possible.
– enable/disable all breakpoints.
That button does not move the execution. Just a mass on/off for breakpoints.
– enable/disable automatic pause in case of an error.
When enabled, and the developer tools is open, a script error automatically pauses the execution. Then we can analyze variables to see what went wrong. So if our script dies with an error, we can open debugger, enable this option and reload the page to see where it dies and what's the context at that moment.
Continue to here
Right click on a line of code opens the context menu with a great option called “Continue to here”.
That's handy when we want to move multiple steps forward, but we're too lazy to set a breakpoint.
Logging
To output something to console, there's console.log function.
For instance, this outputs values from 0 to 4 to console:
// open console to see
for (let i = 0; i < 5; i++) {
console.log("value", i);
}
Regular users don't see that output, it is in the console. To see it, either open the Console tab of developer tools or press Esc while in another tab: that opens the console at the bottom.
If we have enough logging in our code, then we can see what's going on from the records, without the debugger.
Summary
As we can see, there are three main ways to pause a script:
A breakpoint.
The debugger statements.
An error (if dev tools are open and the button is “on”)
Then we can examine variables and step on to see where the execution goes wrong.
The information from this chapter is enough to begin debugging, but later, especially if you do a lot of browser stuff, please go there and look through more advanced capabilities of developer tools.
Oh, and also you can click at various places of dev tools and just see what's showing up. That's probably the fastest route to learn dev tools. Don't forget about the right click as well!
Coding style
Our code must be as clean and easy to read as possible.
That is actually an art of programming – to take a complex task and code it in a way that is both correct and human-readable.
One thing to help is the good code style.
Syntax
A cheatsheet with the rules (more details below):
Now let's discuss the rules and reasons for them in detail.
Nothing is “carved in stone” here. Everything is optional and can be changed: these are coding rules, not religious dogmas.
Figure brackets
In most JavaScript projects figure brackets are written on the same line, not on the new line. A so-called “egyptian” style. There's also a space before an opening bracket.
Like this:
if (condition) {
// do this
// ...and that
// ...and that
}
A single-line construct is an important edge case. Should we use brackets at all? If yes, then where?
Here are the annotated variants, so you can judge about their readability on your own:
As a summary:
For a really short code, one line is acceptable: like if (cond) return null.
But a separate line for each statement in brackets is usually better.
Line length
The maximal line length should be limited. No one likes to eye-follow a long horizontal line. It's better to split it.
The maximal line length is agreed on the team-level. It's usually 80 or 120 characters.
Indents
There are two types of indents:
A horizontal indent: 2(4) spaces.
A horizontal indentation is made using either 2 or 4 spaces or the “Tab” symbol. Which one to choose is an old holy war. Spaces are more common nowadays.
One advantage of spaces over tabs is that spaces allow more flexible configurations of indents than the “Tab” symbol.
For instance, we can align the arguments with the opening bracket, like this:
show(parameters,
aligned, // 5 spaces padding at the left
one,
after,
another
) {
// ...
}
A vertical indent: empty lines for splitting code into logical blocks.
Even a single function can often be divided in logical blocks. In the example below, the initialization of variables, the main loop and returning the result are split vertically:
function pow(x, n) {
let result = 1;
// <--
for (let i = 0; i < n; i++) {
result *= x;
}
// <--
return result;
}
Insert an extra newline where it helps to make the code more readable. There should not be more than nine lines of code without a vertical indentation.
A semicolon
A semicolon should be present after each statement. Even if it could possibly be skipped.
There are languages where a semicolon is truly optional. It's rarely used there. But in JavaScript there are few cases when a line break is sometimes not interpreted as a semicolon. That leaves a place for programming errors.
As you become more mature as a programmer, you may choose a no-semicolon style, like
StandardJS, but that's only when you know JavaScript well and understand possible pitfalls.
Nesting levels
There should not be too many nesting levels.
Sometimes it's a good idea to use the
“continue” directive in the loop to evade extra nesting in if(..) { ... }:
Instead of:
for (let i = 0; i < 10; i++) {
if (cond) {
... // <- one more nesting level
}
}
We can write:
for (let i = 0; i < 10; i++) {
if (!cond) continue;
... // <- no extra nesting level
}
A similar thing can be done with if/else and return.
For example, two constructs below are identical.
The first one:
function pow(x, n) {
if (n < 0) {
alert("Negative 'n' not supported");
} else {
let result = 1;
for (let i = 0; i < n; i++) {
result *= x;
}
return result;
}
}
And this:
function pow(x, n) {
if (n < 0) {
alert("Negative 'n' not supported");
return;
}
let result = 1;
for (let i = 0; i < n; i++) {
result *= x;
}
return result;
}
…But the second one is more readable, because the “edge case” of n < 0 is handled early on, and then we have the “main” code flow, without an additional nesting.
Functions below the code
If you are writing several “helper” functions and the code to use them, then there are three ways to place them.
Functions above the code that uses them:
// function declarations
function createElement() {
...
}
function setHandler(elem) {
...
}
function walkAround() {
...
}
// the code which uses them
let elem = createElement();
setHandler(elem);
walkAround();
Code first, then functions
// the code which uses the functions
let elem = createElement();
setHandler(elem);
walkAround();
// --- helper functions ---
function createElement() {
...
}
function setHandler(elem) {
...
}
function walkAround() {
...
}
Mixed: a function is described where it's first used.
Most of time, the second variant is preferred.
That's because when reading a code, we first want to know “what it does”. If the code goes first, then it provides that information. And then maybe we won't need to read functions at all, especially if their names are adequate to what they're doing.
Style guides
A style guide contains general rules about “how to write”: which quotes to use, how many spaces to indent, where to put line breaks, etc. A lot of minor things.
In total, when all members of a team use the same style guide, the code looks uniform. No matter who of the team wrote it, it's still the same style.
Surely, a team may think out a style guide themselves. But as of now, there's no need to. There are many tried, worked-out style guides, which are easy to adopt.
If you're a novice developer, then you could start with the cheatsheet above in the chapter, and later browse the style guides to pick up the common principles and maybe choose one.
Automated linters
There are tools that can check the code style automatically. They are called “linters”.
The great thing about them is that style-checking also finds some bugs, like a typo in a variable or function name.
So it's recommended to install one, even if you don't want to stick to a “code style”. They help to find typos – and that's already good enough.
Using a linter has a great side-effect: linters catch typos. For instance, when an undefined variable is accessed, a linter detects it and (if integrated with an editor) highlights it. In most cases that's a mistype. So we can fix it right ahead.
For that reason even if you're not concerned about styles, using a linter is highly recommended.
Also certain IDEs support built-in linting, that also may be good, but not so tunable as ESLint.
Summary
All syntax rules from this chapter and the style guides aim to increase readability, so all of them are debatable.
When we think about “how to write better?”, the sole criterion is “what makes the code more readable and easier to understand? what helps to evade errors?” That's the main thing to keep in mind when choosing the style or discussing which one is better.
Read style guides to see the latest ideas about that and follow those that you find the best.
function pow(x,n)
{
let result=1;
for(let i=0;i<n;i++) {result*=x;}
return result;
}
let x=prompt("x?",''), n=prompt("n?",'')
if (n<=0)
{
alert(`Power ${n} is not supported, please enter an integer number greater than zero`);
}
else
{
alert(pow(x,n))
}
Fix it.
You could note the following:
function pow(x,n) // <- no space between arguments
{ // <- figure bracket on a separate line
let result=1; // <- no spaces to the both sides of =
for(let i=0;i<n;i++) {result*=x;} // <- no spaces
// the contents of { ... } should be on a new line
return result;
}
let x=prompt("x?",''), n=prompt("n?",'') // <-- technically possible,
// but better make it 2 lines, also there's no spaces and ;
if (n<0) // <- no spaces inside (n < 0), and should be extra line above it
{ // <- figure bracket on a separate line
// below - a long line, may be worth to split into 2 lines
alert(`Power ${n} is not supported, please enter an integer number greater than zero`);
}
else // <- could write it on a single line like "} else {"
{
alert(pow(x,n)) // no spaces and ;
}
The fixed variant:
function pow(x, n) {
let result = 1;
for (let i = 0; i < n; i++) {
result *= x;
}
return result;
}
let x = prompt("x?", "");
let n = prompt("n?", "");
if (n < 0) {
alert(`Power ${n} is not supported,
please enter an integer number greater than zero`);
} else {
alert( pow(x, n) );
}
Comments
As we know from the chapter
Code structure, comments can be single-line: starting with // and multiline: /* ... */.
We normally use them to describe how and why the code works.
From the first sight, commenting might be obvious, but novices in programming usually get it wrong.
Bad comments
Novices tend to use comments to explain “what is going on in the code”. Like this:
// This code will do this thing (...) and that thing (...)
// ...and who knows what else...
very;
complex;
code;
But in a good code the amount of such “explanatory” comments should be minimal. Seriously, a code should be easy to understand without them.
There's a great rule about that: “if the code is so unclear that it requires a comment, then maybe it should be rewritten instead”.
Recipe: factor out functions
Sometimes it's beneficial to replace a code piece with a function, like here:
function showPrimes(n) {
nextPrime:
for (let i = 2; i < n; i++) {
// check if i is a prime number
for (let j = 2; j < i; j++) {
if (i % j == 0) continue nextPrime;
}
alert(i);
}
}
The better variant, with a factored out function isPrime:
function showPrimes(n) {
for (let i = 2; i < n; i++) {
if (!isPrime(i)) continue;
alert(i);
}
}
function isPrime(n) {
for (let i = 2; i < n; i++) {
if (n % i == 0) return false;
}
return true;
}
Now we can understand the code easily. The function itself becomes the comment. Such code is called self-descriptive.
Recipe: create functions
And if we have a long “code sheet” like this:
// here we add whiskey
for(let i = 0; i < 10; i++) {
let drop = getWhiskey();
smell(drop);
add(drop, glass);
}
// here we add juice
for(let t = 0; t < 3; t++) {
let tomato = getTomato();
examine(tomato);
let juice = press(tomato);
add(juice, glass);
}
// ...
Then it might be a better variant to refactor it into functions like:
addWhiskey(glass);
addJuice(glass);
function addWhiskey(container) {
for(let i = 0; i < 10; i++) {
let drop = getWhiskey();
//...
}
}
function addJuice(container) {
for(let t = 0; t < 3; t++) {
let tomato = getTomato();
//...
}
}
Once again, functions themselves tell what's going on. There's nothing to comment. And also the code structure is better when split. It's clear what every function does, what it takes and what it returns.
In reality, we can't totally evade “explanatory” comments. There are complex algorithms. And there are smart “tweaks” for purposes of optimization. But generally we should try to keep the code simple and self-descriptive.
Good comments
So, explanatory comments are usually bad. Which comments are good?
Describe the architecture
Provide a high-level overview of components, how they interact, what's the control flow in various situations… In short – the bird's eye view of the code. There's a special diagram language
UML for high-level architecture diagrams. Definitely worth studying.
Document a function usage
There's a special syntax
JSDoc to document a function: usage, parameters, returned value.
For instance:
/**
* Returns x raised to the n-th power.
*
* @param {number} x The number to raise.
* @param {number} n The power, must be a natural number.
* @return {number} x raised to the n-th power.
*/
function pow(x, n) {
...
}
Such comments allow us to understand the purpose of the function and use it the right way without looking in its code.
By the way, many editors like
WebStorm can understand them as well and use them to provide autocomplete and some automatic code-checking.
Also, there are tools like
JSDoc 3 that can generate HTML-documentation from the comments. You can read more information about JSDoc at
http://usejsdoc.org/.
Why is the task solved this way?
What's written is important. But what's not written maybe even more important to understand what's going on. Why is the task solved exactly this way? The code gives no answer.
If there are many ways to solve the task, why this one? Especially when it's not the most obvious one.
Without such comments the following situation is possible:
You (or your colleague) open the code written some time ago, and see that it's “suboptimal”.
You think: “How stupid I was then, and how much smarter I'm now”, and rewrite using the “more obvious and correct” variant.
…The urge to rewrite was good. But in the process you see that the “more obvious” solution is actually lacking. You even dimly remember why, because you already tried it long ago. You revert to the correct variant, but the time was wasted.
Comments that explain the solution are very important. They help to continue development the right way.
Any subtle features of the code? Where they are used?
If the code has anything subtle and counter-obvious, it's definitely worth commenting.
Summary
An important sign of a good developer is comments: their presence and even their absense.
Good comments allow us to maintain the code well, come back to it after a delay and use it more effectively.
Comment this:
Overall architecture, high-level view.
Function usage.
Important solutions, especially when not immediately obvious.
Evade comments:
That tell “how code works” and “what it does”.
Put them only if it's impossible to make the code so simple and self-descriptive that it doesn't require those.
Comments are also used for auto-documenting tools like JSDoc3: they read them and generate HTML-docs (or docs in another format).
Ninja code
Programmer ninjas of the past used these tricks to make code maintainers cry.
Code review gurus look for them in test tasks.
Novice developers sometimes use them even better than programmer ninjas.
Read them carefully and find out who you are – a ninja, a novice, or maybe a code reviewer?
Irony detected
Many start following ninja paths. Few succeed.
Brevity is the soul of wit
Make the code as short as possible. Show how smart you are.
Let subtle language features guide you.
For instance, take a look at this ternary operator '?':
// taken from a well-known javascript library
i = i ? i < 0 ? Math.max(0, len + i) : i : 0;
Cool, right? If you write like that, the developer who comes across this line and tries to understand what is the value of i is going to have a merry time. Then come to you, seeking for an answer.
Tell him that shorter is always better. Initiate him into the paths of ninja.
One-letter variables
The Dao hides in wordlessness. Only the Dao is well begun and well
completed.
Another way to code faster (and much worse!) is to use single-letter variable names everywhere. Like a, b or c.
A short variable disappears in the code like a real ninja in the forest. No one will be able to find it using “search” of the editor. And even if someone does, he won't be able to “decipher” what the name a or b means.
…But there's an exception. A real ninja will never use i as the counter in a "for" loop. Anywhere, but not here. Look around, there are many more exotic letters. For instance, x or y.
An exotic variable as a loop counter is especially cool if the loop body takes 1-2 pages (make it longer if you can). Then if someone looks deep inside the loop, he won't be able to quickly figure out that the variable named x is the loop counter.
Use abbreviations
If the team rules forbid the use of one-letter and vague names – shorten them, make abbreviations.
Like this:
list → lst.
userAgent → ua.
browser → brsr.
…etc
Only the one with truly good intuition will be able to understand such names. Try to shorten everything. Only a worthy person should be able to uphold the development of your code.
Soar high. Be abstract.
The great square is cornerless
The great vessel is last complete,
The great note is rarified sound,
The great image has no form.
While choosing a name try to use the most abstract word. Like obj, data, value, item, elem and so on.
The ideal name for a variable is data. Use it everywhere you can. Indeed, every variable holds data, right?
…But what to do if data is already taken? Try value, it's also universal. After all, a variable eventually gets a value.
Name a variable by its type: str, num…
Give them a try. A young ninja may wonder – do such names make the code worse? Actually, yes!
From one hand, the variable name still means something. It says what's inside the variable: a string, a number or something else. But when an outsider tries to understand the code, he'll be surprised to see that there's actually no information at all!
Indeed, the value type is easy to find out by debugging. But what's the meaning of the variable? Which string/number does it store? There's just no way to figure out without a good meditation!
…But what if there are no more such names? Just add a number: data1, item2, elem5…
Attention test
Only a truly attentive programmer should be able to understand the code. But how to check that?
One of the ways – use similar variable names, like date and data.
Mix them where you can.
A quick read of such code becomes impossible. And when there's a typo… Ummm… We're stuck for long, time to drink tea.
Smart synonyms
The hardest thing of all is to find a black cat in a dark room, especially if there is no cat.
Using similar names for same things makes life more interesting and shows your creativity to the public.
For instance, consider function prefixes. If a function shows a message on the screen – start it with display…, like displayMessage. And then if another function shows on the screen something else, like a user name, start it with show… (like showName).
Insinuate that there's a subtle difference between such functions, while there is none.
Make a pact with fellow ninjas of the team: if John starts “showing” functions with display... in his code, then Peter could use render.., and Ann – paint.... Note how much more interesting and diverse the code became.
…And now the hat trick!
For two functions with important differences – use the same prefix!
For instance, the function printPage(page) will use a printer. And the function printText(text) will put the text on-screen. Let an unfamiliar reader think well over similarly named function printMessage: “Where does it put the message? To a printer or on the screen?”. To make it really shine, printMessage(message) should output it in the new window!
Reuse names
Once the whole is divided, the parts
need names.
There are already enough names.
One must know when to stop.
Add a new variable only when absolutely necessary.
Instead, reuse existing names. Just write new values into them.
In a function try to use only variables passed as parameters.
That would make it really hard to identify what's exactly in the variable now. And also where it comes from. A person with weak intuition would have to analyze the code line-by-line and track the changes through every code branch.
An advanced variant of the approach is to covertly (!) replace the value with something alike in the middle of a loop or a function.
For instance:
function ninjaFunction(elem) {
// 20 lines of code working with elem
elem = clone(elem);
// 20 more lines, now working with the clone of the elem!
}
A fellow programmer who wants to work with elem in the second half of the function will be surprised… Only during the debugging, after examining the code he will find out that he's working with a clone!
Deadly effective even against an experienced ninja. Seen in code regularly.
Underscores for fun
Put underscores _ and __ before variable names. Like _name or __value. It would be great if only you knew their meaning. Or, better, add them just for fun, without particular meaning at all. Or different meanings in different places.
You kill two rabbits with one shot. First, the code becomes longer and less readable, and the second, a fellow developer may spend a long time trying to figure out what the underscores mean.
A smart ninja puts underscores at one spot of code and evades them at other places. That makes the code even more fragile and increases the probability of future errors.
Show your love
Let everyone see how magnificent your entities are! Names like superElement, megaFrame and niceItem will definitely enlighten a reader.
Indeed, from one hand, something is written: super.., mega.., nice.. But from the other hand – that brings no details. A reader may decide to look for a hidden meaning and meditate for an hour or two.
Overlap outer variables
When in the light, can't see anything in the darkness.
When in the darkness, can see everything in the light.
Use same names for variables inside and outside a function. As simple. No efforts required.
let user = authenticateUser();
function render() {
let user = anotherValue();
...
...many lines...
...
... // <-- a programmer wants to work with user here and...
...
}
A programmer who jumps inside the render will probably fail to notice that there's a local user shadowing the outer one.
Then he'll try to work with user assuming that it's the external variable, the result of authenticateUser()… The trap is sprung! Hello, debugger…
Side-effects everywhere!
There are functions that look like they don't change anything. Like isReady(), checkPermission(), findTags()… They are assumed to carry out calculations, find and return the data, without changing anything outside of them. In other words, without “side-effects”.
A really beautiful trick is to add a “useful” action to them, besides the main task.
The expression of dazed surprise on the face of your colleague when he sees a function named is.., check.. or find... changing something – will definitely broaden your boundaries of reason.
Another way to surprise is to return a non-standard result.
Show your original thinking! Let the call of checkPermission return not true/false, but a complex object with the results of the check.
Those developers who try to write if (checkPermission(..)), will wonder why it doesn't work. Tell them: “Read the docs!”. And give this article.
Powerful functions!
The great Tao flows everywhere,
both to the left and to the right.
Don't limit the function by what's written in its name. Be broader.
For instance, a function validateEmail(email) could (besides checking the email for correctness) show an error message and ask to re-enter the email.
Additional actions should not be obvious from the function name. A true ninja coder will make them not obvious from the code as well.
Joining several actions into one protects your code from reuse.
Imagine, another developer wants only to check the email, and not output any message. Your function validateEmail(email) that does both will not suit him. So he won't break your meditation by asking anything about it.
Summary
All “pieces of advice” above are from the real code… Sometimes, written by experienced developers. Maybe even more experienced than you are ;)
Follow some of them, and your code will become full of surprises.
Follow many of them, and your code will become truly yours, no one would want to change it.
Follow all, and your code will become a valuable lesson for young developers looking for enlightenment.
Automated testing with mocha
Automated testing will be used in further tasks.
It's actually a part of the “educational minimum” of a developer.
Why we need tests?
When we write a function, we can usually imagine what it should do: which parameters give which results.
During development, we can check the function by running it and comparing the outcome with the expected one. For instance, we can do it in the console.
If something is wrong – then we fix the code, run again, check the result – and so on till it works.
But such manual “re-runs” are imperfect.
When testing a code by manual re-runs, it's easy to miss something.
For instance, we're creating a function f. Wrote some code, testing: f(1) works, but f(2) doesn't work. We fix the code and now f(2) works. Looks complete? But we forgot to re-test f(1). That may lead to an error.
That's very typical. When we develop something, we keep a lot of possible use cases in mind. But it's hard to expect a programmer to check all of them manually after every change. So it becomes easy to fix one thing and break another one.
Automated testing means that tests are written separately, in addition to the code. They can be executed easily and check all the main use cases.
Behavior Driven Development (BDD)
Let's use a technique named
Behavior Driven Development or, in short, BDD. That approach is used among many projects. BDD is not just about testing. That's more.
BDD is three things in one: tests AND documentation AND examples.
Enough words. Let's see the example.
Development of “pow”: the spec
Let's say we want to make a function pow(x, n) that raises x to an integer power n. We assume that n≥0.
That task is just an example: there's the ** operator in JavaScript that can do that, but here we concentrate on the development flow that can be applied to more complex tasks as well.
Before creating the code of pow, we can imagine what the function should do and describe it.
Such description is called a specification or, in short, a spec, and looks like this:
A spec has three main building blocks that you can see above:
describe("title", function() { ... })
What functionality we're describing. Uses to group “workers” – the it blocks. In our case we're describing the function pow.
it("title", function() { ... })
In the title of it we in a human-readable way describe the particular use case, and the second argument is a function that tests it.
assert.equal(value1, value2)
The code inside it block, if the implementation is correct, should execute without errors.
Functions assert.* are used to check whether pow works as expected. Right here we're using one of them – assert.equal, it compares arguments and yields an error if they are not equal. Here it checks that the result of pow(2, 3) equals 8.
There are other types of comparisons and checks that we'll see further.
The development flow
The flow of development usually looks like this:
An initial spec is written, with tests for the most basic functionality.
An initial implementation is created.
To check whether it works, we run the testing framework
Mocha (more details soon) that runs the spec. Errors are displayed. We make corrections until everything works.
Now we have a working initial implementation with tests.
We add more use cases to the spec, probably not yet supported by the implementations. Tests start to fail.
Go to 3, update the implementation till tests give no errors.
Repeat steps 3-6 till the functionality is ready.
So, the development is iterative. We write the spec, implement it, make sure tests pass, then write more tests, make sure they work etc. At the end we have both a working implementation and tests for it.
In our case, the first step is complete: we have an initial spec for pow. So let's make an implementation. But before that let's make a “zero” run of the spec, just to see that tests are working (they will all fail).
The spec in action
Here in the tutorial we'll be using the following JavaScript libraries for tests:
Mocha – the core framework: it provides common testing functions including describe and it and the main function that runs tests.
Chai – the library with many assertions. It allows to use a lot of different assertions, for now we need only assert.equal.
Sinon – a library to spy over functions, emulate built-in functions and more, we'll need it much later.
These libraries are suitable for both in-browser and server-side testing. Here we'll consider the browser variant.
The full HTML page with these frameworks and pow spec:
<!DOCTYPE html>
<html>
<head>
<!-- add mocha css, to show results -->
<link rel="stylesheet" href="https://cdnjs.cloudflare.com/ajax/libs/mocha/3.2.0/mocha.css">
<!-- add mocha framework code -->
<script src="https://cdnjs.cloudflare.com/ajax/libs/mocha/3.2.0/mocha.js"></script>
<script>
mocha.setup('bdd'); // minimal setup
</script>
<!-- add chai -->
<script src="https://cdnjs.cloudflare.com/ajax/libs/chai/3.5.0/chai.js"></script>
<script>
// chai has a lot of stuff, let's make assert global
let assert = chai.assert;
</script>
</head>
<body>
<script>
function pow(x, n) {
/* function code is to be written, empty now */
}
</script>
<!-- the script with tests (describe, it...) -->
<script src="test.js"></script>
<!-- the element with id="mocha" will contain test results -->
<div id="mocha"></div>
<!-- run tests! -->
<script>
mocha.run();
</script>
</body>
</html>
The page can be divided into four parts:
The <head> – add third-party libraries and styles for tests.
The <script> with the function to test, in our case – with the code for pow.
The tests – in our case an external script test.js that has describe("pow", ...) from above.
The HTML element <div id="mocha"> will be used by Mocha to output results.
The tests are started by the command mocha.run().
The result:
As of now, the test fails, there's an error. That's logical: we have an empty function code in pow, so pow(2,3) returns undefined instead of 8.
For the future, let's note that there are advanced test-runners, like
karma and others. So it's generally not a problem to setup many different tests.
Initial implementation
Let's make a simple implementation of pow, for tests to pass:
function pow() {
return 8; // :) we cheat!
}
Wow, now it works!
Improving the spec
What we've done is definitely a cheat. The function does not work: an attempt to calculate pow(3,4) would give an incorrect result, but tests pass.
…But the situation is quite typical, it happens in practice. Tests pass, but the function works wrong. Our spec is imperfect. We need to add more use cases to it.
Let's add one more test to see if pow(3, 4) = 81.
We can select one of two ways to organize the test here:
The first variant – add one more assert into the same it:
describe("pow", function() {
it("2 raised to power 3 is 8", function() {
assert.equal(pow(2, 3), 8);
});
it("3 raised to power 3 is 27", function() {
assert.equal(pow(3, 3), 27);
});
});
The principal difference is that when assert triggers an error, the it block immediately terminates. So, in the first variant if the first assert fails, then we'll never see the result of the second assert.
Making tests separate is useful to get more information about what's going on, so the second variant is better.
And besides that, there's one more rule that's good to follow.
One test checks one thing.
If we look at the test and see two independent checks in it, it's better to split it into two simpler ones.
So let's continue with the second variant.
The result:
As we could expect, the second test failed. Sure, our function always returns 8, while the assert expects 27.
Improving the implementation
Let's write something more real for tests to pass:
function pow(x, n) {
let result = 1;
for (let i = 0; i < n; i++) {
result *= x;
}
return result;
}
To be sure that the function works well, let's test it for more values. Instead of writing it blocks manually, we can generate them in for:
describe("pow", function() {
function makeTest(x) {
let expected = x * x * x;
it(`${x} in the power 3 is ${expected}`, function() {
assert.equal(pow(x, 3), expected);
});
}
for (let x = 1; x <= 5; x++) {
makeTest(x);
}
});
The result:
Nested describe
We're going to add even more tests. But before that let's note that the helper function makeTest and for should be grouped together. We won't need makeTest in other tests, it's needed only in for: their common task is to check how pow raises into the given power.
Grouping is done with a nested describe:
describe("pow", function() {
describe("raises x to power n", function() {
function makeTest(x) {
let expected = x * x * x;
it(`${x} in the power 3 is ${expected}`, function() {
assert.equal(pow(x, 3), expected);
});
}
for (let x = 1; x <= 5; x++) {
makeTest(x);
}
});
// ... more tests to follow here, both describe and it can be added
});
The nested describe defines a new “subgroup” of tests. In the output we can see the titled indentation:
In the future we can add more it and describe on the top level with helper functions of their own, they won't see makeTest.
before/after and beforeEach/afterEach
We can setup before/after functions that execute before/after running tests, and also beforeEach/afterEach functions that execute before/after everyit.
For instance:
describe("test", function() {
before(() => alert("Testing started – before all tests"));
after(() => alert("Testing finished – after all tests"));
beforeEach(() => alert("Before a test – enter a test"));
afterEach(() => alert("After a test – exit a test"));
it('test 1', () => alert(1));
it('test 2', () => alert(2));
});
The running sequence will be:
Testing started – before all tests (before)
Before a test – enter a test (beforeEach)
1
After a test – exit a test (afterEach)
Before a test – enter a test (beforeEach)
2
After a test – exit a test (afterEach)
Testing finished – after all tests (after)
Usually, beforeEach/afterEach (before/each) are used to perform initialization, zero out counters or do something else between the tests (or test groups).
Extending the spec
The basic functionality of pow is complete. The first iteration of the development is done. When we're done celebrating and drinking champagne – let's go on and improve it.
As it was said, the function pow(x, n) is meant to work with positive integer values n.
To indicate a mathematical error, JavaScript functions usually return NaN. Let's do the same for invalid values of n.
Let's first add the behavior to the spec(!):
describe("pow", function() {
// ...
it("for negative n the result is NaN", function() {
assert.isNaN(pow(2, -1));
});
it("for non-integer n the result is NaN", function() {
assert.isNaN(pow(2, 1.5));
});
});
The result with new tests:
The newly added tests fail, because our implementation does not support them. That's how BDD is done: first we write failing tests, and then make an implementation for them.
Other assertions
Please note the assertion assert.isNaN: it checks for NaN.
There are other assertions in Chai as well, for instance:
assert.equal(value1, value2) – checks the equality value1 == value2.
assert.strictEqual(value1, value2) – checks the strict equality value1 === value2.
assert.notEqual, assert.notStrictEqual – inverse checks to the ones above.
assert.isTrue(value) – checks that value === true
assert.isFalse(value) – checks that value === false
function pow(x, n) {
if (n < 0) return NaN;
if (Math.round(n) != n) return NaN;
let result = 1;
for (let i = 0; i < n; i++) {
result *= x;
}
return result;
}
In BDD, the spec goes first, followed by implementation. At the end we have both the spec and the code.
The spec can be used in three ways:
Tests guarantee that the code works correctly.
Docs – the titles of describe and it tell what the function does.
Examples – the tests are actually working examples showing how a function can be used.
With the spec, we can safely improve, change, even rewrite the function from scratch and make sure it still works right.
That's especially important in large projects when a function is used in many places. When we change such a function, there's just no way to manually check if every place that uses it still works right.
Without tests, people have two ways:
To perform the change, no matter what. And then our users meet bugs and report them. If we can afford that.
Or people become afraid to modify such functions, if the punishment for errors is harsh. Then it becomes old, overgrown with cobwebs, no one wants to get into it, and that's not good.
Automatically tested code is contrary to that!
If the project is covered with tests, there's just no such problem. We can run tests and see a lot of checks made in a matter of seconds.
Besides, a well-tested code has better architecture.
Naturally, that's because it's easier to change and improve it. But not only that.
To write tests, the code should be organized in such a way that every function has a clearly described task, well-defined input and output. That means a good architecture from the beginning.
In real life that's sometimes not that easy. Sometimes it's difficult to write a spec before the actual code, because it's not yet clear how it should behave. But in general writing tests makes development faster and more stable.
What now?
Later in the tutorial you will meet many tasks with tests baked-in. So you'll see more practical examples.
Writing tests requires good JavaScript knowledge. But we're just starting to learn it. So, to settle down everything, as of now you're not required to write tests, but you should already be able to read them even if they are a little bit more complex than in this chapter.
it("Raises x to the power n", function() {
let x = 5;
let result = x;
assert.equal(pow(x, 1), result);
result *= x;
assert.equal(pow(x, 2), result);
result *= x;
assert.equal(pow(x, 3), result);
});
P.S. Syntactically the test is correct and passes.
The test demonstrates one of the temptations a developer meets when writing tests.
What we have here is actually 3 tests, but layed out as a single function with 3 asserts.
Sometimes it's easier to write this way, but if an error occurs, it's much less obvious what went wrong.
If an error happens inside a complex execution flow, then we'll have to figure out the data at that point. We'll actually have to debug the test.
It would be much better to break the test into multiple it blocks with clearly written inputs and outputs.
Like this:
describe("Raises x to power n", function() {
it("5 in the power of 1 equals 5", function() {
assert.equal(pow(5, 1), 5);
});
it("5 in the power of 2 equals 25", function() {
assert.equal(pow(5, 2), 25);
});
it("5 in the power of 3 equals 125", function() {
assert.equal(pow(5, 3), 125);
});
});
We replaced the single it with describe and a group of it blocks. Now if something fails we would see clearly what the data was.
Also we can isolate a single test and run it in standalone mode by writing it.only instead of it:
describe("Raises x to power n", function() {
it("5 in the power of 1 equals 5", function() {
assert.equal(pow(5, 1), 5);
});
// Mocha will run only this block
it.only("5 in the power of 2 equals 25", function() {
assert.equal(pow(5, 2), 25);
});
it("5 in the power of 3 equals 125", function() {
assert.equal(pow(5, 3), 125);
});
});
Polyfills
The JavaScript language steadily evolves. New proposals to the language appear regularly, they are analyzed and, if considered worthy, are appended to the list at
https://tc39.github.io/ecma262/ and then progress to the
specification.
Teams behind JavaScript engines have their own ideas about what to implement first. They may decide to implement proposals that are in draft and postpone things that are already in the spec, because they are less interesting or just harder to do.
So it's quite common for an engine to implement only the part of the standard.
When we use modern features of the language, some engines may fail to support such code. Just as said, not all features are implemented everywhere.
Here Babel comes to the rescue.
Babel is a
transpiler. It rewrites modern JavaScript code into the previous standard.
Actually, there are two parts in Babel:
First, the transpiler program, which rewrites the code. The developer runs it on his own computer. It rewrites the code into the older standard. And then the code is delivered to the website for users. Modern project build system like
webpack or
brunch provide means to run transpiler automatically on every code change, so that doesn't involve any time loss from our side.
Second, the polyfill.
The transpiler rewrites the code, so syntax features are covered. But for new functions we need to write a special script that implements them. JavaScript is a highly dynamic language, scripts may not just add new functions, but also modify built-in ones, so that they behave according to the modern standard.
There's a term “polyfill” for scripts that “fill in” the gap and add missing implementations.
polyfill.io service that allows to load/construct polyfills on-demand, depending on the features we need.
So, we need to setup the transpiler and add the polyfill for old engines to support modern features.
If we orient towards modern engines and do not use features except those supported everywhere, then we don't need to use Babel.
Examples in the tutorial
Most examples are runnable at-place, like this:
alert('Press the "Play" button in the upper-right corner to run');
Examples that use modern JS will work only if your browser supports it.
Chrome Canary is good for all examples, but other modern browsers are mostly fine too.
Note that on production we can use Babel to translate the code into suitable for less recent browsers, so there will be no such limitation, the code will run everywhere.
As we know from the chapter
Data types, there are seven language types in JavaScript. Six of them are called “primitive”, because their values contain only a single thing (be it a string or a number or whatever).
In contrast, objects are used to store keyed collections of various data and more complex entities. In JavaScript, objects penetrate almost every aspect of the language. So we must understand them first before going in-depth anywhere else.
An object can be created with figure brackets {…} with an optional list of properties. A property is a “key: value” pair, where key is a string (also called a “property name”), and value can be anything.
We can imagine an object as a cabinet with signed files. Every piece of data is stored in it's file by the key. It's easy to find a file by it's name or add/remove a file.
An empty object (“empty cabinet”) can be created using one of two syntaxes:
let user = new Object(); // "object constructor" syntax
let user = {}; // "object literal" syntax
The last property in the list may end with a comma:
let user = {
name: "John",
age: 30,
}
That is called a “trailing” or “hanging” comma. Makes it easier to add/remove/move around properties, because all lines become alike.
Square brackets
For multiword properties, the dot access doesn't work:
// this would give a syntax error
user.likes birds = true
That's because the dot requires the key to be a valid variable identifier. That is: no spaces and other limitations.
There's an alternative “square bracket notation” that works with any string:
let user = {};
// set
user["likes birds"] = true;
// get
alert(user["likes birds"]); // true
// delete
delete user["likes birds"];
Now everything is fine. Please note that the string inside the brackets is properly quoted (any type of quotes will do).
Square brackets also provide a way to obtain the property name as the result of any expression – as opposed to a literal string – like from a variable as follows:
let key = "likes birds";
// same as user["likes birds"] = true;
user[key] = true;
Here, the variable key may be calculated at run-time or depend on the user input. And then we use it to access the property. That gives us a great deal of flexibility. The dot notation cannot be used in a similar way.
For instance:
let user = {
name: "John",
age: 30
};
let key = prompt("What do you want to know about the user?", "name");
// access by variable
alert( user[key] ); // John (if enter "name")
Computed properties
We can use square brackets in an object literal. That's called computed properties.
For instance:
let fruit = prompt("Which fruit to buy?", "apple");
let bag = {
[fruit]: 5, // the name of the property is taken from the variable fruit
};
alert( bag.apple ); // 5 if fruit="apple"
The meaning of a computed property is simple: [fruit] means that the property name should be taken from fruit.
So, if a visitor enters "apple", bag will become {apple: 5}.
Essentially, that works the same as:
let fruit = prompt("Which fruit to buy?", "apple");
let bag = {};
// take property name from the fruit variable
bag[fruit] = 5;
…But looks nicer.
We can use more complex expressions inside square brackets:
let fruit = 'apple';
let bag = {
[fruit + 'Computers']: 5 // bag.appleComputers = 5
};
Square brackets are much more powerful than the dot notation. They allow any property names and variables. But they are also more cumbersome to write.
So most of the time, when property names are known and simple, the dot is used. And if we need something more complex, then we switch to square brackets.
Reserved words are allowed as property names
A variable cannot have a name equal to one of language-reserved words like “for”, “let”, “return” etc.
But for an object property, there's no such restriction. Any name is fine:
Basically, any name is allowed, but there's a special one: "__proto__" that gets special treatment for historical reasons. For instance, we can't set it to a non-object value:
let obj = {};
obj.__proto__ = 5;
alert(obj.__proto__); // [object Object], didn't work as intended
As we see from the code, the assignment to a primitive 5 is ignored.
That can become a source of bugs and even vulnerabilies if we intent to store arbitrary key-value pairs in an object, and allow a visitor to specify the keys.
In that case the visitor may choose “proto” as the key, and the assignment logic will be ruined (as shown above).
There exist a way to make objects treat __proto__ as a regular property, we'll cover it later, but first we need to know more about objects to understand it.
There's another data structure
Map, that we'll learn in the chapter
Map, Set, WeakMap and WeakSet, which supports arbitrary keys. Also
Property value shorthand
In real code we often use existing variables as values for property names.
For instance:
function makeUser(name, age) {
return {
name: name,
age: age
// ...other properties
};
}
let user = makeUser("John", 30);
alert(user.name); // John
In the example above, properties have the same names as variables. The use-case of making a property from a variable is so common, that there's a special property value shorthand to make it shorter.
Instead of name:name we can just write name, like this:
function makeUser(name, age) {
return {
name, // same as name: name
age // same as age: age
// ...
};
}
We can use both normal properties and shorthands in the same object:
let user = {
name, // same as name:name
age: 30
};
Existence check
A notable objects feature is that it's possible to access any property. There will be no error if the property doesn't exist! Accessing a non-existing property just returns undefined. It provides a very common way to test whether the property exists – to get it and compare vs undefined:
let user = {};
alert( user.noSuchProperty === undefined ); // true means "no such property"
There also exists a special operator "in" to check for the existence of a property.
The syntax is:
"key" in object
For instance:
let user = { name: "John", age: 30 };
alert( "age" in user ); // true, user.age exists
alert( "blabla" in user ); // false, user.blabla doesn't exist
Please note that on the left side of in there must be a property name. That's usually a quoted string.
If we omit quotes, that would mean a variable containing the actual name to be tested. For instance:
let user = { age: 30 };
let key = "age";
alert( key in user ); // true, takes the name from key and checks for such property
Using “in” for properties that store undefined
Usually, the strict comparison "=== undefined" check works fine. But there's a special case when it fails, but "in" works correctly.
It's when an object property exists, but stores undefined:
let obj = {
test: undefined
};
alert( obj.test ); // it's undefined, so - no such property?
alert( "test" in obj ); // true, the property does exist!
In the code above, the property obj.test technically exists. So the in operator works right.
Situations like this happen very rarely, because undefined is usually not assigned. We mostly use null for “unknown” or “empty” values. So the in operator is an exotic guest in the code.
The “for…in” loop
To walk over all keys of an object, there exists a special form of the loop: for..in. This is a completely different thing from the for(;;) construct that we studied before.
The syntax:
for(key in object) {
// executes the body for each key among object properties
}
For instance, let's output all properties of user:
let user = {
name: "John",
age: 30,
isAdmin: true
};
for(let key in user) {
// keys
alert( key ); // name, age, isAdmin
// values for the keys
alert( user[key] ); // John, 30, true
}
Note that all “for” constructs allow us to declare the looping variable inside the loop, like let key here.
Also, we could use another variable name here instead of key. For instance, "for(let prop in obj)" is also widely used.
Ordered like an object
Are objects ordered? In other words, if we loop over an object, do we get all properties in the same order that they are added in it? Can we rely on it?
The short answer is: “ordered in a special fashion”: integer properties are sorted, others appear in creation order. The details follow.
As an example, let's consider an object with the phone codes:
The object may be used to suggest a list of options to the user. If we're making a site mainly for German audience then we probably want 49 to be the first.
But if we run the code, we see a totally different picture:
USA (1) goes first
then Switzerland (41) and so on.
The phone codes go in the ascending sorted order, because they are integers. So we see 1, 41, 44, 49.
Integer properties? What's that?
The “integer property” term here means a string that can be converted to-and-from an integer without a change.
So, “49” is an integer property name, because when it's transformed to an integer number and back, it's still the same. But “+49” and “1.2” are not:
// Math.trunc is a built-in function that removes the decimal part
alert( String(Math.trunc(Number("49"))) ); // "49", same, integer property
alert( String(Math.trunc(Number("+49"))) ); // "49", not same ⇒ not integer property
alert( String(Math.trunc(Number("1.2"))) ); // "1", not same ⇒ not integer property
…On the other hand, if the keys are non-integer, then they are listed in the creation order, for instance:
let user = {
name: "John",
surname: "Smith"
};
user.age = 25; // add one more
// non-integer properties are listed in the creation order
for (let prop in user) {
alert( prop ); // name, surname, age
}
So, to fix the issue with the phone codes, we can “cheat” by making the codes non-integer. Adding a plus "+" sign before each code is enough.
Here, the object is stored somewhere in memory. And the variable user has a “reference” to it.
When an object variable is copied – the reference is copied, the object is not duplicated.
If we imagine an object as a cabinet, then a variable is a key to it. Copying a variable duplicates the key, but not the cabinet itself.
For instance:
let user = { name: "John" };
let admin = user; // copy the reference
Now we have two variables, each one with the reference to the same object:
We can use any variable to access the cabinet and modify its contents:
let user = { name: 'John' };
let admin = user;
admin.name = 'Pete'; // changed by the "admin" reference
alert(user.name); // 'Pete', changes are seen from the "user" reference
The example above demonstrates that there is only one object. Like if we had a cabinet with two keys and used one of them (admin) to get into it. Then, if we later use the other key (user) we would see changes.
Comparison by reference
The equality == and strict equality === operators for objects work exactly the same.
Two objects are equal only if they are the same object.
For instance, two variables reference the same object, they are equal:
let a = {};
let b = a; // copy the reference
alert( a == b ); // true, both variables reference the same object
alert( a === b ); // true
And here two independent objects are not equal, even though both are empty:
let a = {};
let b = {}; // two independent objects
alert( a == b ); // false
For comparisons like obj1 > obj2 or for a comparison against a primitive obj == 5, objects are converted to primitives. We'll study how object conversions work very soon, but to say the truth, such comparisons are necessary very rarely and usually are a result of a coding mistake.
It might seem that the line (*) would cause an error, but no, there's totally no problem. That's because const fixes the value of user itself. And here user stores the reference to the same object all the time. The line (*) goes inside the object, it doesn't reassign user.
The const would give an error if we try to set user to something else, for instance:
const user = {
name: "John"
};
// Error (can't reassign user)
user = {
name: "Pete"
};
…But what if we want to make constant object properties? So that user.age = 25 would give an error. That's possible too. We'll cover it in the chapter
Property flags and descriptors.
Cloning and merging, Object.assign
So, copying an object variable creates one more reference to the same object.
But what if we need to duplicate an object? Create an independent copy, a clone?
That's also doable, but a little bit more difficult, because there's no built-in method for that in JavaScript. Actually, that's rarely needed. Copying by reference is good most of the time.
But if we really want that, then we need to create a new object and replicate the structure of the existing one by iterating over its properties and copying them on the primitive level.
Like this:
let user = {
name: "John",
age: 30
};
let clone = {}; // the new empty object
// let's copy all user properties into it
for (let key in user) {
clone[key] = user[key];
}
// now clone is a fully independant clone
clone.name = "Pete"; // changed the data in it
alert( user.name ); // still John in the original object
Arguments dest, and src1, ..., srcN (can be as many as needed) are objects.
It copies the properties of all objects src1, ..., srcN into dest. In other words, properties of all arguments starting from the 2nd are copied into the 1st. Then it returns dest.
For instance, we can use it to merge several objects into one:
let user = { name: "John" };
let permissions1 = { canView: true };
let permissions2 = { canEdit: true };
// copies all properties from permissions1 and permissions2 into user
Object.assign(user, permissions1, permissions2);
// now user = { name: "John", canView: true, canEdit: true }
If the receiving object (user) already has the same named property, it will be overwritten:
let user = { name: "John" };
// overwrite name, add isAdmin
Object.assign(user, { name: "Pete", isAdmin: true });
// now user = { name: "Pete", isAdmin: true }
We also can use Object.assign to replace the loop for simple cloning:
let user = {
name: "John",
age: 30
};
let clone = Object.assign({}, user);
It copies all properties of user into the empty object and returns it. Actually, the same as the loop, but shorter.
Until now we assumed that all properties of user are primitive. But properties can be references to other objects. What to do with them?
Like this:
let user = {
name: "John",
sizes: {
height: 182,
width: 50
}
};
alert( user.sizes.height ); // 182
Now it's not enough to copy clone.sizes = user.sizes, because the user.sizes is an object, it will be copied by reference. So clone and user will share the same sizes:
Like this:
let user = {
name: "John",
sizes: {
height: 182,
width: 50
}
};
let clone = Object.assign({}, user);
alert( user.sizes === clone.sizes ); // true, same object
// user and clone share sizes
user.sizes.width++; // change a property from one place
alert(clone.sizes.width); // 51, see the result from the other one
To fix that, we should use the cloning loop that examines each value of user[key] and, if it's an object, then replicate it's structure as well. That is called a “deep cloning”.
There's a standard algorithm for deep cloning that handles the case above and more complex cases, called the
Structured cloning algorithm. In order not to reinvent the wheel, we can use a working implementation of it from the JavaScript library
lodash, the method is called
_.cloneDeep(obj).
Summary
Objects are associative arrays with several special features.
They store properties (key-value pairs), where:
Property keys must be strings or symbols (usually strings).
Values can be of any type.
To access a property, we can use:
The dot notation: obj.property.
Square brackets notation obj["property"]. Square brackets allow to take the key from a variable, like obj[varWithKey].
Additional operators:
To delete a property: delete obj.prop.
To check if a property with the given key exists: "key" in obj.
To iterate over an object: for(let key in obj) loop.
Objects are assigned and copied by reference. In other words, a variable stores not the “object value”, but a “reference” (address in memory) for the value. So copying such a variable or passing it as a function argument copies that reference, not the object. All operations via copied references (like adding/removing properties) are performed on the same single object.
To make a “real copy” (a clone) we can use Object.assign or
_.cloneDeep(obj).
What we've studied in this chapter is called a “plain object”, or just Object.
There are many other kinds of objects in JavaScript:
Array to store ordered data collections,
Date to store the information about the date and time,
Error to store the information about an error.
…And so on.
They have their special features that we'll study later. Sometimes people say something like “Array type” or “Date type”, but formally they are not types of their own, but belong to a single “object” data type. And they extend it in various ways.
Objects in JavaScript are very powerful. Here we've just scratched the surface of the topic that is really huge. We'll be closely working with objects and learning more about them in further parts of the tutorial.
Create a function multiplyNumeric(obj) that multiplies all numeric properties of obj by 2.
For instance:
// before the call
let menu = {
width: 200,
height: 300,
title: "My menu"
};
multiplyNumeric(menu);
// after the call
menu = {
width: 400,
height: 600,
title: "My menu"
};
Please note that multiplyNumeric does not need to return anything. It should modify the object in-place.
Memory management in JavaScript is performed automatically and invisibly to us. We create primitives, objects, functions… All that takes memory.
What happens when something is not needed any more? How does the JavaScript engine discover it and clean it up?
Reachability
The main concept of memory management in JavaScript is reachability.
Simply put, “reachable” values are those that are accessible or usable somehow. They are guaranteed to be stored in memory.
There's a base set of inherently reachable values, that cannot be deleted for obvious reasons.
For instance:
Local variables and parameters of the current function.
Variables and parameters for other functions on the current chain of nested calls.
Global variables.
(there are some other, internal ones as well)
These values are called roots.
Any other value is considered reachable if it's reachable from a root by a reference or by a chain of references.
For instance, if there's an object in a local variable, and that object has a property referencing another object, that object is considered reachable. And those that it references are also reachable. Detailed examples to follow.
There's a background process in the JavaScript engine that is called
garbage collector. It monitors all objects and removes those that have become unreachable.
A simple example
Here's the simplest example:
// user has a reference to the object
let user = {
name: "John"
};
Here the arrow depicts an object reference. The global variable "user" references the object {name: "John"} (we'll call it John for brevity). The "name" property of John stores a primitive, so it's painted inside the object.
If the value of user is overwritten, the reference is lost:
It's not enough to delete only one of these two references, because all objects would still be reachable.
But if we delete both, then we can see that John has no incoming reference any more:
Outgoing references do not matter. Only incoming ones can make an object reachable. So, John is now unreachable and will be removed from the memory with all its data that also became unaccessible.
After garbage collection:
Unreachable island
It is possible that the whole island of interlinked objects becomes unreachable and is removed from the memory.
The source object is the same as above. Then:
family = null;
The in-memory picture becomes:
This example demonstrates how important the concept of reachability is.
It's obvious that John and Ann are still linked, both have incoming references. But that's not enough.
The former "family" object has been unlinked from the root, there's no reference to it any more, so the whole island becomes unreachable and will be removed.
Internal algorithms
The basic garbage collection algorithm is called “mark-and-sweep”.
The following “garbage collection” steps are regularly performed:
The garbage collector takes roots and “marks” (remembers) them.
Then it visits and “marks” all references from them.
Then it visits marked objects and marks their references. All visited objects are remembered, so as not to visit the same object twice in the future.
…And so on until there are unvisited references (reachable from the roots).
All objects except marked ones are removed.
For instance, let our object structure look like this:
We can clearly see an “unreachable island” to the right side. Now let's see how “mark-and-sweep” garbage collector deals with it.
The first step marks the roots:
Then their references are marked:
…And their references, while possible:
Now the objects that could not be visited in the process are considered unreachable and will be removed:
That's the concept of how garbage collection works.
JavaScript engines apply many optimizations to make it run faster and not affect the execution.
Some of the optimizations:
Generational collection – objects are split into two sets: “new ones” and “old ones”. Many objects appear, do their job and die fast, they can be cleaned up aggressively. Those that survive for long enough, become “old” and are examined less often.
Incremental collection – if there are many objects, and we try to walk and mark the whole object set at once, it may take some time and introduce visible delays in the execution. So the engine tries to split the garbage collection into pieces. Then the pieces are executed one by one, separately. That requires some extra bookkeeping between them to track changes, but we have many tiny delays instead of a big one.
Idle-time collection – the garbage collector tries to run only while the CPU is idle, to reduce the possible effect on the execution.
There are other optimizations and flavours of garbage collection algorithms. As much as I'd like to describe them here, I have to hold off, because different engines implement different tweaks and techniques. And, what's even more important, things change as engines develop, so going deeper “in advance”, without a real need is probably not worth that. Unless, of course, it is a matter of pure interest, then there will be some links for you below.
Summary
The main things to know:
Garbage collection is performed automatically. We cannot force or prevent it.
Objects are retained in memory while they are reachable.
Being referenced is not the same as being reachable (from a root): a pack of interlinked objects can become unreachable as a whole.
Modern engines implement advanced algorithms of garbage collection.
A general book “The Garbage Collection Handbook: The Art of Automatic Memory Management” (R. Jones et al) covers some of them.
If you are familiar with low-level programming, the more detailed information about V8 garbage collector is in the article
A tour of V8: Garbage Collection.
V8 blog also publishes articles about changes in memory management from time to time. Naturally, to learn the garbage collection, you'd better prepare by learning about V8 internals in general and read the blog of
Vyacheslav Egorov who worked as one of V8 engineers. I'm saying: “V8”, because it is best covered with articles in the internet. For other engines, many approaches are similar, but garbage collection differs in many aspects.
In-depth knowledge of engines is good when you need low-level optimizations. It would be wise to plan that as the next step after you're familiar with the language.
Symbol type
By specification, object property keys may be either of string type, or of symbol type. Not numbers, not booleans, only strings or symbols, these two types.
Till now we've only seen strings. Now let's see the advantages that symbols can give us.
Symbols
“Symbol” value represents a unique identifier.
A value of this type can be created using Symbol():
// id is a new symbol
let id = Symbol();
We can also give symbol a description (also called a symbol name), mostly useful for debugging purposes:
// id is a symbol with the description "id"
let id = Symbol("id");
Symbols are guaranteed to be unique. Even if we create many symbols with the same description, they are different values. The description is just a label that doesn't affect anything.
For instance, here are two symbols with the same description – they are not equal:
let id1 = Symbol("id");
let id2 = Symbol("id");
alert(id1 == id2); // false
If you are familiar with Ruby or another language that also has some sort of “symbols” – please don't be misguided. JavaScript symbols are different.
Symbols don't auto-convert to a string
Most values in JavaScript support implicit conversion to a string. For instance, we can alert almost any value, and it will work. Symbols are special. They don't auto-convert.
For instance, this alert will show an error:
let id = Symbol("id");
alert(id); // TypeError: Cannot convert a Symbol value to a string
If we really want to show a symbol, we need to call .toString() on it, like here:
let id = Symbol("id");
alert(id.toString()); // Symbol(id), now it works
That's a “language guard” against messing up, because strings and symbols are fundamentally different and should not occasionally convert one into another.
“Hidden” properties
Symbols allow us to create “hidden” properties of an object, that no other part of code can occasionally access or overwrite.
For instance, if we want to store an “identifier” for the object user, we can use a symbol as a key for it:
let user = { name: "John" };
let id = Symbol("id");
user[id] = "ID Value";
alert( user[id] ); // we can access the data using the symbol as the key
What's the benefit over using Symbol("id") over a string "id"?
Let's make the example a bit deeper to see that.
Imagine that another script wants to have its own “id” property inside user, for its own purposes. That may be another JavaScript library, so the scripts are completely unaware of each other.
Then that script can create its own Symbol("id"), like this:
// ...
let id = Symbol("id");
user[id] = "Their id value";
There will be no conflict, because symbols are always different, even if they have the same name.
Now note that if we used a string "id" instead of a symbol for the same purpose, then there would be a conflict:
let user = { name: "John" };
// our script uses "id" property
user.id = "ID Value";
// ...if later another script the uses "id" for its purposes...
user.id = "Their id value"
// boom! overwritten! it did not mean to harm the colleague, but did it!
Symbols in a literal
If we want to use a symbol in an object literal, we need square brackets.
Like this:
let id = Symbol("id");
let user = {
name: "John",
[id]: 123 // not just "id: 123"
};
That's because we need the value from the variable id as the key, not the string “id”.
Symbols are skipped by for…in
Symbolic properties do not participate in for..in loop.
For instance:
let id = Symbol("id");
let user = {
name: "John",
age: 30,
[id]: 123
};
for (let key in user) alert(key); // name, age (no symbols)
// the direct access by the symbol works
alert( "Direct: " + user[id] );
That's a part of the general “hiding” concept. If another script or a library loops over our object, it won't unexpectedly access a symbolic property.
In contrast,
Object.assign copies both string and symbol properties:
let id = Symbol("id");
let user = {
[id]: 123
};
let clone = Object.assign({}, user);
alert( clone[id] ); // 123
There's no paradox here. That's by design. The idea is that when we clone an object or merge objects, we usually want all properties to be copied (including symbols like id).
Property keys of other types are coerced to strings
We can only use strings or symbols as keys in objects. Other types are converted to strings.
For instance, a number 0 becomes a string "0" when used as a property key:
let obj = {
0: "test" // same as "0": "test"
};
// both alerts access the same property (the number 0 is converted to string "0")
alert( obj["0"] ); // test
alert( obj[0] ); // test (same property)
Global symbols
As we've seen, usually all symbols are different, even if they have the same names. But sometimes we want same-named symbols to be same entities.
For instance, different parts of our application want to access symbol "id" meaning exactly the same property.
To achieve that, there exists a global symbol registry. We can create symbols in it and access them later, and it guarantees that repeated accesses by the same name return exactly the same symbol.
In order to create or read a symbol in the registry, use Symbol.for(key).
That call checks the global registry, and if there's a symbol described as key, then returns it, otherwise creates a new symbol Symbol(key) and stores it in the registry by the given key.
For instance:
// read from the global registry
let id = Symbol.for("id"); // if the symbol did not exist, it is created
// read it again
let idAgain = Symbol.for("id");
// the same symbol
alert( id === idAgain ); // true
Symbols inside the registry are called global symbols. If we want an application-wide symbol, accessible everywhere in the code – that's what they are for.
That sounds like Ruby
In some programming languages, like Ruby, there's a single symbol per name.
In JavaScript, as we can see, that's right for global symbols.
Symbol.keyFor
For global symbols, not only Symbol.for(key) returns a symbol by name, but there's a reverse call: Symbol.keyFor(sym), that does the reverse: returns a name by a global symbol.
For instance:
let sym = Symbol.for("name");
let sym2 = Symbol.for("id");
// get name from symbol
alert( Symbol.keyFor(sym) ); // name
alert( Symbol.keyFor(sym2) ); // id
The Symbol.keyFor internally uses the global symbol registry to look up the key for the symbol. So it doesn't work for non-global symbols. If the symbol is not global, it won't be able to find it and return undefined.
For instance:
alert( Symbol.keyFor(Symbol.for("name")) ); // name, global symbol
alert( Symbol.keyFor(Symbol("name2")) ); // undefined, the argument isn't a global symbol
System symbols
There exist many “system” symbols that JavaScript uses internally, and we can use them to fine-tune various aspects of our objects.
For instance, Symbol.toPrimitive allows us to describe object to primitive conversion. We'll see its use very soon.
Other symbols will also become familiar when we study the corresponding language features.
Summary
Symbol is a primitive type for unique identifiers.
Symbols are created with Symbol() call with an optional description.
Symbols are always different values, even if they have the same name. If we want same-named symbols to be equal, then we should use the global registry: Symbol.for(key) returns (creates if needed) a global symbol with key as the name. Multiple calls of Symbol.for return exactly the same symbol.
Symbols have two main use cases:
“Hidden” object properties.
If we want to add a property into an object that “belongs” to another script or a library, we can create a symbol and use it as a property key. A symbolic property does not appear in for..in, so it won't be occasionally listed. Also it won't be accessed directly, because another script does not have our symbol, so it will not occasionally intervene into its actions.
So we can “covertly” hide something into objects that we need, but others should not see, using symbolic properties.
There are many system symbols used by JavaScript which are accessible as Symbol.*. We can use them to alter some built-in behaviors. For instance, later in the tutorial we'll use Symbol.iterator for
iterables, Symbol.toPrimitive to setup
object-to-primitive conversion and so on.
Technically, symbols are not 100% hidden. There is a built-in method
Object.getOwnPropertySymbols(obj) that allows us to get all symbols. Also there is a method named
Reflect.ownKeys(obj) that returns all keys of an object including symbolic ones. So they are not really hidden. But most libraries, built-in methods and syntax constructs adhere to a common agreement that they are. And the one who explicitly calls the aforementioned methods probably understands well what he's doing.
Object methods, "this"
Objects are usually created to represent entities of the real world, like users, orders and so on:
let user = {
name: "John",
age: 30
};
And, in the real world, a user can act: select something from the shopping cart, login, logout etc.
Actions are represented in JavaScript by functions in properties.
Method examples
For the start, let's teach the user to say hello:
let user = {
name: "John",
age: 30
};
user.sayHi = function() {
alert("Hello!");
};
user.sayHi(); // Hello!
Here we've just used a Function Expression to create the function and assign it to the property user.sayHi of the object.
Then we can call it. The user can now speak!
A function that is the property of an object is called its method.
So, here we've got a method sayHi of the object user.
Of course, we could use a pre-declared function as a method, like this:
let user = {
// ...
};
// first, declare
function sayHi() {
alert("Hello!");
};
// then add as a method
user.sayHi = sayHi;
user.sayHi(); // Hello!
Object-oriented programming
When we write our code using objects to represent entities, that's called an
object-oriented programming, in short: “OOP”.
OOP is a big thing, an interesting science of its own. How to choose the right entities? How to organize the interaction between them? That's architecture, and there are great books on that topic, like “Design Patterns: Elements of Reusable Object-Oriented Software” by E.Gamma, R.Helm, R.Johnson, J.Vissides or “Object-Oriented Analysis and Design with Applications” by G.Booch, and more. We'll scratch the surface of that topic later in the chapter
Objects, classes, inheritance.
Method shorthand
There exists a shorter syntax for methods in an object literal:
// these objects do the same
let user = {
sayHi: function() {
alert("Hello");
}
};
// method shorthand looks better, right?
let user = {
sayHi() { // same as "sayHi: function()"
alert("Hello");
}
};
As demonstrated, we can omit "function" and just write sayHi().
To tell the truth, the notations are not fully identical. There are subtle differences related to object inheritance (to be covered later), but for now they do not matter. In almost all cases the shorter syntax is preferred.
“this” in methods
It's common that an object method needs to access the information stored in the object to do its job.
For instance, the code inside user.sayHi() may need the name of the user.
To access the object, a method can use the this keyword.
The value of this is the object “before dot”, the one used to call the method.
For instance:
let user = {
name: "John",
age: 30,
sayHi() {
alert(this.name);
}
};
user.sayHi(); // John
Here during the execution of user.sayHi(), the value of this will be user.
Technically, it's also possible to access the object without this, by referencing it via the outer variable:
let user = {
name: "John",
age: 30,
sayHi() {
alert(user.name); // "user" instead of "this"
}
};
…But such code is unreliable. If we decide to copy user to another variable, e.g. admin = user and overwrite user with something else, then it will access the wrong object.
That's demonstrated below:
let user = {
name: "John",
age: 30,
sayHi() {
alert( user.name ); // leads to an error
}
};
let admin = user;
user = null; // overwrite to make things obvious
admin.sayHi(); // Whoops! inside sayHi(), the old name is used! error!
If we used this.name instead of user.name inside the alert, then the code would work.
“this” is not bound
In JavaScript, “this” keyword behaves unlike most other programming languages. First, it can be used in any function.
There's no syntax error in the code like that:
function sayHi() {
alert( this.name );
}
The value of this is evaluated during the run-time. And it can be anything.
For instance, the same function may have different “this” when called from different objects:
let user = { name: "John" };
let admin = { name: "Admin" };
function sayHi() {
alert( this.name );
}
// use the same functions in two objects
user.f = sayHi;
admin.f = sayHi;
// these calls have different this
// "this" inside the function is the object "before the dot"
user.f(); // John (this == user)
admin.f(); // Admin (this == admin)
admin['f'](); // Admin (dot or square brackets access the method – doesn't matter)
Actually, we can call the function without an object at all:
function sayHi() {
alert(this);
}
sayHi(); // undefined
In this case this is undefined in strict mode. If we try to access this.name, there will be an error.
In non-strict mode (if one forgets use strict) the value of this in such case will be the global object (window in a browser, we'll get to it later). This is a historical behavior that "use strict" fixes.
Please note that usually a call of a function that uses this without an object is not normal, but rather a programming mistake. If a function has this, then it is usually meant to be called in the context of an object.
The consequences of unbound this
If you come from another programming language, then you are probably used to the idea of a "bound this", where methods defined in an object always have this referencing that object.
In JavaScript this is “free”, its value is evaluated at call-time and does not depend on where the method was declared, but rather on what's the object “before the dot”.
The concept of run-time evaluated this has both pluses and minuses. On the one hand, a function can be reused for different objects. On the other hand, greater flexibility opens a place for mistakes.
Here our position is not to judge whether this language design decision is good or bad. We'll understand how to work with it, how to get benefits and evade problems.
Internals: Reference Type
In-depth language feature
This section covers an advanced topic, to understand certain edge-cases better.
If you want to go on faster, it can be skipped or postponed.
An intricate method call can lose this, for instance:
let user = {
name: "John",
hi() { alert(this.name); },
bye() { alert("Bye"); }
};
user.hi(); // John (the simple call works)
// now let's call user.hi or user.bye depending on the name
(user.name == "John" ? user.hi : user.bye)(); // Error!
On the last line there is a ternary operator that chooses either user.hi or user.bye. In this case the result is user.hi.
The method is immediately called with parentheses (). But it doesn't work right!
You can see that the call results in an error, cause the value of "this" inside the call becomes undefined.
Why? If we want to understand why it happens, let's get under the hood of how obj.method() call works.
Looking closely, we may notice two operations in obj.method() statement:
First, the dot '.' retrieves the property obj.method.
Then parentheses () execute it.
So, how does the information about this gets passed from the first part to the second one?
If we put these operations on separate lines, then this will be lost for sure:
let user = {
name: "John",
hi() { alert(this.name); }
}
// split getting and calling the method in two lines
let hi = user.hi;
hi(); // Error, because this is undefined
Here hi = user.hi puts the function into the variable, and then on the last line it is completely standalone, and so there's no this.
To make user.hi() calls work, JavaScript uses a trick – the dot '.' returns not a function, but a value of the special
Reference Type.
The Reference Type is a “specification type”. We can't explicitly use it, but it is used internally by the language.
The value of Reference Type is a three-value combination (base, name, strict), where:
base is the object.
name is the property.
strict is true if use strict is in effect.
The result of a property access user.hi is not a function, but a value of Reference Type. For user.hi in strict mode it is:
// Reference Type value
(user, "hi", true)
When parentheses () are called on the Reference Type, they receive the full information about the object and it's method, and can set the right this (=user in this case).
Any other operation like assignment hi = user.hi discards the reference type as a whole, takes the value of user.hi (a function) and passes it on. So any further operation “loses” this.
So, as the result, the value of this is only passed the right way if the function is called directly using a dot obj.method() or square brackets obj[method]() syntax (they do the same here).
Arrow functions have no “this”
Arrow functions are special: they don't have their “own” this. If we reference this from such a function, it's taken from the outer “normal” function.
For instance, here arrow() uses this from the outer user.sayHi() method:
let user = {
firstName: "Ilya",
sayHi() {
let arrow = () => alert(this.firstName);
arrow();
}
};
user.sayHi(); // Ilya
That's a special feature of arrow functions, it's useful when we actually do not want to have a separate this, but rather to take it from the outer context. Later in the chapter
Arrow functions revisited we'll go more deeply into arrow functions.
Summary
Functions that are stored in object properties are called “methods”.
Methods allow objects to “act” like object.doSomething().
Methods can reference the object as this.
The value of this is defined at run-time.
When a function is declared, it may use this, but that this has no value until the function is called.
That function can be copied between objects.
When a function is called in the “method” syntax: object.method(), the value of this during the call is object.
Please note that arrow functions are special: they have no this. When this is accessed inside an arrow function, it is taken from outside.
let user = {
name: "John",
go: function() { alert(this.name) }
}
(user.go)()
P.S. There's a pitfall :)
Error!
Try it:
let user = {
name: "John",
go: function() { alert(this.name) }
}
(user.go)() // error!
The error message in most browsers does not give understanding what went wrong.
The error appears because a semicolon is missing after user = {...}.
JavaScript does not assume a semicolon before a bracket (user.go)(), so it reads the code like:
let user = { go:... }(user.go)()
Then we can also see that such a joint expression is syntactically a call of the object { go: ... } as a function with the argument (user.go). And that also happens on the same line with let user, so the user object has not yet even been defined, hence the error.
If we insert the semicolon, all is fine:
let user = {
name: "John",
go: function() { alert(this.name) }
};
(user.go)() // John
Please note that brackets around (user.go) do nothing here. Usually they setup the order of operations, but here the dot . works first anyway, so there's no effect. Only the semicolon thing matters.
The same, brackets do not change the order of operations here, the dot is first anyway.
Here we have a more complex call (expression).method(). The call works as if it were split into two lines:
f = obj.go; // calculate the expression
f(); // call what we have
Here f() is executed as a function, without this.
The similar thing as (3), to the left of the dot . we have an expression.
To explain the behavior of (3) and (4) we need to recall that property accessors (dot or square brackets) return a value of the Reference Type.
Any operation on it except a method call (like assignment = or ||) turns it into an ordinary value, which does not carry the information allowing to set this.
function makeUser() {
return {
name: "John",
ref: this
};
};
let user = makeUser();
alert( user.ref.name ); // What's the result?
Answer: an error.
Try it:
function makeUser() {
return {
name: "John",
ref: this
};
};
let user = makeUser();
alert( user.ref.name ); // Error: Cannot read property 'name' of undefined
That's because rules that set this do not look at object literals.
Here the value of this inside makeUser() is undefined, because it is called as a function, not as a method.
And the object literal itself has no effect on this. The value of this is one for the whole function, code blocks and object literals do not affect it.
So ref: this actually takes current this of the function.
Here's the opposite case:
function makeUser() {
return {
name: "John",
ref() {
return this;
}
};
};
let user = makeUser();
alert( user.ref().name ); // John
Now it works, because user.ref() is a method. And the value of this is set to the object before dot ..
What happens when objects are added obj1 + obj2, subtracted obj1 - obj2 or printed using alert(obj)?
There are special methods in objects that do the conversion.
In the chapter
Type Conversions we've seen the rules for numeric, string and boolean conversions of primitives. But we left a gap for objects. Now, as we know about methods and symbols it becomes possible to close it.
For objects, there's no to-boolean conversion, because all objects are true in a boolean context. So there are only string and numeric conversions.
The numeric conversion happens when we subtract objects or apply mathematical functions. For instance, Date objects (to be covered in the chapter
Date and time) can be subtracted, and the result of date1 - date2 is the time difference between two dates.
As for the string conversion – it usually happens when we output an object like alert(obj) and in similar contexts.
ToPrimitive
When an object is used in the context where a primitive is required, for instance, in an alert or mathematical operations, it's converted to a primitive value using the ToPrimitive algorithm (
specification).
That algorithm allows us to customize the conversion using a special object method.
Depending on the context, the conversion has a so-called “hint”.
There are three variants:
"string"
When an operation expects a string, for object-to-string conversions, like alert:
// output
alert(obj);
// using object as a property key
anotherObj[obj] = 123;
"number"
When an operation expects a number, for object-to-number conversions, like maths:
// explicit conversion
let num = Number(obj);
// maths (except binary plus)
let n = +obj; // unary plus
let delta = date1 - date2;
// less/greater comparison
let greater = user1 > user2;
"default"
Occurs in rare cases when the operator is “not sure” what type to expect.
For instance, binary plus + can work both with strings (concatenates them) and numbers (adds them), so both strings and numbers would do. Or when an object is compared using == with a string, number or a symbol.
// binary plus
let total = car1 + car2;
// obj == string/number/symbol
if (user == 1) { ... };
The greater/less operator <> can work with both strings and numbers too. Still, it uses “number” hint, not “default”. That's for historical reasons.
In practice, all built-in objects except for one case (Date object, we'll learn it later) implement "default" conversion the same way as "number". And probably we should do the same.
Please note – there are only three hints. It's that simple. There is no “boolean” hint (all objects are true in boolean context) or anything else. And if we treat "default" and "number" the same, like most built-ins do, then there are only two conversions.
To do the conversion, JavaScript tries to find and call three object methods:
Call obj[Symbol.toPrimitive](hint) if the method exists,
Otherwise if hint is "string"
try obj.toString() and obj.valueOf(), whatever exists.
Otherwise if hint is "number" or "default"
try obj.valueOf() and obj.toString(), whatever exists.
Symbol.toPrimitive
Let's start from the first method. There's a built-in symbol named Symbol.toPrimitive that should be used to name the conversion method, like this:
obj[Symbol.toPrimitive] = function(hint) {
// return a primitive value
// hint = one of "string", "number", "default"
}
As we can see from the code, user becomes a self-descriptive string or a money amount depending on the conversion. The single method user[Symbol.toPrimitive] handles all conversion cases.
toString/valueOf
Methods toString and valueOf come from ancient times. They are not symbols (symbols did not exist that long ago), but rather “regular” string-named methods. They provide an alternative “old-style” way to implement the conversion.
If there's no Symbol.toPrimitive then JavaScript tries to find them and try in the order:
toString -> valueOf for “string” hint.
valueOf -> toString otherwise.
For instance, here user does the same as above using a combination of toString and valueOf:
let user = {
name: "John",
money: 1000,
// for hint="string"
toString() {
return `{name: "${this.name}"}`;
},
// for hint="number" or "default"
valueOf() {
return this.money;
}
};
alert(user); // toString -> {name: "John"}
alert(+user); // valueOf -> 1000
alert(user + 500); // valueOf -> 1500
Often we want a single “catch-all” place to handle all primitive conversions. In this case we can implement toString only, like this:
let user = {
name: "John",
toString() {
return this.name;
}
};
alert(user); // toString -> John
alert(user + 500); // toString -> John500
In the absence of Symbol.toPrimitive and valueOf, toString will handle all primitive conversions.
ToPrimitive and ToString/ToNumber
The important thing to know about all primitive-conversion methods is that they do not necessarily return the “hinted” primitive.
There is no control whether toString() returns exactly a string, or whether Symbol.toPrimitive method returns a number for a hint “number”.
The only mandatory thing: these methods must return a primitive.
An operation that initiated the conversion gets that primitive, and then continues to work with it, applying further conversions if necessary.
let obj = {
toString() { // toString handles all conversions in the absence of other methods
return "2";
}
};
alert(obj * 2); // 4, ToPrimitive gives "2", then it becomes 2
Binary plus checks the primitive – if it's a string, then it does concatenation, otherwise it performs ToNumber and works with numbers.
String example:
let obj = {
toString() {
return "2";
}
};
alert(obj + 2); // 22 (ToPrimitive returned string => concatenation)
Number example:
let obj = {
toString() {
return true;
}
};
alert(obj + 2); // 3 (ToPrimitive returned boolean, not string => ToNumber)
Historical notes
For historical reasons, methods toString or valueOfshould return a primitive: if any of them returns an object, then there's no error, but that object is ignored (like if the method didn't exist).
In contrast, Symbol.toPrimitivemust return a primitive, otherwise, there will be an error.
Summary
The object-to-primitive conversion is called automatically by many built-in functions and operators that expect a primitive as a value.
There are 3 types (hints) of it:
"string" (for alert and other string conversions)
"number" (for maths)
"default" (few operators)
The specification describes explicitly which operator uses which hint. There are very few operators that “don't know what to expect” and use the "default" hint. Usually for built-in objects "default" hint is handled the same way as "number", so in practice the last two are often merged together.
The conversion algorithm is:
Call obj[Symbol.toPrimitive](hint) if the method exists,
Otherwise if hint is "string"
try obj.toString() and obj.valueOf(), whatever exists.
Otherwise if hint is "number" or "default"
try obj.valueOf() and obj.toString(), whatever exists.
In practice, it's often enough to implement only obj.toString() as a “catch-all” method for all conversions that return a “human-readable” representation of an object, for logging or debugging purposes.
Constructor, operator "new"
The regular {...} syntax allows to create one object. But often we need to create many similar objects, like multiple users or menu items and so on.
That can be done using constructor functions and the "new" operator.
Constructor function
Constructor functions technically are regular functions. There are two conventions though:
They are named with capital letter first.
They should be executed only with "new" operator.
For instance:
function User(name) {
this.name = name;
this.isAdmin = false;
}
let user = new User("Jack");
alert(user.name); // Jack
alert(user.isAdmin); // false
When a function is executed as new User(...), it does the following steps:
A new empty object is created and assigned to this.
The function body executes. Usually it modifies this, adds new properties to it.
The value of this is returned.
In other words, new User(...) does something like:
function User(name) {
// this = {}; (implicitly)
// add properties to this
this.name = name;
this.isAdmin = false;
// return this; (implicitly)
}
So the result of new User("Jack") is the same object as:
let user = {
name: "Jack",
isAdmin: false
};
Now if we want to create other users, we can call new User("Ann"), new User("Alice") and so on. Much shorter than using literals every time, and also easy to read.
That's the main purpose of constructors – to implement reusable object creation code.
Let's note once again – technically, any function can be used as a constructor. That is: any function can be run with new, and it will execute the algorithm above. The “capital letter first” is a common agreement, to make it clear that a function is to be run with new.
new function() { … }
If we have many lines of code all about creation of a single complex object, we can wrap them in constructor function, like this:
let user = new function() {
this.name = "John";
this.isAdmin = false;
// ...other code for user creation
// maybe complex logic and statements
// local variables etc
};
The constructor can't be called again, because it is not saved anywhere, just created and called. So this trick aims to encapsulate the code that constructs the single object, without future reuse.
Dual-syntax constructors: new.target
Inside a function, we can check whether it was called with new or without it, using a special new.target property.
It is empty for regular calls and equals the function if called with new:
function User() {
alert(new.target);
}
// without new:
User(); // undefined
// with new:
new User(); // function User { ... }
That can be used to allow both new and regular syntax to work the same:
function User(name) {
if (!new.target) { // if you run me without new
return new User(name); // ...I will add new for you
}
this.name = name;
}
let john = User("John"); // redirects call to new User
alert(john.name); // John
This approach is sometimes used in libraries to make the syntax more flexible. Probably not a good thing to use everywhere though, because omitting new makes it a bit less obvious what's going on. With new we all know that the new object is being created, that's a good thing.
Return from constructors
Usually, constructors do not have a return statement. Their task is to write all necessary stuff into this, and it automatically becomes the result.
But if there is a return statement, then the rule is simple:
If return is called with object, then it is returned instead of this.
If return is called with a primitive, it's ignored.
In other words, return with an object returns that object, in all other cases this is returned.
For instance, here return overrides this by returning an object:
function BigUser() {
this.name = "John";
return { name: "Godzilla" }; // <-- returns an object
}
alert( new BigUser().name ); // Godzilla, got that object ^^
And here's an example with an empty return (or we could place a primitive after it, doesn't matter):
function SmallUser() {
this.name = "John";
return; // finishes the execution, returns this
// ...
}
alert( new SmallUser().name ); // John
Usually constructors don't have a return statement. Here we mention the special behavior with returning objects mainly for the sake of completeness.
Omitting parentheses
By the way, we can omit parentheses after new, if it has no arguments:
let user = new User; // <-- no parentheses
// same as
let user = new User();
Omitting parentheses here is not considered a “good style”, but the syntax is permitted by specification.
Methods in constructor
Using constructor functions to create objects gives a great deal of flexibility. The constructor function may have parameters that define how to construct the object, and what to put in it.
Of course, we can add to this not only properties, but methods as well.
For instance, new User(name) below creates an object with the given name and the method sayHi:
function User(name) {
this.name = name;
this.sayHi = function() {
alert( "My name is: " + this.name );
};
}
let john = new User("John");
john.sayHi(); // My name is: John
/*
john = {
name: "John",
sayHi: function() { ... }
}
*/
Summary
Constructor functions or, briefly, constructors, are regular functions, but there's a common agreement to name them with capital letter first.
Constructor functions should only be called using new. Such a call implies a creation of empty this at the start and returning the populated one at the end.
We can use constructor functions to make multiple similar objects.
JavaScript provides constructor functions for many built-in language objects: like Date for dates, Set for sets and others that we plan to study.
Objects, we'll be back!
In this chapter we only cover the basics about objects and constructors. They are essential for learning more about data types and functions in the next chapters.
After we learn that, in the chapter
Objects, classes, inheritance we return to objects and cover them in-depth, including inheritance and classes.
Create a constructor function Accumulator(startingValue).
Object that it creates should:
Store the “current value” in the property value. The starting value is set to the argument of the constructor startingValue.
The read() method should use prompt to read a new number and add it to value.
In other words, the value property is the sum of all user-entered values with the initial value startingValue.
Here's the demo of the code:
let accumulator = new Accumulator(1); // initial value 1
accumulator.read(); // adds the user-entered value
accumulator.read(); // adds the user-entered value
alert(accumulator.value); // shows the sum of these values
Create a constructor function Calculator that creates “extendable” calculator objects.
The task consists of two parts.
First, implement the method calculate(str) that takes a string like "1 + 2" in the format “NUMBER operator NUMBER” (space-delimited) and returns the result. Should understand plus + and minus -.
Usage example:
let calc = new Calculator;
alert( calc.calculate("3 + 7") ); // 10
Then add the method addOperator(name, func) that teaches the calculator a new operation. It takes the operator name and the two-argument function func(a,b) that implements it.
For instance, let's add the multiplication *, division / and power **:
let powerCalc = new Calculator;
powerCalc.addMethod("*", (a, b) => a * b);
powerCalc.addMethod("/", (a, b) => a / b);
powerCalc.addMethod("**", (a, b) => a ** b);
let result = powerCalc.calculate("2 ** 3");
alert( result ); // 8
No brackets or complex expressions in this task.
The numbers and the operator are delimited with exactly one space.
There may be error handling if you'd like to add it.
JavaScript allows us to work with primitives (strings, numbers etc) as if they were objects.
They also provide methods to call and such. We will study those soon, but first we'll see how it works, because, of course, primitives are not objects (and here we will make it even more clear).
Let's look at the key distinction between primitives and objects.
A primitive
An object
Is capable of storing multiple values as properties.
Can be created with {}, for instance: {name: "John", age: 30}. There are other kinds of objects in JavaScript, e.g. functions are objects.
One of the best things about objects is that we can store a function as one of its properties:
let john = {
name: "John",
sayHi: function() {
alert("Hi buddy!");
}
};
john.sayHi(); // Hi buddy!
So here we've made an object john with the method sayHi.
Many built-in objects already exist, such as those that work with dates, errors, HTML elements etc. They have different properties and methods.
But, these features come with a cost!
Objects are “heavier” than primitives. They require additional resources to support the internal machinery. But as properties and methods are very useful in programming, JavaScript engines try to optimize them to reduce the additional burden.
A primitive as an object
Here's the paradox faced by the creator of JavaScript:
There are many things one would want to do with a primitive like a string or a number. It would be great to access them as methods.
Primitives must be as fast and lightweight as possible.
The solution looks a little bit awkward, but here it is:
Primitives are still primitive. A single value, as desired.
The language allows access to methods and properties of strings, numbers, booleans and symbols.
When this happens, a special “object wrapper” is created that provides the extra functionality, and then is destroyed.
The “object wrappers” are different for each primitive type and are called: String, Number, Boolean and Symbol. Thus, they provide different sets of methods.
For instance, there exists a method
str.toUpperCase() that returns a capitalized string.
Here's how it works:
let str = "Hello";
alert( str.toUpperCase() ); // HELLO
Simple, right? Here's what actually happens in str.toUpperCase():
The string str is a primitive. So in the moment of accessing its property, a special object is created that knows the value of the string, and has useful methods, like toUpperCase().
That method runs and returns a new string (shown by alert).
The special object is destroyed, leaving the primitive str alone.
So primitives can provide methods, but they still remain lightweight.
The JavaScript engine highly optimizes this process. It may even skip the creation of the extra object at all. But it must still adhere to the specification and behave as if it creates one.
A number has methods of its own, for instance,
toFixed(n) rounds the number to the given precision:
let n = 1.23456;
alert( n.toFixed(2) ); // 1.23
We'll see more specific methods in chapters
Numbers and
Strings.
Constructors String/Number/Boolean are for internal use only
Some languages like Java allow us to create “wrapper objects” for primitives explicitly using a syntax like new Number(1) or new Boolean(false).
In JavaScript, that's also possible for historical reasons, but highly unrecommended. Things will go crazy in several places.
And because what follows, zero, is an object, the alert will show up:
let zero = new Number(0);
if (zero) { // zero is true, because it's an object
alert( "zero is truthy?!?" );
}
On the other hand, using the same functions String/Number/Boolean without new is a totally sane and useful thing. They convert a value to the corresponding type: to a string, a number, or a boolean (primitive).
For example, this is entirely valid:
let num = Number("123"); // convert a string to number
null/undefined have no methods
The special primitives null and undefined are exceptions. They have no corresponding “wrapper objects” and provide no methods. In a sense, they are “the most primitive”.
An attempt to access a property of such value would give the error:
alert(null.test); // error
Summary
Primitives except null and undefined provide many helpful methods. We will study those in the upcoming chapters.
Formally, these methods work via temporary objects, but JavaScript engines are well tuned to optimize that internally, so they are not expensive to call.
How do you think, will it work? What will be shown?
Try running it:
let str = "Hello";
str.test = 5; // (*)
alert(str.test);
There may be two kinds of result:
undefined
An error.
Why? Let's replay what's happening at line (*):
When a property of str is accessed, a “wrapper object” is created.
The operation with the property is carried out on it. So, the object gets the test property.
The operation finishes and the “wrapper object” disappears.
So, on the last line, str has no trace of the property. A new wrapper object for every object operation on a string.
Some browsers though may decide to further limit the programmer and disallow to assign properties to primitives at all. That's why in practice we can also see errors at line (*). It's a little bit farther from the specification though.
This example clearly shows that primitives are not objects.
They just can not store data.
All property/method operations are performed with the help of temporary objects.
Numbers
All numbers in JavaScript are stored in 64-bit format
IEEE-754, also known as “double precision”.
Let's recap and expand upon what we currently know about them.
More ways to write a number
Imagine we need to write 1 billion. The obvious way is:
let billion = 1000000000;
But in real life we usually avoid writing a long string of zeroes as it's easy to mistype. Also, we are lazy. We will usually write something like "1bn" for a billion or "7.3bn" for 7 billion 300 million. The same is true for most large numbers.
In JavaScript, we shorten a number by appending the letter "e" to the number and specifying the zeroes count:
let billion = 1e9; // 1 billion, literally: 1 and 9 zeroes
alert( 7.3e9 ); // 7.3 billions (7,300,000,000)
In other words, "e" multiplies the number by 1 with the given zeroes count.
1e3 = 1 * 1000
1.23e6 = 1.23 * 1000000
Now let's write something very small. Say, 1 microsecond (one millionth of a second):
let ms = 0.000001;
Just like before, using "e" can help. If we'd like to avoid writing the zeroes explicitly, we could say:
let ms = 1e-6; // six zeroes to the left from 1
If we count the zeroes in 0.000001, there are 6 of them. So naturally it's 1e-6.
In other words, a negative number after "e" means a division by 1 with the given number of zeroes:
// -3 divides by 1 with 3 zeroes
1e-3 = 1 / 1000 (=0.001)
// -6 divides by 1 with 6 zeroes
1.23e-6 = 1.23 / 1000000 (=0.00000123)
Hex, binary and octal numbers
Hexadecimal numbers are widely used in JavaScript to represent colors, encode characters, and for many other things. So naturally, there exists a shorter way to write them: 0x and then the number.
For instance:
alert( 0xff ); // 255
alert( 0xFF ); // 255 (the same, case doesn't matter)
Binary and octal numeral systems are rarely used, but also supported using the 0b and 0o prefixes:
let a = 0b11111111; // binary form of 255
let b = 0o377; // octal form of 255
alert( a == b ); // true, the same number 255 at both sides
There are only 3 numeral systems with such support. For other numeral systems, we should use the function parseInt (which we will see later in this chapter).
toString(base)
The method num.toString(base) returns a string representation of num in the numeral system with the given base.
For example:
let num = 255;
alert( num.toString(16) ); // ff
alert( num.toString(2) ); // 11111111
The base can vary from 2 to 36. By default it's 10.
Common use cases for this are:
base=16 is used for hex colors, character encodings etc, digits can be 0..9 or A..F.
base=2 is mostly for debugging bitwise operations, digits can be 0 or 1.
base=36 is the maximum, digits can be 0..9 or A..Z. The whole latin alphabet is used to represent a number. A funny, but useful case for 36 is when we need to turn a long numeric identifier into something shorter, for example to make a short url. Can simply represent it in the numeral system with base 36:
alert( 123456..toString(36) ); // 2n9c
Two dots to call a method
Please note that two dots in 123456..toString(36) is not a typo. If we want to call a method directly on a number, like toString in the example above, then we need to place two dots .. after it.
If we placed a single dot: 123456.toString(36), then there would be an error, because JavaScript syntax implies the decimal part after the first dot. And if we place one more dot, then JavaScript knows that the decimal part is empty and now goes the method.
Also could write (123456).toString(36).
Rounding
One of the most used operations when working with numbers is rounding.
There are several built-in functions for rounding:
Math.floor
Rounds down: 3.1 becomes 3, and -1.1 becomes -2.
Math.ceil
Rounds up: 3.1 becomes 4, and -1.1 becomes -1.
Math.round
Rounds to the nearest integer: 3.1 becomes 3, 3.6 becomes 4 and -1.1 becomes -1.
Math.trunc (not supported by Internet Explorer)
Removes anything after the decimal point without rounding: 3.1 becomes 3, -1.1 becomes -1.
Here's the table to summarize the differences between them:
Math.floor
Math.ceil
Math.round
Math.trunc
3.1
3
4
3
3
3.6
3
4
4
3
-1.1
-2
-1
-1
-1
-1.6
-2
-1
-2
-1
These functions cover all of the possible ways to deal with the decimal part of a number. But what if we'd like to round the number to n-th digit after the decimal?
For instance, we have 1.2345 and want to round it to 2 digits, getting only 1.23.
There are two ways to do so:
Multiply-and-divide.
For example, to round the number to the 2nd digit after the decimal, we can multiply the number by 100, call the rounding function and then divide it back.
let num = 1.23456;
alert( Math.floor(num * 100) / 100 ); // 1.23456 -> 123.456 -> 123 -> 1.23
The method
toFixed(n) rounds the number to n digits after the point and returns a string representation of the result.
let num = 12.34;
alert( num.toFixed(1) ); // "12.3"
This rounds up or down to the nearest value, similar to Math.round:
let num = 12.36;
alert( num.toFixed(1) ); // "12.4"
Please note that result of toFixed is a string. If the decimal part is shorter than required, zeroes are appended to the end:
let num = 12.34;
alert( num.toFixed(5) ); // "12.34000", added zeroes to make exactly 5 digits
We can convert it to a number using the unary plus or a Number() call: +num.toFixed(5).
Imprecise calculations
Internally, a number is represented in 64-bit format
IEEE-754, so there are exactly 64 bits to store a number: 52 of them are used to store the digits, 11 of them store the position of the decimal point (they are zero for integer numbers), and 1 bit is for the sign.
If a number is too big, it would overflow the 64-bit storage, potentially giving an infinity:
alert( 1e500 ); // Infinity
What may be a little less obvious, but happens quite often, is the loss of precision.
Consider this (falsy!) test:
alert( 0.1 + 0.2 == 0.3 ); // false
That's right, if we check whether the sum of 0.1 and 0.2 is 0.3, we get false.
Strange! What is it then if not 0.3?
alert( 0.1 + 0.2 ); // 0.30000000000000004
Ouch! There are more consequences than an incorrect comparison here. Imagine you're making an e-shopping site and the visitor puts $0.10 and $0.20 goods into his chart. The order total will be $0.30000000000000004. That would surprise anyone.
But why does this happen?
A number is stored in memory in its binary form, a sequence of ones and zeroes. But fractions like 0.1, 0.2 that look simple in the decimal numeric system are actually unending fractions in their binary form.
In other words, what is 0.1? It is one divided by ten 1/10, one-tenth. In decimal numeral system such numbers are easily representable. Compare it to one-third: 1/3. It becomes an endless fraction 0.33333(3).
So, division by powers 10 is guaranteed to work well in the decimal system, but division by 3 is not. For the same reason, in the binary numeral system, the division by powers of 2 is guaranteed to work, but 1/10 becomes an endless binary fraction.
There's just no way to store exactly 0.1 or exactly 0.2 using the binary system, just like there is no way to store one-third as a decimal fraction.
The numeric format IEEE-754 solves this by rounding to the nearest possible number. These rounding rules normally don't allow us to see that “tiny precision loss”, so the number shows up as 0.3. But beware, the loss still exists.
And when we sum two numbers, their “precision losses” add up.
That's why 0.1 + 0.2 is not exactly 0.3.
Not only JavaScript
The same issue exists in many other programming languages.
PHP, Java, C, Perl, Ruby give exactly the same result, because they are based on the same numeric format.
Can we work around the problem? Sure, there're a number of ways:
We can round the result with the help of a method
toFixed(n):
let sum = 0.1 + 0.2;
alert( sum.toFixed(2) ); // 0.30
Please note that toFixed always returns a string. It ensures that it has 2 digits after the decimal point. That's actually convenient if we have an e-shopping and need to show $0.30. For other cases, we can use the unary plus to coerce it into a number:
let sum = 0.1 + 0.2;
alert( +sum.toFixed(2) ); // 0.3
We can temporarily turn numbers into integers for the maths and then revert it back. It works like this:
alert( (0.1 * 10 + 0.2 * 10) / 10 ); // 0.3
This works because when we do 0.1 * 10 = 1 and 0.2 * 10 = 2 then both numbers become integers, and there's no precision loss.
If we were dealing with a shop, then the most radical solution would be to store all prices in cents and use no fractions at all. But what if we apply a discount of 30%? In practice, totally evading fractions is rarely feasible, so the solutions above help avoid this pitfall.
This suffers from the same issue: a loss of precision. There are 64 bits for the number, 52 of them can be used to store digits, but that's not enough. So the least significant digits disappear.
JavaScript doesn't trigger an error in such events. It does its best to fit the number into the desired format, but unfortunately, this format is not big enough.
Two zeroes
Another funny consequence of the internal representation of numbers is the existence of two zeroes: 0 and -0.
That's because a sign is represented by a single bit, so every number can be positive or negative, including a zero.
In most cases the distinction is unnoticeable, because operators are suited to treat them as the same.
Tests: isFinite and isNaN
Remember these two special numeric values?
Infinite (and -Infinite) is a special numeric value that is greater (less) than anything.
NaN represents an error.
They belong to the type number, but are not “normal” numbers, so there are special functions to check for them:
isNaN(value) converts its argument to a number and then tests it for being NaN:
But do we need this function? Can't we just use the comparison === NaN? Sorry, but the answer is no. The value NaN is unique in that it does not equal anything, including itself:
alert( NaN === NaN ); // false
isFinite(value) converts its argument to a number and returns true if it's a regular number, not NaN/Infinity/-Infinity:
alert( isFinite("15") ); // true
alert( isFinite("str") ); // false, because a special value: NaN
alert( isFinite(Infinity) ); // false, because a special value: Infinity
Sometimes isFinite is used to validate whether a string value is a regular number:
let num = +prompt("Enter a number", '');
// will be true unless you enter Infinity, -Infinity or not a number
alert( isFinite(num) );
Please note that an empty or a space-only string is treated as 0 in all numeric functions including isFinite.
Compare with Object.is
There is a special built-in method
Object.is that compares values like ===, but is more reliable for two edge cases:
It works with NaN: Object.is(NaN, NaN) === true, that's a good thing.
Values 0 and -0 are different: Object.is(0, -0) === false, it rarely matters, but these values technically are different.
In all other cases, Object.is(a, b) is the same as a === b.
This way of comparison is often used in JavaScript specification. When an internal algorithm needs to compare two values for being exactly the same, it uses Object.is (internally called
SameValue).
parseInt and parseFloat
Numeric conversion using a plus + or Number() is strict. If a value is not exactly a number, it fails:
alert( +"100px" ); // NaN
The sole exception is spaces at the beginning or at the end of the string, as they are ignored.
But in real life we often have values in units, like "100px" or "12pt" in CSS. Also in many countries the currency symbol goes after the amount, so we have "19€" and would like to extract a numeric value out of that.
That's what parseInt and parseFloat are for.
They “read” a number from a string until they can. In case of an error, the gathered number is returned. The function parseInt returns an integer, whilst parseFloat will return a floating-point number:
alert( parseInt('100px') ); // 100
alert( parseFloat('12.5em') ); // 12.5
alert( parseInt('12.3') ); // 12, only the integer part is returned
alert( parseFloat('12.3.4') ); // 12.3, the second point stops the reading
There are situations when parseInt/parseFloat will return NaN. It happens when no digits could be read:
alert( parseInt('a123') ); // NaN, the first symbol stops the process
The second argument of parseInt(str, radix)
The parseInt() function has an optional second parameter. It specifies the base of the numeral system, so parseInt can also parse strings of hex numbers, binary numbers and so on:
alert( parseInt('0xff', 16) ); // 255
alert( parseInt('ff', 16) ); // 255, without 0x also works
alert( parseInt('2n9c', 36) ); // 123456
Other math functions
JavaScript has a built-in
Math object which contains a small library of mathematical functions and constants.
A few examples:
Math.random()
Returns a random number from 0 to 1 (not including 1)
The precision loss can cause both increase and decrease of a number. In this particular case the number becomes a tiny bit less, that's why it rounded down.
Note that 63.5 has no precision loss at all. That's because the decimal part 0.5 is actually 1/2. Fractions divided by powers of 2 are exactly represented in the binary system, now we can round it:
function readNumber() {
let num;
do {
num = prompt("Enter a number please?", 0);
} while ( !isFinite(num) );
if (num === null || num === '') return null;
return +num;
}
alert(`Read: ${readNumber()}`);
The solution is a little bit more intricate that it could be because we need to handle null/empty lines.
So we actually accept the input until it is a “regular number”. Both null (cancel) and empty line also fit that condition, because in numeric form they are 0.
After we stopped, we need to treat null and empty line specially (return null), because converting them to a number would return 0.
The simplest, but wrong solution would be to generate a value from min to max and round it:
function randomInteger(min, max) {
let rand = min + Math.random() * (max - min);
return Math.round(rand);
}
alert( randomInteger(1, 3) );
The function works, but it is incorrect. The probability to get edge values min and max is two times less than any other.
If you run the example above many times, you would easily see that 2 appears the most often.
That happens because Math.round() gets random numbers from the interval 1..3 and rounds them as follows:
values from 1 ... to 1.4999999999 become 1
values from 1.5 ... to 2.4999999999 become 2
values from 2.5 ... to 2.9999999999 become 3
Now we can clearly see that 1 gets twice less values than 2. And the same with 3.
The correct solution
There are many correct solutions to the task. One of them is to adjust interval borders. To ensure the same intervals, we can generate values from 0.5 to 2.5, thus adding the required probabilities to the edges:
function randomInteger(min, max) {
// now rand is from (min-0.5) to (max+0.5)
let rand = min - 0.5 + Math.random() * (max - min + 1);
return Math.round(rand);
}
alert( randomInteger(1, 3) );
An alternative way could be to use Math.floor for a random number from min to max+1:
function randomInteger(min, max) {
// here rand is from min to (max+1)
let rand = min + Math.random() * (max + 1 - min);
return Math.floor(rand);
}
alert( randomInteger(1, 3) );
Now all intervals are mapped this way:
values from 1 ... to 1.9999999999 become 1
values from 2 ... to 2.9999999999 become 2
values from 3 ... to 3.9999999999 become 3
All intervals have the same length, making the final distribution uniform.
Strings
In JavaScript, the textual data is stored as strings. There is no separate type for a single character.
The internal format for strings is always
UTF-16, it is not tied to the page encoding.
Quotes
Let's recall the kinds of quotes.
Strings can be enclosed within either single quotes, double quotes or backticks:
let single = 'single-quoted';
let double = "double-quoted";
let backticks = `backticks`;
Single and double quotes are essentially the same. Backticks, however, allow us to embed any expression into the string, including function calls:
function sum(a, b) {
return a + b;
}
alert(`1 + 2 = ${sum(1, 2)}.`); // 1 + 2 = 3.
Another advantage of using backticks is that they allow a string to span multiple lines:
let guestList = `Guests:
* John
* Pete
* Mary
`;
alert(guestList); // a list of guests, multiple lines
If we try to use single or double quotes in the same way, there will be an error:
Single and double quotes come from ancient times of language creation when the need for multiline strings was not taken into account. Backticks appeared much later and thus are more versatile.
Backticks also allow us to specify a “template function” before the first backtick. The syntax is: func`string`. The function func is called automatically, receives the string and embedded expressions and can process them. You can read more about it in the
docs. This is called “tagged templates”. This feature makes it easier to wrap strings into custom templating or other functionality, but it is rarely used.
Special characters
It is still possible to create multiline strings with single quotes by using a so-called “newline character”, written as \n, which denotes a line break:
let guestList = "Guests:\n * John\n * Pete\n * Mary";
alert(guestList); // a multiline list of guests
For example, these two lines describe the same:
alert( "Hello\nWorld" ); // two lines using a "newline symbol"
// two lines using a normal newline and backticks
alert( `Hello
World` );
There are other, less common “special” characters as well. Here's the list:
All special characters start with a backslash character \. It is also called an “escape character”.
We would also use it if we want to insert a quote into the string.
For instance:
alert( 'I\'m the Walrus!' ); // I'm the Walrus!
As you can see, we have to prepend the inner quote by the backslash \', because otherwise it would indicate the string end.
Of course, that refers only to the quotes that are same as the enclosing ones. So, as a more elegant solution, we could switch to double quotes or backticks instead:
alert( `I'm the Walrus!` ); // I'm the Walrus!
Note that the backslash \ serves for the correct reading of the string by JavaScript, then disappears. The in-memory string has no \. You can clearly see that in alert from the examples above.
But what if we need to show an actual backslash \ within the string?
That's possible, but we need to double it like \\:
alert( `The backslash: \\` ); // The backslash: \
String length
The length property has the string length:
alert( `My\n`.length ); // 3
Note that \n is a single “special” character, so the length is indeed 3.
length is a property
People with a background in some other languages sometimes mistype by calling str.length() instead of just str.length. That doesn't work.
Please note that str.length is a numeric property, not a function. There is no need to add brackets after it.
Accessing characters
To get a character at position pos, use square brackets [pos] or call the method
str.charAt(pos). The first character starts from the zero position:
let str = `Hello`;
// the first character
alert( str[0] ); // H
alert( str.charAt(0) ); // H
// the last character
alert( str[str.length - 1] ); // o
The square brackets are a modern way of getting a character, while charAt exists mostly for historical reasons.
The only difference between them is that if no character is found, [] returns undefined, and charAt returns an empty string:
It looks for the substr in str, starting from the given position pos, and returns the position where the match was found or -1 if nothing can be found.
For instance:
let str = 'Widget with id';
alert( str.indexOf('Widget') ); // 0, because 'Widget' is found at the beginning
alert( str.indexOf('widget') ); // -1, not found, the search is case-sensitive
alert( str.indexOf("id") ); // 1, "id" is found at the position 1 (..idget with id)
The optional second parameter allows us to search starting from the given position.
For instance, the first occurrence of "id" is at position 1. To look for the next occurrence, let's start the search from position 2:
let str = 'Widget with id';
alert( str.indexOf('id', 2) ) // 12
If we're interested in all occurrences, we can run indexOf in a loop. Every new call is made with the position after the previous match:
let str = 'As sly as a fox, as strong as an ox';
let target = 'as'; // let's look for it
let pos = 0;
while (true) {
let foundPos = str.indexOf(target, pos);
if (foundPos == -1) break;
alert( `Found at ${foundPos}` );
pos = foundPos + 1; // continue the search from the next position
}
The same algorithm can be layed out shorter:
let str = "As sly as a fox, as strong as an ox";
let target = "as";
let pos = -1;
while ((pos = str.indexOf(target, pos + 1)) != -1) {
alert( pos );
}
str.lastIndexOf(pos)
There is also a similar method
str.lastIndexOf(pos) that searches from the end of a string to its beginning.
It would list the occurrences in the reverse order.
There is a slight inconvenience with indexOf in the if test. We can't put it in the if like this:
let str = "Widget with id";
if (str.indexOf("Widget")) {
alert("We found it"); // doesn't work!
}
The alert in the example above doesn't show because str.indexOf("Widget") returns 0 (meaning that it found the match at the starting position). Right, but if considers 0 to be false.
So, we should actually check for -1, like this:
let str = "Widget with id";
if (str.indexOf("Widget") != -1) {
alert("We found it"); // works now!
}
The bitwise NOT trick
One of the old tricks used here is the
bitwise NOT~ operator. It converts the number to a 32-bit integer (removes the decimal part if exists) and then reverses all bits in its binary representation.
For 32-bit integers the call ~n means exactly the same as -(n+1) (due to IEEE-754 format).
For instance:
alert( ~2 ); // -3, the same as -(2+1)
alert( ~1 ); // -2, the same as -(1+1)
alert( ~0 ); // -1, the same as -(0+1)
alert( ~-1 ); // 0, the same as -(-1+1)
As we can see, ~n is zero only if n == -1.
So, the test if ( ~str.indexOf("...") ) is truthy that the result of indexOf is not -1. In other words, when there is a match.
People use it to shorten indexOf checks:
let str = "Widget";
if (~str.indexOf("Widget")) {
alert( 'Found it!' ); // works
}
It is usually not recommended to use language features in a non-obvious way, but this particular trick is widely used in old code, so we should understand it.
Just remember: if (~str.indexOf(...)) reads as “if found”.
includes, startsWith, endsWith
The more modern method
str.includes(substr, pos) returns true/false depending on whether str contains substr within.
It's the right choice if we need to test for the match, but don't need its position:
alert( "Widget".startsWith("Wid") ); // true, "Widget" starts with "Wid"
alert( "Widget".endsWith("get") ); // true, "Widget" ends with "get"
Getting a substring
There are 3 methods in JavaScript to get a substring: substring, substr and slice.
str.slice(start [, end])
Returns the part of the string from start to (but not including) end.
For instance:
let str = "stringify";
alert( str.slice(0, 5) ); // 'strin', the substring from 0 to 5 (not including 5)
alert( str.slice(0, 1) ); // 's', from 0 to 1, but not including 1, so only character at 0
If there is no second argument, then slice goes till the end of the string:
let str = "stringify";
alert( str.slice(2) ); // ringify, from the 2nd position till the end
Negative values for start/end are also possible. They mean the position is counted from the string end:
let str = "stringify";
// start at the 4th position from the right, end at the 1st from the right
alert( str.slice(-4, -1) ); // gif
str.substring(start [, end])
Returns the part of the string betweenstart and end.
This is almost the same as slice, but it allows start to be greater than end.
For instance:
let str = "stringify";
// these are same for substring
alert( str.substring(2, 6) ); // "ring"
alert( str.substring(6, 2) ); // "ring"
// ...but not for slice:
alert( str.slice(2, 6) ); // "ring" (the same)
alert( str.slice(6, 2) ); // "" (an empty string)
Negative arguments are (unlike slice) not supported, they are treated as 0.
str.substr(start [, length])
Returns the part of the string from start, with the given length.
In contrast with the previous methods, this one allows us to specify the length instead of the ending position:
let str = "stringify";
alert( str.substr(2, 4) ); // ring, from the 2nd position get 4 characters
The first argument may be negative, to count from the end:
let str = "stringify";
alert( str.substr(-4, 2) ); // gi, from the 4th position get 2 characters
Let's recap these methods to avoid any confusion:
method
selects…
negatives
slice(start, end)
from start to end
allows negatives
substring(start, end)
between start and end
negative values mean 0
substr(start, length)
from start get length characters
allows negative start
Which one to choose?
All of them can do the job. Formally, substr has a minor drawback: it is described not in the core JavaScript specification, but in Annex B, which covers browser-only features that exist mainly for historical reasons. So, non-browser environments may fail to support it. But in practice it works everywhere.
The author finds himself using slice almost all the time.
Comparing strings
As we know from the chapter
Comparisons, strings are compared character-by-character in alphabetical order.
Although, there are some oddities.
A lowercase letter is always greater than the uppercase:
alert( 'a' > 'Z' ); // true
Letters with diacritical marks are “out of order”:
alert( 'Österreich' > 'Zealand' ); // true
This may lead to strange results if we sort these country names. Usually people would expect Zealand to come after Österreich in the list.
To understand what happens, let's review the internal representation of strings in JavaScript.
All strings are encoded using
UTF-16. That is: each character has a corresponding numeric code. There are special methods that allow to get the character for the code and back.
str.codePointAt(pos)
Returns the code for the character at position pos:
// different case letters have different codes
alert( "z".codePointAt(0) ); // 122
alert( "Z".codePointAt(0) ); // 90
String.fromCodePoint(code)
Creates a character by its numeric code
alert( String.fromCodePoint(90) ); // Z
We can also add unicode characters by their codes using \u followed by the hex code:
// 90 is 5a in hexadecimal system
alert( '\u005a' ); // Z
Now let's see the characters with codes 65..220 (the latin alphabet and a little bit extra) by making a string of them:
See? Capital characters go first, then a few special ones, then lowercase characters.
Now it becomes obvious why a > Z.
The characters are compared by their numeric code. The greater code means that the character is greater. The code for a (97) is greater than the code for Z (90).
All lowercase letters go after uppercase letters because their codes are greater.
Some letters like Ö stand apart from the main alphabet. Here, it's code is greater than anything from a to z.
Correct comparisons
The “right” algorithm to do string comparisons is more complex than it may seem, because alphabets are different for different languages. The same-looking letter may be located differently in different alphabets.
So, the browser needs to know the language to compare.
Luckily, all modern browsers (IE10- requires the additional library
Intl.JS) support the internationalization standard
ECMA 402.
It provides a special method to compare strings in different languages, following their rules.
This method actually has two additional arguments specified in
the documentation, which allows it to specify the language (by default taken from the environment) and setup additional rules like case sensitivity or should "a" and "á" be treated as the same etc.
Internals, Unicode
Advanced knowledge
The section goes deeper into string internals. This knowledge will be useful for you if you plan to deal with emoji, rare mathematical of hieroglyphs characters or other rare symbols.
You can skip the section if you don't plan to support them.
Surrogate pairs
Most symbols have a 2-byte code. Letters in most european languages, numbers, and even most hieroglyphs, have a 2-byte representation.
But 2 bytes only allow 65536 combinations and that's not enough for every possible symbol. So rare symbols are encoded with a pair of 2-byte characters called “a surrogate pair”.
The length of such symbols is 2:
alert( '𝒳'.length ); // 2, MATHEMATICAL SCRIPT CAPITAL X
alert( '😂'.length ); // 2, FACE WITH TEARS OF JOY
alert( '𩷶'.length ); // 2, a rare chinese hieroglyph
Note that surrogate pairs did not exist at the time when JavaScript was created, and thus are not correctly processed by the language!
We actually have a single symbol in each of the strings above, but the length shows a length of 2.
String.fromCodePoint and str.codePointAt are few rare methods that deal with surrogate pairs right. They recently appeared in the language. Before them, there were only
String.fromCharCode and
str.charCodeAt. These methods are actually the same as fromCodePoint/codePointAt, but don't work with surrogate pairs.
But, for instance, getting a symbol can be tricky, because surrogate pairs are treated as two characters:
alert( '𝒳'[0] ); // strange symbols...
alert( '𝒳'[1] ); // ...pieces of the surrogate pair
Note that pieces of the surrogate pair have no meaning without each other. So the alerts in the example above actually display garbage.
Technically, surrogate pairs are also detectable by their codes: if a character has the code in the interval of 0xd800..0xdbff, then it is the first part of the surrogate pair. The next character (second part) must have the code in interval 0xdc00..0xdfff. These intervals are reserved exclusively for surrogate pairs by the standard.
In the case above:
// charCodeAt is not surrogate-pair aware, so it gives codes for parts
alert( '𝒳'.charCodeAt(0).toString(16) ); // d835, between 0xd800 and 0xdbff
alert( '𝒳'.charCodeAt(1).toString(16) ); // dcb3, between 0xdc00 and 0xdfff
You will find more ways to deal with surrogate pairs later in the chapter
Iterables. There are probably special libraries for that too, but nothing famous enough to suggest here.
Diacritical marks and normalization
In many languages there are symbols that are composed of the base character with a mark above/under it.
For instance, the letter a can be the base character for: àáâäãåā. Most common “composite” character have their own code in the UTF-16 table. But not all of them, because there are too many possible combinations.
To support arbitrary compositions, UTF-16 allows us to use several unicode characters. The base character and one or many “mark” characters that “decorate” it.
For instance, if we have S followed by the special “dot above” character (code \u0307), it is shown as Ṡ.
alert( 'S\u0307' ); // Ṡ
If we need an additional mark above the letter (or below it) – no problem, just add the necessary mark character.
For instance, if we append a character “dot below” (code \u0323), then we'll have “S with dots above and below”: Ṩ.
For example:
alert( 'S\u0307\u0323' ); // Ṩ
This provides great flexibility, but also an interesting problem: two characters may visually look the same, but be represented with different unicode compositions.
In reality, this is not always the case. The reason being that the symbol Ṩ is “common enough”, so UTF-16 creators included it in the main table and gave it the code.
If you want to learn more about normalization rules and variants – they are described in the appendix of the Unicode standard:
Unicode Normalization Forms, but for most practical purposes the information from this section is enough.
Summary
There are 3 types of quotes. Backticks allow a string to span multiple lines and embed expressions.
Strings in JavaScript are encoded using UTF-16.
We can use special characters like \n and insert letters by their unicode using \u....
To get a character, use: [].
To get a substring, use: slice or substring.
To lowercase/uppercase a string, use: toLowerCase/toUpperCase.
To look for a substring, use: indexOf, or includes/startsWith/endsWith for simple checks.
To compare strings according to the language, use: localeCompare, otherwise they are compared by character codes.
There are several other helpful methods in strings:
str.trim() – removes (“trims”) spaces from the beginning and end of the string.
Strings also have methods for doing search/replace with regular expressions. But that topic deserves a separate chapter, so we'll return to that later.
Create a function truncate(str, maxlength) that checks the length of the str and, if it exceeds maxlength – replaces the end of str with the ellipsis character "…", to make its length equal to maxlength.
The result of the function should be the truncated (if needed) string.
For instance:
truncate("What I'd like to tell on this topic is:", 20) = "What I'd like to te…"
truncate("Hi everyone!", 20) = "Hi everyone!"
Objects allow to store keyed collections of values. That's fine.
But quite often we find that we need an ordered collection, where we have a 1st, a 2nd, a 3rd element and so on. For example, we need that to store a list of something: users, goods, HTML elements etc.
It is not convenient to use an object here, because it provides no methods to manage the order of elements. We can't insert a new property “between” the existing ones. Objects are just not meant for such use.
There exists a special data structure named Array, to store ordered collections.
Declaration
There are two syntaxes for creating an empty array:
let arr = new Array();
let arr = [];
Almost all the time, the second syntax is used. We can supply initial elements in the brackets:
let fruits = ["Apple", "Orange", "Plum"];
Array elements are numbered, starting with zero.
We can get an element by its number in square brackets:
// mix of values
let arr = [ 'Apple', { name: 'John' }, true, function() { alert('hello'); } ];
// get the object at index 1 and then show its name
alert( arr[1].name ); // John
// get the function at index 3 and run it
arr[3](); // hello
Trailing comma
An array, just like an object, may end with a comma:
let fruits = [
"Apple",
"Orange",
"Plum",
];
The “trailing comma” style makes it easier to insert/remove items, because all lines become alike.
Methods pop/push, shift/unshift
A
queue is one of most common uses of an array. In computer science, this means an ordered collection of elements which supports two operations:
push appends an element to the end.
shift get an element from the beginning, advancing the queue, so that the 2nd element becomes the 1st.
Arrays support both operations.
In practice we meet it very often. For example, a queue of messages that need to be shown on-screen.
There's another use case for arrays – the data structure named
stack.
It supports two operations:
push adds an element to the end.
pop takes an element from the end.
So new elements are added or taken always from the “end”.
A stack is usually illustrated as a pack of cards: new cards are added to the top or taken from the top:
For stacks, the latest pushed item is received first, that's also called LIFO (Last-In-First-Out) principle. For queues, we have FIFO (First-In-First-Out).
Arrays in JavaScript can work both as a queue and as a stack. They allow to add/remove elements both to/from the beginning or the end.
In computer science the data structure that allows it is called
deque.
Methods that work with the end of the array:
pop
Extracts the last element of the array and returns it:
let fruits = ["Apple", "Orange", "Pear"];
alert( fruits.pop() ); // remove "Pear" and alert it
alert( fruits ); // Apple, Orange
An array is a special kind of object. The square brackets used to access a property arr[0] actually come from the object syntax. Numbers are used as keys.
They extend objects providing special methods to work with ordered collections of data and also the length property. But at the core it's still an object.
Remember, there are only 7 basic types in JavaScript. Array is an object and thus behaves like an object.
For instance, it is copied by reference:
let fruits = ["Banana"]
let arr = fruits; // copy by reference (two variables reference the same array)
alert( arr === fruits ); // true
arr.push("Pear"); // modify the array by reference
alert( fruits ); // Banana, Pear - 2 items now
…But what makes arrays really special is their internal representation. The engine tries to store its elements in the contiguous memory area, one after another, just as depicted on the illustrations in this chapter, and there are other optimizations as well, to make arrays work really fast.
But they all break if we quit working with an array as with an “ordered collection” and start working with it as if it were a regular object.
For instance, technically we can do this:
let fruits = []; // make an array
fruits[99999] = 5; // assign a property with the index far greater than its length
fruits.age = 25; // create a property with an arbitrary name
That's possible, because arrays are objects at their base. We can add any properties to them.
But the engine will see that we're working with the array as with a regular object. Array-specific optimizations are not suited for such cases and will be turned off, their benefits disappear.
The ways to misuse an array:
Add a non-numeric property like arr.test = 5.
Make holes, like: add arr[0] and then arr[1000] (and nothing between them).
Fill the array in the reverse order, like arr[1000], arr[999] and so on.
Please think of arrays as special structures to work with the ordered data. They provide special methods for that. Arrays are carefully tuned inside JavaScript engines to work with contiguous ordered data, please use them this way. And if you need arbitrary keys, chances are high that you actually require a regular object {}.
Performance
Methods push/pop run fast, while shift/unshift are slow.
Why is it faster to work with the end of an array than with its beginning? Let's see what happens during the execution:
fruits.shift(); // take 1 element from the start
It's not enough to take and remove the element with the number 0. Other elements need to be renumbered as well.
The shift operation must do 3 things:
Remove the element with the index 0.
Move all elements to the left, renumber them from the index 1 to 0, from 2 to 1 and so on.
Update the length property.
The more elements in the array, the more time to move them, more in-memory operations.
The similar thing happens with unshift: to add an element to the beginning of the array, we need first to move existing elements to the right, increasing their indexes.
And what's with push/pop? They do not need to move anything. To extract an element from the end, the pop method cleans the index and shortens length.
The pop method does not need to move anything, because other elements keep their indexes. That's why it's blazingly fast.
The similar thing with the push method.
Loops
One of the oldest ways to cycle array items is the for loop over indexes:
let arr = ["Apple", "Orange", "Pear"];
for (let i = 0; i < arr.length; i++) {
alert( arr[i] );
}
But for arrays there is another form of loop, for..of:
let fruits = ["Apple", "Orange", "Plum"];
// iterates over array elements
for (let fruit of fruits) {
alert( fruit );
}
The for..of doesn't give access to the number of the current element, just its value, but in most cases that's enough. And it's shorter.
Technically, because arrays are objects, it is also possible to use for..in:
let arr = ["Apple", "Orange", "Pear"];
for (let key in arr) {
alert( arr[key] ); // Apple, Orange, Pear
}
But that's actually a bad idea. There are potential problems with it:
The loop for..in iterates over all properties, not only the numeric ones.
There are so-called “array-like” objects in the browser and in other environments, that look like arrays. That is, they have length and indexes properties, but they may also have other non-numeric properties and methods, which we usually don't need. The for..in loop will list them though. So if we need to work with array-like objects, then these “extra” properties can become a problem.
The for..in loop is optimized for generic objects, not arrays, and thus is 10-100 times slower. Of course, it's still very fast. The speedup may matter only in bottlenecks or just irrelevant. But still we should be aware of the difference.
Generally, we shouldn't use for..in for arrays.
A word about “length”
The length property automatically updates when we modify the array. To be precise, it is actually not the count of values in the array, but the greatest numeric index plus one.
For instance, a single element with a large index gives a big length:
Another interesting thing about the length property is that it's writable.
If we increase it manually, nothing interesting happens. But if we decrease it, the array is truncated. The process is irreversible, here's the example:
let arr = [1, 2, 3, 4, 5];
arr.length = 2; // truncate to 2 elements
alert( arr ); // [1, 2]
arr.length = 5; // return length back
alert( arr[3] ); // undefined: the values do not return
So, the simplest way to clear the array is: arr.length = 0;.
new Array()
There is one more syntax to create an array:
let arr = new Array("Apple", "Pear", "etc");
It's rarely used, because square brackets [] are shorter. Also there's a tricky feature with it.
If new Array is called with a single argument which is a number, then it creates an array without items, but with the given length.
Let's see how one can shoot himself in the foot:
let arr = new Array(2); // will it create an array of [2] ?
alert( arr[0] ); // undefined! no elements.
alert( arr.length ); // length 2
In the code above, new Array(number) has all elements undefined.
To evade such surprises, we usually use square brackets, unless we really know what we're doing.
Multidimensional arrays
Arrays can have items that are also arrays. We can use it for multidimensional arrays, to store matrices:
let matrix = [
[1, 2, 3],
[4, 5, 6],
[7, 8, 9]
];
alert( matrix[1][1] ); // the central element
toString
Arrays have their own implementation of toString method that returns a comma-separated list of elements.
Arrays do not have Symbol.toPrimitive, neither a viable valueOf, they implement only toString conversion, so here [] becomes an empty string, [1] becomes "1" and [1,2] becomes "1,2".
When the binary plus "+" operator adds something to a string, it converts it to a string as well, so the next step looks like this:
let fruits = ["Apples", "Pear", "Orange"];
// push a new value into the "copy"
let shoppingCart = fruits;
shoppingCart.push("Banana");
// what's in fruits?
alert( fruits.length ); // ?
The result is 4:
let fruits = ["Apples", "Pear", "Orange"];
let shoppingCart = fruits;
shoppingCart.push("Banana");
alert( fruits.length ); // 4
That's because arrays are objects. So both shoppingCart and fruits are the references to the same array.
Please note the subtle, but important detail of the solution. We don't convert value to number instantly after prompt, because after value = +value we would not be able to tell an empty string (stop sign) from the zero (valid number). We do it later instead.
function sumInput() {
let numbers = [];
while (true) {
let value = prompt("A number please?", 0);
// should we cancel?
if (value === "" || value === null || !isFinite(value)) break;
numbers.push(+value);
}
let sum = 0;
for (let number of numbers) {
sum += number;
}
return sum;
}
alert( sumInput() );
The code is actually a nested loop: the external loop over array elements, and the internal counts subsums starting with the current element.
function getMaxSubSum(arr) {
let maxSum = 0; // if we take no elements, zero will be returned
for (let i = 0; i < arr.length; i++) {
let sumFixedStart = 0;
for (let j = i; j < arr.length; j++) {
sumFixedStart += arr[j];
maxSum = Math.max(maxSum, sumFixedStart);
}
}
return maxSum;
}
alert( getMaxSubSum([-1, 2, 3, -9]) ); // 5
alert( getMaxSubSum([-1, 2, 3, -9, 11]) ); // 11
alert( getMaxSubSum([-2, -1, 1, 2]) ); // 3
alert( getMaxSubSum([1, 2, 3]) ); // 6
alert( getMaxSubSum([100, -9, 2, -3, 5]) ); // 100
The solution has a time complexety of
O(n2). In other words, if we increase the array size 2 times, the algorithm will work 4 times longer.
For big arrays (1000, 10000 or more items) such algorithms can lead to a seroius sluggishness.
Fast solution
Let's walk the array and keep the current partial sum of elements in the variable s. If s becomes negative at some point, then assign s=0. The maximum of all such s will be the answer.
If the description is too vague, please see the code, it's short enough:
function getMaxSubSum(arr) {
let maxSum = 0;
let partialSum = 0;
for (let item of arr) { // for each item of arr
partialSum += item; // add it to partialSum
maxSum = Math.max(maxSum, partialSum); // remember the maximum
if (partialSum < 0) partialSum = 0; // zero if negative
}
return maxSum;
}
alert( getMaxSubSum([-1, 2, 3, -9]) ); // 5
alert( getMaxSubSum([-1, 2, 3, -9, 11]) ); // 11
alert( getMaxSubSum([-2, -1, 1, 2]) ); // 3
alert( getMaxSubSum([100, -9, 2, -3, 5]) ); // 100
alert( getMaxSubSum([1, 2, 3]) ); // 6
alert( getMaxSubSum([-1, -2, -3]) ); // 0
The algorithm requires exactly 1 array pass, so the time complexity is O(n).
You can find more detail information about the algorithm here:
Maximum subarray problem. If it's still not obvious why that works, then please trace the algorithm on the examples above, see how it works, that's better than any words.
The element was removed, but the array still has 3 elements, we can see that arr.length == 3.
That's natural, because delete obj.key removes a value by the key. It's all it does. Fine for objects. But for arrays we usually want the rest of elements to shift and occupy the freed place. We expect to have a shorter array now.
So, special methods should be used.
The
arr.splice(str) method is a swiss army knife for arrays. It can do everything: add, remove and insert elements.
It starts from the position index: removes deleteCount elements and then inserts elem1, ..., elemN at their place. Returns the array of removed elements.
This method is easy to grasp by examples.
Let's start with the deletion:
let arr = ["I", "study", "JavaScript"];
arr.splice(1, 1); // from index 1 remove 1 element
alert( arr ); // ["I", "JavaScript"]
Easy, right? Starting from the index 1 it removed 1 element.
In the next example we remove 3 elements and replace them with the other two:
let arr = ["I", "study", "JavaScript", "right", "now"];
// remove 3 first elements and replace them with another
arr.splice(0, 3, "Let's", "dance");
alert( arr ) // now ["Let's", "dance", "right", "now"]
Here we can see that splice returns the array of removed elements:
let arr = ["I", "study", "JavaScript", "right", "now"];
// remove 2 first elements
let removed = arr.splice(0, 2);
alert( removed ); // "I", "study" <-- array of removed elements
The splice method is also able to insert the elements without any removals. For that we need to set deleteCount to 0:
let arr = ["I", "study", "JavaScript"];
// from index 2
// delete 0
// then insert "complex" and "language"
arr.splice(2, 0, "complex", "language");
alert( arr ); // "I", "study", "complex", "language", "JavaScript"
Negative indexes allowed
Here and in other array methods, negative indexes are allowed. They specify the position from the end of the array, like here:
let arr = [1, 2, 5];
// from index -1 (one step from the end)
// delete 0 elements,
// then insert 3 and 4
arr.splice(-1, 0, 3, 4);
alert( arr ); // 1,2,3,4,5
slice
The method
arr.slice is much simpler than similar-looking arr.splice.
The syntax is:
arr.slice(start, end)
It returns a new array where it copies all items start index "start" to "end" (not including "end"). Both start and end can be negative, in that case position from array end is assumed.
It works like str.slice, but makes subarrays instead of substrings.
For instance:
let str = "test";
let arr = ["t", "e", "s", "t"];
alert( str.slice(1, 3) ); // es
alert( arr.slice(1, 3) ); // e,s
alert( str.slice(-2) ); // st
alert( arr.slice(-2) ); // s,t
concat
The method
arr.concat joins the array with other arrays and/or items.
The syntax is:
arr.concat(arg1, arg2...)
It accepts any number of arguments – either arrays or values.
The result is a new array containing items from arr, then arg1, arg2 etc.
If an argument is an array or has Symbol.isConcatSpreadable property, then all its elements are copied. Otherwise, the argument itself is copied.
For instance:
let arr = [1, 2];
// merge arr with [3,4]
alert( arr.concat([3, 4])); // 1,2,3,4
// merge arr with [3,4] and [5,6]
alert( arr.concat([3, 4], [5, 6])); // 1,2,3,4,5,6
// merge arr with [3,4], then add values 5 and 6
alert( arr.concat([3, 4], 5, 6)); // 1,2,3,4,5,6
Normally, it only copies elements from arrays (“spreads” them). Other objects, even if they look like arrays, added as a whole:
These are methods to search for something in an array.
indexOf/lastIndexOf and includes
The methods
arr.indexOf,
arr.lastIndexOf and
arr.includes have the same syntax and do essentially the same as their string counterparts, but operate on items instead of characters:
arr.indexOf(item, from) looks for item starting from index from, and returns the index where it was found, otherwise -1.
arr.lastIndexOf(item, from) – same, but looks from right to left.
arr.includes(item, from) – looks for item starting from index from, returns true if found.
let arr = [ 1, 2, 15 ];
// the method reorders the content of arr (and returns it)
arr.sort();
alert( arr ); // 1, 15, 2
Did you notice anything strange in the outcome?
The order became 1, 15, 2. Incorrect. But why?
The items are sorted as strings by default.
Literally, all elements are converted to strings and then compared. So, the lexicographic ordering is applied and indeed "2" > "15".
To use our own sorting order, we need to supply a function of two arguments as the argument of arr.sort().
The function should work like this:
function compare(a, b) {
if (a > b) return 1;
if (a == b) return 0;
if (a < b) return -1;
}
For instance:
function compareNumeric(a, b) {
if (a > b) return 1;
if (a == b) return 0;
if (a < b) return -1;
}
let arr = [ 1, 2, 15 ];
arr.sort(compareNumeric);
alert(arr); // 1, 2, 15
Now it works as intended.
Let's step aside and think what's happening. The arr can be array of anything, right? It may contain numbers or strings or html elements or whatever. We have a set of something. To sort it, we need an ordering function that knows how to compare its elements. The default is a string order.
The arr.sort(fn) method has a built-in implementation of sorting algorithm. We don't need to care how it exactly works (an optimized
quicksort most of the time). It will walk the array, compare its elements using the provided function and reorder them, all we need is to provide the fn which does the comparison.
By the way, if we ever want to know which elements are compared – nothing prevents from alerting them:
[1, -2, 15, 2, 0, 8].sort(function(a, b) {
alert( a + " <> " + b );
});
The algorithm may compare an element multiple times in the process, but it tries to make as few comparisons as possible.
A comparison function may return any number
Actually, a comparison function is only required to return a positive number to say “greater” and a negative number to say “less”.
That allows to write shorter functions:
let arr = [ 1, 2, 15 ];
arr.sort(function(a, b) { return a - b; });
alert(arr); // 1, 2, 15
Arrow functions for the best
Remember Article "function-expression" not found? We can use them here for neater sorting:
arr.sort( (a, b) => a - b );
This works exactly the same as the other, longer, version above.
reverse
The method
arr.reverse reverses the order of elements in arr.
Here's the situation from the real life. We are writing a messaging app, and the person enters the comma-delimited list of receivers: John, Pete, Mary. But for us an array of names would be much more comfortable than a single string. How to get it?
The
str.split(delim) method does exactly that. It splits the string into an array by the given delimiter delim.
In the example below, we split by a comma followed by space:
let names = 'Bilbo, Gandalf, Nazgul';
let arr = names.split(', ');
for (let name of arr) {
alert( `A message to ${name}.` ); // A message to Bilbo (and other names)
}
The split method has an optional second numeric argument – a limit on the array length. If it is provided, then the extra elements are ignored. In practice it is rarely used though:
The call to split(s) with an empty s would split the string into an array of letters:
let str = "test";
alert( str.split('') ); // t,e,s,t
The call
arr.join(str) does the reverse to split. It creates a string of arr items glued by str between them.
For instance:
let arr = ['Bilbo', 'Gandalf', 'Nazgul'];
let str = arr.join(';');
alert( str ); // Bilbo;Gandalf;Nazgul
reduce/reduceRight
When we need to iterate over an array – we can use forEach.
When we need to iterate and return the data for each element – we can use map.
The methods
arr.reduce and
arr.reduceRight also belong to that breed, but are a little bit more intricate. They are used to calculate a single value based on the array.
The syntax is:
let value = arr.reduce(function(previousValue, item, index, arr) {
// ...
}, initial);
The function is applied to the elements. You may notice the familiar arguments, starting from the 2nd:
item – is the current array item.
index – is its position.
arr – is the array.
So far, like forEach/map. But there's one more argument:
previousValue – is the result of the previous function call, initial for the first call.
The easiest way to grasp that is by example.
Here we get a sum of array in one line:
let arr = [1, 2, 3, 4, 5];
let result = arr.reduce((sum, current) => sum + current, 0);
alert(result); // 15
Here we used the most common variant of reduce which uses only 2 arguments.
Let's see the details of what's going on.
On the first run, sum is the initial value (the last argument of reduce), equals 0, and current is the first array element, equals 1. So the result is 1.
On the second run, sum = 1, we add the second array element (2) to it and return.
On the 3rd run, sum = 3 and we add one more element to it, and so on…
The calculation flow:
Or in the form of a table, where each row represents is a function call on the next array element:
sum
current
result
the first call
0
1
1
the second call
1
2
3
the third call
3
3
6
the fourth call
6
4
10
the fifth call
10
5
15
As we can see, the result of the previous call becomes the first argument of the next one.
We also can omit the initial value:
let arr = [1, 2, 3, 4, 5];
// removed initial value from reduce (no 0)
let result = arr.reduce((sum, current) => sum + current);
alert( result ); // 15
The result is the same. That's because if there's no initial, then reduce takes the first element of the array as the initial value and starts the iteration from the 2nd element.
The calculation table is the same as above, minus the first row.
But such use requires an extreme care. If the array is empty, then reduce call without initial value gives an error.
Here's an example:
let arr = [];
// Error: Reduce of empty array with no initial value
// if the initial value existed, reduce would return it for the empty arr.
arr.reduce((sum, current) => sum + current);
So it's advised to always specify the initial value.
The method
arr.reduceRight does the same, but goes from right to left.
Iterate: forEach
The
arr.forEach method allows to run a function for every element of the array.
The syntax:
arr.forEach(function(item, index, array) {
// ... do something with item
});
For instance, this shows each element of the array:
// for each element call alert
["Bilbo", "Gandalf", "Nazgul"].forEach(alert);
And this code is more elaborate about their positions in the target array:
["Bilbo", "Gandalf", "Nazgul"].forEach((item, index, array) => {
alert(`${item} is at index ${index} in ${array}`);
});
The result of the function (if it returns any) is thrown away and ignored.
Array.isArray
Arrays do not form a separate language type. They are based on objects.
So typeof does not help to distinguish a plain object from an array:
alert(typeof {}); // object
alert(typeof []); // same
…But arrays are used so often that there's a special method for that:
Array.isArray(value). It returns true if the value is an array, and false otherwise.
Almost all array methods that call functions – like find, filter, map, with a notable exception of sort, accept an optional additional parameter thisArg.
That parameter is not explained in the sections above, because it's rarely used. But for completeness we have to cover it.
Here's the full syntax of these methods:
arr.find(func, thisArg);
arr.filter(func, thisArg);
arr.map(func, thisArg);
// ...
// thisArg is the optional last argument
The value of thisArg parameter becomes this for func.
For instance, here we use an object method as a filter and thisArg comes in handy:
let user = {
age: 18,
younger(otherUser) {
return otherUser.age < this.age;
}
};
let users = [
{age: 12},
{age: 16},
{age: 32}
];
// find all users younger than user
let youngerUsers = users.filter(user.younger, user);
alert(youngerUsers.length); // 2
In the call above, we use user.younger as a filter and also provide user as the context for it. If we didn't provide the context, users.filter(user.younger) would call user.younger as a standalone function, with this=undefined. That would mean an instant error.
Summary
A cheatsheet of array methods:
To add/remove elements:
push(...items) – adds items to the end,
pop() – extracts an item from the end,
shift() – extracts an item from the beginning,
unshift(...items) – adds items to the beginning.
splice(pos, deleteCount, ...items) – at index pos delete deleteCount elements and insert items.
slice(start, end) – creates a new array, copies elements from position start till end (not inclusive) into it.
concat(...items) – returns a new array: copies all members of the current one and adds items to it. If any of items is an array, then its elements are taken.
To search among elements:
indexOf/lastIndexOf(item, pos) – look for item starting from position pos, return the index or -1 if not found.
includes(value) – returns true if the array has value, otherwise false.
find/filter(func) – filter elements through the function, return first/all values that make it return true.
findIndex is like find, but returns the index instead of a value.
To transform the array:
map(func) – creates a new array from results of calling func for every element.
sort(func) – sorts the array in-place, then returns it.
reverse() – reverses the array in-place, then returns it.
split/join – convert a string to array and back.
reduce(func, initial) – calculate a single value over the array by calling func for each element and passing an intermediate result between the calls.
To iterate over elements:
forEach(func) – calls func for every element, does not return anything.
Additionally:
Array.isArray(arr) checks arr for being an array.
Please note that methods sort, reverse and splice modify the array itself.
These methods are the most used ones, they cover 99% of use cases. But there are few others:
From the first sight it may seem that there are so many methods, quite difficult to remember. But actually that's much easier than it seems.
Look through the cheatsheet just to be aware of them. Then solve the tasks of this chapter to practice, so that you have experience with array methods.
Afterwards whenever you need to do something with an array, and you don't know how – come here, look at the cheatsheet and find the right method. Examples will help you to write it correctly. Soon you'll automatically remember the methods, without specific efforts from your side.
Write a function filterRangeInPlace(arr, a, b) that gets an array arr and removes from it all values except those that are between a and b. The test is: a ≤ arr[i] ≤ b.
The function should only modify the array. It should not return anything.
For instance:
let arr = [5, 3, 8, 1];
filterRangeInPlace(arr, 1, 4); // removed the numbers except from 1 to 4
alert( arr ); // [3, 1]
You have an array of user objects, each one has user.name. Write the code that converts it into an array of names.
For instance:
let john = { name: "John", age: 25 };
let pete = { name: "Pete", age: 30 };
let mary = { name: "Mary", age: 28 };
let users = [ john, pete, mary ];
let names = /* ... your code */
alert( names ); // John, Pete, Mary
let john = { name: "John", age: 25 };
let pete = { name: "Pete", age: 30 };
let mary = { name: "Mary", age: 28 };
let users = [ john, pete, mary ];
let names = users.map(item => item.name);
alert( names ); // John, Pete, Mary
Write the function sortByName(users) that gets an array of objects with property name and sorts it.
For instance:
let john = { name: "John", age: 25 };
let pete = { name: "Pete", age: 30 };
let mary = { name: "Mary", age: 28 };
let arr = [ john, pete, mary ];
sortByName(arr);
// now: [john, mary, pete]
alert(arr[1].name); // Mary
function sortByName(arr) {
arr.sort((a, b) => a.name > b.name);
}
let john = { name: "John", age: 25 };
let pete = { name: "Pete", age: 30 };
let mary = { name: "Mary", age: 28 };
let arr = [ john, pete, mary ];
sortByName(arr);
// now sorted is: [john, mary, pete]
alert(arr[1].name); // Mary
All element orders should have an equal probability. For instance, [1,2,3] can be reordered as [1,2,3] or [1,3,2] or [3,1,2] etc, with equal probability of each case.
The simple solution could be:
function shuffle(array) {
array.sort(() => Math.random() - 0.5);
}
let arr = [1, 2, 3];
shuffle(arr);
alert(arr);
That somewhat works, because Math.random() - 0.5 is a random number that may be positive or negative, so the sorting function reorders elements randomly.
But because the sorting function is not meant to be used this way, not all permutations have the same probability.
For instance, consider the code below. It runs shuffle 1000000 times and counts appearances of all possible results:
function shuffle(array) {
array.sort(() => Math.random() - 0.5);
}
// counts of appearances for all possible permutations
let count = {
'123': 0,
'132': 0,
'213': 0,
'231': 0,
'321': 0,
'312': 0
};
for (let i = 0; i < 1000000; i++) {
let array = [1, 2, 3];
shuffle(array);
count[array.join('')]++;
}
// show counts of all possible permutations
for (let key in count) {
alert(`${key}: ${count[key]}`);
}
We can see the bias clearly: 123 and 213 appear much more often than others.
The result of the code may vary between JavaScript engines, but we can already see that the approach is unreliable.
Why it doesn't work? Generally speaking, sort is a “black box”: we throw an array and a comparison function into it and expect the array to be sorted. But due to the utter randomness of the comparison the black box goes mad, and how exactly it goes mad depends on the concrete implementation that differs between engines.
There are other good ways to do the task. For instance, there's a great algorithm called
Fisher-Yates shuffle. The idea is to walk the array in the reverse order and swap each element with a random one before it:
function shuffle(array) {
for (let i = array.length - 1; i > 0; i--) {
let j = Math.floor(Math.random() * (i + 1)); // random index from 0 to i
[array[i], array[j]] = [array[j], array[i]]; // swap elements
}
}
Let's test it the same way:
function shuffle(array) {
for (let i = array.length - 1; i > 0; i--) {
let j = Math.floor(Math.random() * (i + 1));
[array[i], array[j]] = [array[j], array[i]];
}
}
// counts of appearances for all possible permutations
let count = {
'123': 0,
'132': 0,
'213': 0,
'231': 0,
'321': 0,
'312': 0
};
for (let i = 0; i < 1000000; i++) {
let array = [1, 2, 3];
shuffle(array);
count[array.join('')]++;
}
// show counts of all possible permutations
for (let key in count) {
alert(`${key}: ${count[key]}`);
}
For each item we'll check if the resulting array already has that item.
If it is so, then ignore, otherwise add to results.
function unique(arr) {
let result = [];
for (let str of arr) {
if (!result.includes(str)) {
result.push(str);
}
}
return result;
}
let strings = ["Hare", "Krishna", "Hare", "Krishna",
"Krishna", "Krishna", "Hare", "Hare", ":-O"
];
alert( unique(strings) ); // Hare, Krishna, :-O
The code works, but there's a potential performance problem in it.
The method result.includes(str) internally walks the array result and compares each element against str to find the match.
So if there are 100 elements in result and no one matches str, then it will walk the whole result and do exactly 100 comparisons. And if result is large, like 10000, then there would be 10000 comparisons.
That's not a problem by itself, because JavaScript engines are very fast, so walk 10000 array is a matter of microseconds.
But we do such test for each element of arr, in the for loop.
So if arr.length is 10000 we'll have something like 10000*10000 = 100 millions of comparisons. That's a lot.
Iterable objects is a generalization of arrays. That's a concept that allows to make any object useable in a for..of loop.
Arrays by themselves are iterable. But not only arrays. Strings are iterable too, and many other built-in objects as well.
Iterables are widely used by the core JavaScript. As we'll see many built-in operators and methods rely on them.
Symbol.iterator
We can easily grasp the concept of iterables by making one of our own.
For instance, we have an object, that is not an array, but looks suitable for for..of.
Like a range object that represents an interval of numbers:
let range = {
from: 1,
to: 5
};
// We want the for..of to work:
// for(let num of range) ... num=1,2,3,4,5
To make the range iterable (and thus let for..of work) we need to add a method to the object named Symbol.iterator (a special built-in symbol just for that).
When for..of starts, it calls that method (or errors if not found).
The method must return an iterator – an object with the method next.
When for..of wants the next value, it calls next() on that object.
The result of next() must have the form {done: Boolean, value: any}, where done=true means that the iteration is finished, otherwise value must be the new value.
Here's the full implementation for range:
let range = {
from: 1,
to: 5
};
// 1. call to for..of initially calls this
range[Symbol.iterator] = function() {
// 2. ...it returns the iterator:
return {
current: this.from,
last: this.to,
// 3. next() is called on each iteration by the for..of loop
next() {
// 4. it should return the value as an object {done:.., value :...}
if (this.current <= this.last) {
return { done: false, value: this.current++ };
} else {
return { done: true };
}
}
};
};
// now it works!
for (let num of range) {
alert(num); // 1, then 2, 3, 4, 5
}
There is an important separation of concerns in this code:
The range itself does not have the next() method.
Instead, another object, a so-called “iterator” is created by the call to range[Symbol.iterator](), and it handles the iteration.
So, the iterator object is separate from the object it iterates over.
Technically, we may merge them and use range itself as the iterator to make the code simpler.
Like this:
let range = {
from: 1,
to: 5,
[Symbol.iterator]() {
this.current = this.from;
return this;
},
next() {
if (this.current <= this.to) {
return { done: false, value: this.current++ };
} else {
return { done: true };
}
}
};
for (let num of range) {
alert(num); // 1, then 2, 3, 4, 5
}
Now range[Symbol.iterator]() returns the range object itself: it has the necessary next() method and remembers the current iteration progress in this.current. Sometimes that's fine too. The downside is that now it's impossible to have two for..of loops running over the object simultaneously: they'll share the iteration state, because there's only one iterator – the object itself.
Infinite iterators
Infinite iterators are also doable. For instance, the range becomes infinite for range.to = Infinity. Or we can make an iterable object that generates an infinite sequence of pseudorandom numbers. Also can be useful.
There are no limitations on next, it can return more and more values, that's normal.
Of course, the for..of loop over such an iterable would be endless. But we can always stop it using break.
String is iterable
Arrays and strings are most widely used built-in iterables.
For a string, for..of loops over its characters:
for (let char of "test") {
alert( char ); // t, then e, then s, then t
}
And it works right with surrogate pairs!
let str = '𝒳😂';
for (let char of str) {
alert( char ); // 𝒳, and then 😂
}
Calling an iterator explicitly
Normally, internals of iterables are hidden from the external code. There's a for..of loop, that works, that's all it needs to know.
But to understand things a little bit deeper let's see how to create an iterator explicitly.
We'll iterate over a string the same way as for..of, but with direct calls. This code gets a string iterator and calls it “manually”:
let str = "Hello";
// does the same as
// for (let char of str) alert(char);
let iterator = str[Symbol.iterator]();
while (true) {
let result = iterator.next();
if (result.done) break;
alert(result.value); // outputs characters one by one
}
That is rarely needed, but gives us more control over the process than for..of. For instance, we can split the iteration process: iterate a bit, then stop, do something else, and then resume later.
Iterables and array-likes
There are two official terms that look similar, but are very different. Please make sure you understand them well to avoid the confusion.
Iterables are objects that implement the Symbol.iterator method, as described above.
Array-likes are objects that have indexes and length, so they look like arrays.
Naturally, these properties can combine. For instance, strings are both iterable (for..of works on them) and array-like (they have numeric indexes and length).
But an iterable may be not array-like. And vice versa an array-like may be not iterable.
For example, the range in the example above is iterable, but not array-like, because it does not have indexed properties and length.
And here's the object that is array-like, but not iterable:
let arrayLike = { // has indexes and length => array-like
0: "Hello",
1: "World",
length: 2
};
// Error (no Symbol.iterator)
for (let item of arrayLike) {}
What they share in common – both iterables and array-likes are usually not arrays, they don't have push, pop etc. That's rather inconvenient if we have such an object and want to work with it as with an array.
Array.from
There's a universal method
Array.from that brings them together. It takes an iterable or array-like value and makes a “real” Array from it. Then we can call array methods on it.
For instance:
let arrayLike = {
0: "Hello",
1: "World",
length: 2
};
let arr = Array.from(arrayLike); // (*)
alert(arr.pop()); // World (method works)
Array.from at the line (*) takes the object, examines it for being an iterable or array-like, then makes a new array and copies there all items.
The same happens for an iterable:
// assuming that range is taken from the example above
let arr = Array.from(range);
alert(arr); // 1,2,3,4,5 (array toString conversion works)
The full syntax for Array.from allows to provide an optional “mapping” function:
Array.from(obj[, mapFn, thisArg])
The second argument mapFn should be the function to apply to each element before adding to the array, and thisArg allows to set this for it.
For instance:
// assuming that range is taken from the example above
// square each number
let arr = Array.from(range, num => num * num);
alert(arr); // 1,4,9,16,25
Here we use Array.from to turn a string into an array of characters:
let str = '𝒳😂';
// splits str into array of characters
let chars = Array.from(str);
alert(chars[0]); // 𝒳
alert(chars[1]); // 😂
alert(chars.length); // 2
Unlike str.split, it relies on the iterable nature of the string and so, just like for..of, correctly works with surrogate pairs.
Technically here it does the same as:
let str = '𝒳😂';
let chars = []; // Array.from internally does the same loop
for (let char of str) {
chars.push(char);
}
alert(chars);
…But is shorter.
We can even build surrogate-aware slice on it:
function slice(str, start, end) {
return Array.from(str).slice(start, end).join('');
}
let str = '𝒳😂𩷶';
alert( slice(str, 1, 3) ); // 😂𩷶
// native method does not support surrogate pairs
alert( str.slice(1, 3) ); // garbage (two pieces from different surrogate pairs)
Summary
Objects that can be used in for..of are called iterable.
Technically, iterables must implement the method named Symbol.iterator.
The result of obj[Symbol.iterator] is called an iterator. It handles the further iteration process.
An iterator must have the method named next() that returns an object {done: Boolean, value: any}, here done:true denotes the iteration end, otherwise the value is the next value.
The Symbol.iterator method is called automatically by for..of, but we also can do it directly.
Built-in iterables like strings or arrays, also implement Symbol.iterator.
String iterator knows about surrogate pairs.
Objects that have indexed properties and length are called array-like. Such objects may also have other properties and methods, but lack built-in methods of arrays.
If we look inside the specification – we'll see that most built-in methods assume that they work with iterables or array-likes instead of “real” arrays, because that's more abstract.
Array.from(obj[, mapFn, thisArg]) makes a real Array of an iterable or array-like obj, and then we can use array methods on it. The optional arguments mapFn and thisArg allow to apply a function to each item.
Map, Set, WeakMap and WeakSet
Now we know the following complex data structures:
Objects for storing keyed collections.
Arrays for storing ordered collections.
But that's not enough for real life. That's why there also exist Map and Set.
Map
Map is a collection of keyed data items. Just like an Object. But the main difference is that Map allows keys of any type.
The main methods are:
new Map() – creates the map.
map.set(key, value) – stores the value by the key.
map.get(key) – returns the value by the key, undefined if key doesn't exist in map.
map.has(key) – returns true if the key exists, false otherwise.
map.delete(key) – removes the value by the key.
map.clear() – clears the map
map.size – is the current elements count.
For instance:
let map = new Map();
map.set('1', 'str1'); // a string key
map.set(1, 'num1'); // a numeric key
map.set(true, 'bool1'); // a boolean key
// remember the regular Object? it would convert keys to string
// Map keeps the type, so these two are different:
alert( map.get(1) ); // 'num1'
alert( map.get('1') ); // 'str1'
alert( map.size ); // 3
As we can see, unlike objects, keys are not converted to strings. Any type of key is possible.
Map can also use objects as keys.
For instance:
let john = { name: "John" };
// for every user, let's store his visits count
let visitsCountMap = new Map();
// john is the key for the map
visitsCountMap.set(john, 123);
alert( visitsCountMap.get(john) ); // 123
Using objects as keys is one of most notable and important Map features. For string keys, Object can be fine, but it would be difficult to replace the Map with a regular Object in the example above.
In the old times, before Map existed, people added unique identifiers to objects for that:
// we add the id field
let john = { name: "John", id: 1 };
let visitsCounts = {};
// now store the value by id
visitsCounts[john.id] = 123;
alert( visitsCounts[john.id] ); // 123
…But Map is much more elegant.
How Map compares keys
To test values for equivalence, Map uses the algorithm
SameValueZero. It is roughly the same as the strict equality ===, but the difference is that NaN is considered equal to NaN. So NaN can be used as the key as well.
This algorithm can't be changed or customized.
Chaining
Every map.set call returns the map itself, so we can “chain” the calls:
When a Map is created, we can pass an array (or another iterable) with key-value pairs, like this:
// array of [key, value] pairs
let map = new Map([
['1', 'str1'],
[1, 'num1'],
[true, 'bool1']
]);
There is a built-in method
Object.entries(obj) that returns the array of key/value pairs for an object exactly in that format.
So we can initialize a map from an object like this:
let map = new Map(Object.entries({
name: "John",
age: 30
}));
Here, Object.entries returns the array of key/value pairs: [ ["name","John"], ["age", 30] ]. That's what Map needs.
Iteration over Map
For looping over a map, there are 3 methods:
map.keys() – returns an iterable for keys,
map.values() – returns an iterable for values,
map.entries() – returns an iterable for entries [key, value], it's used by default in for..of.
For instance:
let recipeMap = new Map([
['cucumber', 500],
['tomatoes', 350],
['onion', 50]
]);
// iterate over keys (vegetables)
for (let vegetable of recipeMap.keys()) {
alert(vegetable); // cucumber, tomateos, onion
}
// iterate over values (amounts)
for (let amount of recipeMap.values()) {
alert(amount); // 500, 350, 50
}
// iterate over [key, value] entries
for (let entry of recipeMap) { // the same as of recipeMap.entries()
alert(entry); // cucumber,500 (and so on)
}
The insertion order is used
The iteration goes in the same order as the values were inserted. Map preserves this order, unlike a regular Object.
Besides that, Map has a built-in forEach method, similar to Array:
Set – is a collection of values, where each value may occur only once.
The main methods are:
new Set(iterable) – creates the set, optionally from an array of values (any iterable will do).
set.add(value) – adds a value, returns the set itself.
set.delete(value) – removes the value, returns true if value existed at the moment of the call, otherwise false.
set.has(value) – returns true if the value exists in the set, otherwise false.
set.clear() – removes everything from the set.
set.size – is the elements count.
For example, we have visitors coming, and we'd like to remember everyone. But repeated visits should not lead to duplicates. A visitor must be “counted” only once.
Set is just the right thing for that:
let set = new Set();
let john = { name: "John" };
let pete = { name: "Pete" };
let mary = { name: "Mary" };
// visits, some users come multiple times
set.add(john);
set.add(pete);
set.add(mary);
set.add(john);
set.add(mary);
// set keeps only unique values
alert( set.size ); // 3
for (let user of set) {
alert(user.name); // John (then Pete and Mary)
}
The alternative to Set could be an array of users, and the code to check for duplicates on every insertion using
arr.find. But the performance would be much worse, because this method walks through the whole array checking every element. Set is much better optimized internally for uniqueness checks.
Iteration over Set
We can loop over a set either with for..of or using forEach:
let set = new Set(["oranges", "apples", "bananas"]);
for (let value of set) alert(value);
// the same with forEach:
set.forEach((value, valueAgain, set) => {
alert(value);
});
Note the funny thing. The forEach function in the Set has 3 arguments: a value, then again a value, and then the target object. Indeed, the same value appears in the arguments twice.
That's made for compatibility with Map where forEach has three arguments.
The same methods as Map has for iterators are also supported:
set.keys() – returns an iterable object for values,
set.values() – same as set.keys, for compatibility with Map,
set.entries() – returns an iterable object for entries [value, value], exists for compatibility with Map.
WeakMap and WeakSet
WeakSet is a special kind of Set that does not prevent JavaScript from removing its items from memory. WeakMap is the same thing for Map.
As we know from the chapter
Garbage collection, JavaScript engine stores a value in memory while it is reachable (and can potentially be used).
For instance:
let john = { name: "John" };
// the object can be accessed, john is the reference to it
// overwrite the reference
john = null;
// the object will be removed from memory
Usually, properties of an object or elements of an array or another data structure are considered reachable and kept in memory while that data structure is in memory.
In a regular Map, it does not matter if we store an object as a key or as a value. It's kept in memory even if there are no more references to it.
For instance:
let john = { name: "John" };
let map = new Map();
map.set(john, "...");
john = null; // overwrite the reference
// john is stored inside the map
// we can get it by using map.keys()
With the exception of WeakMap/WeakSet.
WeakMap/WeakSet does not prevent the object removal from the memory.
Let's start with WeakMap.
The first difference from Map is that its keys must be objects, not primitive values:
let weakMap = new WeakMap();
let obj = {};
weakMap.set(obj, "ok"); // works fine (object key)
weakMap.set("test", "Whoops"); // Error, because "test" is a primitive
Now, if we use an object as the key in it, and there are no other references to that object – it will be removed from memory (and from the map) automatically.
let john = { name: "John" };
let weakMap = new WeakMap();
weakMap.set(john, "...");
john = null; // overwrite the reference
// john is removed from memory!
Compare it with the regular Map example above. Now if john only exists as the key of WeakMap – it is to be automatically deleted.
…And WeakMap does not support methods keys(), values(), entries(), we can not iterate over it. So there's really no way to receive all keys or values from it.
WeakMap has only the following methods:
weakMap.get(key)
weakMap.set(key, value)
weakMap.delete(key, value)
weakMap.has(key)
Why such a limitation? That's for technical reasons. If the object has lost all other references (like john in the code above), then it is to be deleted automatically. But technically it's not exactly specified when the cleanup happens.
The JavaScript engine decides that. It may choose to perform the memory cleanup immediately or to wait and do the cleaning later when more deletions happen. So, technically the current element count of the WeakMap is not known. The engine may have cleaned it up or not, or did it partially. For that reason, methods that access WeakMap as a whole are not supported.
Now where do we need such thing?
The idea of WeakMap is that we can store something for an object that exists only while the object exists. But we do not force the object to live by the mere fact that we store something for it.
weakMap.put(john, "secret documents");
// if john dies, secret documents will be destroyed
That's useful for situations when we have a main storage for the objects somewhere and need to keep additional information that is only relevant while the object lives.
Let's see an example.
For instance, we have a code that keeps a visit count for each user. The information is stored in a map: a user is the key and the visit count is the value. When a user leaves, we don't want to store his visit count anymore.
One way would be to keep track of leaving users and clean up the storage manually:
let john = { name: "John" };
// map: user => visits count
let visitsCountMap = new Map();
// john is the key for the map
visitsCountMap.set(john, 123);
// now john leaves us, we don't need him anymore
john = null;
// but it's still in the map, we need to clean it!
alert( visitsCountMap.size ); // 1
// it's also in the memory, because Map uses it as the key
Another way would be to use WeakMap:
let john = { name: "John" };
let visitsCountMap = new WeakMap();
visitsCountMap.set(john, 123);
// now john leaves us, we don't need him anymore
john = null;
// there are no references except WeakMap,
// so the object is removed both from the memory and from visitsCountMap automatically
With a regular Map, cleaning up after a user has left becomes a tedious task: we not only need to remove the user from its main storage (be it a variable or an array), but also need to clean up the additional stores like visitsCountMap. And it can become cumbersome in more complex cases when users are managed in one place of the code and the additional structure is at another place and is getting no information about removals.
WeakMap can make things simpler, because it is cleaned up automatically. The information in it like visits count in the example above lives only while the key object exists.
WeakSet behaves similarly:
It is analogous to Set, but we may only add objects to WeakSet (not primitives).
An object exists in the set while it has reachable from somewhere else.
Like Set, it supports add, has and delete, but not size, keys() and no iterations.
For instance, we can use it to keep track of whether an item is checked:
let messages = [
{text: "Hello", from: "John"},
{text: "How goes?", from: "John"},
{text: "See you soon", from: "Alice"}
];
// fill it with array elements (3 items)
let unreadSet = new WeakSet(messages);
// we can use unreadSet to see whether a message is unread
alert(unreadSet.has(messages[1])); // true
// remove it from the set after reading
unreadSet.delete(messages[1]); // true
// and when we shift our messages history, the set is cleaned up automatically
messages.shift();
// no need to clean unreadSet, it now has 2 items
// unfortunately, there's no method to get the exact count of items, so can't show it
The most notable limitation of WeakMap and WeakSet is the absence of iterations, and inability to get all current content. That may appear inconvenient, but actually does not prevent WeakMap/WeakSet from doing their main job – be an “additional” storage of data for objects which are stored/managed at another place.
Summary
Map – is a collection of keyed values.
The differences from a regular Object:
Any keys, objects can be keys.
Iterates in the insertion order.
Additional convenient methods, the size property.
Set – is a collection of unique values.
Unlike an array, does not allow to reorder elements.
Keeps the insertion order.
WeakMap – a variant of Map that allows only objects as keys and removes them once they become inaccessible by other means.
It does not support operations on the structure as a whole: no size, no clear(), no iterations.
WeakSet – is a variant of Set that only stores objects and removes them once they become inaccessible by other means.
Also does not support size/clear() and iterations.
WeakMap and WeakSet are used as “secondary” data structures in addition to the “main” object storage. Once the object is removed from the main storage, so it only stays in WeakMap/WeakSet, they clean up automatically.
To find all anagrams, let's split every word to letters and sort them. When letter-sorted, all anagrams are same.
For instance:
nap, pan -> anp
ear, era, are -> aer
cheaters, hectares, teachers -> aceehrst
...
We'll use the letter-sorted variants as map keys to store only one value per each key:
function aclean(arr) {
let map = new Map();
for (let word of arr) {
// split the word by letters, sort them and join back
let sorted = word.toLowerCase().split('').sort().join(''); // (*)
map.set(sorted, word);
}
return Array.from(map.values());
}
let arr = ["nap", "teachers", "cheaters", "PAN", "ear", "era", "hectares"];
alert( aclean(arr) );
Letter-sorting is done by the chain of calls in the line (*).
For convenience let's split it into multiple lines:
let sorted = arr[i] // PAN
.toLowerCase() // pan
.split('') // ['p','a','n']
.sort() // ['a','n','p']
.join(''); // anp
Two different words 'PAN' and 'nap' receive the same letter-sorted form 'anp'.
The next line put the word into the map:
map.set(sorted, word);
If we ever meet a word the same letter-sorted form again, then it would overwrite the previous value with the same key in the map. So we'll always have at maximum one word per letter-form.
At the end Array.from(map.values()) takes an iterable over map values (we don't need keys in the result) and returns an array of them.
Here we could also use a plain object instead of the Map, because keys are strings.
That's how the solution can look:
function aclean(arr) {
let obj = {};
for (let i = 0; i < arr.length; i++) {
let sorted = arr[i].toLowerCase().split("").sort().join("");
obj[sorted] = arr[i];
}
return Array.from(Object.values(obj));
}
let arr = ["nap", "teachers", "cheaters", "PAN", "ear", "era", "hectares"];
alert( aclean(arr) );
let messages = [
{text: "Hello", from: "John"},
{text: "How goes?", from: "John"},
{text: "See you soon", from: "Alice"}
];
Your code can access it, but the messages are managed by someone else's code. New messages are added, old ones are removed regularly by that code, and you don't know the exact moments when it happens.
Now, which data structure you could use to store information whether the message “have been read”? The structure must be well-suited to give the answer “was it read?” for the given message object.
P.S. When a message is removed from messages, it should disappear from your structure as well.
P.P.S. We shouldn't modify message objects directly. If they are managed by someone else's code, then adding extra properties to them may have bad consequences.
The sane choice here is a WeakSet:
let messages = [
{text: "Hello", from: "John"},
{text: "How goes?", from: "John"},
{text: "See you soon", from: "Alice"}
];
let readMessages = new WeakSet();
// two messages have been read
readMessages.add(messages[0]);
readMessages.add(messages[1]);
// readMessages has 2 elements
// ...let's read the first message again!
readMessages.add(messages[0]);
// readMessages still has 2 unique elements
// answer: was the message[0] read?
alert("Read message 0: " + readMessages.has(messages[0])); // true
messages.shift();
// now readMessages has 1 element (technically memory may be cleaned later)
The WeakSet allows to store a set of messages and easily check for the existance of a message in it.
It cleans up itself automatically. The tradeoff is that we can't iterate over it. We can't get “all read messages” directly. But we can do it by iterating over all messages and filtering those that are in the set.
P.S. Adding a property of our own to each message may be dangerous if messages are managed by someone else's code, but we can make it a symbol to evade conflicts.
Like this:
// the symbolic property is only known to our code
let isRead = Symbol("isRead");
messages[0][isRead] = true;
Now even if someone else's code uses for..in loop for message properties, our secret flag won't appear.
There's an array of messages as in the
previous task. The situation is similar.
let messages = [
{text: "Hello", from: "John"},
{text: "How goes?", from: "John"},
{text: "See you soon", from: "Alice"}
];
The question now is: which data structure you'd suggest to store the information: “when the message was read?”.
In the previous task we only needed to store the “yes/no” fact. Now we need to store the date and it, once again, should disappear if the message is gone.
To store a date, we can use WeakMap:
let messages = [
{text: "Hello", from: "John"},
{text: "How goes?", from: "John"},
{text: "See you soon", from: "Alice"}
];
let readMap = new WeakMap();
readMap.set(messages[0], new Date(2017, 1, 1));
// Date object we'll study later
Object.keys, values, entries
Let's step away from the individual data structures and talk about the iterations over them.
In the previous chapter we saw methods map.keys(), map.values(), map.entries().
These methods are generic, there is a common agreement to use them for data structures. If we ever create a data structure of our own, we should implement them too.
They are supported for:
Map
Set
Array (except arr.values())
Plain objects also support similar methods, but the syntax is a bit different.
Object.keys, values, entries
For plain objects, the following methods are available:
…But please note the distinctions (compared to map for example):
Map
Object
Call syntax
map.keys()
Object.keys(obj), but not obj.keys()
Returns
iterable
“real” Array
The first difference is that we have to call Object.keys(obj), and not obj.keys().
Why so? The main reason is flexibility. Remember, objects are a base of all complex structures in JavaScript. So we may have an object of our own like order that implements its own order.values() method. And we still can call Object.values(order) on it.
The second difference is that Object.* methods return “real” array objects, not just an iterable. That's mainly for historical reasons.
Just like a for..in loop, these methods ignore properties that use Symbol(...) as keys.
Usually that's convenient. But if we want symbolic keys too, then there's a separate method
Object.getOwnPropertySymbols that returns an array of only symbolic keys. Also, the method
Reflect.ownKeys(obj) returns all keys.
The two most used data structures in JavaScript are Object and Array.
Objects allow us to pack many pieces of information into a single entity and arrays allow us to store ordered collections. So we can make an object or an array and handle it as a single entity, or maybe pass it to a function call.
Destructuring assignment is a special syntax that allows us to “unpack” arrays or objects into a bunch of variables, as sometimes they are more convenient. Destructuring also works great with complex functions that have a lot of parameters, default values, and soon we'll see how these are handled too.
Array destructuring
An example of how the array is destructured into variables:
// we have an array with the name and surname
let arr = ["Ilya", "Kantor"]
// destructuring assignment
let [firstName, surname] = arr;
alert(firstName); // Ilya
alert(surname); // Kantor
Now we can work with variables instead of array members.
It looks great when combined with split or other array-returning methods:
let [firstName, surname] = "Ilya Kantor".split(' ');
“Destructuring” does not mean “destructive”
It's called “destructuring assignment”, because it “destructurizes” by copying items into variables. But the array itself is not modified.
It's just a shorter way to write:
// let [firstName, surname] = arr;
let firstName = arr[0];
let surname = arr[1];
Ignore first elements
Unwanted elements of the array can also be thrown away via an extra comma:
// first and second elements are not needed
let [, , title] = ["Julius", "Caesar", "Consul", "of the Roman Republic"];
alert( title ); // Consul
In the code above, although the first and second elements of the array are skipped, the third one is assigned to title, and the rest are also skipped.
Works with any iterable on the right-side
…Actually, we can use it with any iterable, not only arrays:
let [a, b, c] = "abc"; // ["a", "b", "c"]
let [one, two, three] = new Set([1, 2, 3]);
Assign to anything at the left-side
We can use any “assignables” at the left side.
For instance, an object property:
let user = {};
[user.name, user.surname] = "Ilya Kantor".split(' ');
alert(user.name); // Ilya
We can use it with destructuring to loop over keys-and-values of an object:
let user = {
name: "John",
age: 30
};
// loop over keys-and-values
for (let [key, value] of Object.entries(user)) {
alert(`${key}:${value}`); // name:John, then age:30
}
…And the same for a map:
let user = new Map();
user.set("name", "John");
user.set("age", "30");
for (let [key, value] of user.entries()) {
alert(`${key}:${value}`); // name:John, then age:30
}
The rest ‘…'
If we want not just to get first values, but also to gather all that follows – we can add one more parameter that gets “the rest” using three dots "...":
let [name1, name2, ...rest] = ["Julius", "Caesar", "Consul", "of the Roman Republic"];
alert(name1); // Julius
alert(name2); // Caesar
alert(rest[0]); // Consul
alert(rest[1]); // of the Roman Republic
alert(rest.length); // 2
The value of rest is the array of the remaining array elements. We can use any other variable name in place of rest, just make sure it has three dots before it and goes last in the destructuring assignment.
Default values
If there are fewer values in the array than variables in the assignment, there will be no error. Absent values are considered undefined:
let [firstName, surname] = [];
alert(firstName); // undefined
If we want a “default” value to replace the missing one, we can provide it using =:
Default values can be more complex expressions or even function calls. They are evaluated only if the value is not provided.
For instance, here we use the prompt function for two defaults. But it will run only for the missing one:
// runs only prompt for surname
let [name = prompt('name?'), surname = prompt('surname?')] = ["Julius"];
alert(name); // Julius (from array)
alert(surname); // whatever prompt gets
Object destructuring
The destructuring assignment also works with objects.
The basic syntax is:
let {var1, var2} = {var1:…, var2…}
We have an existing object at the right side, that we want to split into variables. The left side contains a “pattern” for corresponding properties. In the simple case, that's a list of variable names in {...}.
For instance:
let options = {
title: "Menu",
width: 100,
height: 200
};
let {title, width, height} = options;
alert(title); // Menu
alert(width); // 100
alert(height); // 200
Properties options.title, options.width and options.height are assigned to the corresponding variables. The order does not matter. This works too:
// changed the order of properties in let {...}
let {height, width, title} = { title: "Menu", height: 200, width: 100 }
The pattern on the left side may be more complex and specify the mapping between properties and variables.
If we want to assign a property to a variable with another name, for instance, options.width to go into the variable named w, then we can set it using a colon:
let options = {
title: "Menu",
width: 100,
height: 200
};
// { sourceProperty: targetVariable }
let {width: w, height: h, title} = options;
// width -> w
// height -> h
// title -> title
alert(title); // Menu
alert(w); // 100
alert(h); // 200
The colon shows “what : goes where”. In the example above the property width goes to w, property height goes to h, and title is assigned to the same name.
For potentially missing properties we can set default values using "=", like this:
let options = {
title: "Menu"
};
let {width = 100, height = 200, title} = options;
alert(title); // Menu
alert(width); // 100
alert(height); // 200
Just like with arrays or function parameters, default values can be any expressions or even function calls. They will be evaluated if the value is not provided.
The code below asks for width, but not the title.
let options = {
title: "Menu"
};
let {width = prompt("width?"), title = prompt("title?")} = options;
alert(title); // Menu
alert(width); // (whatever you the result of prompt is)
We also can combine both the colon and equality:
let options = {
title: "Menu"
};
let {width: w = 100, height: h = 200, title} = options;
alert(title); // Menu
alert(w); // 100
alert(h); // 200
The rest operator
What if the object has more properties than we have variables? Can we take some and then assign the “rest” somewhere?
The specification for using the rest operator (three dots) here is almost in the standard, but most browsers do not support it yet.
It looks like this:
let options = {
title: "Menu",
height: 200,
width: 100
};
let {title, ...rest} = options;
// now title="Menu", rest={height: 200, width: 100}
alert(rest.height); // 200
alert(rest.width); // 100
Gotcha without let
In the examples above variables were declared right before the assignment: let {…} = {…}. Of course, we could use existing variables too. But there's a catch.
This won't work:
let title, width, height;
// error in this line
{title, width, height} = {title: "Menu", width: 200, height: 100};
The problem is that JavaScript treats {...} in the main code flow (not inside another expression) as a code block. Such code blocks can be used to group statements, like this:
{
// a code block
let message = "Hello";
// ...
alert( message );
}
To show JavaScript that it's not a code block, we can wrap the whole assignment in brackets (...):
let title, width, height;
// okay now
({title, width, height} = {title: "Menu", width: 200, height: 100});
alert( title ); // Menu
Nested destructuring
If an object or an array contain other objects and arrays, we can use more complex left-side patterns to extract deeper portions.
In the code below options has another object in the property size and an array in the property items. The pattern at the left side of the assignment has the same structure:
let options = {
size: {
width: 100,
height: 200
},
items: ["Cake", "Donut"],
extra: true // something extra that we will not destruct
};
// destructuring assignment on multiple lines for clarity
let {
size: { // put size here
width,
height
},
items: [item1, item2], // assign items here
title = "Menu" // not present in the object (default value is used)
} = options;
alert(title); // Menu
alert(width); // 100
alert(height); // 200
alert(item1); // Cake
alert(item2); // Donut
The whole options object except extra that was not mentioned, is assigned to corresponding variables.
Finally, we have width, height, item1, item2 and title from the default value.
That often happens with destructuring assignments. We have a complex object with many properties and want to extract only what we need.
Even here it happens:
// take size as a whole into a variable, ignore the rest
let { size } = options;
Smart function parameters
There are times when a function may have many parameters, most of which are optional. That's especially true for user interfaces. Imagine a function that creates a menu. It may have a width, a height, a title, items list and so on.
In real-life the problem is how to remember the order of arguments. Usually IDEs try to help us, especially if the code is well-documented, but still… Another problem is how to call a function when most parameters are ok by default.
That's ugly. And becomes unreadable when we deal with more parameters.
Destructuring comes to the rescue!
We can pass parameters as an object, and the function immediately destructurizes them into variables:
// we pass object to function
let options = {
title: "My menu",
items: ["Item1", "Item2"]
};
// ...and it immediately expands it to variables
function showMenu({title = "Untitled", width = 200, height = 100, items = []}) {
// title, items – taken from options,
// width, height – defaults used
alert( `${title} ${width} ${height}` ); // My Menu 200 100
alert( items ); // Item1, Item2
}
showMenu(options);
We can also use more complex destructuring with nested objects and colon mappings:
let options = {
title: "My menu",
items: ["Item1", "Item2"]
};
function showMenu({
title = "Untitled",
width: w = 100, // width goes to w
height: h = 200, // height goes to h
items: [item1, item2] // items first element goes to item1, second to item2
}) {
alert( `${title} ${w} ${h}` ); // My Menu 100 200
alert( item1 ); // Item1
alert( item2 ); // Item2
}
showMenu(options);
The syntax is the same as for a destructuring assignment:
Please note that such destructuring assumes that showMenu() does have an argument. If we want all values by default, then we should specify an empty object:
showMenu({});
// that would give an error
showMenu();
We can fix this by making {} the default value for the whole destructuring thing:
// simplified parameters a bit for clarity
function showMenu({ title = "Menu", width = 100, height = 200 } = {}) {
alert( `${title} ${width} ${height}` );
}
showMenu(); // Menu 100 200
In the code above, the whole arguments object is {} by default, so there's always something to destructurize.
Summary
Destructuring assignment allows for instantly mapping an object or array onto many variables.
The object syntax:
let {prop : varName = default, ...} = object
This means that property prop should go into the variable varName and, if no such property exists, then default value should be used.
The array syntax:
let [item1 = default, item2, ...rest] = array
The first item goes to item1, the second goes into item2, all the rest makes the array rest.
For more complex cases, the left side must have the same structure as the right one.
isAdmin property into the variable isAdmin (false if absent)
The values after the assignment should be:
let user = { name: "John", years: 30 };
// your code to the left side:
// ... = user
alert( name ); // John
alert( age ); // 30
alert( isAdmin ); // false
let user = {
name: "John",
years: 30
};
let {name, years: age, isAdmin = false} = user;
alert( name ); // John
alert( age ); // 30
alert( isAdmin ); // false
Let's meet a new built-in object:
Date. It stores the date, time and provides methods for date/time management.
For instance, we can use it to store creation/modification times, or to measure time, or just to print out the current date.
Creation
To create a new Date object call new Date() with one of the following arguments:
new Date()
Without arguments – create a Date object for the current date and time:
let now = new Date();
alert( now ); // shows current date/time
new Date(milliseconds)
Create a Date object with the time equal to number of milliseconds (1/1000 of a second) passed after the Jan 1st of 1970 UTC+0.
// 0 means 01.01.1970 UTC+0
let Jan01_1970 = new Date(0);
alert( Jan01_1970 );
// now add 24 hours, get 02.01.1970 UTC+0
let Jan02_1970 = new Date(24 * 3600 * 1000);
alert( Jan02_1970 );
The number of milliseconds that has passed since the beginning of 1970 is called a timestamp.
It's a lightweight numeric representation of a date. We can always create a date from a timestamp using new Date(timestamp) and convert the existing Date object to a timestamp using the date.getTime() method (see below).
new Date(datestring)
If there is a single argument, and it's a string, then it is parsed with the Date.parse algorithm (see below).
let date = new Date("2017-01-26");
alert(date); // Thu Jan 26 2017 ...
new Date(year, month, date, hours, minutes, seconds, ms)
Create the date with the given components in the local time zone. Only two first arguments are obligatory.
Note:
The year must have 4 digits: 2013 is okay, 98 is not.
The month count starts with 0 (Jan), up to 11 (Dec).
The date parameter is actually the day of month, if absent then 1 is assumed.
If hours/minutes/seconds/ms is absent, they are assumed to be equal 0.
For instance:
new Date(2011, 0, 1, 0, 0, 0, 0); // // 1 Jan 2011, 00:00:00
new Date(2011, 0, 1); // the same, hours etc are 0 by default
The minimal precision is 1 ms (1/1000 sec):
let date = new Date(2011, 0, 1, 2, 3, 4, 567);
alert( date ); // 1.01.2011, 02:03:04.567
Access date components
There are many methods to access the year, month and so on from the Date object. But they can be easily remembered when categorized.
Many JavaScript engines implement a non-standard method getYear(). This method is deprecated. It returns 2-digit year sometimes. Please never use it. There is getFullYear() for the year.
Get the day of week, from 0 (Sunday) to 6 (Saturday). The first day is always Sunday, in some countries that's not so, but can't be changed.
All the methods above return the components relative to the local time zone.
There are also their UTC-counterparts, that return day, month, year and so on for the time zone UTC+0:
getUTCFullYear(),
getUTCMonth(),
getUTCDay(). Just insert the "UTC" right after "get".
If your local time zone is shifted relative to UTC, then the code below shows different hours:
// current date
let date = new Date();
// the hour in your current time zone
alert( date.getHours() );
// the hour in UTC+0 time zone (London time without daylight savings)
alert( date.getUTCHours() );
Besides the given methods, there are two special ones, that do not have a UTC-variant:
Every one of them except setTime() has a UTC-variant, for instance: setUTCHours().
As we can see, some methods can set multiple components at once, for example setHours. The components that are not mentioned are not modified.
For instance:
let today = new Date();
today.setHours(0);
alert(today); // still today, but the hour is changed to 0
today.setHours(0, 0, 0, 0);
alert(today); // still today, now 00:00:00 sharp.
Autocorrection
The autocorrection is a very handy feature of Date objects. We can set out-of-range values, and it will auto-adjust itself.
For instance:
let date = new Date(2013, 0, 32); // 32 Jan 2013 ?!?
alert(date); // ...is 1st Feb 2013!
Out-of-range date components are distributed automatically.
Let's say we need to increase the date “28 Feb 2016” by 2 days. It may be “2 Mar” or “1 Mar” in case of a leap-year. We don't need to think about it. Just add 2 days. The Date object will do the rest:
let date = new Date(2016, 1, 28);
date.setDate(date.getDate() + 2);
alert( date ); // 1 Mar 2016
That feature is often used to get the date after the given period of time. For instance, let's get the date for “70 seconds after now”:
let date = new Date();
date.setSeconds(date.getSeconds() + 70);
alert( date ); // shows the correct date
We can also set zero or even negative values. For example:
let date = new Date(2016, 0, 2); // 2 Jan 2016
date.setDate(1); // set day 1 of month
alert( date );
date.setDate(0); // min day is 1, so the last day of the previous month is assumed
alert( date ); // 31 Dec 2015
Date to number, date diff
When a Date object is converted to number, it becomes the timestamp same as date.getTime():
let date = new Date();
alert(+date); // the number of milliseconds, same as date.getTime()
The important side effect: dates can be subtracted, the result is their difference in ms.
That can be used for time measurements:
let start = new Date(); // start counting
// do the job
for (let i = 0; i < 100000; i++) {
let doSomething = i * i * i;
}
let end = new Date(); // done
alert( `The loop took ${end - start} ms` );
Date.now()
If we only want to measure the difference, we don't need the Date object.
There's a special method Date.now() that returns the current timestamp.
It is semantically equivalent to new Date().getTime(), but it doesn't create an intermediate Date object. So it's faster and doesn't put pressure on garbage collection.
It is used mostly for convenience or when performance matters, like in games in JavaScript or other specialized applications.
So this is probably better:
let start = Date.now(); // milliseconds count from 1 Jan 1970
// do the job
for (let i = 0; i < 100000; i++) {
let doSomething = i * i * i;
}
let end = Date.now(); // done
alert( `The loop took ${end - start} ms` ); // subtract numbers, not dates
Benchmarking
If we want a reliable benchmark of CPU-hungry function, we should be careful.
For instance, let's measure two functions that calculate the difference between two dates: which one is faster?
// we have date1 and date2, which function faster returns their difference in ms?
function diffSubtract(date1, date2) {
return date2 - date1;
}
// or
function diffGetTime(date1, date2) {
return date2.getTime() - date1.getTime();
}
These two do exactly the same thing, but one of them uses an explicit date.getTime() to get the date in ms, and the other one relies on a date-to-number transform. Their result is always the same.
So, which one is faster?
The first idea may be to run them many times in a row and measure the time difference. For our case, functions are very simple, so we have to do it around 100000 times.
Let's measure:
function diffSubtract(date1, date2) {
return date2 - date1;
}
function diffGetTime(date1, date2) {
return date2.getTime() - date1.getTime();
}
function bench(f) {
let date1 = new Date(0);
let date2 = new Date();
let start = Date.now();
for (let i = 0; i < 100000; i++) f(date1, date2);
return Date.now() - start;
}
alert( 'Time of diffSubtract: ' + bench(diffSubtract) + 'ms' );
alert( 'Time of diffGetTime: ' + bench(diffGetTime) + 'ms' );
Wow! Using getTime() is so much faster! That's because there's no type conversion, it is much easier for engines to optimize.
Okay, we have something. But that's not a good benchmark yet.
Imagine that at the time of running bench(diffSubtract) CPU was doing something in parallel, and it was taking resources. And by the time of running bench(diffGetTime) the work has finished.
A pretty real scenario for a modern multi-process OS.
As a result, the first benchmark will have less CPU resources than the second. That may lead to wrong results.
For more reliable benchmarking, the whole pack of benchmarks should be rerun multiple times.
Here's the code example:
function diffSubtract(date1, date2) {
return date2 - date1;
}
function diffGetTime(date1, date2) {
return date2.getTime() - date1.getTime();
}
function bench(f) {
let date1 = new Date(0);
let date2 = new Date();
let start = Date.now();
for (let i = 0; i < 100000; i++) f(date1, date2);
return Date.now() - start;
}
let time1 = 0;
let time2 = 0;
// run bench(upperSlice) and bench(upperLoop) each 10 times alternating
for (let i = 0; i < 10; i++) {
time1 += bench(diffSubtract);
time2 += bench(diffGetTime);
}
alert( 'Total time for diffSubtract: ' + time1 );
alert( 'Total time for diffGetTime: ' + time2 );
Modern JavaScript engines start applying advanced optimizations only to “hot code” that executes many times (no need to optimize rarely executed things). So, in the example above, first executions are not well-optimized. We may want to add a heat-up run:
// added for "heating up" prior to the main loop
bench(diffSubtract);
bench(diffGetTime);
// now benchmark
for (let i = 0; i < 10; i++) {
time1 += bench(diffSubtract);
time2 += bench(diffGetTime);
}
Be careful doing microbenchmarking
Modern JavaScript engines perform many optimizations. They may tweak results of “artificial tests” compared to “normal usage”, especially when we benchmark something very small. So if you seriously want to understand performance, then please study how the JavaScript engine works. And then you probably won't need microbenchmarks at all.
The great pack of articles about V8 can be found at
http://mrale.ph.
The string format should be: YYYY-MM-DDTHH:mm:ss.sssZ, where:
YYYY-MM-DD – is the date: year-month-day.
The character "T" is used as the delimiter.
HH:mm:ss.sss – is the time: hours, minutes, seconds and milliseconds.
The optional 'Z' part denotes the time zone in the format +-hh:mm. A single letter Z that would mean UTC+0.
Shorter variants are also possible, like YYYY-MM-DD or YYYY-MM or even YYYY.
The call to Date.parse(str) parses the string in the given format and returns the timestamp (number of milliseconds from 1 Jan 1970 UTC+0). If the format is invalid, returns NaN.
For instance:
let ms = Date.parse('2012-01-26T13:51:50.417-07:00');
alert(ms); // 1327611110417 (timestamp)
We can instantly create a new Date object from the timestamp:
let date = new Date( Date.parse('2012-01-26T13:51:50.417-07:00') );
alert(date);
Summary
Date and time in JavaScript are represented with the
Date object. We can't create “only date” or “only time”: Date objects always carry both.
Months are counted from zero (yes, January is a zero month).
Days of week in getDay() are also counted from zero (that's Sunday).
Date auto-corrects itself when out-of-range components are set. Good for adding/subtracting days/months/hours.
Dates can be subtracted, giving their difference in milliseconds. That's because a Date becomes the timestamp when converted to a number.
Use Date.now() to get the current timestamp fast.
Note that unlike many other systems, timestamps in JavaScript are in milliseconds, not in seconds.
Also, sometimes we need more precise time measurements. JavaScript itself does not have a way to measure time in microseconds (1 millionth of a second), but most environments provide it. For instance, browser has
performance.now() that gives the number of milliseconds from the start of page loading with microsecond precision (3 digits after the point):
alert(`Loading started ${performance.now()}ms ago`);
// Something like: "Loading started 34731.26000000001ms ago"
// .26 is microseconds (260 microseconds)
// more than 3 digits after the decimal point are precision errors, but only the first 3 are correct
Node.JS has microtime module and other ways. Technically, any device and environment allows to get more precision, it's just not in Date.
The method date.getDay() returns the number of the weekday, starting from sunday.
Let's make an array of weekdays, so that we can get the proper day name by its number:
function getWeekDay(date) {
let days = ['SU', 'MO', 'TU', 'WE', 'TH', 'FR', 'SA'];
return days[date.getDay()];
}
let date = new Date(2014, 0, 3); // 3 Jan 2014
alert( getWeekDay(date) ); // FR
European countries have days of week starting with monday (number 1), then tuesday (number 2) and till sunday (number 7). Write a function getLocalDay(date) that returns the “european” day of week for date.
let date = new Date(2012, 0, 3); // 3 Jan 2012
alert( getLocalDay(date) ); // tuesday, should show 2
Let's create a date using the next month, but pass zero as the day:
function getLastDayOfMonth(year, month) {
let date = new Date(year, month + 1, 0);
return date.getDate();
}
alert( getLastDayOfMonth(2012, 0) ); // 31
alert( getLastDayOfMonth(2012, 1) ); // 29
alert( getLastDayOfMonth(2013, 1) ); // 28
Normally, dates start from 1, but technically we can pass any number, the date will autoadjust itself. So when we pass 0, then it means “one day before 1st day of the month”, in other words: “the last day of the previous month”.
Write a function getSecondsToday() that returns the number of seconds from the beginning of today.
For instance, if now 10:00 am, and there was no daylight savings shift, then:
getSecondsToday() == 36000 // (3600 * 10)
The function should work in any day. That is, it should not have a hard-coded value of “today”.
To get the number of seconds, we can generate a date using the current day and time 00:00:00, then substract it from “now”.
The difference is the number of milliseconds from the beginning of the day, that we should divide by 1000 to get seconds:
function getSecondsToday() {
let now = new Date();
// create an object using the current day/month/year
let today = new Date(now.getFullYear(), now.getMonth(), now.getDate());
let diff = now - today; // ms difference
return Math.round(diff / 1000); // make seconds
}
alert( getSecondsToday() );
An alternative solution would be to get hours/minutes/seconds and convert them to seconds:
function getSecondsToday() {
let d = new Date();
return d.getHours() * 3600 + d.getMinutes() * 60 + d.getSeconds();
};
Create a function getSecondsToTomorrow() that returns the number of seconds till tomorrow.
For instance, if now is 23:00, then:
getSecondsToTomorrow() == 3600
P.S. The function should work at any day, the “today” is not hardcoded.
To get the number of milliseconds till tomorrow, we can from “tomorrow 00:00:00” substract the current date.
First, we generate that “tomorrow”, and then do it:
function getSecondsToTomorrow() {
let now = new Date();
// tomorrow date
let tomorrow = new Date(now.getFullYear(), now.getMonth(), now.getDate()+1);
let diff = tomorrow - now; // difference in ms
return Math.round(diff / 1000); // convert to seconds
}
To get the time from date till now – let's substract the dates.
function formatDate(date) {
let diff = new Date() - date; // the difference in milliseconds
if (diff < 1000) { // less than 1 second
return 'right now';
}
let sec = Math.floor(diff / 1000); // convert diff to seconds
if (sec < 60) {
return sec + ' sec. ago';
}
let min = Math.floor(diff / 60000); // convert diff to minutes
if (min < 60) {
return min + ' min. ago';
}
// format the date
// add leading zeroes to single-digit day/month/hours/minutes
let d = date;
d = [
'0' + d.getDate(),
'0' + (d.getMonth() + 1),
'' + d.getFullYear(),
'0' + d.getHours(),
'0' + d.getMinutes()
].map(component => component.slice(-2)); // take last 2 digits of every component
// join the components into date
return d.slice(0, 3).join('.') + ' ' + d.slice(3).join(':');
}
alert( formatDate(new Date(new Date - 1)) ); // "right now"
alert( formatDate(new Date(new Date - 30 * 1000)) ); // "30 sec. ago"
alert( formatDate(new Date(new Date - 5 * 60 * 1000)) ); // "5 min. ago"
// yesterday's date like 31.12.2016, 20:00
alert( formatDate(new Date(new Date - 86400 * 1000)) );
…But in the process of development, new properties are added, old properties are renamed and removed. Updating such toString every time can become a pain. We could try to loop over properties in it, but what if the object is complex and has nested objects in properties? We'd need to implement their conversion as well. And, if we're sending the object over a network, then we also need to supply the code to “read” our object on the receiving side.
Luckily, there's no need to write the code to handle all this. The task has been solved already.
JSON.stringify
The
JSON (JavaScript Object Notation) is a general format to represent values and objects. It is described as in
RFC 4627 standard. Initially it was made for JavaScript, but many other languages have libraries to handle it as well. So it's easy to use JSON for data exchange when the client uses JavaScript and the server is written on Ruby/PHP/Java/Whatever.
The method JSON.stringify(student) takes the object and converts it into a string.
The resulting json string is a called JSON-encoded or serialized or stringified or marshalled object. We are ready to send it over the wire or put into plain data store.
Please note that JSON-encoded object has several important differences from the object literal:
Strings use double quotes. No single quotes or backticks in JSON. So 'John' becomes "John".
Object property names are double-quoted also. That's obligatory. So age:30 becomes "age":30.
JSON.stringify can be applied to primitives as well.
Natively supported JSON types are:
Objects { ... }
Arrays [ ... ]
Primitives:
strings,
numbers,
boolean values true/false,
null.
For instance:
// a number in JSON is just a number
alert( JSON.stringify(1) ) // 1
// a string in JSON is still a string, but double-quoted
alert( JSON.stringify('test') ) // "test"
alert( JSON.stringify(true) ); // true
alert( JSON.stringify([1, 2, 3]) ); // [1,2,3]
JSON is data-only cross-language specification, so some JavaScript-specific object properties are skipped by JSON.stringify.
Here, the conversion fails, because of circular reference: room.occupiedBy references meetup, and meetup.place references room:
Excluding and transforming: replacer
The full syntax of JSON.stringify is:
let json = JSON.stringify(value[, replacer, space])
value
A value to encode.
replacer
Array of properties to encode or a mapping function function(key, value).
space
Amount of space to use for formatting
Most of time, JSON.stringify is used with first argument only. But if we need to fine-tune the replacement process, like to filter out circular references, we can use the second argument of JSON.stringify.
If we pass an array of properties to it, only these properties will be encoded.
Here we are probably too strict. The property list is applied to the whole object structure. So participants are empty, because name is not in the list.
Let's include every property except room.occupiedBy that would cause the circular reference:
Now everything except occupiedBy is serialized. But the list of properties is quite long.
Fortunately, we can use a function instead of an array as the replacer.
The function will be called for every (key,value) pair and should return the “replaced” value, which will be used instead of the original one.
In our case, we can return value “as is” for everything except occupiedBy. To ignore occupiedBy, the code below returns undefined:
let room = {
number: 23
};
let meetup = {
title: "Conference",
participants: [{name: "John"}, {name: "Alice"}],
place: room // meetup references room
};
room.occupiedBy = meetup; // room references meetup
alert( JSON.stringify(meetup, function replacer(key, value) {
alert(`${key}: ${value}`); // to see what replacer gets
return (key == 'occupiedBy') ? undefined : value;
}));
/* key:value pairs that come to replacer:
: [object Object]
title: Conference
participants: [object Object],[object Object]
0: [object Object]
name: John
1: [object Object]
name: Alice
place: [object Object]
number: 23
*/
Please note that replacer function gets every key/value pair including nested objects and array items. It is applied recursively. The value of this inside replacer is the object that contains the current property.
The first call is special. It is made using a special “wrapper object”: {"": meetup}. In other words, the first (key,value) pair has an empty key, and the value is the target object as a whole. That's why the first line is ":[object Object]" in the example above.
The idea is to provide as much power for replacer as possible: it has a chance to analyze and replace/skip the whole object if necessary.
Formatting: spacer
The third argument of JSON.stringify(value, replacer, spaces) is the number of spaces to use for pretty formatting.
Previously, all stringified objects had no indents and extra spaces. That's fine if we want to send an object over a network. The spacer argument is used exclusively for a nice output.
Here spacer = 2 tells JavaScript to show nested objects on multiple lines, with indentation of 2 spaces inside an object:
let user = {
name: "John",
age: 25,
roles: {
isAdmin: false,
isEditor: true
}
};
alert(JSON.stringify(user, null, 2));
/* two-space indents:
{
"name": "John",
"age": 25,
"roles": {
"isAdmin": false,
"isEditor": true
}
}
*/
/* for JSON.stringify(user, null, 4) the result would be more indented:
{
"name": "John",
"age": 25,
"roles": {
"isAdmin": false,
"isEditor": true
}
}
*/
The spaces parameter is used solely for logging and nice-output purposes.
Custom “toJSON”
Like toString for a string conversion, an object may provide method toJSON for to-JSON conversion. JSON.stringify automatically calls it if available.
let user = '{ "name": "John", "age": 35, "isAdmin": false, "friends": [0,1,2,3] }';
user = JSON.parse(user);
alert( user.friends[1] ); // 1
The JSON may be as complex as necessary, objects and arrays can include other objects and arrays. But they must obey the format.
Here are typical mistakes in hand-written JSON (sometimes we have to write it for debugging purposes):
let json = `{
name: "John", // mistake: property name without quotes
"surname": 'Smith', // mistake: single quotes in value (must be double)
'isAdmin': false // mistake: single quotes in key (must be double)
"birthday": new Date(2000, 2, 3), // mistake: no "new" is allowed, only bare values
"friends": [0,1,2,3] // here all fine
}`;
Besides, JSON does not support comments. Adding a comment to JSON makes it invalid.
There's another format named
JSON5, which allows unquoted keys, comments etc. But this is a standalone library, not in the specification of the language.
The regular JSON is that strict not because its developers are lazy, but to allow easy, reliable and very fast implementations of the parsing algorithm.
Using reviver
Imagine, we got a stringified meetup object from the server.
Let's return to functions and study them more in-depth.
Our first topic will be recursion.
If you are not new to programming, then it is probably familiar and you could skip this chapter.
Recursion is a programming pattern that is useful in situations when a task can be naturally split into several tasks of the same kind, but simpler. Or when a task can be simplified into an easy action plus a simpler variant of the same task. Or, as we'll see soon, to deal with certain data structures.
When a function solves a task, in the process it can call many other functions. A partial case of this is when a function calls itself. That's called recursion.
Two ways of thinking
For something simple to start with – let's write a function pow(x, n) that raises x to a natural power of n. In other words, multiplies x by itself n times.
pow(2, 2) = 4
pow(2, 3) = 8
pow(2, 4) = 16
There are two ways to implement it.
Iterative thinking: the for loop:
function pow(x, n) {
let result = 1;
// multiply result by x n times in the loop
for (let i = 0; i < n; i++) {
result *= x;
}
return result;
}
alert( pow(2, 3) ); // 8
Recursive thinking: simplify the task and call self:
function pow(x, n) {
if (n == 1) {
return x;
} else {
return x * pow(x, n - 1);
}
}
alert( pow(2, 3) ); // 8
Please note how the recursive variant is fundamentally different.
When pow(x, n) is called, the execution splits into two branches:
if n==1 = x
/
pow(x, n) =
\
else = x * pow(x, n - 1)
If n == 1, then everything is trivial. It is called the base of recursion, because it immediately produces the obvious result: pow(x, 1) equals x.
Otherwise, we can represent pow(x, n) as x * pow(x, n - 1). In maths, one would write xn = x * xn-1. This is called a recursive step: we transform the task into a simpler action (multiplication by x) and a simpler call of the same task (pow with lower n). Next steps simplify it further and further until n reaches 1.
We can also say that powrecursively calls itself till n == 1.
For example, to calculate pow(2, 4) the recursive variant does these steps:
pow(2, 4) = 2 * pow(2, 3)
pow(2, 3) = 2 * pow(2, 2)
pow(2, 2) = 2 * pow(2, 1)
pow(2, 1) = 2
So, the recursion reduces a function call to a simpler one, and then – to even more simpler, and so on, until the result becomes obvious.
Recursion is usually shorter
A recursive solution is usually shorter than an iterative one.
Here we can rewrite the same using the ternary ? operator instead of if to make pow(x, n) more terse and still very readable:
function pow(x, n) {
return (n == 1) ? x : (x * pow(x, n - 1));
}
The maximal number of nested calls (including the first one) is called recursion depth. In our case, it will be exactly n.
The maximal recursion depth is limited by JavaScript engine. We can make sure about 10000, some engines allow more, but 100000 is probably out of limit for the majority of them. There are automatic optimizations that help alleviate this (“tail calls optimizations”), but they are not yet supported everywhere and work only in simple cases.
That limits the application of recursion, but it still remains very wide. There are many tasks where recursive way of thinking gives simpler code, easier to maintain.
The execution stack
Now let's examine how recursive calls work. For that we'll look under the hood of functions.
The information about a function run is stored in its execution context.
The
execution context is an internal data structure that contains details about the execution of a function: where the control flow is now, the current variables, the value of this (we don't use it here) and few other internal details.
One function call has exactly one execution context associated with it.
When a function makes a nested call, the following happens:
The current function is paused.
The execution context associated with it is remembered in a special data structure called execution context stack.
The nested call executes.
After it ends, the old execution context is retrieved from the stack, and the outer function is resumed from where it stopped.
Let's see what happens during the pow(2, 3) call.
pow(2, 3)
In the beginning of the call pow(2, 3) the execution context will store variables: x = 2, n = 3, the execution flow is at line 1 of the function.
We can sketch it as:
Context: { x: 2, n: 3, at line 1 }pow(2, 3)
That's when the function starts to execute. The condition n == 1 is false, so the flow continues into the second branch of if:
function pow(x, n) {
if (n == 1) {
return x;
} else {
return x * pow(x, n - 1);
}
}
alert( pow(2, 3) );
The variables are same, but the line changes, so the context is now:
Context: { x: 2, n: 3, at line 5 }pow(2, 3)
To calculate x * pow(x, n - 1), we need to make a subcall of pow with new arguments pow(2, 2).
pow(2, 2)
To do a nested call, JavaScript remembers the current execution context in the execution context stack.
Here we call the same function pow, but it absolutely doesn't matter. The process is the same for all functions:
The current context is “remembered” on top of the stack.
The new context is created for the subcall.
When the subcall is finished – the previous context is popped from the stack, and its execution continues.
Here's the context stack when we entered the subcall pow(2, 2):
Context: { x: 2, n: 2, at line 1 }pow(2, 2)
Context: { x: 2, n: 3, at line 5 }pow(2, 3)
The new current execution context is on top (and bold), and previous remembered contexts are below.
When we finish the subcall – it is easy to resume the previous context, because it keeps both variables and the exact place of the code where it stopped. Here in the picture we use the word “line”, but of course it's more precise.
pow(2, 1)
The process repeats: a new subcall is made at line 5, now with arguments x=2, n=1.
A new execution context is created, the previous one is pushed on top of the stack:
Context: { x: 2, n: 1, at line 1 }pow(2, 1)
Context: { x: 2, n: 2, at line 5 }pow(2, 2)
Context: { x: 2, n: 3, at line 5 }pow(2, 3)
There are 2 old contexts now and 1 currently running for pow(2, 1).
The exit
During the execution of pow(2, 1), unlike before, the condition n == 1 is truthy, so the first branch of if works:
function pow(x, n) {
if (n == 1) {
return x;
} else {
return x * pow(x, n - 1);
}
}
There are no more nested calls, so the function finishes, returning 2.
As the function finishes, its execution context is not needed anymore, so it's removed from the memory. The previous one is restored off the top of the stack:
Context: { x: 2, n: 2, at line 5 }pow(2, 2)
Context: { x: 2, n: 3, at line 5 }pow(2, 3)
The execution of pow(2, 2) is resumed. It has the result of the subcall pow(2, 1), so it also can finish the evaluation of x * pow(x, n - 1), returning 4.
Then the previous context is restored:
Context: { x: 2, n: 3, at line 5 }pow(2, 3)
When it finishes, we have a result of pow(2, 3) = 8.
The recursion depth in this case was: 3.
As we can see from the illustrations above, recursion depth equals the maximal number of context in the stack.
Note the memory requirements. Contexts take memory. In our case, raising to the power of n actually requires the memory for n contexts, for all lower values of n.
A loop-based algorithm is more memory-saving:
function pow(x, n) {
let result = 1;
for (let i = 0; i < n; i++) {
result *= x;
}
return result;
}
The iterative pow uses a single context changing i and result in the process. Its memory requirements are small, fixed and do not depend on n.
Any recursion can be rewritten as a loop. The loop variant usually can be made more effective.
…But sometimes the rewrite is non-trivial, especially when function uses different recursive subcalls depending on conditions and merges their results or when the branching is more intricate. And the optimization may be unneeded and totally not worth the efforts.
Recursion can give a shorter code, easier to understand and support. Optimizations are not required in every place, mostly we need a good code, that's why it's used.
Recursive traversals
Another great application of the recursion is a recursive traversal.
Imagine, we have a company. The staff structure can be presented as an object:
A department may have an array of staff. For instance, sales department has 2 employees: John and Alice.
Or a department may split into subdepartments, like development has two branches: sites and internals. Each of them has the own staff.
It is also possible that when a subdepartment grows, it divides into subsubdepartments (or teams).
For instance, the sites department in the future may be split into teams for siteA and siteB. And they, potentially, can split even more. That's not on the picture, just something to have in mind.
Now let's say we want a function to get the sum of all salaries. How can we do that?
An iterative approach is not easy, because the structure is not simple. The first idea may be to make a for loop over company with nested subloop over 1st level departments. But then we need more nested subloops to iterate over the staff in 2nd level departments like sites. …And then another subloop inside those for 3rd level departments that might appear in the future? Should we stop on level 3 or make 4 levels of loops? If we put 3-4 nested subloops in the code to traverse a single object, it becomes rather ugly.
Let's try recursion.
As we can see, when our function gets a department to sum, there are two possible cases:
Either it's a “simple” department with an array of people – then we can sum the salaries in a simple loop.
Or it's an object with N subdepartments – then we can make N recursive calls to get the sum for each of the subdeps and combine the results.
The (1) is the base of recursion, the trivial case.
The (2) is the recursive step. A complex task is split into subtasks for smaller departments. They may in turn split again, but sooner or later the split will finish at (1).
The algorithm is probably even easier to read from the code:
let company = { // the same object, compressed for brevity
sales: [{name: 'John', salary: 1000}, {name: 'Alice', salary: 600 }],
development: {
sites: [{name: 'Peter', salary: 2000}, {name: 'Alex', salary: 1800 }],
internals: [{name: 'Jack', salary: 1300}]
}
};
// The function to do the job
function sumSalaries(department) {
if (Array.isArray(department)) { // case (1)
return department.reduce((prev, current) => prev + current.salary, 0); // sum the array
} else { // case (2)
let sum = 0;
for (let subdep of Object.values(department)) {
sum += sumSalaries(subdep); // recursively call for subdepartments, sum the results
}
return sum;
}
}
alert(sumSalaries(company)); // 6700
The code is short and easy to understand (hopefully?). That's the power of recursion. It also works for any level of subdepartment nesting.
Here's the diagram of calls:
We can easily see the principle: for an object {...} subcalls are made, while arrays [...] are the “leaves” of the recursion tree, they give immediate result.
Note that the code uses smart features that we've covered before:
Method arr.reduce explained in the chapter
Array methods to get the sum of the array.
Loop for(val of Object.values(obj)) to iterate over object values: Object.values returns an array of them.
Recursive structures
A recursive (recursively-defined) data structure is a structure that replicates itself in parts.
We've just seen it in the example of a company structure above.
A company department is:
Either an array of people.
Or an object with departments.
For web-developers there are much better-known examples: HTML and XML documents.
In the HTML document, an HTML-tag may contain a list of:
Text pieces.
HTML-comments.
Other HTML-tags (that in turn may contain text pieces/comments or other tags etc).
That's once again a recursive definition.
For better understanding, we'll cover one more recursive structure named “Linked list” that might be a better alternative for arrays in some cases.
Linked list
Imagine, we want to store an ordered list of objects.
The natural choice would be an array:
let arr = [obj1, obj2, obj3];
…But there's a problem with arrays. The “delete element” and “insert element” operations are expensive. For instance, arr.unshift(obj) operation has to renumber all elements to make room for a new obj, and if the array is big, it takes time. Same with arr.shift().
The only structural modifications that do not require mass-renumbering are those that operate with the end of array: arr.push/pop. So an array can be quite slow for big queues.
Alternatively, if we really need fast insertion/deletion, we can choose another data structure called a
linked list.
The linked list element is recursively defined as an object with:
value.
next property referencing the next linked list element or null if that's the end.
Here we can even more clearer see that there are multiple objects, each one has the value and next pointing to the neighbour. The list variable is the first object in the chain, so following next pointers from it we can reach any element.
The list can be easily split into multiple parts and later joined back:
let secondList = list.next.next;
list.next.next = null;
And surely we can insert or remove items in any place.
For instance, to prepend a new value, we need to update the head of the list:
let list = { value: 1 };
list.next = { value: 2 };
list.next.next = { value: 3 };
list.next.next.next = { value: 4 };
// prepend the new value to the list
list = { value: "new item", next: list };
We made list.next jump over 1 to value 2. The value 1 is now excluded from the chain. If it's not stored anywhere else, it will be automatically removed from the memory.
Unlike arrays, there's no mass-renumbering, we can easily rearrange elements.
Naturally, lists are not always better than arrays. Otherwise everyone would use only lists.
The main drawback is that we can't easily access an element by its number. In an array that's easy: arr[n] is a direct reference. But in the list we need to start from the first item and go nextN times to get the Nth element.
…But we don't always need such operations. For instance, when we need a queue or even a
deque – the ordered structure that must allow very fast adding/removing elements from both ends.
Sometimes it's worth to add another variable named tail to track the last element of the list (and update it when adding/removing elements from the end). For large sets of elements the speed difference versus arrays is huge.
Summary
Terms:
Recursion is a programming term that means a “self-calling” function. Such functions can be used to solve certain tasks in elegant ways.
When a function calls itself, that's called a recursion step. The basis of recursion is function arguments that make the task so simple that the function does not make further calls.
A
recursively-defined data structure is a data structure that can be defined using itself.
For instance, the linked list can be defined as a data structure consisting of an object referencing a list (or null).
list = { value, next -> list }
Trees like HTML elements tree or the department tree from this chapter are also naturally recursive: they branch and every branch can have other branches.
Recursive functions can be used to walk them as we've seen in the sumSalary example.
Any recursive function can be rewritten into an iterative one. And that's sometimes required to optimize stuff. But for many tasks a recursive solution is fast enough and easier to write and support.
function sumTo(n) { /*... your code ... */ }
alert( sumTo(100) ); // 5050
P.S. Which solution variant is the fastest? The slowest? Why?
P.P.S. Can we use recursion to count sumTo(100000)?
The solution using a loop:
function sumTo(n) {
let sum = 0;
for (let i = 1; i <= n; i++) {
sum += i;
}
return sum;
}
alert( sumTo(100) );
The solution using recursion:
function sumTo(n) {
if (n == 1) return 1;
return n + sumTo(n - 1);
}
alert( sumTo(100) );
The solution using the formula: sumTo(n) = n*(n+1)/2:
function sumTo(n) {
return n * (n + 1) / 2;
}
alert( sumTo(100) );
P.S. Naturally, the formula is the fastest solution. It uses only 3 operations for any number n. The math helps!
The loop variant is the second in terms of speed. In both the recursive and the loop variant we sum the same numbers. But the recursion involves nested calls and execution stack management. That also takes resources, so it's slower.
P.P.S. The standard describes a “tail call” optimization: if the recursive call is the very last one in the function (like in sumTo above), then the outer function will not need to resume the execution and we don't need to remember its execution context. In that case sumTo(100000) is countable. But if your JavaScript engine does not support it, there will be an error: maximum stack size exceeded, because there's usually a limitation on the total stack size.
The
factorial of a natural number is a number multiplied by "number minus one", then by "number minus two", and so on till 1. The factorial of n is denoted as n!
The task is to write a function factorial(n) that calculates n! using recursive calls.
alert( factorial(5) ); // 120
P.S. Hint: n! can be written as n * (n-1)! For instance: 3! = 3*2! = 3*2*1! = 6
By definition, a factorial is n! can be written as n * (n-1)!.
In other words, the result of factorial(n) can be calculated as n multiplied by the result of factorial(n-1). And the call for n-1 can recursively descend lower, and lower, till 1.
Here we can see that the value of fib(3) is needed for both fib(5) and fib(4). So fib(3) will be called and evaluated two times completely independently.
Here's the full recursion tree:
We can clearly notice that fib(3) is evaluated two times and fib(2) is evaluated three times. The total amount of computations grows much faster than n, making it enormous even for n=77.
We can optimize that by remembering already-evaluated values: if a value of say fib(3) is calculated once, then we can just reuse it in future computations.
Another variant would be to give up recursion and use a totally different loop-based algorithm.
Instead of going from n down to lower values, we can make a loop that starts from 1 and 2, then gets fib(3) as their sum, then fib(4) as the sum of two previous values, then fib(5) and goes up and up, till it gets to the needed value. On each step we only need to remember two previous values.
Here are the steps of the new algorithm in details.
The start:
// a = fib(1), b = fib(2), these values are by definition 1
let a = 1, b = 1;
// get c = fib(3) as their sum
let c = a + b;
/* we now have fib(1), fib(2), fib(3)
a b c
1, 1, 2
*/
Now we want to get fib(4) = fib(2) + fib(3).
Let's shift the variables: a,b will get fib(2),fib(3), and c will get their sum:
a = b; // now a = fib(2)
b = c; // now b = fib(3)
c = a + b; // c = fib(4)
/* now we have the sequence:
a b c
1, 1, 2, 3
*/
The next step gives another sequence number:
a = b; // now a = fib(3)
b = c; // now b = fib(4)
c = a + b; // c = fib(5)
/* now the sequence is (one more number):
a b c
1, 1, 2, 3, 5
*/
…And so on until we get the needed value. That's much faster than recursion and involves no duplicate computations.
The full code:
function fib(n) {
let a = 1;
let b = 1;
for (let i = 3; i <= n; i++) {
let c = a + b;
a = b;
b = c;
}
return b;
}
alert( fib(3) ); // 2
alert( fib(7) ); // 13
alert( fib(77) ); // 5527939700884757
The loop starts with i=3, because the first and the second sequence values are hard-coded into variables a=1, b=1.
Write a function printList(list) that outputs list items one-by-one.
Make two variants of the solution: using a loop and using recursion.
What's better: with recursion or without it?
Loop-based solution
The loop-based variant of the solution:
let list = {
value: 1,
next: {
value: 2,
next: {
value: 3,
next: {
value: 4,
next: null
}
}
}
};
function printList(list) {
let tmp = list;
while (tmp) {
alert(tmp.value);
tmp = tmp.next;
}
}
printList(list);
Please note that we use a temporary variable tmp to walk over the list. Technically, we could use a function parameter list instead:
function printList(list) {
while(list) {
alert(list.value);
list = list.next;
}
}
…But that would be unwise. In the future we may need to extend a function, do something else with the list. If we change list, then we loose such ability.
Talking about good variable names, list here is the list itself. The first element of it. And it should remain like that. That's clear and reliable.
From the other side, the role of tmp is exclusively a list traversal, like i in the for loop.
Recursive solution
The recursive variant of printList(list) follows a simple logic: to output a list we should output the current element list, then do the same for list.next:
let list = {
value: 1,
next: {
value: 2,
next: {
value: 3,
next: {
value: 4,
next: null
}
}
}
};
function printList(list) {
alert(list.value); // output the current item
if (list.next) {
printList(list.next); // do the same for the rest of the list
}
}
printList(list);
Now what's better?
Technically, the loop is more effective. These two variants do the same, but the loop does not spend resources for nested function calls.
From the other side, the recursive variant is shorter and sometimes easier to understand.
Make two solutions: using a loop and using a recursion.
Using a recursion
The recursive logic is a little bit tricky here.
We need to first output the rest of the list and then output the current one:
let list = {
value: 1,
next: {
value: 2,
next: {
value: 3,
next: {
value: 4,
next: null
}
}
}
};
function printReverseList(list) {
if (list.next) {
printReverseList(list.next);
}
alert(list.value);
}
printReverseList(list);
Using a loop
The loop variant is also a little bit more complicated then the direct output.
There is no way to get the last value in our list. We also can't “go back”.
So what we can do is to first go through the items in the direct order and rememeber them in an array, and then output what we remembered in the reverse order:
let list = {
value: 1,
next: {
value: 2,
next: {
value: 3,
next: {
value: 4,
next: null
}
}
}
};
function printReverseList(list) {
let arr = [];
let tmp = list;
while (tmp) {
arr.push(tmp.value);
tmp = tmp.next;
}
for (let i = arr.length - 1; i >= 0; i--) {
alert( arr[i] );
}
}
printReverseList(list);
Please note that the recursive solution actually does exactly the same: it follows the list, remembers the items in the chain of nested calls (in the execution context stack), and then outputs them.
Rest parameters and spread operator
Many JavaScript built-in functions support an arbitrary number of arguments.
For instance:
Math.max(arg1, arg2, ..., argN) – returns the greatest of the arguments.
Object.assign(dest, src1, ..., srcN) – copies properties from src1..N into dest.
…and so on.
In this chapter we'll see how to do the same. And, more important, how to feel comfortable working with such functions and arrays.
Rest parameters ...
A function can be called with any number of arguments, no matter how it is defined.
Like here:
function sum(a, b) {
return a + b;
}
alert( sum(1, 2, 3, 4, 5) );
There will be no error because of “excessive” arguments. But of course in the result only the first two will be counted.
The rest parameters can be mentioned in a function definition with three dots .... They literally mean: “gather the remaining parameters into an array”.
For instance, to gather all arguments into array args:
function sumAll(...args) { // args is the name for the array
let sum = 0;
for (let arg of args) sum += arg;
return sum;
}
alert( sumAll(1) ); // 1
alert( sumAll(1, 2) ); // 3
alert( sumAll(1, 2, 3) ); // 6
We can choose to get first parameters as variables, and gather only the rest.
Here the first two arguments go into variables and the rest goes to titles array:
function showName(firstName, lastName, ...titles) {
alert( firstName + ' ' + lastName ); // Julius Caesar
// the rest go into titles array
// i.e. titles = ["Consul", "Imperator"]
alert( titles[0] ); // Consul
alert( titles[1] ); // Imperator
alert( titles.length ); // 2
}
showName("Julius", "Caesar", "Consul", "Imperator");
The rest parameters must be at the end
The rest parameters gather all remaining arguments, so the following has no sense:
function f(arg1, ...rest, arg2) { // arg2 after ...rest ?!
// error
}
The ...rest must always be the last.
The “arguments” variable
There is also a special array-like object named arguments that contains all arguments by their index.
For instance:
function showName() {
alert( arguments.length );
alert( arguments[0] );
alert( arguments[1] );
// it's iterable
// for(let arg of arguments) alert(arg);
}
// shows: 2, Julius, Caesar
showName("Julius", "Caesar");
// shows: 1, Ilya, undefined (no second argument)
showName("Ilya");
In old times, rest parameters did not exist in the language, and arguments was the only way to get all arguments of the function no matter of their total number.
And it still works, we can use it.
But the downside is that although arguments is both array-like and iterable, it's not an array. It does not support array methods, so we can't say call arguments.map(...).
Also, it always has all arguments in it, we can't capture them partially, like we did with rest parameters.
So when we need these features, then rest parameters are preferred.
Arrow functions do not have "arguments"
If we access the arguments object from an arrow function, it takes them from the outer “normal” function.
Here's an example:
function f() {
let showArg = () => alert(arguments[0]);
showArg();
}
f(1); // 1
As we remember, arrow functions don't have their own this. Now we know they don't have the special arguments object either.
Spread operator
We've just seen how to get an array from the list of parameters.
But sometimes we need to do exactly the reverse.
For instance, there's a built-in function
Math.max that returns the greatest number from the list:
alert( Math.max(3, 5, 1) ); // 5
Now let's say we have an array [3, 5, 1]. How to call Math.max with it?
Passing it “as it” won't work, because Math.max expects a list of numeric arguments, not a single array:
let arr = [3, 5, 1];
alert( Math.max(arr) ); // NaN
…And surely we can't manually list items in the code Math.max(arg[0], arg[1], arg[2]), because we may be unsure how much are there. As our script executes, there might be many, or there might be none. Also that would be ugly.
Spread operator to the rescue. It looks similar to rest parameters, also using ..., but does quite the opposite.
When ...arr is used in the function call, it “expands” an iterable object arr into the list of arguments.
For Math.max:
let arr = [3, 5, 1];
alert( Math.max(...arr) ); // 5 (spread turns array into a list of arguments)
We also can pass multiple iterables this way:
let arr1 = [1, -2, 3, 4];
let arr2 = [8, 3, -8, 1];
alert( Math.max(...arr1, ...arr2) ); // 8
…And even combine the spread operator with normal values:
let arr = [3, 5, 1];
let arr2 = [8, 9, 15];
let merged = [0, ...arr, 2, ...arr2];
alert(merged); // 0,3,5,1,2,8,9,15 (0, then arr, then 2, then arr2)
In the examples above we used an array to demonstrate the spread operator, but any iterable will do.
For instance, here we use spread operator to turn the string into array of characters:
let str = "Hello";
alert( [...str] ); // H,e,l,l,o
The spread operator internally uses iterators to gather elements, the same way as for..of does.
So, for a string, for..of returns characters and ...str becomes "H","e","l","l","o". The list of characters is passed to array initializer [...str].
For this particular task we could also use Array.from, because it converts an iterable (like a string) into an array:
let str = "Hello";
// Array.from converts an iterable into an array
alert( Array.from(str) ); // H,e,l,l,o
The result is the same as [...str].
But there's a subtle difference between Array.from(obj) and [...obj]:
Array.from operates on both array-likes and iterables.
The spread operator operates only on iterables.
So, for the task of turning something into an array, Array.from appears more universal.
Summary
When we see "..." in the code, it is either rest parameters or the spread operator.
There's an easy way to distinguish between them:
When ... is at the end of function parameters, it's “rest parameters” and gathers the rest of the list into the array.
When ... occurs in a function call or alike, it's called a “spread operator” and expands an array into the list.
Use patterns:
Rest parameters are used to create functions that accept any number of arguments.
The spread operator is used to pass an array to functions that normally require a list of many arguments.
Together they help to travel between a list and an array of parameters with ease.
All arguments of a function call are also available in “old-style” arguments: array-like iterable object.
Closure
JavaScript is a very function-oriented language. It gives a lot of freedom. A function can be created at one moment, then copied to another variable or passed as an argument to another function and called from a totally different place later.
We know that a function can access variables outside of it. And this feature is used quite often.
But what happens when an outer variables changes? Does a function get a most recent value or the one that existed when the function was created?
Also, what happens when a function travels to another place of the code and is called from there – does it get access to outer variables in the new place?
Different languages behave differently here, in this chapter we cover JavaScript.
A couple of questions
Let's formulate two questions for the seed, and then study the internal mechanics piece-by-piece, so that you'll be able to answer these questions and more complex ones in the future.
The function sayHi uses an external variable name. When the function runs, which value of these two it's going to use?
let name = "John";
function sayHi() {
alert("Hi, " + name);
}
name = "Pete";
sayHi(); // what will it show: "John" or "Pete"?
Such situations are common in both browser and server-side development. A function may be scheduled to execute later than it is created, for instance after a user action or a network request.
So, the question is: does it pick up latest changes?
The function makeWorker makes another function and returns it. That new function can be called from somewhere else. Will it have access to outer variables from its creation place or the invocation place or maybe both?
function makeWorker() {
let name = "Pete";
return function() {
alert(name);
};
}
let name = "John";
// create a function
let work = makeWorker();
// call it
work(); // what will it show? "Pete" (name where created) or "John" (name where called)?
Lexical Environment
To understand what's going on, let's first discuss what a “variable” technically is.
In JavaScript, every running function, code block and the script as a whole have an associated object named Lexical Environment.
The Lexical Environment object consists of two parts:
Environment Record – an object that has all local variables as its properties (and some other information like the value of this).
A reference to the outer lexical environment, usually the one associated with the code lexically right outside of it (outside of the current figure brackets).
So, a “variable” is just a property of the special internal object, Environment Record. “To get or change a variable” means “to get or change the property of that object”.
For instance, in this simple code, there is only one Lexical Environment:
This is a so-called global Lexical Environment, associated with the whole script. For browsers, all <script> tags share the same global environment.
On the picture above, the rectangle means Environment Record (variable store) and the arrow means the outer reference. The global Lexical Environment has no outer one, so that's null.
Here's the bigger picture of how let variables work:
Rectangles on the right-hand side demonstrate how the global Lexical Environment changes during the execution:
When the script starts, the Lexical Environment is empty.
The let phrase definition appears. Now it initially has no value, so undefined is stored.
phrase is assigned.
phrase refers to a new value.
Everything looks simple for now, right?
To summarize:
A variable is a property of a special internal object, associated with the currently executing block/function/script.
Working with variables is actually working with the properties of that object.
Function Declaration
Function Declarations are special. Unlike let variables, they are processed not when the execution reaches them, but when a Lexical Environment is created. For the global Lexical Environment, it means the moment when the script is started.
…And that is why we can call a function declaration before it is defined.
The code below demonstrates that the Lexical Environment is non-empty from the beginning. It has say, because that's a Function Declaration. And later it gets phrase, declared with let:
Inner and outer Lexical Environment
During the call say() uses an outer variable, so let's see the details of what's going on.
First, when a function runs, a new function Lexical Environment is created automatically. That's a general rule for all functions. That Lexical Environment is used to store local variables and parameters of the call.
Here's the picture of Lexical Environments when the execution is inside say("John"), at the line labelled with an arrow:
During the function call we have two Lexical Environments: the inner one (for the function call) and the outer one (global):
The inner Lexical Environment corresponds to the current execution of say. It has a single variable: name, the function argument. We called say("John"), so the value of name is "John".
The outer Lexical Environment is the global Lexical Environment.
The inner Lexical Environment has the outer reference to the outer one.
When a code wants to access a variable – it is first searched in the inner Lexical Environment, then in the outer one, then the more outer one and so on until the end of the chain.
If a variable is not found anywhere, that's an error in strict mode. Without use strict, an assignment to an undefined variable creates a new global variable, for backwards compatibility.
Let's see how the search proceeds in our example:
When the alert inside say wants to access name, it finds it immediately in the function Lexical Environment.
When it wants to access phrase, then there is no phrase locally, so it follows the outer reference and finds it globally.
Now we can give the answer to the first seed question from the beginning of the chapter.
A function gets outer variables as they are now, the most recent values.
That's because of the described mechanism. Old variable values are not saved anywhere. When a function wants them, it takes the current values from its own or an outer Lexical Environment.
So the answer to the first question is Pete:
let name = "John";
function sayHi() {
alert("Hi, " + name);
}
name = "Pete"; // (*)
sayHi(); // Pete
The execution flow of the code above:
The global Lexical Environment has name: "John".
At the line (*) the global variable is changed, now it has name: "Pete".
When the function say(), is executed and takes name from outside. Here that's from the global Lexical Environment where it's already "Pete".
One call – one Lexical Environment
Please note that a new function Lexical Environment is created each time a function runs.
And if a function is called multiple times, then each invocation will have its own Lexical Environment, with local variables and parameters specific for that very run.
Lexical Environment is a specification object
“Lexical Environment” is a specification object. We can't get this object in our code and manipulate it directly. JavaScript engines also may optimize it, discard variables that are unused to save memory and perform other internal tricks, but the visible behavior should be as described.
Nested functions
A function is called “nested” when it is created inside another function.
Technically, that is easily possible.
We can use it to organize the code, like this:
function sayHiBye(firstName, lastName) {
// helper nested function to use below
function getFullName() {
return firstName + " " + lastName;
}
alert( "Hello, " + getFullName() );
alert( "Bye, " + getFullName() );
}
Here the nested function getFullName() is made for convenience. It can access the outer variables and so can return the full name.
What's more interesting, a nested function can be returned: as a property of a new object (if the outer function creates an object with methods) or as a result by itself. And then used somewhere else. No matter where, it still keeps the access to the same outer variables.
// constructor function returns a new object
function User(name) {
// the object method is created as a nested function
this.sayHi = function() {
alert(name);
};
}
let user = new User("John");
user.sayHi(); // the method code has access to the outer "name"
An example with returning a function:
function makeCounter() {
let count = 0;
return function() {
return count++; // has access to the outer counter
};
}
let counter = makeCounter();
alert( counter() ); // 0
alert( counter() ); // 1
alert( counter() ); // 2
Let's go on with the makeCounter example. It creates the “counter” function that returns the next number on each invocation. Despite being simple, slightly modified variants of that code have practical uses, for instance, as a
pseudorandom number generator, and more. So the example is not quite artificial.
How does the counter work internally?
When the inner function runs, the variable in count++ is searched from inside out. For the example above, the order will be:
The locals of the nested function.
The variables of the outer function.
…And further until it reaches globals.
In that example count is found on the step 2. When an outer variable is modified, it's changed where it's found. So count++ finds the outer variable and increases it in the Lexical Environment where it belongs. Like if we had let count = 1.
Here are two questions for you:
Can we somehow reset the counter from the code that doesn't belong to makeCounter? E.g. after alert calls in the example above.
If we call makeCounter() multiple times – it returns many counter functions. Are they independent or do they share the same count?
Try to answer them before going on reading.
…Are you done?
Okay, here we go with the answers.
There is no way. The counter is a local function variable, we can't access it from the outside.
For every call to makeCounter() a new function Lexical Environment is created, with its own counter. So the resulting counter functions are independent.
Here's the demo:
function makeCounter() {
let count = 0;
return function() {
return count++;
};
}
let counter1 = makeCounter();
let counter2 = makeCounter();
alert( counter1() ); // 0
alert( counter1() ); // 1
alert( counter2() ); // 0 (independent)
Probably, the situation with outer variables is quite clear for you as of now. But in more complex situations a deeper understanding of internals may be required. So let's go ahead.
Environments in detail
Now as you understand how closures work generally, we may finally descend to the very nuts and bolts.
Here's what's going on in the makeCounter example step-by-step, follow it to make sure that you understand everything. Please note the additional [[Environment]] property that we didn't cover yet.
When the script has just started, there is only global Lexical Environment:
At that starting moment there is only makeCounter function, because it's a Function Declaration. It did not run yet.
All functions “on birth” receive a hidden property [[Environment]] with the reference to the Lexical Environment of their creation. We didn't talk about it yet, but technically that's a way how the function knows where it was made.
Here, makeCounter is created in the global Lexical Environment, so [[Environment]] keeps the reference to it.
In other words, a function is “imprinted” with a reference to the Lexical Environment where it was born. And [[Environment]] is the hidden function property that has that reference.
Then the code runs on, and the call to makeCounter() is performed. Here's the picture for the moment when the execution is on the first line inside makeCounter():
At the moment of the call of makeCounter(), the Lexical Environment is created, to hold its variables and arguments.
As all Lexical Environments, it stores two things:
An Environment Record with local variables. In our case count is the only local variable (appears in it when the line with let count is executed).
The outer lexical reference, which is set to [[Environment]] of the function. Here [[Environment]] of makeCounter references the global Lexical Environment.
So, now we have two Lexical Environments: the first one is global, the second one is for the current makeCounter call, with the outer reference to global.
During the execution of makeCounter(), a tiny nested function is created.
It doesn't matter whether the function is created using Function Declaration or Function Expression. All functions get the [[Environment]] property that references the Lexical Environment where they were made. So that new tiny nested function gets it as well.
For our new nested function the value of [[Environment]] is the current Lexical Environment of makeCounter() (where it was born):
Please note that on this step the inner function was created, but not yet called. The code inside function() { return count++; } is not running, we're going to return it.
As the execution goes on, the call to makeCounter() finishes, and the result (the tiny nested function) is assigned to the global variable counter:
That function has only one line: return count++, that will be executed when we run it.
When the counter() is called, an “empty” Lexical Environment is created for it. It has no local variables by itself. But the [[Environment]] of counter is used as the outer reference for it, so it has access to the variables of the former makeCounter() call, where it was created:
Now if it accesses a variable, it first searches its own Lexical Environment (empty), then the Lexical Environment of the former makeCounter() call, then the global one.
When it looks for count, it finds it among the variables makeCounter, in the nearest outer Lexical Environment.
Please note how memory management works here. When makeCounter() call finished some time ago, its Lexical Environment was retained in memory, because there's a nested function with [[Environment]] referencing it.
Generally, a Lexical Environment object lives as long as there is a function which may use it. And when there are none, it is cleared.
The call to counter() not only returns the value of count, but also increases it. Note that the modification is done “in place”. The value of count is modified exactly in the environment where it was found.
So we return to the previous step with the only change – the new value of count. The following calls all do the same.
Next counter() invocations do the same.
The answer to the second seed question from the beginning of the chapter should now be obvious.
The work() function in the code below uses the name from the place of its origin through the outer lexical environment reference:
So, the result is "Pete" here.
…But if there were no let name in makeWorker(), then the search would go outside and take the global variable as we can see from the chain above. In that case it would be "John".
Closures
There is a general programming term “closure”, that developers generally should know.
A
closure is a function that remembers its outer variables and can access them. In some languages, that's not possible, or a function should be written in a special way to make it happen. But as explained above, in JavaScript all functions are naturally closures (there is only one exclusion, to be covered in
The "new Function" syntax).
That is: they automatically remember where they are created using a hidden [[Environment]] property, and all of them can access outer variables.
When on an interview a frontend developer gets a question about “what's a closure?”, a valid answer would be a definition of the closure and an explanation that all functions in JavaScript are closures, and maybe few more words about technical details: the [[Environment]] property and how Lexical Environments work.
Code blocks and loops, IIFE
The examples above concentrated on functions. But Lexical Environments also exist for code blocks {...}.
They are created when a code block runs and contain block-local variables. Here's a couple of examples.
If
In the example below, when the execution goes into if block, the new “if-only” Lexical Environment is created for it:
The new Lexical Environment gets the enclosing one as the outer reference, so phrase can be found. But all variables and Function Expressions declared inside if reside in that Lexical Environment and can't be seen from the outside.
For instance, after if finishes, the alert below won't see the user, hence the error.
For, while
For a loop, every run has a separate Lexical Environment. If the variable is declared in for, then it's also local to that Lexical Environment:
for (let i = 0; i < 10; i++) {
// Each loop has its own Lexical Environment
// {i: value}
}
alert(i); // Error, no such variable
That's actually an exception, because let i is visually outside of {...}. But in fact each run of the loop has its own Lexical Environment with the current i in it.
After the loop, i is not visible.
Code blocks
We also can use a “bare” code block {…} to isolate variables into a “local scope”.
For instance, in a web browser all scripts share the same global area. So if we create a global variable in one script, it becomes available to others. But that becomes a source of conflicts if two scripts use the same variable name and overwrite each other.
That may happen if the variable name is a widespread word, and script authors are unaware of each other.
If we'd like to evade that, we can use a code block to isolate the whole script or an area in it:
{
// do some job with local variables that should not be seen outside
let message = "Hello";
alert(message); // Hello
}
alert(message); // Error: message is not defined
The code outside of the block (or inside another script) doesn't see variables in it, because a code block has its own Lexical Environment.
IIFE
In old scripts, one can find so-called “immediately-invoked function expressions” (abbreviated as IIFE) used for this purpose.
They look like this:
(function() {
let message = "Hello";
alert(message); // Hello
})();
Here a Function Expression is created and immediately called. So the code executes right now and has its own private variables.
The Function Expression is wrapped with brackets (function {...}), because when JavaScript meets "function" in the main code flow, it understands it as a start of Function Declaration. But a Function Declaration must have a name, so there will be an error:
// Error: Unexpected token (
function() { // <-- JavaScript cannot find function name, meets ( and gives error
let message = "Hello";
alert(message); // Hello
}();
We can say “okay, let it be Function Declaration, let's add a name”, but it won't work. JavaScript does not allow Function Declarations to be called immediately:
// syntax error because of brackets below
function go() {
}(); // <-- can't call Function Declaration immediately
…So the brackets are needed to show JavaScript that the function is created in the context of another expression, and hence it's a Function Expression. Needs no name and can be called immediately.
There are other ways to tell JavaScript that we mean Function Expression:
// Ways to create IIFE
(function() {
alert("Brackets around the function");
})();
(function() {
alert("Brackets around the whole thing");
}());
!function() {
alert("Bitwise NOT operator starts the expression");
}();
+function() {
alert("Unary plus starts the expression");
}();
In all cases above we declare a Function Expression and run it immediately.
Garbage collection
Lexical Environment objects that we've been talking about are subjects to same memory management rules as regular values.
Usually, Lexical Environment is cleaned up after the function run. For instance:
function f() {
let value1 = 123;
let value2 = 456;
}
f();
Here two values are technically the properties of the Lexical Environment. But after f() finishes that Lexical Environment becomes unreachable, so it's deleted from the memory.
…But if there's a nested function that is still reachable after the end of f, then its [[Environment]] reference keeps the outer lexical environment alive as well:
function f() {
let value = 123;
function g() { alert(value); }
return g;
}
let g = f(); // g is reachable, and keeps the outer lexical environment in memory
Please note that if f() is called many times, and resulting functions are saved, then the corresponding Lexical Environment objects will also be retained in memory. All 3 of them in the code below:
function f() {
let value = Math.random();
return function() { alert(value); };
}
// 3 functions in array, every one of them links to Lexical Environment
// from the corresponding f() run
// LE LE LE
let arr = [f(), f(), f()];
A Lexical Environment object dies when it becomes unreachable. That is: when no nested functions remain that reference it. In the code below, after g becomes unreachable, the value is also cleaned from the memory;
function f() {
let value = 123;
function g() { alert(value); }
return g;
}
let g = f(); // while g is alive
// there corresponding Lexical Environment lives
g = null; // ...and now the memory is cleaned up
Real-life optimizations
As we've seen, in theory while a function is alive, all outer variables are also retained.
But in practice, JavaScript engines try to optimize that. They analyze variable usage and if it's easy to see that an outer variable is not used – it is removed.
An important side effect in V8 (Chrome, Opera) is that such variable will become unavailable in debugging.
Try running the example below with the open Developer Tools in Chrome.
When it pauses, in console type alert(value).
function f() {
let value = Math.random();
function g() {
debugger; // in console: type alert( value ); No such variable!
}
return g;
}
let g = f();
g();
As you could see – there is no such variable! In theory, it should be accessible, but the engine optimized it out.
That may lead to funny (if not such time-consuming) debugging issues. One of them – we can see a same-named outer variable instead of the expected one:
let value = "Surprise!";
function f() {
let value = "the closest value";
function g() {
debugger; // in console: type alert( value ); Surprise!
}
return g;
}
let g = f();
g();
See ya!
This feature of V8 is good to know. If you are debugging with Chrome/Opera, sooner or later you will meet it.
That is not a bug of debugger, but a special feature of V8. Maybe it will be changed sometime.
You always can check for it by running examples on this page.
We have a built-in method arr.filter(f) for arrays. It filters all elements through the function f. If it returns true, then that element is returned in the resulting array.
Make a set of “ready to use” filters:
inBetween(a, b) – between a and b or equal to them (inclusively).
inArray([...]) – in the given array.
The usage must be like this:
arr.filter(inBetween(3,6)) – selects only values between 3 and 6.
arr.filter(inArray([1,2,3])) – selects only elements matching with one of the members of [1,2,3].
For instance:
/* .. your code for inBetween and inArray */
let arr = [1, 2, 3, 4, 5, 6, 7];
alert( arr.filter(inBetween(3, 6)) ); // 3,4,5,6
alert( arr.filter(inArray([1, 2, 10])) ); // 1,2
Every function is meant to output its number. But something is wrong…
function makeArmy() {
let shooters = [];
let i = 0;
while (i < 10) {
let shooter = function() { // shooter function
alert( i ); // should show its number
};
shooters.push(shooter);
i++;
}
return shooters;
}
let army = makeArmy();
army[0](); // the shooter number 0 shows 10
army[5](); // and number 5 also outputs 10...
// ... all shooters show 10 instead of their 0, 1, 2, 3...
Why all shooters show the same? Fix the code so that they work as intended.
Let's examine what's done inside makeArmy, and the solution will become obvious.
It creates an empty array shooters:
let shooters = [];
Fills it in the loop via shooters.push(function...).
Every element is a function, so the resulting array looks like this:
shooters = [
function () { alert(i); },
function () { alert(i); },
function () { alert(i); },
function () { alert(i); },
function () { alert(i); },
function () { alert(i); },
function () { alert(i); },
function () { alert(i); },
function () { alert(i); },
function () { alert(i); }
];
The array is returned from the function.
Then, later, the call to army[5]() will get the element army[5] from the array (it will be a function) and call it.
Now why all such functions show the same?
That's because there's no local variable i inside shooter functions. When such a function is called, it takes i from its outer lexical environment.
What will be the value of i?
If we look at the source:
function makeArmy() {
...
let i = 0;
while (i < 10) {
let shooter = function() { // shooter function
alert( i ); // should show its number
};
...
}
...
}
…We can see that it lives in the lexical environment associated with the current makeArmy() run. But when army[5]() is called, makeArmy has already finished its job, and i has the last value: 10 (the end of while).
As a result, all shooter functions get from the outer lexical envrironment the same, last value i=10.
The fix can be very simple:
function makeArmy() {
let shooters = [];
for(let i = 0; i < 10; i++) {
let shooter = function() { // shooter function
alert( i ); // should show its number
};
shooters.push(shooter);
}
return shooters;
}
let army = makeArmy();
army[0](); // 0
army[5](); // 5
Now it works correctly, because every time the code block in for (..) {...} is executed, a new Lexical Environment is created for it, with the corresponding value of i.
So, the value of i now lives a little bit closer. Not in makeArmy() Lexical Environment, but in the Lexical Environment that corresponds the current loop iteration. A shooter gets the value exactly from the one where it was created.
Here we rewrote while into for.
Another trick could be possible, let's see it for better understanding of the subject:
function makeArmy() {
let shooters = [];
let i = 0;
while (i < 10) {
let j = i;
let shooter = function() { // shooter function
alert( j ); // should show its number
};
shooters.push(shooter);
i++;
}
return shooters;
}
let army = makeArmy();
army[0](); // 0
army[5](); // 5
The while loop, just like for, makes a new Lexical Environment for each run. So here we make sure that it gets the right value for a shooter.
We copy let j = i. This makes a loop body local j and copies the value of i to it. Primitives are copied “by value”, so we actually get a complete independent copy of i, belonging to the current loop iteration.
In the very first chapter about
variables, we mentioned three ways of variable declaration:
let
const
var
let and const behave exactly the same way in terms of Lexical Environments.
But var is a very different beast, that originates from very old times. It's generally not used in modern scripts, but still lurks in the old ones.
If you don't plan meeting such scripts you may even skip this chapter or postpone it, but then there's a chance that it bites you later.
From the first sight, var behaves similar to let. That is, declares a variable:
function sayHi() {
var phrase = "Hello"; // local variable, "var" instead of "let"
alert(phrase); // Hello
}
sayHi();
alert(phrase); // Error, phrase is not defined
…But here are the differences.
“var” has no block scope
var variables are either function-wide or global, they are visible through blocks.
For instance:
if (true) {
var test = true; // use "var" instead of "let"
}
alert(test); // true, the variable lives after if
If we used let test on the 2nd line, then it wouldn't be visible to alert. But var ignores code blocks, so we've got a global test.
The same thing for loops: var cannot be block- or loop-local:
for (var i = 0; i < 10; i++) {
// ...
}
alert(i); // 10, "i" is visible after loop, it's a global variable
If a code block is inside a function, then var becomes a function-level variable:
function sayHi() {
if (true) {
var phrase = "Hello";
}
alert(phrase); // works
}
sayHi();
alert(phrase); // Error: phrase is not defined
As we can see, var pierces through if, for or other code blocks. That's because a long time ago in JavaScript blocks had no Lexical Environments. And var is a reminiscence of that.
“var” are processed at the function start
var declarations are processed when the function starts (or script starts for globals).
In other words, var variables are defined from the beginning of the function, no matter where the definition is (assuming that the definition is not in the nested function).
So this code:
function sayHi() {
phrase = "Hello";
alert(phrase);
var phrase;
}
…Is technically the same as this (moved var phrase above):
function sayHi() {
var phrase;
phrase = "Hello";
alert(phrase);
}
…Or even as this (remember, code blocks are ignored):
function sayHi() {
phrase = "Hello"; // (*)
if (false) {
var phrase;
}
alert(phrase);
}
People also call such behavior “hoisting” (raising), because all var are “hoisted” (raised) to the top of the function.
So in the example above, if (false) branch never executes, but that doesn't matter. The var inside it is processed in the beginning of the function, so at the moment of (*) the variable exists.
Declarations are hoisted, but assignments are not.
That's better to demonstrate with an example, like this:
function sayHi() {
alert(phrase);
var phrase = "Hello";
}
sayHi();
The line var phrase = "Hello" has two actions in it:
Variable declaration var
Variable assignment =.
The declaration is processed at the start of function execution (“hoisted”), but the assignment always works at the place where it appears. So the code works essentially like this:
function sayHi() {
var phrase; // declaration works at the start...
alert(phrase); // undefined
phrase = "Hello"; // ...assignment - when the execution reaches it.
}
sayHi();
Because all var declarations are processed at the function start, we can reference them at any place. But variables are undefined until the assignments.
In both examples above alert runs without an error, because the variable phrase exists. But its value is not yet assigned, so it shows undefined.
Summary
There are two main differences of var:
Variables have no block scope, they are visible minimum at the function level.
Variable declarations are processed at function start.
There's one more minor difference related to the global object, we'll cover that in the next chapter.
These differences are actually a bad thing most of the time. First, we can't create block-local variables. And hoisting just creates more space for errors. So, for new scripts var is used exceptionally rarely.
Global object
When JavaScript was created, there was an idea of a “global object” that provides all global variables and functions. It was planned that multiple in-browser scripts would use that single global object and share variables through it.
Since then, JavaScript greatly evolved, and that idea of linking code through global variables became much less appealing. In modern JavaScript, the concept of modules took its place.
But the global object still remains in the specification.
In a browser it is named “window”, for Node.JS it is “global”, for other environments it may have another name.
It does two things:
Provides access to built-in functions and values, defined by the specification and the environment.
For instance, we can call alert directly or as a method of window:
alert("Hello");
// the same as
window.alert("Hello");
The same applies to other built-ins. E.g. we can use window.Array instead of Array.
Provides access to global Function Declarations and var variables. We can read and write them using its properties, for instance:
var phrase = "Hello";
function sayHi() {
alert(phrase);
}
// can read from window
alert( window.phrase ); // Hello (global var)
alert( window.sayHi ); // function (global function declaration)
// can write to window (creates a new global variable)
window.test = 5;
alert(test); // 5
…But the global object does not have variables declared with let/const!
let user = "John";
alert(user); // John
alert(window.user); // undefined, don't have let
alert("user" in window); // false
The global object is not a global Environment Record
In versions of ECMAScript prior to ES-2015, there were no let/const variables, only var. And global object was used as a global Environment Record (wordings were a bit different, but that's the gist).
But starting from ES-2015, these entities are split apart. There's a global Lexical Environment with its Environment Record. And there's a global object that provides some of the global variables.
As a practical difference, global let/const variables are definitively properties of the global Environment Record, but they do not exist in the global object.
Naturally, that's because the idea of a global object as a way to access “all global things” comes from ancient times. Nowadays is not considered to be a good thing. Modern language features like let/const do not make friends with it, but old ones are still compatible.
Uses of “window”
In server-side environments like Node.JS, the global object is used exceptionally rarely. Probably it would be fair to say “never”.
In-browser window is sometimes used though.
Usually, it's not a good idea to use it, but here are some examples you can meet.
To access exactly the global variable if the function has the local one with the same name.
var user = "Global";
function sayHi() {
var user = "Local";
alert(window.user); // Global
}
sayHi();
Such use is a workaround. Would be better to name variables differently, that won't require use to write the code it this way. And please note "var" before user. The trick doesn't work with let variables.
To check if a certain global variable or a builtin exists.
For instance, we want to check whether a global function XMLHttpRequest exists.
We can't write if (XMLHttpRequest), because if there's no XMLHttpRequest, there will be an error (variable not defined).
But we can read it from window.XMLHttpRequest:
if (window.XMLHttpRequest) {
alert('XMLHttpRequest exists!')
}
If there is no such global function then window.XMLHttpRequest is just a non-existing object property. That's undefined, no error, so it works.
We can also write the test without window:
if (typeof XMLHttpRequest == 'function') {
/* is there a function XMLHttpRequest? */
}
This doesn't use window, but is (theoretically) less reliable, because typeof may use a local XMLHttpRequest, and we want the global one.
To take the variable from the right window. That's probably the most valid use case.
A browser may open multiple windows and tabs. A window may also embed another one in <iframe>. Every browser window has its own window object and global variables. JavaScript allows windows that come from the same site (same protocol, host, port) to access variables from each other.
That use is a little bit beyond our scope for now, but it looks like:
<iframe src="/" id="iframe"></iframe>
<script>
alert( innerWidth ); // get innerWidth property of the current window (browser only)
alert( Array ); // get Array of the current window (javascript core builtin)
// when the iframe loads...
iframe.onload = function() {
// get width of the iframe window
alert( iframe.contentWindow.innerWidth );
// get the builtin Array from the iframe window
alert( iframe.contentWindow.Array );
};
</script>
Here, first two alerts use the current window, and the latter two take variables from iframe window. Can be any variables if iframe originates from the same protocol/host/port.
“this” and global object
Sometimes, the value of this is exactly the global object. That's rarely used, but some scripts rely on that.
In the browser, the value of this in the global area is window:
// outside of functions
alert( this === window ); // true
Other, non-browser environments, may use another value for this in such cases.
When a function with this is called in non-strict mode, it gets the global object as this:
// not in strict mode (!)
function f() {
alert(this); // [object Window]
}
f(); // called without an object
By specification, this in this case must be the global object, even in non-browser environments like Node.JS. That's for compatibility with old scripts, in strict mode this would be undefined.
Function object, NFE
As we already know, functions in JavaScript are values.
Every value in JavaScript has the type. What type of value is a function?
In JavaScript, a function is an object.
A good way to imagine functions is as callable “action objects”. We can not only call them, but also treat them as objects: add/remove properties, pass by reference etc.
The “name” property
Function objects contain few sometimes-useable properties.
For instance, a function name is accessible as the “name” property:
function sayHi() {
alert("Hi");
}
alert(sayHi.name); // sayHi
What's more funny, the name-assigning logic is smart. It also sticks the right name to function that are used in assignments:
In the specification, this feature is called a “contextual name”. If the function does not provide one, then in an assignment it is figured out from the context.
There's no magic though. There are cases when there's no way to figure out the right name.
Then it's empty, like here:
// function created inside array
let arr = [function() {}];
alert( arr[0].name ); // <empty string>
// the engine has no way to set up the right name, so there is none
In practice, most functions do have a name.
The “length” property
There is another built-in property “length” that returns the number of function parameters, for instance:
function f1(a) {}
function f2(a, b) {}
function many(a, b, ...more) {}
alert(f1.length); // 1
alert(f2.length); // 2
alert(many.length); // 2
Here we can see that rest parameters are not counted.
The length property is sometimes used for introspection in functions that operate on other functions.
For instance, in the code below ask function accepts a question to ask and an arbitrary number of handler functions to call.
When a user answers, it calls the handlers. We can pass two kinds of handlers:
A zero-argument function, then it is only called for a positive answer.
A function with arguments, then it is called in any case and gets the answer.
The idea is that we have a simple no-arguments handler syntax for positive cases (most frequent variant), but allow to provide universal handlers as well.
To call handlers the right way, we examine the length property:
function ask(question, ...handlers) {
let isYes = confirm(question);
for(let handler of handlers) {
if (handler.length == 0) {
if (isYes) handler();
} else {
handler(isYes);
}
}
}
// for positive answer, both handlers are called
// for negative answer, only the second one
ask("Question?", () => alert('You said yes'), result => alert(result));
This is a particular case of so-called
polymorphism – treating arguments differently depending on their type or, in our case depending on the length. The idea does have a use in JavaScript libraries.
Custom properties
We can also add properties of our own.
Here we add the counter property to track the total calls count:
function sayHi() {
alert("Hi");
// let's count how many times we run
sayHi.counter++;
}
sayHi.counter = 0; // initial value
sayHi(); // Hi
sayHi(); // Hi
alert( `Called ${sayHi.counter} times` ); // Called 2 times
A property is not a variable
A property assigned to a function like sayHi.counter = 0 does not define a local variable counter inside it. In other words, a property counter and a variable let counter are two unrelated things.
We can treat a function as an object, store properties in it, but that has no effect on its execution. Variables never use function properties and vice versa. These are just parallel words.
Function properties can replace the closure sometimes. For instance, we can rewrite the counter example from the chapter
Closure to use a function property:
function makeCounter() {
// instead of:
// let count = 0
function counter() {
return counter.count++;
};
counter.count = 0;
return counter;
}
let counter = makeCounter();
alert( counter() ); // 0
alert( counter() ); // 1
The count is now stored in the function directly, not in its outer Lexical Environment.
Is it worse or better than using the closure?
The main difference is that if the value of count lives in an outer variable, then an external code is unable to access it. Only nested functions may modify it. And if it's bound to function, then such thing is possible:
function makeCounter() {
function counter() {
return counter.count++;
};
counter.count = 0;
return counter;
}
let counter = makeCounter();
counter.count = 10;
alert( counter() ); // 10
So it depends on our aims which variant to choose.
Named Function Expression
Named Function Expression or, shortly, NFE, is a term for Function Expressions that have a name.
For instance, let's take an ordinary Function Expression:
let sayHi = function(who) {
alert(`Hello, ${who}`);
};
…And add a name to it:
let sayHi = function func(who) {
alert(`Hello, ${who}`);
};
Did we do anything sane here? What's the role of that additional "func" name?
First let's note, that we still have a Function Expression. Adding the name "func" after function did not make it a Function Declaration, because it is still created as a part of an assignment expression.
Adding such a name also did not break anything.
The function is still available as sayHi():
let sayHi = function func(who) {
alert(`Hello, ${who}`);
};
sayHi("John"); // Hello, John
There are two special things about the name func:
It allows to reference the function from inside itself.
It is not visible outside of the function.
For instance, the function sayHi below re-calls itself with "Guest" if no who is provided:
let sayHi = function func(who) {
if (who) {
alert(`Hello, ${who}`);
} else {
func("Guest"); // use func to re-call itself
}
};
sayHi(); // Hello, Guest
// But this won't work:
func(); // Error, func is not defined (not visible outside of the function)
Why do we use func? Maybe just use sayHi for the nested call?
Actually, in most cases we can:
let sayHi = function(who) {
if (who) {
alert(`Hello, ${who}`);
} else {
sayHi("Guest");
}
};
The problem with that code is that the value of sayHi may change. The function may go to another variable, and the code will start to give errors:
let sayHi = function(who) {
if (who) {
alert(`Hello, ${who}`);
} else {
sayHi("Guest"); // Error: sayHi is not a function
}
};
let welcome = sayHi;
sayHi = null;
welcome(); // Error, the nested sayHi call doesn't work any more!
That happens because the function takes sayHi from its outer lexical environment. There's no local sayHi, so the outer variable is used. And at the moment of the call that outer sayHi is null.
The optional name which we can put into the Function Expression is exactly meant to solve this kind of problems.
Let's use it to fix the code:
let sayHi = function func(who) {
if (who) {
alert(`Hello, ${who}`);
} else {
func("Guest"); // Now all fine
}
};
let welcome = sayHi;
sayHi = null;
welcome(); // Hello, Guest (nested call works)
Now it works, because the name "func" is function-local. It is not taken from outside (and not visible there). The specification guarantees that it always references the current function.
The outer code still has it's variable sayHi or welcome later. And func is an “internal function name”, how it calls itself privately.
There's no such thing for Function Declaration
The “internal name” feature described here is only available for Function Expressions, not to Function Declarations. For Function Declarations, there's just no syntax possibility to add a one more “internal” name.
Sometimes, when we need a reliable internal name, it's the reason to rewrite a Function Declaration to Named Function Expression form.
Summary
Functions are objects.
Here we covered their properties:
name – the function name. Exists not only when given in the function definition, but also for assignments and object properties.
length – the number of arguments in the function definition. Rest parameters are not counted.
If the function is declared as a Function Expression (not in the main code flow), and it carries the name, then it is called Named Function Expression. The name can be used inside to reference itself, for recursive calls or such.
Also, functions may carry additional properties. Many well-known JavaScript libraries make a great use of this feature.
They create a “main” function and attach many other “helper” functions to it. For instance, the
jquery library creates a function named $. The
lodash library creates a function _. And then adds _.clone, _.keyBy and other properties to (see the
docs when you want learn more about them). Actually, they do it to less pollute the global space, so that a single library gives only one global variable. That lowers the chance of possible naming conflicts.
So, a function can do a useful job by itself and also carry a bunch of other functionality in properties.
The solution uses count in the local variable, but addition methods are written right into the counter. They share the same outer lexical environment and also can access the current count.
P.S. Hint: you may need to setup custom object to primitive conversion for your function.
For the whole thing to work anyhow, the result of sum must be function.
That function must keep in memory the current value between calls.
According to the task, the function must become the number when used in ==. Functions are objects, so the conversion happens as described in the chapter
Object to primitive conversion, and we can provide our own method that returns the number.
And in our case, we just return the function, without calling it:
function f(b) {
currentSum += b;
return f; // <-- does not call itself, returns itself
}
This f will be used in the next call, again return itself, so many times as needed. Then, when used as a number or a string – the toString returns the currentSum. We could also use Symbol.toPrimitive or valueOf here for the conversion.
The "new Function" syntax
There's one more way to create a function. It's rarely used, but sometimes there's no alternative.
The syntax
The syntax for creating a function:
let func = new Function ([arg1[, arg2[, ...argN]],] functionBody)
In other words, function parameters (or, more precise, names for them) go first, and the body is the last. All arguments are strings.
That's easy to understand by example.
For instance, here's a function with two arguments:
let sum = new Function('a', 'b', 'return a + b');
alert( sum(1, 2) ); // 3
If there are no arguments, then there's only one single argument, function body:
let sayHi = new Function('alert("Hello")');
sayHi(); // Hello
The major difference from other ways we've seen – the function is created literally from a string, that is passed at run time.
All previous declarations required us, programmers, to write the function code in the script.
But new Function allows to turn any string into a function, for example we can receive a new function from the server and then execute it:
let str = ... receive the code from the server dynamically ...
let func = new Function(str);
func();
It is used in very specific cases, like when we receive the code from the server, or to dynamically compile a function from a template. The need for that usually arises at advanced stages of development.
The closure
Usually, a function remembers where it was born in the special property [[Environment]]. It references the Lexical Environment from where it's created.
But when a function is created using new Function, its [[Environment]] references not the current Lexical Environment, but instead the global one.
function getFunc() {
let value = "test";
let func = new Function('alert(value)');
return func;
}
getFunc()(); // error: value is not defined
Compare it with the regular behavior:
function getFunc() {
let value = "test";
let func = function() { alert(value); };
return func;
}
getFunc()(); // "test", from the Lexical Environment of getFunc
This special feature of new Function looks strange, but appears very useful in practice.
Imagine that we really have to create a function from the string. The code of that function is not known at the time of writing the script (that's why we don't use regular functions), but will be known in the process of execution. We may receive it from the server or from another source.
Our new function needs to interact with the main script.
Maybe we want it to be able to access outer local variables?
But the problem is that before JavaScript is published to production, it's compressed using a minifier – a special program that shrinks code by removing extra comments, spaces and – what's important, renames local variables into shorter ones.
For instance, if a function has let userName, minifier replaces it let a (or another letter if this one is occupied), and does it everywhere. That's usually a safe thing to do, because the variable is local, nothing outside the function can access it. And inside the function minifier replaces every mention of it. Minifiers are smart, they analyze the code structure, not just find-and-replace, so that's ok.
…But if new Function could access outer variables, then it would be unable to find userName.
Even if we could access outer lexical environment in new Function, we would have problems with minifiers.
The “special feature” of new Function saves us from mistakes.
And it enforces better code. If we need to pass something to a function, created by new Function, we should pass it explicitly as arguments.
The “sum” function actually does that right:
let sum = new Function('a', 'b', ' return a + b; ');
let a = 1, b = 2;
// outer values are passed as arguments
alert( sum(a, b) ); // 3
Summary
The syntax:
let func = new Function(arg1, arg2, ..., body);
For historical reasons, arguments can also be given as a comma-separated list.
These three mean the same:
new Function('a', 'b', ' return a + b; '); // basic syntax
new Function('a,b', ' return a + b; '); // comma-separated
new Function('a , b', ' return a + b; '); // comma-separated with spaces
Functions created with new Function, have [[Environment]] referencing the global Lexical Environment, not the outer one. Hence, they can not use outer variables. But that's actually good, because it saves us from errors. Explicit parameters passing is a much better thing architecturally and has no problems with minifiers.
Scheduling: setTimeout and setInterval
We may decide to execute a function not right now, but at a certain time later. That's called “scheduling a call”.
There are two methods for it:
setTimeout allows to run a function once after the interval of time.
setInterval allows to run a function regularly with the interval between the runs.
These methods are not a part of JavaScript specification. But most environments have the internal scheduler and provide these methods. In particular, they are supported in all browsers and Node.JS.
setTimeout
The syntax:
let timerId = setTimeout(func|code, delay[, arg1, arg2...])
Parameters:
func|code
Function or a string of code to execute.
Usually, that's a function. For historical reasons, a string of code can be passed, but that's not recommended.
delay
The delay before run, in milliseconds (1000 ms = 1 second).
arg1, arg2…
Arguments for the function (not supported in IE9-)
For instance, this code calls sayHi() after one second:
function sayHi() {
alert('Hello');
}
setTimeout(sayHi, 1000);
With arguments:
function sayHi(phrase, who) {
alert( phrase + ', ' + who );
}
setTimeout(sayHi, 1000, "Hello", "John"); // Hello, John
If the first argument is a string, then JavaScript creates a function from it.
So, this will also work:
setTimeout("alert('Hello')", 1000);
But using strings is not recommended, use functions instead of them, like this:
setTimeout(() => alert('Hello'), 1000);
Pass a function, but don't run it
Novice developers sometimes make a mistake by adding brackets () after the function:
// wrong!
setTimeout(sayHi(), 1000);
That doesn't work, because setTimeout expects a reference to function. And here sayHi() runs the function, and the result of its execution is passed to setTimeout. In our case the result of sayHi() is undefined (the function returns nothing), so nothing is scheduled.
Canceling with clearTimeout
A call to setTimeout returns a “timer identifier” timerId that we can use to cancel the execution.
The syntax to cancel:
let timerId = setTimeout(...);
clearTimeout(timerId);
In the code below we schedule the function and then cancel it (changed our mind). As a result, nothing happens:
let timerId = setTimeout(() => alert("never happens"), 1000);
alert(timerId); // timer identifier
clearTimeout(timerId);
alert(timerId); // same identifier (doesn't become null after canceling)
As we can see from alert output, in a browser the timer identifier is a number. In other environments, that can be something else. For instance, Node.JS returns a timer object with additional methods.
Again, there is no universal specification for these methods, so that's fine.
For browsers, timers are described in the
timers section of HTML5 standard.
setInterval
Method setInterval has the same syntax as setTimeout:
let timerId = setInterval(func|code, delay[, arg1, arg2...])
All arguments have the same meaning. But unlike setTimeout it runs the function not only once, but regularly after the given interval of time.
To stop further calls, we should call clearInterval(timerId).
The following example will show the message every 2 seconds. After 5 seconds, the output is stopped:
// repeat with the interval of 2 seconds
let timerId = setInterval(() => alert('tick'), 2000);
// after 5 seconds stop
setTimeout(() => { clearInterval(timerId); alert('stop'); }, 5000);
Modal windows freeze time in Chrome/Opera/Safari
In browsers IE and Firefox the internal timer continues “ticking” while showing alert/confirm/prompt, but in Chrome, Opera and Safari the internal timer becomes “frozen”.
So if you run the code above and don't dismiss the alert window for some time, then in Firefox/IE next alert will be shown immediately as you do it (2 seconds passed from the previous invocation), and in Chrome/Opera/Safari – after 2 more seconds (timer did not tick during the alert).
Recursive setTimeout
There are two ways of running something regularly.
One is setInterval. The other one is a recursive setTimeout, like this:
The setTimeout above schedules next call right at the end of the current one (*).
Recursive setTimeout is more flexible method than setInterval. This way the next call may be scheduled differently, depending on the results of the current one.
For instance, we need to write a service that every 5 seconds sends a request to server asking for data, but in case the server is overloaded, it should increase the interval to 10, 20, 40 seconds…
Here's the pseudocode:
let delay = 5000;
let timerId = setTimeout(function request() {
...send request...
if (request failed due to server overload) {
// increase the interval to the next run
delay *= 2;
}
timerId = setTimeout(request, delay);
}, delay);
And if we regularly have CPU-hungry tasks, then we can measure the time taken by the execution and plan the next call sooner or later.
Recursive setTimeout guarantees a delay between the executions, setInterval – does not.
Let's compare two code fragments. The first one uses setInterval:
let i = 1;
setInterval(function() {
func(i);
}, 100);
The second one uses recursive setTimeout:
let i = 1;
setTimeout(function run() {
func(i);
setTimeout(run, 100);
}, 100);
For setInterval the internal scheduler will run func(i) every 100ms:
Did you notice?…
The real delay between func calls for setInterval is less than in the code!
That's natural, because the time is taken by func execution “consumes” a part of the interval.
It is possible that func execution turns out to be longer than we expected and takes more than 100ms.
In this case the engine waits for func to complete, then checks the scheduler and if the time is up, then runs it again immediately.
In the edge case, if the function always executes longer than delay ms, then the calls will happen without pause at all.
And here is the picture for recursive setTimeout:
Recursive setTimeout guarantees the fixed delay (here 100ms).
That's because a new call is planned at the end of the previous one.
Garbage collection
When a function is passed in setInterval/setTimeout, an internal reference is created to it and saved in the scheduler. It prevents the function from being garbage collected, even if there are no other references to it.
// the function stays in memory until the scheduler calls it
setTimeout(function() {...}, 100);
For setInterval the function stays in memory until clearInterval is called.
There's a side-effect. A function references the outer lexical environment, so, while it lives, outer variables live too. They may take much more memory than the function itself. So when we don't need the scheduled function anymore, it's better to cancel it, even if it's very small.
setTimeout(…,0)
There's a special use case: setTimeout(func, 0).
This schedules the execution of func as soon as possible. But scheduler will invoke it only after the current code is complete.
So the function is scheduled to run “right after” the current code. In other words, asynchronously.
For instance, this outputs “Hello”, then immediately “World”:
The first line “puts the call into calendar after 0ms”. But the scheduler will only “check the calendar” after the current code is complete, so "Hello" is first, and "World" – after it.
Splitting CPU-hungry tasks
There's a trick to split CPU-hungry task using setTimeout.
For instance, syntax highlighting script (used to colorize code examples on this page) is quite CPU-heavy. To highlight the code, it performs the analysis, creates many colored elements, adds them to the document – for a big text that takes a lot. It may even cause the browser to “hang”, that's unacceptable.
So we can split the long text to pieces. First 100 lines, then plan another 100 lines using setTimeout(...,0), and so on.
For clarity, let's take a simpler example for consideration. We have a function to count from 1 to 1000000000.
If you run it, the CPU will hang. For server-side JS that's clearly noticeable, and if you are running it in-browser, then try to click other buttons on the page – you'll see that whole JavaScript actually is paused, no other actions work until it finishes.
let i = 0;
let start = Date.now();
function count() {
// do a heavy job
for (let j = 0; j < 1e9; j++) {
i++;
}
alert("Done in " + (Date.now() - start) + 'ms');
}
count();
The browser may even show “the script takes too long” warning (but hopefully won't, the number is not very big).
Let's split the job using the nested setTimeout:
let i = 0;
let start = Date.now();
function count() {
// do a piece of the heavy job (*)
do {
i++;
} while (i % 1e6 != 0);
if (i == 1e9) {
alert("Done in " + (Date.now() - start) + 'ms');
} else {
setTimeout(count, 0); // schedule the new call (**)
}
}
count();
Now the browser UI is fully functional during the “counting” process.
We do a part of the job (*):
First run: i=1...1000000.
Second run: i=1000001..2000000.
…and so on, the while checks if i is evenly divided by 100000.
Then the next call is scheduled in (*) if we're not done yet.
Pauses between count executions provide just enough “breath” for the JavaScript engine to do something else, to react on other user actions.
The notable thing is that both variants: with and without splitting the job by setTimeout – are comparable in speed. There's no much difference in the overall counting time.
To make them closer let's make an improvement.
We'll move the scheduling in the beginning of the count():
let i = 0;
let start = Date.now();
function count() {
// move the scheduling at the beginning
if (i < 1e9 - 1e6) {
setTimeout(count, 0); // schedule the new call
}
do {
i++;
} while (i % 1e6 != 0);
if (i == 1e9) {
alert("Done in " + (Date.now() - start) + 'ms');
}
}
count();
Now when we start to count() and know that we'll need to count() more – we schedule that immediately, before doing the job.
If you run it, easy to notice that it takes significantly less time.
Minimal delay of nested timers in-browser
In the browser, there's a limitation of how often nested timers can run. The
HTML5 standard says: “after five nested timers…, the interval is forced to be at least four milliseconds.”.
Let's demonstrate what it means by the example below. The setTimeout call in it re-schedules itself after 0ms. Each call remembers the real time from the previous one in the times array. What the real delays look like? Let's see:
let start = Date.now();
let times = [];
setTimeout(function run() {
times.push(Date.now() - start); // remember delay from the previous call
if (start + 100 < Date.now()) alert(times); // show the delays after 100ms
else setTimeout(run, 0); // else re-schedule
}, 0);
// an example of the output:
// 1,1,1,1,9,15,20,24,30,35,40,45,50,55,59,64,70,75,80,85,90,95,100
First timers run immediately (just as written in the spec), and then the delay comes into play and we see 9, 15, 20, 24....
That limitation comes from ancient times and many scripts rely on it, so it exists for historical reasons.
For server-side JavaScript, that limitation does not exist, and there exist other ways to schedule an immediate asynchronous job, like
process.nextTick and
setImmediate for Node.JS. So the notion is browser-specific only.
Allowing the browser to render
Another benefit for in-browser scripts is that they can show a progress bar or something to the user. That's because the browser usually does all “repainting” after the script is complete.
So if we do a single huge function then even if it changes something, the changes are not reflected in the document till it finishes.
Here's the demo:
<div id="progress"></div>
<script>
let i = 0;
function count() {
for (let j = 0; j < 1e6; j++) {
i++;
// put the current i into the <div>
// (we'll talk more about innerHTML in the specific chapter, should be obvious here)
progress.innerHTML = i;
}
}
count();
</script>
If you run it, the changes to i will show up after the whole count finishes.
And if we use setTimeout to split it into pieces then changes are applied in-between the runs, so this looks better:
<div id="progress"></div>
<script>
let i = 0;
function count() {
// do a piece of the heavy job (*)
do {
i++;
progress.innerHTML = i;
} while (i % 1e3 != 0);
if (i < 1e9) {
setTimeout(count, 0);
}
}
count();
</script>
Now the <div> shows increasing values of i.
Summary
Methods setInterval(func, delay, ...args) and setTimeout(func, delay, ...args) allow to run the func regularly/once after delay milliseconds.
To cancel the execution, we should call clearInterval/clearTimeout with the value returned by setInterval/setTimeout.
Nested setTimeout calls is a more flexible alternative to setInterval. Also they can guarantee the minimal time between the executions.
Zero-timeout scheduling setTimeout(...,0) is used to schedule the call “as soon as possible, but after the current code is complete”.
Some use cases of setTimeout(...,0):
To split CPU-hungry tasks into pieces, so that the script doesn't “hang”
To let the browser do something else while the process is going on (paint the progress bar).
Please note that all scheduling methods do not guarantee the exact delay. We should not rely on that in the scheduled code.
For example, the in-browser timer may slow down for a lot of reasons:
The CPU is overloaded.
The browser tab is in the background mode.
The laptop is on battery.
All that may increase the minimal timer resolution (the minimal delay) to 300ms or even 1000ms depending on the browser and settings.
Write a function printNumbers(from, to) that outputs a number every second, starting from from and ending with to.
Make two variants of the solution.
Using setInterval.
Using recursive setTimeout.
Using setInterval:
function printNumbers(from, to) {
let current = from;
let timerId = setInterval(function() {
alert(current);
if (current == to) {
clearInterval(timerId);
}
current++;
}, 1000);
}
// usage:
printNumbers(5, 10);
Using recursive setTimeout:
function printNumbers(from, to) {
let current = from;
setTimeout(function go() {
alert(current);
if (current < to) {
setTimeout(go, 1000);
}
current++;
}, 1000);
}
// usage:
printNumbers(5, 10);
Note that in both solutions, there is an initial delay before the first output. Sometimes we need to add a line to make the first output immediately, that's easy to do.
Here's the function that uses nested setTimeout to split a job into pieces.
Rewrite it to setInterval:
let i = 0;
let start = Date.now();
function count() {
if (i == 1000000000) {
alert("Done in " + (Date.now() - start) + 'ms');
} else {
setTimeout(count, 0);
}
// a piece of heavy job
for(let j = 0; j < 1000000; j++) {
i++;
}
}
count();
let i = 0;
let start = Date.now();
let timer = setInterval(count, 0);
function count() {
for(let j = 0; j < 1000000; j++) {
i++;
}
if (i == 1000000000) {
alert("Done in " + (Date.now() - start) + 'ms');
cancelInterval(timer);
}
}
In the code below there's a setTimeout call scheduled, then a heavy calculation is run, that takes more than 100ms to finish.
When the scheduled function will run?
After the loop.
Before the loop.
In the beginning of the loop.
What alert is going to show?
let i = 0;
setTimeout(() => alert(i), 100); // ?
// assume that the time to execute this function is >100ms
for(let j = 0; j < 100000000; j++) {
i++;
}
Any setTimeout will run only after the current code has finished.
The i will be the last one: 100000000.
let i = 0;
setTimeout(() => alert(i), 100); // 100000000
// assume that the time to execute this function is >100ms
for(let j = 0; j < 100000000; j++) {
i++;
}
Decorators and forwarding, call/apply
JavaScript gives exceptional flexibility when dealing with functions. They can be passed around, used as objects, and now we'll see how to forward calls between them and decorate them.
Transparent caching
Let's say we have a function slow(x) which is CPU-heavy, but its results are stable. In other words, for the same x it always returns the same result.
If the function is called often, we may want to cache (remember) the results for different x to avoid spending extra-time on recalculations.
But instead of adding that functionality into slow() we'll create a wrapper. As we'll see, there are many benefits of doing so.
Here's the code, and explanations follow:
function slow(x) {
// there can be a heavy CPU-intensive job here
alert(`Called with ${x}`);
return x;
}
function cachingDecorator(func) {
let cache = new Map();
return function(x) {
if (cache.has(x)) { // if the result is in the map
return cache.get(x); // return it
}
let result = func(x); // otherwise call func
cache.set(x, result); // and cache (remember) the result
return result;
};
}
slow = cachingDecorator(slow);
alert( slow(1) ); // slow(1) is cached
alert( "Again: " + slow(1) ); // the same
alert( slow(2) ); // slow(2) is cached
alert( "Again: " + slow(2) ); // the same as the previous line
In the code above cachingDecorator is a decorator: a special function that takes another function and alters its behavior.
The idea is that we can call cachingDecorator for any function, and it will return the caching wrapper. That's great, because we can have many functions that could use such a feature, and all we need to do is to apply cachingDecorator to them.
By separating caching from the main function code we also keep the main code simpler.
Now let's get into details of how it works.
The result of cachingDecorator(func) is a “wrapper”: function(x) that “wraps” the call of func(x) into caching logic:
As we can see, the wrapper returns the result of func(x) “as is”. From an outside code, the wrapped slow function still does the same. It just got a caching aspect added to its behavior.
To summarize, there are several benefits of using a separate cachingDecorator instead of altering the code of slow itself:
The cachingDecorator is reusable. We can apply it to another function.
The caching logic is separate, it did not increase the complexity of slow itself (if there were any).
We can combine multiple decorators if needed (other decorators will follow).
Using “func.call” for the context
The caching decorator mentioned above is not suited to work with object methods.
For instance, in the code below user.format() stops working after the decoration:
// we'll make worker.slow caching
let worker = {
someMethod() {
return 1;
},
slow(x) {
// actually, there can be a scary CPU-heavy task here
alert("Called with " + x);
return x * this.someMethod(); // (*)
}
};
// same code as before
function cachingDecorator(func) {
let cache = new Map();
return function(x) {
if (cache.has(x)) {
return cache.get(x);
}
let result = func(x); // (**)
cache.set(x, result);
return result;
};
}
alert( worker.slow(1) ); // the original method works
worker.slow = cachingDecorator(worker.slow); // now make it caching
alert( worker.slow(2) ); // Whoops! Error: Cannot read property 'someMethod' of undefined
The error occurs in the line (*) that tries to access this.someMethod and fails. Can you see why?
The reason is that the wrapper calls the original function as func(x) in the line (**). And, when called like that, the function gets this = undefined.
We would observe a similar symptom if we tried to run:
let func = worker.slow;
func(2);
So, the wrapper passes the call to the original method, but without the context this. Hence the error.
Let's fix it.
There's a special built-in function method
func.call(context, …args) that allows to call a function explicitly setting this.
The syntax is:
func.call(context, arg1, arg2, ...)
It runs func providing the first argument as this, and the next as the arguments.
To put it simply, these two calls do almost the same:
func(1, 2, 3);
func.call(obj, 1, 2, 3)
They both call func with arguments 1, 2 and 3. The only difference is that func.call also sets this to obj.
As an example, in the code below we call sayHi in the context of different objects: sayHi.call(user) runs sayHi providing this=user, and the next line sets this=admin:
function sayHi() {
alert(this.name);
}
let user = { name: "John" };
let admin = { name: "Admin" };
// use call to pass different objects as "this"
sayHi.call( user ); // this = John
sayHi.call( admin ); // this = Admin
And here we use call to call say with the given context and phrase:
function say(phrase) {
alert(this.name + ': ' + phrase);
}
let user = { name: "John" };
// user becomes this, and "Hello" becomes the first argument
say.call( user, "Hello" ); // John: Hello
In our case, we can use call in the wrapper to pass the context to the original function:
let worker = {
someMethod() {
return 1;
},
slow(x) {
alert("Called with " + x);
return x * this.someMethod(); // (*)
}
};
function cachingDecorator(func) {
let cache = new Map();
return function(x) {
if (cache.has(x)) {
return cache.get(x);
}
let result = func.call(this, x); // "this" is passed correctly now
cache.set(x, result);
return result;
};
}
worker.slow = cachingDecorator(worker.slow); // now make it caching
alert( worker.slow(2) ); // works
alert( worker.slow(2) ); // works, doesn't call the original (cached)
Now everything is fine.
To make it all clear, let's see more deeply how this is passed along:
After the decoration worker.slow is now the wrapper function (x) { ... }.
So when worker.slow(2) is executed, the wrapper gets 2 as an argument and this=worker (it's the object before dot).
Inside the wrapper, assuming the result is not yet cached, func.call(this, x) passes the current this (=worker) and the current argument (=2) to the original method.
Going multi-argument with “func.apply”
Now let's make cachingDecorator even more universal. Till now it was working only with single-argument functions.
Now how to cache the multi-argument worker.slow method?
let worker = {
slow(min, max) {
return min + max; // scary CPU-hogger is assumed
}
};
// should remember same-argument calls
worker.slow = cachingDecorator(worker.slow);
We have two tasks to solve here.
First is how to use both arguments min and max for the key in cache map. Previously, for a single argument x we could just cache.set(x, result) to save the result and cache.get(x) to retrieve it. But now we need to remember the result for a combination of arguments(min,max). The native Map takes single value only as the key.
There are many solutions possible:
Implement a new (or use a third-party) map-like data structure that is more versatile and allows multi-keys.
Use nested maps: cache.set(min) will be a Map that stores the pair (max, result). So we can get result as cache.get(min).get(max).
Join two values into one. In our particular case we can just use a string "min,max" as the Map key. For flexibility, we can allow to provide a hashing function for the decorator, that knows how to make one value from many.
For many practical applications, the 3rd variant is good enough, so we'll stick to it.
The second task to solve is how to pass many arguments to func. Currently, the wrapper function(x) assumes a single argument, and func.call(this, x) passes it.
Here we can use another built-in method
func.apply.
The syntax is:
func.apply(context, args)
It runs the func setting this=context and using an array-like object args as the list of arguments.
For instance, these two calls are almost the same:
func(1, 2, 3);
func.apply(context, [1, 2, 3])
Both run func giving it arguments 1,2,3. But apply also sets this=context.
For instance, here say is called with this=user and messageData as a list of arguments:
function say(time, phrase) {
alert(`[${time}] ${this.name}: ${phrase}`);
}
let user = { name: "John" };
let messageData = ['10:00', 'Hello']; // become time and phrase
// user becomes this, messageData is passed as a list of arguments (time, phrase)
say.apply(user, messageData); // [10:00] John: Hello (this=user)
The only syntax difference between call and apply is that call expects a list of arguments, while apply takes an array-like object with them.
We already know the spread operator ... from the chapter
Rest parameters and spread operator that can pass an array (or any iterable) as a list of arguments. So if we use it with call, we can achieve almost the same as apply.
These two calls are almost equivalent:
let args = [1, 2, 3];
func.call(context, ...args); // pass an array as list with spread operator
func.apply(context, args); // is same as using apply
If we look more closely, there's a minor difference between such uses of call and apply.
The spread operator ... allows to pass iterableargs as the list to call.
The apply accepts only array-likeargs.
So, these calls complement each other. Where we expect an iterable, call works, where we expect an array-like, apply works.
And if args is both iterable and array-like, like a real array, then we technically could use any of them, but apply will probably be faster, because it's a single operation. Most JavaScript engines internally optimize is better than a pair call + spread.
One of the most important uses of apply is passing the call to another function, like this:
let wrapper = function() {
return anotherFunction.apply(this, arguments);
};
That's called call forwarding. The wrapper passes everything it gets: the context this and arguments to anotherFunction and returns back its result.
When an external code calls such wrapper, it is indistinguishable from the call of the original function.
Now let's bake it all into the more powerful cachingDecorator:
let worker = {
slow(min, max) {
alert(`Called with ${min},${max}`);
return min + max;
}
};
function cachingDecorator(func, hash) {
let cache = new Map();
return function() {
let key = hash(arguments); // (*)
if (cache.has(key)) {
return cache.get(key);
}
let result = func.apply(this, arguments); // (**)
cache.set(key, result);
return result;
};
}
function hash(args) {
return args[0] + ',' + args[1];
}
worker.slow = cachingDecorator(worker.slow, hash);
alert( worker.slow(3, 5) ); // works
alert( "Again " + worker.slow(3, 5) ); // same (cached)
Now the wrapper operates with any number of arguments.
There are two changes:
In the line (*) it calls hash to create a single key from arguments. Here we use a simple “joining” function that turns arguments (3, 5) into the key "3,5". More complex cases may require other hashing functions.
Then (**) uses func.apply to pass both the context and all arguments the wrapper got (no matter how many) to the original function.
Borrowing a method
Now let's make one more minor improvement in the hashing function:
function hash(args) {
return args[0] + ',' + args[1];
}
As of now, it works only on two arguments. It would be better if it could glue any number of args.
The natural solution would be to use
arr.join method:
function hash(args) {
return args.join();
}
…Unfortunately, that won't work. Because we are calling hash(arguments) and arguments object is both iterable and array-like, but not a real array.
So calling join on it would fail, as we can see below:
function hash() {
alert( arguments.join() ); // Error: arguments.join is not a function
}
hash(1, 2);
We take (borrow) a join method from a regular array [].join. And use [].join.call to run it in the context of arguments.
Why does it work?
That's because the internal algorithm of the native method arr.join(glue) is very simple.
Taken from the specification almost “as-is”:
Let glue be the first argument or, if no arguments, then a comma ",".
Let result be an empty string.
Append this[0] to result.
Append glue and this[1].
Append glue and this[2].
…Do so until this.length items are glued.
Return result.
So, technically it takes this and joins this[0], this[1] …etc together. It's intentionally written in a way that allows any array-like this (not a coincidence, many methods follow this practice). That's why it also works with this=arguments.
Summary
Decorator is a wrapper around a function that alters its behavior. The main job is still carried out by the function.
It is generally safe to replace a function or a method with a decorated one, except for one little thing. If the original function had properties on it, like func.calledCount or whatever, then the decorated one will not provide them. Because that is a wrapper. So one needs to be careful if one uses them. Some decorators provide their own properties.
Decorators can be seen as “features” or “aspects” that can be added to a function. We can add one or add many. And all this without changing its code!
To implement cachingDecorator, we studied methods:
func.apply(context, args) – calls func passing context as this and array-like args into a list of arguments.
The generic call forwarding is usually done with apply:
let wrapper = function() {
return original.apply(this, arguments);
}
We also saw an example of method borrowing when we take a method from an object and call it in the context of another object. It is quite common to take array methods and apply them to arguments. The alternative is to use rest parameters object that is a real array.
There are many decorators there in the wild. Check how well you got them by solving the tasks of this chapter.
Create a decorator spy(func) that should return a wrapper that saves all calls to function in its calls property.
Every call is saved as an array of arguments.
For instance:
function work(a, b) {
alert( a + b ); // work is an arbitrary function or method
}
work = spy(work);
work(1, 2); // 3
work(4, 5); // 9
for (let args of work.calls) {
alert( 'call:' + args.join() ); // "call:1,2", "call:4,5"
}
P.S. That decorator is sometimes useful for unit-testing, it's advanced form is sinon.spy in
Sinon.JS library.
Please note how an arrow function is used here. As we know, arrow functions do not have own this and arguments, so f.apply(this, arguments) takes this and arguments from the wrapper.
If we pass a regular function, setTimeout would call it without arguments and this=window (in-browser), so we'd need to write a bit more code to pass them from the wrapper:
function delay(f, ms) {
// added variables to pass this and arguments from the wrapper inside setTimeout
return function(...args) {
let savedThis = this;
setTimeout(function() {
f.apply(savedThis, args);
}, ms);
};
}
The result of debounce(f, ms) decorator should be a wrapper that passes the call to f at maximum once per ms milliseconds.
In other words, when we call a “debounced” function, it guarantees that all other future in the closest ms milliseconds will be ignored.
For instance:
let f = debounce(alert, 1000);
f(1); // runs immediately
f(2); // ignored
setTimeout( () => f(3), 100); // ignored ( only 100 ms passed )
setTimeout( () => f(4), 1100); // runs
setTimeout( () => f(5), 1500); // ignored (less than 1000 ms from the last run)
In practice debounce is useful for functions that retrieve/update something when we know that nothing new can be done in such a short period of time, so it's better not to waste resources.
Create a “throttling” decorator throttle(f, ms) – that returns a wrapper, passing the call to f at maximum once per ms milliseconds. Those calls that fall into the “cooldown” period, are ignored.
The difference with debounce – if an ignored call is the last during the cooldown, then it executes at the end of the delay.
Let's check the real-life application to better understand that requirement and to see where it comes from.
For instance, we want to track mouse movements.
In browser we can setup a function to run at every mouse micro-movement and get the pointer location as it moves. During an active mouse usage, this function usually runs very frequently, can be something like 100 times per second (every 10 ms).
The tracking function should update some information on the web-page.
Updating function update() is too heavy to do it on every micro-movement. There is also no sense in making it more often than once per 100ms.
So we'll assign throttle(update, 100) as the function to run on each mouse move instead of the original update(). The decorator will be called often, but update() will be called at maximum once per 100ms.
Visually, it will look like this:
For the first mouse movement the decorated variant passes the call to update. That's important, the user sees our reaction to his move immediately.
Then as the mouse moves on, until 100ms nothing happens. The decorated variant ignores calls.
At the end of 100ms – one more update happens with the last coordinates.
Then, finally, the mouse stops somewhere. The decorated variant waits until 100ms expire and then runs update runs with last coordinates. So, perhaps the most important, the final mouse coordinates are processed.
A code example:
function f(a) {
console.log(a)
};
// f1000 passes calls to f at maximum once per 1000 ms
let f1000 = throttle(f, 1000);
f1000(1); // shows 1
f1000(2); // (throttling, 1000ms not out yet)
f1000(3); // (throttling, 1000ms not out yet)
// when 1000 ms time out...
// ...outputs 3, intermediate value 2 was ignored
P.S. Arguments and the context this passed to f1000 should be passed to the original f.
During the first call, the wrapper just runs func and sets the cooldown state (isThrottled = true).
In this state all calls memorized in savedArgs/savedThis. Please note that both the context and the arguments are equally important and should be memorized. We need them simultaneously to reproduce the call.
…Then after ms milliseconds pass, setTimeout triggers. The cooldown state is removed (isThrottled = false). And if we had ignored calls, then wrapper is executed with last memorized arguments and context.
The 3rd step runs not func, but wrapper, because we not only need to execute func, but once again enter the cooldown state and setup the timeout to reset it.
return a * b;
};
function ask(question, answer, ok, fail) {
let result = prompt(question, '');
if (result.toLowerCase() == answer.toLowerCase()) ok();
else fail();
}
function bind(func, context /*, args*/) {
let bindArgs = [].slice.call(arguments, 2); // (1)
function wrapper() { // (2)
let args = [].slice.call(arguments);
let unshiftArgs = bindArgs.concat(args); // (3)
return func.apply(context, unshiftArgs); // (4)
}
return wrapper;
}
Function binding
When using setTimeout with object methods or passing object methods along, there's a known problem: "losing this".
Suddenly, this just stops working right. The situation is typical for novice developers, but happens with experienced ones as well.
Losing “this”
We already know that in JavaScript it's easy to lose this. Once a method is passed somewhere separately from the object – this is lost.
Here's how it may happen with setTimeout:
let user = {
firstName: "John",
sayHi() {
alert(`Hello, ${this.firstName}!`);
}
};
setTimeout(user.sayHi, 1000); // Hello, undefined!
As we can see, the output shows not “John” as this.firstName, but undefined!
That's because setTimeout got the function user.sayHi, separately from the object. The last line can be rewritten as:
let f = user.sayHi;
setTimeout(f, 1000); // lost user context
The method setTimeout in-browser is a little special: it sets this=window for the function call (for Node.JS, this becomes the timer object, but doesn't really matter here). So for this.firstName it tries to get window.firstName, which does not exist. In other similar cases as we'll see, usually this just becomes undefined.
The task is quite typical – we want to pass an object method somewhere else (here – to the scheduler) where it will be called. How to make sure that it will be called in the right context?
Solution 1: a wrapper
The simplest solution is to use an wrapping function:
let user = {
firstName: "John",
sayHi() {
alert(`Hello, ${this.firstName}!`);
}
};
setTimeout(function() {
user.sayHi(); // Hello, John!
}, 1000);
Now it works, because it receives user from the outer lexical environment, and then calls the method normally.
Looks fine, but a slight vulnerability appears in our code structure.
What if before setTimeout triggers (there's one second delay!) user changes value? Then, suddenly, it will call the wrong object!
let user = {
firstName: "John",
sayHi() {
alert(`Hello, ${this.firstName}!`);
}
};
setTimeout(() => user.sayHi(), 1000);
// ...within 1 second
user = { sayHi() { alert("Another user in setTimeout!"); } };
// Another user in setTimeout?!?
The next solution guarantees that such thing won't happen.
Solution 2: bind
Functions provide a built-in method
bind that allows to fix this.
The basic syntax is:
// more complex syntax will be little later
let boundFunc = func.bind(context);
The result of func.bind(context) is a special function-like “exotic object”, that is callable as function and transparently passes the call to func setting this=context.
In other words, calling boundFunc is like func with fixed this.
For instance, here funcUser passes a call to func with this=user:
let user = {
firstName: "John"
};
function func() {
alert(this.firstName);
}
let funcUser = func.bind(user);
funcUser(); // John
Here func.bind(user) as a “bound variant” of func, with fixed this=user.
All arguments are passed to the original func “as is”, for instance:
let user = {
firstName: "John"
};
function func(phrase) {
alert(phrase + ', ' + this.firstName);
}
// bind this to user
let funcUser = func.bind(user);
funcUser("Hello"); // Hello, John (argument "Hello" is passed, and this=user)
Now let's try with an object method:
let user = {
firstName: "John",
sayHi() {
alert(`Hello, ${this.firstName}!`);
}
};
let sayHi = user.sayHi.bind(user); // (*)
sayHi(); // Hello, John!
setTimeout(sayHi, 1000); // Hello, John!
In the line (*) we take the method user.sayHi and bind it to user. The sayHi is a “bound” function, that can be called alone or passed to setTimeout – doesn't matter, the context will be right.
Here we can see that arguments are passed “as is”, only this is fixed by bind:
let user = {
firstName: "John",
say(phrase) {
alert(`${phrase}, ${this.firstName}!`);
}
};
let say = user.say.bind(user);
say("Hello"); // Hello, John ("Hello" argument is passed to say)
say("Bye"); // Bye, John ("Bye" is passed to say)
Convenience method: bindAll
If an object has many methods and we plan to actively pass it around, then we could bind them all in a loop:
for (let key in user) {
if (typeof user[key] == 'function') {
user[key] = user[key].bind(user);
}
}
JavaScript libraries also provide functions for convenient mass binding , e.g.
_.bindAll(obj) in lodash.
Summary
Method func.bind(context, ...args) returns a “bound variant” of function func that fixes the context this and first arguments if given.
Usually we apply bind to fix this in an object method, so that we can pass it somewhere. For example, to setTimeout. There are more reasons to bind in the modern development, we'll meet them later.
There's a value in the property of a function. Will it change after bind? Why, elaborate?
function sayHi() {
alert( this.name );
}
sayHi.test = 5;
let bound = sayHi.bind({
name: "John"
});
alert( bound.test ); // what will be the output? why?
The answer: undefined.
The result of bind is another object. It does not have the test property.
Usually that also works, but may fail in more complex situations where user has a chance of being overwritten between the moments of asking and running () => user.loginOk().
Currying and partials
Till now we were only talking about binding this. Now let's make a step further.
We can bind not only this, but also arguments. That's rarely done, but sometimes can be handy.
The full syntax of bind:
let bound = func.bind(context, arg1, arg2, ...);
It allows to bind context as this and starting arguments of the function.
For instance, we have a multiplication function mul(a, b):
function mul(a, b) {
return a * b;
}
Let's use bind to create a function double on its base:
The call to mul.bind(null, 2) creates a new function double that passes calls to mul, fixing null as the context and 2 as the first argument. Further arguments are passed “as is”.
That's called
partial function application – we create a new function by fixing some parameters of the existing one.
Please note that here we actually don't use this here. But bind requires it, so we must put in something like null.
The function triple in the code below triples the value:
Here our benefit is that we created an independent function with a readable name (double, triple). We can use it and don't write the first argument of every time, cause it's fixed with bind.
In other cases, partial application is useful when we have a very generic function, and want a less universal variant of it for convenience.
For instance, we have a function send(from, to, text). Then, inside a user object we may want to use a partial variant of it: sendTo(to, text) that sends from the current user.
Going partial without context
What if we'd like to fix some arguments, but not bind this?
The native bind does not allow that. We can't just omit the context and jump to arguments.
Fortunately, a partial function for binding only arguments can be easily implemented.
Like this:
function partial(func, ...argsBound) {
return function(...args) { // (*)
return func.call(this, ...argsBound, ...args);
}
}
// Usage:
let user = {
firstName: "John",
say(time, phrase) {
alert(`[${time}] ${this.firstName}: ${phrase}!`);
}
};
// add a partial method that says something now by fixing the first argument
user.sayNow = partial(user.say, new Date().getHours() + ':' + new Date().getMinutes());
user.sayNow("Hello");
// Something like:
// [10:00] Hello, John!
The result of partial(func[, arg1, arg2...]) call is a wrapper (*) that calls func with:
Same this as it gets (for user.sayNow call it's user)
Then gives it ...argsBound – arguments from the partial call ("10:00")
Then gives it ...args – arguments given to the wrapper ("Hello")
So easy to do it with the spread operator, right?
Also there's a ready
_.partial implementation from lodash library.
Currying
Sometimes people mix up partial function application mentioned above with another thing named “currying”. That's another interesting technique of working with functions that we just have to mention here.
Currying is translating a function from callable as f(a, b, c) into callable as f(a)(b)(c).
Let's make curry function that performs currying for binary functions. In other words, it translates f(a, b) into f(a)(b):
function curry(func) {
return function(a) {
return function(b) {
return func(a, b);
};
};
}
// usage
function sum(a, b) {
return a + b;
}
let carriedSum = curry(sum);
alert( carriedSum(1)(2) ); // 3
As you can see, the implementation is a series of wrappers.
The result of curry(func) is a wrapper function(a).
When it is called like sum(1), the argument is saved in the Lexical Environment, and a new wrapper is returned function(b).
Then sum(1)(2) finally calls function(b) providing 2, and it passes the call to the original multi-argument sum.
More advanced implementations of currying like
_.curry from lodash library do something more sophisticated. They return a wrapper that allows a function to be called normally when all arguments are supplied or returns a partial otherwise.
function curry(f) {
return function(..args) {
// if args.length == f.length (as many arguments as f has),
// then pass the call to f
// otherwise return a partial function that fixes args as first arguments
};
}
Currying? What for?
Advanced currying allows both to keep the function callable normally and to get partials easily. To understand the benefits we definitely need a worthy real-life example.
For instance, we have the logging function log(date, importance, message) that formats and outputs the information. In real projects such functions also have many other useful features like: sending it over the network or filtering:
function log(date, importance, message) {
alert(`[${date.getHours()}:${date.getMinutes()}] [${importance}] ${message}`);
}
Let's get a convenience function for today's logs:
// todayLog will be the partial of log with fixed first argument
let todayLog = log(new Date());
// use it
todayLog("INFO", "message"); // [HH:mm] INFO message
And now a convenience function for today's debug messages:
let todayDebug = todayLog("DEBUG");
todayDebug("message"); // [HH:mm] DEBUG message
So:
We didn't lose anything after currying: log is still callable normally.
We were able to generate partial functions that are convenient in many cases.
Advanced curry implementation
In case you're interested, here's the “advanced” curry implementation that we could use above.
function curry(func) {
return function curried(...args) {
if (args.length >= func.length) {
return func.apply(this, args);
} else {
return function(...args2) {
return curried.apply(this, args.concat(args2));
}
}
};
}
function sum(a, b, c) {
return a + b + c;
}
let curriedSum = curry(sum);
// still callable normally
alert( curriedSum(1, 2, 3) ); // 6
// get the partial with curried(1) and call it with 2 other arguments
alert( curriedSum(1)(2,3) ); // 6
// full curried form
alert( curriedSum(1)(2)(3) ); // 6
The new curry may look complicated, but it's actually pretty easy to understand.
The result of curry(func) is the wrapper curried that looks like this:
// func is the function to transform
function curried(...args) {
if (args.length >= func.length) { // (1)
return func.apply(this, args);
} else {
return function pass(...args2) { // (2)
return curried.apply(this, args.concat(args2));
}
}
};
When we run it, there are two branches:
Call now: if passed args count is the same as the original function has in its definition (func.length) or longer, then just pass the call to it.
Get a partial: otherwise, func is not called yet. Instead, another wrapper pass is returned, that will re-apply curried providing previous arguments together with the new ones. Then on a new call, again, we'll get either a new partial (if not enough arguments) or, finally, the result.
For instance, let's see what happens in the case of sum(a, b, c). Three arguments, so sum.length = 3.
For the call curried(1)(2)(3):
The first call curried(1) remembers 1 in its Lexical Environment, and returns a wrapper pass.
The wrapper pass is called with (2): it takes previous args (1), concatenates them with what it got (2) and calls curried(1, 2) with them together.
As the argument count is still less than 3, curry returns pass.
The wrapper pass is called again with (3), for the next call pass(3) takes previous args (1, 2) and adds 3 to them, making the call curried(1, 2, 3) – there are 3 arguments at last, they are given to the original function.
If that's still not obvious, just trace the calls sequence in your mind or on the paper.
Fixed-length functions only
The currying requires the function to have a known fixed number of arguments.
A little more than currying
By definition, currying should convert sum(a, b, c) into sum(a)(b)(c).
But most implementations of currying in JavaScript are advanced, as described: they also keep the function callable in the multi-argument variant.
Summary
When we fix some arguments of an existing function, the resulting (less universal) function is called a partial. We can use bind to get a partial, but there are other ways also.
Partials are convenient when we don't want to repeat the same argument over and over again. Like if we have a send(from, to) function, and from should always be the same for our task, we can get a partial and go on with it.
Currying is a transform that makes f(a,b,c) callable as f(a)(b)(c). JavaScript implementations usually both keep the function callable normally and return the partial if arguments count is not enough.
Currying is great when we want easy partials. As we've seen in the logging example: the universal function log(date, importance, message) after currying gives us partials when called with one argument like log(date) or two arguments log(date, importance).
The error occurs because forEach runs functions with this=undefined by default, so the attempt to access undefined.title is made.
That doesn't affect arrow functions, because they just don't have this.
Arrow functions can't run with new
Not having this naturally means another limitation: arrow functions can't be used as constructors. They can't be called with new.
Arrow functions VS bind
There's a subtle difference between an arrow function => and a regular function called with .bind(this):
.bind(this) creates a “bound version” of the function.
The arrow => doesn't create any binding. The function simply doesn't have this. The lookup of this is made exactly the same way as a regular variable search: in the outer lexical environment.
Arrows have no “arguments”
Arrow functions also have no arguments variable.
That's great for decorators, when we need to forward a call with the current this and arguments.
For instance, defer(f, ms) gets a function and returns a wrapper around it that delays the call by ms milliseconds:
function defer(f, ms) {
return function() {
setTimeout(() => f.apply(this, arguments), ms)
};
}
function sayHi(who) {
alert('Hello, ' + who);
}
let sayHiDeferred = defer(sayHi, 2000);
sayHiDeferred("John"); // Hello, John after 2 seconds
The same without an arrow function would look like:
function defer(f, ms) {
return function(...args) {
let ctx = this;
setTimeout(function() {
return f.apply(ctx, args);
}, ms);
};
}
Here we had to create additional variables args and ctx so that the function inside setTimeout could take them.
Summary
Arrow functions:
Do not have this.
Do not have arguments.
Can't be called with new.
(They also don't have super, but we didn't study it. Will be in the chapter
Class inheritance, super).
That's because they are meant for short pieces of code that do not have their own “context”, but rather works in the current one. And they really shine in that use case.
Objects, classes, inheritance
In this section we return to objects and learn them even more in-depth.
Till now, a property was a simple “key-value” pair to us. But an object property is actually more complex and tunable thing.
Property flags
Object properties, besides a value, have three special attributes (so-called “flags”):
writable – if true, can be changed, otherwise it's read-only.
enumerable – if true, then listed in loops, otherwise not listed.
configurable – if true, the property can be deleted and these attributes can be modified, otherwise not.
We didn't see them yet, because generally they do not show up. When we create a property “the usual way”, all of them are true. But we also can change them anytime.
If the property exists, defineProperty updates its flags. Otherwise, it creates the property with the given value and flags; in that case, if a flag is not supplied, it is assumed false.
For instance, here a property name is created with all falsy flags:
Compare it with “normally created” user.name above: now all flags are falsy. If that's not what we want then we'd better set them to true in descriptor.
Now let's see effects of the flags by example.
Read-only
Let's make user.name read-only by changing writable flag:
let user = {
name: "John"
};
Object.defineProperty(user, "name", {
writable: false
});
user.name = "Pete"; // Error: Cannot assign to read only property 'name'...
Now no one can change the name of our user, unless he applies his own defineProperty to override ours.
Here's the same operation, but for the case when a property doesn't exist:
let user = { };
Object.defineProperty(user, "name", {
value: "Pete",
// for new properties need to explicitly list what's true
enumerable: true,
configurable: true
});
alert(user.name); // Pete
user.name = "Alice"; // Error
Non-enumerable
Now let's add a custom toString to user.
Normally, a built-in toString for objects is non-enumerable, it does not show up in for..in. But if we add toString of our own, then by default it shows up in for..in, like this:
let user = {
name: "John",
toString() {
return this.name;
}
};
// By default, both our properties are listed:
for (let key in user) alert(key); // name, toString
If we don't like it, then we can set enumerable:false. Then it won't appear in for..in loop, just like the built-in one:
let user = {
name: "John",
toString() {
return this.name;
}
};
Object.defineProperty(user, "toString", {
enumerable: false
});
// Now our toString disappears:
for (let key in user) alert(key); // name
Non-enumerable properties are also excluded from Object.keys:
alert(Object.keys(user)); // name
Non-configurable
The non-configurable flag (configurable:false) is sometimes preset for built-in objects and properties.
A non-configurable property can not be deleted or altered with defineProperty.
For instance, Math.PI is both read-only, non-enumerable and non-configurable:
So, a programmer is unable to change the value of Math.PI or overwrite it.
Math.PI = 3; // Error
// delete Math.PI won't work either
Making a property non-configurable is a one-way road. We cannot change it back, because defineProperty doesn't work on non-configurable properties.
Here we are making user.name a “forever sealed” constant:
let user = { };
Object.defineProperty(user, "name", {
value: "John",
writable: false,
configurable: false
});
// won't be able to change user.name or its flags
// all this won't work:
// user.name = "Pete"
// delete user.name
// defineProperty(user, "name", ...)
Object.defineProperty(user, "name", {writable: true}); // Error
Errors appear only in use strict
In the non-strict mode, no errors occur when writing to read-only properties and such. But the operation still won't succeed. Flag-violating actions are just silently ignored in non-strict.
Together with Object.defineProperties it can be used as a “flags-aware” way of cloning an object:
let clone = Object.defineProperties({}, Object.getOwnPropertyDescriptors(obj));
Normally when we clone an object, we use an assignment to copy properties, like this:
for (let key in user) {
clone[key] = user[key]
}
…But that does not copy flags. So if we want a “better” clone then Object.defineProperties is preferred.
Another difference is that for..in ignores symbolic properties, but Object.getOwnPropertyDescriptors returns all property descriptors including symbolic ones.
Sealing an object globally
Property descriptors work at the level of individual properties.
There are also methods that limit access to the whole object:
Returns true if adding/removing/changing properties is forbidden, and all current properties are configurable: false, writable: false.
These methods are rarely used in practice.
Property getters and setters
There are two kinds of properties.
The first kind is data properties. We already know how to work with them. Actually, all properties that we've been using till now were data properties.
The second type of properties is something new. It's accessor properties. They are essentially functions that work on getting and setting a value, but look like regular properties to an external code.
Getters and setters
Accessor properties are represented by “getter” and “setter” methods. In an object literal they are denoted by get and set:
let obj = {
get propName() {
// getter, the code executed on getting obj.propName
},
set propName(value) {
// setter, the code executed on setting obj.propName = value
}
};
The getter works when obj.propName is read, the setter – when it is assigned.
For instance, we have a user object with name and surname:
let user = {
name: "John",
surname: "Smith"
};
Now we want to add a “fullName” property, that should be “John Smith”. Of course, we don't want to copy-paste existing information, so we can implement it as an accessor:
let user = {
name: "John",
surname: "Smith",
get fullName() {
return `${this.name} ${this.surname}`;
}
};
alert(user.fullName); // John Smith
From outside, an accessor property looks like a regular one. That's the idea of accessor properties. We don't calluser.fullName as a function, we read it normally: the getter runs behind the scenes.
As of now, fullName has only a getter. If we attempt to assign user.fullName=, there will be an error.
Let's fix it by adding a setter for user.fullName:
let user = {
name: "John",
surname: "Smith",
get fullName() {
return `${this.name} ${this.surname}`;
},
set fullName(value) {
[this.name, this.surname] = value.split(" ");
}
};
// set fullName is executed with the given value.
user.fullName = "Alice Cooper";
alert(user.name); // Alice
alert(user.surname); // Cooper
Now we have a “virtual” property. It is readable and writable, but in fact does not exist.
Accessor properties are only accessible with get/set
A property can either be a “data property” or an “accessor property”, but not both.
Once a property is defined with get prop() or set prop(), it's an accessor property. So there must be a getter to read it, and must be a setter if we want to assign it.
Sometimes it's normal that there's only a setter or only a getter. But the property won't be readable or writable in that case.
Accessor descriptors
Descriptors for accessor properties are different – as compared with data properties.
For accessor properties, there is no value and writable, but instead there are get and set functions.
So an accessor descriptor may have:
get – a function without arguments, that works when a property is read,
set – a function with one argument, that is called when the property is set,
enumerable – same as for data properties,
configurable – same as for data properties.
For instance, to create an accessor fullName with defineProperty, we can pass a descriptor with get and set:
let user = {
name: "John",
surname: "Smith"
};
Object.defineProperty(user, 'fullName', {
get() {
return `${this.name} ${this.surname}`;
},
set(value) {
[this.name, this.surname] = value.split(" ");
}
});
alert(user.fullName); // John Smith
for(let key in user) alert(key);
Please note once again that a property can be either an accessor or a data property, not both.
If we try to supply both get and value in the same descriptor, there will be an error:
Getters/setters can be used as wrappers over “real” property values to gain more control over them.
For instance, if we want to forbid too short names for user, we can store name in a special property _name. And filter assignments in the setter:
let user = {
get name() {
return this._name;
},
set name(value) {
if (value.length < 4) {
alert("Name is too short, need at least 4 characters");
return;
}
this._name = value;
}
};
user.name = "Pete";
alert(user.name); // Pete
user.name = ""; // Name is too short...
Technically, the external code may still access the name directly by using user._name. But there is a widely known agreement that properties starting with an underscore "_" are internal and should not be touched from outside the object.
Using for compatibility
One of the great ideas behind getters and setters – they allow to take control over a “normal” data property and tweak it at any moment.
For instance, we started implementing user objects using data properties name and age:
function User(name, age) {
this.name = name;
this.age = age;
}
let john = new User("John", 25);
alert( john.age ); // 25
…But sooner or later, things may change. Instead of age we may decide to store birthday, because it's more precise and convenient:
function User(name, birthday) {
this.name = name;
this.birthday = birthday;
}
let john = new User("John", new Date(1992, 6, 1));
Now what to do with the old code that still uses age property?
We can try to find all such places and fix them, but that takes time and can be hard to do if that code is written by other people. And besides, age is a nice thing to have in user, right? In some places it's just what we want.
Adding a getter for age mitigates the problem:
function User(name, birthday) {
this.name = name;
this.birthday = birthday;
// age is calculated from the current date and birthday
Object.defineProperty(this, "age", {
get() {
let todayYear = new Date().getFullYear();
return todayYear - this.birthday.getFullYear();
}
});
}
let john = new User("John", new Date(1992, 6, 1));
alert( john.birthday ); // birthday is available
alert( john.age ); // ...as well as the age
Now the old code works too and we've got a nice additional property.
Prototypal inheritance
In programming, we often want to take something and extend it.
For instance, we have a user object with its properties and methods, and want to make admin and guest as slightly modified variants of it. We'd like to reuse what we have in user, not copy/reimplement its methods, just build a new object on top of it.
Prototypal inheritance is a language feature that helps in that.
[[Prototype]]
In JavaScript, objects have a special hidden property [[Prototype]] (as named in the specification), that is either null or references another object. That object is called “a prototype”:
That [[Prototype]] has a “magical” meaning. When we want to read a property from object, and it's missing, JavaScript automatically takes it from the prototype. In programming, such thing is called “prototypal inheritance”. Many cool language features and programming techniques are based on it.
The property [[Prototype]] is internal and hidden, but there are many ways to set it.
One of them is to use __proto__, like this:
let animal = {
eats: true
};
let rabbit = {
jumps: true
};
rabbit.__proto__ = animal;
Please note that __proto__ is not the same as [[Prototype]]. That's a getter/setter for it. We'll talk about other ways of setting it later, but for now __proto__ will do just fine.
If we look for a property in rabbit, and it's missing, JavaScript automatically takes it from animal.
For instance:
let animal = {
eats: true
};
let rabbit = {
jumps: true
};
rabbit.__proto__ = animal; // (*)
// we can find both properties in rabbit now:
alert( rabbit.eats ); // true (**)
alert( rabbit.jumps ); // true
Here the line (*) sets animal to be a prototype of rabbit.
Then, when alert tries to read property rabbit.eats(**), it's not in rabbit, so JavaScript follows the [[Prototype]] reference and finds it in animal (look from the bottom up):
Here we can say that "animal is the prototype of rabbit" or "rabbit prototypally inherits from animal".
So if animal has a lot of useful properties and methods, then they become automatically available in rabbit. Such properties are called “inherited”.
If we have a method in animal, it can be called on rabbit:
let animal = {
eats: true,
walk() {
alert("Animal walk");
}
};
let rabbit = {
jumps: true,
__proto__: animal
};
// walk is taken from the prototype
rabbit.walk(); // Animal walk
The method is automatically taken from the prototype, like this:
The prototype chain can be longer:
let animal = {
eats: true,
walk() {
alert("Animal walk");
}
};
let rabbit = {
jumps: true,
__proto__: animal
};
let longEar = {
earLength: 10,
__proto__: rabbit
}
// walk is taken from the prototype chain
longEar.walk(); // Animal walk
alert(longEar.jumps); // true (from rabbit)
The references can't go in circles. JavaScript will throw an error if we try to assign __proto__ in a circle.
The value of __proto__ can be either an object or null. All other values (like primitives) are ignored.
Also it may be obvious, but still: there can be only one [[Prototype]]. An object may not inherit from two others.
Read/write rules
The prototype is only used for reading properties.
For data properties (not getters/setters) write/delete operations work directly with the object.
In the example below, we assign its own walk method to rabbit:
let animal = {
eats: true,
walk() {
/* this method won't be used by rabbit */
}
};
let rabbit = {
__proto__: animal
}
rabbit.walk = function() {
alert("Rabbit! Bounce-bounce!");
};
rabbit.walk(); // Rabbit! Bounce-bounce!
From now on, rabbit.walk() call finds the method immediately in the object and executes it, without using the prototype:
For getters/setters – if we read/write a property, they are looked up in the prototype and invoked.
For instance, check out admin.fullName property in the code below:
let user = {
name: "John",
surname: "Smith",
set fullName(value) {
[this.name, this.surname] = value.split(" ");
},
get fullName() {
return `${this.name} ${this.surname}`;
}
};
let admin = {
__proto__: user,
isAdmin: true
};
alert(admin.fullName); // John Smith (*)
// setter triggers!
admin.fullName = "Alice Cooper"; // (**)
Here in the line (*) the property admin.fullName has a getter in the prototype user, so it is called. And in the line (**) the property has a setter in the prototype, so it is called.
The value of “this”
An interesting question may arise in the example above: what's the value of this inside set fullName(value)? Where the properties this.name and this.surname are written: user or admin?
The answer is simple: this is not affected by prototypes at all.
No matter where the method is found: in an object or its prototype. In a method call, this is always the object before the dot.
So, the setter actually uses admin as this, not user.
That is actually a super-important thing, because we may have a big object with many methods and inherit from it. Then we can run its methods on inherited objects and they will modify the state of these objects, not the big one.
For instance, here animal represents a “method storage”, and rabbit makes use of it.
The call rabbit.sleep() sets this.isSleeping on the rabbit object:
// animal has methods
let animal = {
walk() {
if (!this.isSleeping) {
alert(`I walk`);
}
},
sleep() {
this.isSleeping = true;
}
};
let rabbit = {
name: "White Rabbit",
__proto__: animal
};
// modifies rabbit.isSleeping
rabbit.sleep();
alert(rabbit.isSleeping); // true
alert(animal.isSleeping); // undefined (no such property in the prototype)
The resulting picture:
If we had other objects like bird, snake etc inheriting from animal, they would also gain access to methods of animal. But this in each method would be the corresponding object, evaluated at the call-time (before dot), not animal. So when we write data into this, it is stored into these objects.
As a result, methods are shared, but the object state is not.
Summary
In JavaScript, all objects have a hidden [[Prototype]] property that's either another object or null.
We can use obj.__proto__ to access it (there are other ways too, to be covered soon).
The object referenced by [[Prototype]] is called a “prototype”.
If we want to read a property of obj or call a method, and it doesn't exist, then JavaScript tries to find it in the prototype. Write/delete operations work directly on the object, they don't use the prototype (unless the property is actually a setter).
If we call obj.method(), and the method is taken from the prototype, this still references obj. So methods always work with the current object even if they are inherited.
let head = {
glasses: 1
};
let table = {
pen: 3
};
let bed = {
sheet: 1,
pillow: 2
};
let pockets = {
money: 2000
};
Use __proto__ to assign prototypes in a way that any property lookup will follow the path: pockets → bed → table → head. For instance, pockets.pen should be 3 (found in table), and bed.glasses should be 1 (found in head).
Answer the question: is it faster to get glasses as pocket.glasses or head.glasses? Benchmark if needed.
Let's add __proto__:
let head = {
glasses: 1
};
let table = {
pen: 3,
__proto__: head
};
let bed = {
sheet: 1,
pillow: 2,
__proto__: table
};
let pockets = {
money: 2000,
__proto__: bed
};
alert( pockets.pen ); // 3
alert( bed.glasses ); // 1
alert( table.money ); // undefined
In modern engines, performance-wise, there's no difference whether we take a property from an object or its prototype. They remember where the property was found and reuse it in the next request.
For instance, for pockets.glasses they remember where they found glasses (in head), and next time will search right there. They are also smart enough to update internal caches if something changes, so that optimization is safe.
We have two hamsters: speedy and lazy inheriting from the general hamster object.
When we feed one of them, the other one is also full. Why? How to fix it?
let hamster = {
stomach: [],
eat(food) {
this.stomach.push(food);
}
};
let speedy = {
__proto__: hamster
};
let lazy = {
__proto__: hamster
};
// This one found the food
speedy.eat("apple");
alert( speedy.stomach ); // apple
// This one also has it, why? fix please.
alert( lazy.stomach ); // apple
Let's look carefully at what's going on in the call speedy.eat("apple").
The method speedy.eat is found in the prototype (=hamster), then executed with this=speedy (the object before the dot).
Then this.stomach.push() needs to find stomach property and call push on it. It looks for stomach in this (=speedy), but nothing found.
Then it follows the prototype chain and finds stomach in hamster.
Then it calls push on it, adding the food into the stomach of the prototype.
So all hamsters share a single stomach!
Every time the stomach is taken from the prototype, then stomach.push modifies it “at place”.
Please note that such thing doesn't happen in case of a simple assignment this.stomach=:
let hamster = {
stomach: [],
eat(food) {
// assign to this.stomach instead of this.stomach.push
this.stomach = [food];
}
};
let speedy = {
__proto__: hamster
};
let lazy = {
__proto__: hamster
};
// Speedy one found the food
speedy.eat("apple");
alert( speedy.stomach ); // apple
// Lazy one's stomach is empty
alert( lazy.stomach ); // <nothing>
Now all works fine, because this.stomach= does not perform a lookup of stomach. The value is written directly into this object.
Also we can totally evade the problem by making sure that each hamster has his own stomach:
let hamster = {
stomach: [],
eat(food) {
this.stomach.push(food);
}
};
let speedy = {
__proto__: hamster,
stomach: []
};
let lazy = {
__proto__: hamster,
stomach: []
};
// Speedy one found the food
speedy.eat("apple");
alert( speedy.stomach ); // apple
// Lazy one's stomach is empty
alert( lazy.stomach ); // <nothing>
As a common solution, all properties that describe the state of a particular object, like stomach above, are usually written into that object. That prevents such problems.
F.prototype
In modern JavaScript we can set a prototype using __proto__, as described in the previous article. But it wasn't like that all the time.
JavaScript has had prototypal inheritance from the beginning. It was one of the core features of the language.
But in the old times, there was another (and the only) way to set it: to use a "prototype" property of the constructor function. And there are still many scripts that use it.
The “prototype” property
As we know already, new F() creates a new object.
When a new object is created with new F(), the object's [[Prototype]] is set to F.prototype.
In other words, if F has a prototype property with a value of the object type, then new operator uses it to set [[Prototype]] for the new object.
Please note that F.prototype here means a regular property named "prototype" on F. It sounds something similar to the term “prototype”, but here we really mean a regular property with this name.
Here's the example:
let animal = {
eats: true
};
function Rabbit(name) {
this.name = name;
}
Rabbit.prototype = animal;
let rabbit = new Rabbit("White Rabbit"); // rabbit.__proto__ == animal
alert( rabbit.eats ); // true
Setting Rabbit.prototype = animal literally states the following: "When a new Rabbit is created, assign its [[Prototype]] to animal".
That's the resulting picture:
On the picture, "prototype" is a horizontal arrow, it's a regular property, and [[Prototype]] is vertical, meaning the inheritance of rabbit from animal.
Default F.prototype, constructor property
Every function has the "prototype" property even if we don't supply it.
The default "prototype" is an object with the only property constructor that points back to the function itself.
We can use constructor property to create a new object using the same constructor as the existing one.
Like here:
function Rabbit(name) {
this.name = name;
alert(name);
}
let rabbit = new Rabbit("White Rabbit");
let rabbit2 = new rabbit.constructor("Black Rabbit");
That's handy when we have an object, don't know which constructor was used for it (e.g. it comes from a 3rd party library), and we need to create another one of the same kind.
But probably the most important thing about "constructor" is that…
…JavaScript itself does not ensure the right "constructor" value.
Yes, it exists in the default "prototype" for functions, but that's all. What happens with it later – is totally on us.
In particular, if we replace the default prototype as a whole, then there will be no "constructor" in it.
For instance:
function Rabbit() {}
Rabbit.prototype = {
jumps: true
};
let rabbit = new Rabbit();
alert(rabbit.constructor === Rabbit); // false
So, to keep the right "constructor" we can choose to add/remove properties to the default "prototype" instead of overwriting it as a whole:
function Rabbit() {}
// Not overwrite Rabbit.prototype totally
// just add to it
Rabbit.prototype.jumps = true
// the default Rabbit.prototype.constructor is preserved
Or, alternatively, recreate the constructor property it manually:
Rabbit.prototype = {
jumps: true,
constructor: Rabbit
};
// now constructor is also correct, because we added it
Summary
In this chapter we briefly described the way of setting a [[Prototype]] for objects created via a constructor function. Later we'll see more advanced programming patterns that rely on it.
Everything is quite simple, just few notes to make things clear:
The F.prototype property is not the same as [[Prototype]]. The only thing F.prototype does: it sets [[Prototype]] of new objects when new F() is called.
The value of F.prototype should be either an object or null: other values won't work.
The "prototype" property only has such a special effect when is set to a constructor function, and invoked with new.
On regular objects the prototype is nothing special:
let user = {
name: "John",
prototype: "Bla-bla" // no magic at all
};
By default all functions have F.prototype = { constructor: F }, so we can get the constructor of an object by accessing its "constructor" property.
In the code below we create new Rabbit, and then try to modify its prototype.
In the start, we have this code:
function Rabbit() {}
Rabbit.prototype = {
eats: true
};
let rabbit = new Rabbit();
alert( rabbit.eats ); // true
We added one more string (emphasized), what alert shows now?
function Rabbit() {}
Rabbit.prototype = {
eats: true
};
let rabbit = new Rabbit();
Rabbit.prototype = {};
alert( rabbit.eats ); // ?
…And if the code is like this (replaced one line)?
function Rabbit() {}
Rabbit.prototype = {
eats: true
};
let rabbit = new Rabbit();
Rabbit.prototype.eats = false;
alert( rabbit.eats ); // ?
Like this (replaced one line)?
function Rabbit() {}
Rabbit.prototype = {
eats: true
};
let rabbit = new Rabbit();
delete rabbit.eats;
alert( rabbit.eats ); // ?
The last variant:
function Rabbit() {}
Rabbit.prototype = {
eats: true
};
let rabbit = new Rabbit();
delete Rabbit.prototype.eats;
alert( rabbit.eats ); // ?
Answers:
true.
The assignment to Rabbit.prototype sets up [[Prototype]] for new objects, but it does not affect the existing ones.
false.
Objects are assigned by reference. The object from Rabbit.prototype is not duplicated, it's still a single object is referenced both by Rabbit.prototype and by the [[Prototype]] of rabbit.
So when we change its content through one reference, it is visible through the other one.
true.
All delete operations are applied directly to the object. Here delete rabbit.eats tries to remove eats property from rabbit, but it doesn't have it. So the operation won't have any effect.
undefined.
The property eats is deleted from the prototype, it doesn't exist any more.
Imagine, we have an arbitrary object obj, created by a constructor function – we don't know which one, but we'd like to create a new object using it.
Can we do it like that?
let obj2 = new obj.constructor();
Give an example of a constructor function for obj which lets such code work right. And an example that makes it work wrong.
We can use such approach if we are sure that "constructor" property has the correct value.
For instance, if we don't touch the default "prototype", then this code works for sure:
function User(name) {
this.name = name;
}
let user = new User('John');
let user2 = new user.constructor('Pete');
alert( user2.name ); // Pete (worked!)
It worked, because User.prototype.constructor == User.
…But if someone, so to say, overwrites User.prototype and forgets to recreate "constructor", then it would fail.
For instance:
function User(name) {
this.name = name;
}
User.prototype = {}; // (*)
let user = new User('John');
let user2 = new user.constructor('Pete');
alert( user2.name ); // undefined
Why user2.name is undefined?
Here's how new user.constructor('Pete') works:
First, it looks for constructor in user. Nothing.
Then it follows the prototype chain. The prototype of user is User.prototype, and it also has nothing.
The value of User.prototype is a plain object {}, its prototype is Object.prototype. And there is Object.prototype.constructor == Object. So it is used.
At the end, we have let user2 = new Object('Pete'). The built-in Object constructor ignores arguments, it always creates an empty object – that's what we have in user2 after all.
Native prototypes
The "prototype" property is widely used by the core of JavaScript itself. All built-in constructor functions use it.
We'll see how it is for plain objects first, and then for more complex ones.
Where's the code that generates the string "[object Object]"? That's a built-in toString method, but where is it? The obj is empty!
…But the short notation obj = {} is the same as obj = new Object(), where Object – is a built-in object constructor function. And that function has Object.prototype that references a huge object with toString and other functions.
Like this (all that is built-in):
When new Object() is called (or a literal object {...} is created), the [[Prototype]] of it is set to Object.prototype by the rule that we've discussed in the previous chapter:
Afterwards when obj.toString() is called – the method is taken from Object.prototype.
Please note that there is no additional [[Prototype]] in the chain above Object.prototype:
alert(Object.prototype.__proto__); // null
Other built-in prototypes
Other built-in objects such as Array, Date, Function and others also keep methods in prototypes.
For instance, when we create an array [1, 2, 3], the default new Array() constructor is used internally. So the array data is written into the new object, and Array.prototype becomes its prototype and provides methods. That's very memory-efficient.
By specification, all built-in prototypes have Object.prototype on the top. Sometimes people say that “everything inherits from objects”.
Here's the overall picture (for 3 built-ins to fit):
Let's check the prototypes manually:
let arr = [1, 2, 3];
// it inherits from Array.prototype?
alert( arr.__proto__ === Array.prototype ); // true
// then from Object.prototype?
alert( arr.__proto__.__proto__ === Object.prototype ); // true
// and null on the top.
alert( arr.__proto__.__proto__.__proto__ ); // null
Some methods in prototypes may overlap, for instance, Array.prototype has its own toString that lists comma-delimited elements:
let arr = [1, 2, 3]
alert(arr); // 1,2,3 <-- the result of Array.prototype.toString
As we've seen before, Object.prototype has toString as well, but Array.prototype is closer in the chain, so the array variant is used.
In-browser tools like Chrome developer console also show inheritance (may need to use console.dir for built-in objects):
Other built-in objects also work the same way. Even functions. They are objects of a built-in Function constructor, and their methods: call/apply and others are taken from Function.prototype. Functions have their own toString too.
function f() {}
alert(f.__proto__ == Function.prototype); // true
alert(f.__proto__.__proto__ == Object.prototype); // true, inherit from objects
Primitives
The most intricate thing happens with strings, numbers and booleans.
As we remember, they are not objects. But if we try to access their properties, then temporary wrapper objects are created using built-in constructors String, Number, Boolean, they provide the methods and disappear.
These objects are created invisibly to us and most engines optimize them out, but the specification describes it exactly this way. Methods of these objects also reside in prototypes, available as String.prototype, Number.prototype and Boolean.prototype.
Values null and undefined have no object wrappers
Special values null and undefined stand apart. They have no object wrappers, so methods and properties are not available for them. And there are no corresponding prototypes too.
Changing native prototypes
Native prototypes can be modified. For instance, if we add a method to String.prototype, it becomes available to all strings:
During the process of development we may have ideas which new built-in methods we'd like to have. And there may be a slight temptation to add them to native prototypes. But that is generally a bad idea.
Prototypes are global, so it's easy to get a conflict. If two libraries add a method String.prototype.show, then one of them overwrites the other one.
In modern programming, there is only one case when modifying native prototypes is approved. That's polyfills. In other words, if there's a method in JavaScript specification that is not yet supported by our JavaScript engine (or any of those that we want to support), then may implement it manually and populate the built-in prototype with it.
For instance:
if (!String.prototype.repeat) { // if there's no such method
// add it to the prototype
String.prototype.repeat = function(n) {
// repeat the string n times
// actually, the code should be more complex than that,
// throw errors for negative values of "n"
// the full algorithm is in the specification
return new Array(n + 1).join(this);
};
}
alert( "La".repeat(3) ); // LaLaLa
function showArgs() {
// borrow join from array and call in the context of arguments
alert( [].join.call(arguments, " - ") );
}
showArgs("John", "Pete", "Alice"); // John - Pete - Alice
Because join resides in Array.prototype, we can call it from there directly and rewrite it as:
function showArgs() {
alert( Array.prototype.join.call(arguments, " - ") );
}
That's more efficient, because it avoids the creation of an extra array object []. On the other hand, it is longer to write.
Summary
All built-in objects follow the same pattern:
The methods are stored in the prototype (Array.prototype, Object.prototype, Date.prototype etc).
The object itself stores only the data (array items, object properties, the date).
Primitives also store methods in prototypes of wrapper objects: Number.prototype, String.prototype, Boolean.prototype. There are no wrapper objects only for undefined and null.
Built-in prototypes can be modified or populated with new methods. But it's not recommended to change them. Probably the only allowable cause is when we add-in a new standard, but not yet supported by the engine JavaScript method.
Add to the prototype of all functions the method defer(ms), that returns a wrapper, delaying the call by ms milliseconds.
Here's an example of how it should work:
function f(a, b) {
alert( a + b );
}
f.defer(1000)(1, 2); // shows 3 after 1 second
Please note that the arguments should be passed to the original function.
Function.prototype.defer = function(ms) {
let f = this;
return function(...args) {
setTimeout(() => f.apply(this, args), ms);
}
};
// check it
function f(a, b) {
alert( a + b );
}
f.defer(1000)(1, 2); // shows 3 after 1 sec
Methods for prototypes
In this chapter we cover additional methods to work with a prototype.
There are also other ways to get/set a prototype, besides those that we already know:
let animal = {
eats: true
};
// create a new object with animal as a prototype
let rabbit = Object.create(animal);
alert(rabbit.eats); // true
alert(Object.getPrototypeOf(rabbit) === animal); // get the prototype of rabbit
Object.setPrototypeOf(rabbit, {}); // change the prototype of rabbit to {}
Object.create has an optional second argument: property descriptors. We can provide additional properties to the new object there, like this:
We can use Object.create to perform an object cloning more powerful than copying properties in for..in:
// fully identical shallow clone of obj
let clone = Object.create(Object.getPrototypeOf(obj), Object.getOwnPropertyDescriptors(obj));
This call makes a truly exact copy of obj, including all properties: enumerable and non-enumerable, data properties and setters/getters – everything, and with the right [[Prototype]].
Brief history
If we count all the ways to manage [[Prototype]], there's a lot! Many ways to do the same!
Why so?
That's for historical reasons.
The "prototype" property of a constructor function works since very ancient times.
Later in the year 2012: Object.create appeared in the standard. It allowed to create objects with the given prototype, but did not allow to get/set it. So browsers implemented non-standard __proto__ accessor that allowed to get/set a prototype at any time.
Later in the year 2015: Object.setPrototypeOf and Object.getPrototypeOf were added to the standard. The __proto__ was de-facto implemented everywhere, so it made its way to the Annex B of the standard, that is optional for non-browser environments.
As of now we have all these ways at our disposal.
Technically, we can get/set [[Prototype]] at any time. But usually we only set it once at the object creation time, and then do not modify: rabbit inherits from animal, and that is not going to change. And JavaScript engines are highly optimized to that. Changing a prototype “on-the-fly” with Object.setPrototypeOf or obj.__proto__= is a very slow operation. But it is possible.
“Very plain” objects
As we know, objects can be used as associative arrays to store key/value pairs.
…But if we try to store user-provided keys in it (for instance, a user-entered dictionary), we can see an interesting glitch: all keys work fine except "__proto__".
Check out the example:
let obj = {};
let key = prompt("What's the key?", "__proto__");
obj[key] = "some value";
alert(obj[key]); // [object Object], not "some value"!
Here if the user types in __proto__, the assignment is ignored!
That shouldn't surprise us. The __proto__ property is special: it must be either an object or null, a string can not become a prototype.
But we did not intend to implement such behavior, right? We want to store key/value pairs, and the key named "__proto__" was not properly saved. So that's a bug. Here the consequences are not terrible. But in other cases the prototype may indeed be changed, so the execution may go wrong in totally unexpected ways.
What's worst – usually developers do not think about such possibility at all. That makes such bugs hard to notice and even turn them into vulnerabilities, especially when JavaScript is used on server-side.
Such thing happens only with __proto__. All other properties are “assignable” normally.
How to evade the problem?
First, we can just switch to using Map, then everything's fine.
But Object also can serve us well here, because language creators gave a thought to that problem long ago.
The __proto__ is not a property of an object, but an accessor property of Object.prototype:
So, if obj.__proto__ is read or assigned, the corresponding getter/setter is called from its prototype, and it gets/sets [[Prototype]].
As it was said in the beginning: __proto__ is a way to access [[Prototype]], it is not [[Prototype]] itself.
Now, if we want to use an object as an associative array, we can do it with a little trick:
let obj = Object.create(null);
let key = prompt("What's the key?", "__proto__");
obj[key] = "some value";
alert(obj[key]); // "some value"
Object.create(null) creates an empty object without a prototype ([[Prototype]] is null):
So, there is no inherited getter/setter for __proto__. Now it is processed as a regular data property, so the example above works right.
We can call such object “very plain” or “pure dictionary objects”, because they are even simpler than regular plain object {...}.
A downside is that such objects lack any built-in object methods, e.g. toString:
let obj = Object.create(null);
alert(obj); // Error (no toString)
…But that's usually fine for associative arrays.
Please note that most object-related methods are Object.something(...), like Object.keys(obj) – they are not in the prototype, so they will keep working on such objects:
There are many ways to get keys/values from an object.
We already know these ones:
Object.keys(obj) /
Object.values(obj) /
Object.entries(obj) – returns an array of enumerable own string property names/values/key-value pairs. These methods only list enumerable properties, and those that have strings as keys.
These methods are a bit different about which properties they return, but all of them operate on the object itself. Properties from the prototype are not listed.
The for..in loop is different: it loops over inherited properties too.
For instance:
let animal = {
eats: true
};
let rabbit = {
jumps: true,
__proto__: animal
};
// only own keys
alert(Object.keys(rabbit)); // jumps
// inherited keys too
for(let prop in rabbit) alert(prop); // jumps, then eats
If we want to distinguish inherited properties, there's a built-in method
obj.hasOwnProperty(key): it returns true if obj has its own (not inherited) property named key.
So we can filter out inherited properties (or do something else with them):
let animal = {
eats: true
};
let rabbit = {
jumps: true,
__proto__: animal
};
for(let prop in rabbit) {
let isOwn = rabbit.hasOwnProperty(prop);
alert(`${prop}: ${isOwn}`); // jumps:true, then eats:false
}
Here we have the following inheritance chain: rabbit, then animal, then Object.prototype (because animal is a literal object {...}, so it's by default), and then null above it:
Note, there's one funny thing. Where is the method rabbit.hasOwnProperty coming from? Looking at the chain we can see that the method is provided by Object.prototype.hasOwnProperty. In other words, it's inherited.
…But why hasOwnProperty does not appear in for..in loop, if it lists all inherited properties? The answer is simple: it's not enumerable. Just like all other properties of Object.prototype. That's why they are not listed.
Summary
Here's a brief list of methods we discussed in this chapter – as a recap:
Object.create(proto[, descriptors]) – creates an empty object with given proto as [[Prototype]] (can be null) and optional property descriptors.
obj.hasOwnProperty(key): it returns true if obj has its own (not inherited) property named key.
We also made it clear that __proto__ is a getter/setter for [[Prototype]] and resides in Object.prototype, just as other methods.
We can create an object without a prototype by Object.create(null). Such objects are used as “pure dictionaries”, they have no issues with "__proto__" as the key.
All methods that return object properties (like Object.keys and others) – return “own” properties. If we want inherited ones, then we can use for..in.
There's an object dictionary, created as Object.create(null), to store any key/value pairs.
Add method dictionary.toString() into it, that should return a comma-delimited list of keys. Your toString should not show up in for..in over the object.
Here's how it should work:
let dictionary = Object.create(null);
// your code to add dictionary.toString method
// add some data
dictionary.apple = "Apple";
dictionary.__proto__ = "test"; // __proto__ is a regular property key here
// only apple and __proto__ are in the loop
for(let key in dictionary) {
alert(key); // "apple", then "__proto__"
}
// your toString in action
alert(dictionary); // "apple,__proto__"
The method can take all enumerable keys using Object.keys and output their list.
To make toString non-enumerable, let's define it using a property descriptor. The syntax of Object.create allows to provide an object with property descriptors as the second argument.
let dictionary = Object.create(null, {
toString: { // define toString property
value() { // the value is a function
return Object.keys(this).join();
}
}
});
dictionary.apple = "Apple";
dictionary.__proto__ = "test";
// apple and __proto__ is in the loop
for(let key in dictionary) {
alert(key); // "apple", then "__proto__"
}
// comma-separated list of properties by toString
alert(dictionary); // "apple,__proto__"
When we create a property using a descriptor, its flags are false by default. So in the code above, dictionary.toString is non-enumerable.
In object-oriented programming, a class is an extensible program-code-template for creating objects, providing initial values for state (member variables) and implementations of behavior (member functions or methods).
There's a special syntax construct and a keyword class in JavaScript. But before studying it, we should consider that the term “class” comes from the theory of object-oriented programming. The definition is cited above, and it's language-independent.
In JavaScript there are several well-known programming patterns to make classes even without using the class keyword. And here we'll talk about them first.
The class construct will be described in the next chapter, but in JavaScript it's a “syntax sugar” and an extension of one of the patterns that we'll study here.
Functional class pattern
The constructor function below can be considered a “class” according to the definition:
function User(name) {
this.sayHi = function() {
alert(name);
};
}
let user = new User("John");
user.sayHi(); // John
It follows all parts of the definition:
It is a “program-code-template” for creating objects (callable with new).
It provides initial values for the state (name from parameters).
It provides methods (sayHi).
This is called functional class pattern.
In the functional class pattern, local variables and nested functions inside User, that are not assigned to this, are visible from inside, but not accessible by the outer code.
So we can easily add internal functions and variables, like calcAge() here:
function User(name, birthday) {
// only visible from other methods inside User
function calcAge() {
return new Date().getFullYear() - birthday.getFullYear();
}
this.sayHi = function() {
alert(`${name}, age:${calcAge()}`);
};
}
let user = new User("John", new Date(2000, 0, 1));
user.sayHi(); // John, age:17
In this code variables name, birthday and the function calcAge() are internal, private to the object. They are only visible from inside of it.
On the other hand, sayHi is the external, public method. The external code that creates user can access it.
This way we can hide internal implementation details and helper methods from the outer code. Only what's assigned to this becomes visible outside.
Factory class pattern
We can create a class without using new at all.
Like this:
function User(name, birthday) {
// only visible from other methods inside User
function calcAge() {
return new Date().getFullYear() - birthday.getFullYear();
}
return {
sayHi() {
alert(`${name}, age:${calcAge()}`);
}
};
}
let user = User("John", new Date(2000, 0, 1));
user.sayHi(); // John, age:17
As we can see, the function User returns an object with public properties and methods. The only benefit of this method is that we can omit new: write let user = User(...) instead of let user = new User(...). In other aspects it's almost the same as the functional pattern.
Prototype-based classes
Prototype-based classes are the most important and generally the best. Functional and factory class patterns are rarely used in practice.
Soon you'll see why.
Here's the same class rewritten using prototypes:
function User(name, birthday) {
this._name = name;
this._birthday = birthday;
}
User.prototype._calcAge = function() {
return new Date().getFullYear() - this._birthday.getFullYear();
};
User.prototype.sayHi = function() {
alert(`${this._name}, age:${this._calcAge()}`);
};
let user = new User("John", new Date(2000, 0, 1));
user.sayHi(); // John, age:17
The code structure:
The constructor User only initializes the current object state.
Methods are added to User.prototype.
As we can see, methods are lexically not inside function User, they do not share a common lexical environment. If we declare variables inside function User, then they won't be visible to methods.
So, there is a widely known agreement that internal properties and methods are prepended with an underscore "_". Like _name or _calcAge(). Technically, that's just an agreement, the outer code still can access them. But most developers recognize the meaning of "_" and try not to touch prefixed properties and methods in the external code.
Here are the advantages over the functional pattern:
In the functional pattern, each object has its own copy of every method. We assign a separate copy of this.sayHi = function() {...} and other methods in the constructor.
In the prototypal pattern, all methods are in User.prototype that is shared between all user objects. An object itself only stores the data.
So the prototypal pattern is more memory-efficient.
…But not only that. Prototypes allow us to setup the inheritance in a really efficient way. Built-in JavaScript objects all use prototypes. Also there's a special syntax construct: “class” that provides nice-looking syntax for them. And there's more, so let's go on with them.
Prototype-based inheritance for classes
Let's say we have two prototype-based classes.
Rabbit:
function Rabbit(name) {
this.name = name;
}
Rabbit.prototype.jump = function() {
alert(`${this.name} jumps!`);
};
let rabbit = new Rabbit("My rabbit");
But we'd want Rabbit to extend Animal. In other words, rabbits should be based on animals, have access to methods of Animal and extend them with its own methods.
What does it mean in the language of prototypes?
Right now methods for rabbit objects are in Rabbit.prototype. We'd like rabbit to use Animal.prototype as a “fallback”, if the method is not found in Rabbit.prototype.
So the prototype chain should be rabbit → Rabbit.prototype → Animal.prototype.
Like this:
The code to implement that:
// Same Animal as before
function Animal(name) {
this.name = name;
}
// All animals can eat, right?
Animal.prototype.eat = function() {
alert(`${this.name} eats.`);
};
// Same Rabbit as before
function Rabbit(name) {
this.name = name;
}
Rabbit.prototype.jump = function() {
alert(`${this.name} jumps!`);
};
// setup the inheritance chain
Rabbit.prototype.__proto__ = Animal.prototype; // (*)
let rabbit = new Rabbit("White Rabbit");
rabbit.eat(); // rabbits can eat too
rabbit.jump();
The line (*) sets up the prototype chain. So that rabbit first searches methods in Rabbit.prototype, then Animal.prototype. And then, just for completeness, let's mention that if the method is not found in Animal.prototype, then the search continues in Object.prototype, because Animal.prototype is a regular plain object, so it inherits from it.
So here's the full picture:
Summary
The term “class” comes from the object-oriented programming. In JavaScript it usually means the functional class pattern or the prototypal pattern. The prototypal pattern is more powerful and memory-efficient, so it's recommended to stick to it.
According to the prototypal pattern:
Methods are stored in Class.prototype.
Prototypes inherit from each other.
In the next chapter we'll study class keyword and construct. It allows to write prototypal classes shorter and provides some additional benefits.
Please note that properties that were internal in functional style (template, timer) and the internal method render are marked private with the underscore _.
The “class” construct allows to define prototype-based classes with a clean, nice-looking syntax.
The “class” syntax
The class syntax is versatile, we'll start with a simple example first.
Here's a prototype-based class User:
function User(name) {
this.name = name;
}
User.prototype.sayHi = function() {
alert(this.name);
}
let user = new User("John");
user.sayHi();
…And that's the same using class syntax:
class User {
constructor(name) {
this.name = name;
}
sayHi() {
alert(this.name);
}
}
let user = new User("John");
user.sayHi();
It's easy to see that the two examples are alike. Just please note that methods in a class do not have a comma between them. Novice developers sometimes forget it and put a comma between class methods, and things don't work. That's not a literal object, but a class syntax.
So, what exactly does class do? We may think that it defines a new language-level entity, but that would be wrong.
The class User {...} here actually does two things:
Declares a variable User that references the function named "constructor".
Puts into User.prototype methods listed in the definition. Here it includes sayHi and the constructor.
Here's the code to dig into the class and see that:
class User {
constructor(name) { this.name = name; }
sayHi() { alert(this.name); }
}
// proof: User is the "constructor" function
alert(User === User.prototype.constructor); // true
// proof: there are two methods in its "prototype"
alert(Object.getOwnPropertyNames(User.prototype)); // constructor, sayHi
Here's the illustration of what class User creates:
So class is a special syntax to define a constructor together with its prototype methods.
…But not only that. There are minor tweaks here and there:
Constructors require new
Unlike a regular function, a class constructor can't be called without new:
class User {
constructor() {}
}
alert(typeof User); // function
User(); // Error: Class constructor User cannot be invoked without 'new'
Different string output
If we output it like alert(User), some engines show "class User...", while others show "function User...".
Please don't be confused: the string representation may vary, but that's still a function, there is no separate “class” entity in JavaScript language.
Class methods are non-enumerable
A class definition sets enumerable flag to false for all methods in the "prototype". That's good, because if we for..in over an object, we usually don't want its class methods.
Classes have a default constructor() {}
If there's no constructor in the class construct, then an empty function is generated, same as if we had written constructor() {}.
Classes always use strict
All code inside the class construct is automatically in strict mode.
Getters/setters
Classes may also include getters/setters. Here's an example with user.name implemented using them:
class User {
constructor(name) {
// invokes the setter
this.name = name;
}
get name() {
return this._name;
}
set name(value) {
if (value.length < 4) {
alert("Name is too short.");
return;
}
this._name = value;
}
}
let user = new User("John");
alert(user.name); // John
user = new User(""); // Name too short.
Internally, getters and setters are also created on the User prototype, like this:
Unlike object literals, no property:value assignments are allowed inside class. There may be only methods and getters/setters. There is some work going on in the specification to lift that limitation, but it's not yet there.
If we really need to put a non-function value into the prototype, then we can alter prototype manually, like this:
class User { }
User.prototype.test = 5;
alert( new User().test ); // 5
So, technically that's possible, but we should know why we're doing it. Such properties will be shared among all objects of the class.
An “in-class” alternative is to use a getter:
class User {
get test() {
return 5;
}
}
alert( new User().test ); // 5
From the external code, the usage is the same. But the getter variant is a bit slower.
Class Expression
Just like functions, classes can be defined inside another expression, passed around, returned etc.
Here's a class-returning function (“class factory”):
function makeClass(phrase) {
// declare a class and return it
return class {
sayHi() {
alert(phrase);
};
};
}
let User = makeClass("Hello");
new User().sayHi(); // Hello
That's quite normal if we recall that class is just a special form of a function-with-prototype definition.
And, like Named Function Expressions, such classes also may have a name, that is visible inside that class only:
// "Named Class Expression" (alas, no such term, but that's what's going on)
let User = class MyClass {
sayHi() {
alert(MyClass); // MyClass is visible only inside the class
}
};
new User().sayHi(); // works, shows MyClass definition
alert(MyClass); // error, MyClass not visible outside of the class
Static methods
We can also assign methods to the class function, not to its "prototype". Such methods are called static.
An example:
class User {
static staticMethod() {
alert(this === User);
}
}
User.staticMethod(); // true
That actually does the same as assigning it as a function property:
The value of this inside User.staticMethod() is the class constructor User itself (the “object before dot” rule).
Usually, static methods are used to implement functions that belong to the class, but not to any particular object of it.
For instance, we have Article objects and need a function to compare them. The natural choice would be Article.compare, like this:
class Article {
constructor(title, date) {
this.title = title;
this.date = date;
}
static compare(articleA, articleB) {
return articleA.date - articleB.date;
}
}
// usage
let articles = [
new Article("Mind", new Date(2016, 1, 1)),
new Article("Body", new Date(2016, 0, 1)),
new Article("JavaScript", new Date(2016, 11, 1))
];
articles.sort(Article.compare);
alert( articles[0].title ); // Body
Here Article.compare stands “over” the articles, as a means to compare them. It's not a method of an article, but rather of the whole class.
Another example would be a so-called “factory” method. Imagine, we need few ways to create an article:
Create by given parameters (title, date etc).
Create an empty article with today's date.
…
The first way can be implemented by the constructor. And for the second one we can make a static method of the class.
Like Article.createTodays() here:
class Article {
constructor(title, date) {
this.title = title;
this.date = date;
}
static createTodays() {
// remember, this = Article
return new this("Today's digest", new Date());
}
}
let article = Article.createTodays();
alert( article.title ); // Todays digest
Now every time we need to create a today's digest, we can call Article.createTodays(). Once again, that's not a method of an article, but a method of the whole class.
Static methods are also used in database-related classes to search/save/remove entries from the database, like this:
// assuming Article is a special class for managing articles
// static method to remove the article:
Article.remove({id: 12345});
Summary
The basic class syntax looks like this:
class MyClass {
constructor(...) {
// ...
}
method1(...) {}
method2(...) {}
get something(...) {}
set something(...) {}
static staticMethod(..) {}
// ...
}
The value of MyClass is a function provided as constructor. If there's no constructor, then an empty function.
In any case, methods listed in the class declaration become members of its prototype, with the exception of static methods that are written into the function itself and callable as MyClass.staticMethod(). Static methods are used when we need a function bound to a class, but not to any object of that class.
In the next chapter we'll learn more about classes, including inheritance.
Classes can extend one another. There's a nice syntax, technically based on the prototypal inheritance.
To inherit from another class, we should specify "extends" and the parent class before the brackets {..}.
Here Rabbit inherits from Animal:
class Animal {
constructor(name) {
this.speed = 0;
this.name = name;
}
run(speed) {
this.speed += speed;
alert(`${this.name} runs with speed ${this.speed}.`);
}
stop() {
this.speed = 0;
alert(`${this.name} stopped.`);
}
}
// Inherit from Animal
class Rabbit extends Animal {
hide() {
alert(`${this.name} hides!`);
}
}
let rabbit = new Rabbit("White Rabbit");
rabbit.run(5); // White Rabbit runs with speed 5.
rabbit.hide(); // White Rabbit hides!
The extends keyword actually adds a [[Prototype]] reference from Rabbit.prototype to Animal.prototype, just as you expect it to be, and as we've seen before.
So now rabbit has access both to its own methods and to methods of Animal.
Any expression is allowed after extends
Class syntax allows to specify not just a class, but any expression after extends.
For instance, a function call that generates the parent class:
function f(phrase) {
return class {
sayHi() { alert(phrase) }
}
}
class User extends f("Hello") {}
new User().sayHi(); // Hello
Here class User inherits from the result of f("Hello").
That may be useful for advanced programming patterns when we use functions to generate classes depending on many conditions and can inherit from them.
Overriding a method
Now let's move forward and override a method. As of now, Rabbit inherits the stop method that sets this.speed = 0 from Animal.
If we specify our own stop in Rabbit, then it will be used instead:
class Rabbit extends Animal {
stop() {
// ...this will be used for rabbit.stop()
}
}
…But usually we don't want to totally replace a parent method, but rather to build on top of it, tweak or extend its functionality. We do something in our method, but call the parent method before/after it or in the process.
Classes provide "super" keyword for that.
super.method(...) to call a parent method.
super(...) to call a parent constructor (inside our constructor only).
For instance, let our rabbit autohide when stopped:
class Animal {
constructor(name) {
this.speed = 0;
this.name = name;
}
run(speed) {
this.speed += speed;
alert(`${this.name} runs with speed ${this.speed}.`);
}
stop() {
this.speed = 0;
alert(`${this.name} stopped.`);
}
}
class Rabbit extends Animal {
hide() {
alert(`${this.name} hides!`);
}
stop() {
super.stop(); // call parent stop
this.hide(); // and then hide
}
}
let rabbit = new Rabbit("White Rabbit");
rabbit.run(5); // White Rabbit runs with speed 5.
rabbit.stop(); // White Rabbit stopped. White rabbit hides!
Now Rabbit has the stop method that calls the parent super.stop() in the process.
If accessed, it's taken from the outer function. For instance:
class Rabbit extends Animal {
stop() {
setTimeout(() => super.stop(), 1000); // call parent stop after 1sec
}
}
The super in the arrow function is the same as in stop(), so it works as intended. If we specified a “regular” function here, there would be an error:
// Unexpected super
setTimeout(function() { super.stop() }, 1000);
Overriding constructor
With constructors it gets a little bit tricky.
Till now, Rabbit did not have its own constructor.
According to the
specification, if a class extends another class and has no constructor, then the following constructor is generated:
class Rabbit extends Animal {
// generated for extending classes without own constructors
constructor(...args) {
super(...args);
}
}
As we can see, it basically calls the parent constructor passing it all the arguments. That happens if we don't write a constructor of our own.
Now let's add a custom constructor to Rabbit. It will specify the earLength in addition to name:
class Animal {
constructor(name) {
this.speed = 0;
this.name = name;
}
// ...
}
class Rabbit extends Animal {
constructor(name, earLength) {
this.speed = 0;
this.name = name;
this.earLength = earLength;
}
// ...
}
// Doesn't work!
let rabbit = new Rabbit("White Rabbit", 10); // Error: this is not defined.
Whoops! We've got an error. Now we can't create rabbits. What went wrong?
The short answer is: constructors in inheriting classes must call super(...), and (!) do it before using this.
…But why? What's going on here? Indeed, the requirement seems strange.
Of course, there's an explanation. Let's get into details, so you'd really understand what's going on.
In JavaScript, there's a distinction between a “constructor function of an inheriting class” and all others. In an inheriting class, the corresponding constructor function is labelled with a special internal property [[ConstructorKind]]:"derived".
The difference is:
When a normal constructor runs, it creates an empty object as this and continues with it.
But when a derived constructor runs, it doesn't do it. It expects the parent constructor to do this job.
So if we're making a constructor of our own, then we must call super, because otherwise the object with this reference to it won't be created. And we'll get an error.
For Rabbit to work, we need to call super() before using this, like here:
class Animal {
constructor(name) {
this.speed = 0;
this.name = name;
}
// ...
}
class Rabbit extends Animal {
constructor(name, earLength) {
super(name);
this.earLength = earLength;
}
// ...
}
// now fine
let rabbit = new Rabbit("White Rabbit", 10);
alert(rabbit.name); // White Rabbit
alert(rabbit.earLength); // 10
Super: internals, [[HomeObject]]
Let's get a little deeper under the hood of super. We'll see some interesting things by the way.
First to say, from all that we've learned till now, it's impossible for super to work.
Yeah, indeed, let's ask ourselves, how it could technically work? When an object method runs, it gets the current object as this. If we call super.method() then, how to retrieve the method? Naturally, we need to take the method from the prototype of the current object. How, technically, we (or a JavaScript engine) can do it?
Maybe we can get the method from [[Prototype]] of this, as this.__proto__.method? Unfortunately, that doesn't work.
Let's try to do it. Without classes, using plain objects for the sake of simplicity.
Here, rabbit.eat() should call animal.eat() method of the parent object:
let animal = {
name: "Animal",
eat() {
alert(`${this.name} eats.`);
}
};
let rabbit = {
__proto__: animal,
name: "Rabbit",
eat() {
// that's how super.eat() could presumably work
this.__proto__.eat.call(this); // (*)
}
};
rabbit.eat(); // Rabbit eats.
At the line (*) we take eat from the prototype (animal) and call it in the context of the current object. Please note that .call(this) is important here, because a simple this.__proto__.eat() would execute parent eat in the context of the prototype, not the current object.
And in the code above it actually works as intended: we have the correct alert.
Now let's add one more object to the chain. We'll see how things break:
let animal = {
name: "Animal",
eat() {
alert(`${this.name} eats.`);
}
};
let rabbit = {
__proto__: animal,
eat() {
// ...bounce around rabbit-style and call parent (animal) method
this.__proto__.eat.call(this); // (*)
}
};
let longEar = {
__proto__: rabbit,
eat() {
// ...do something with long ears and call parent (rabbit) method
this.__proto__.eat.call(this); // (**)
}
};
longEar.eat(); // Error: Maximum call stack size exceeded
The code doesn't work anymore! We can see the error trying to call longEar.eat().
It may be not that obvious, but if we trace longEar.eat() call, then we can see why. In both lines (*) and (**) the value of this is the current object (longEar). That's essential: all object methods get the current object as this, not a prototype or something.
So, in both lines (*) and (**) the value of this.__proto__ is exactly the same: rabbit. They both call rabbit.eat without going up the chain in the endless loop.
Here's the picture of what happens:
Inside longEar.eat(), the line (**) calls rabbit.eat providing it with this=longEar.
// inside longEar.eat() we have this = longEar
this.__proto__.eat.call(this) // (**)
// becomes
longEar.__proto__.eat.call(this)
// that is
rabbit.eat.call(this);
Then in the line (*) of rabbit.eat, we'd like to pass the call even higher in the chain, but this=longEar, so this.__proto__.eat is again rabbit.eat!
// inside rabbit.eat() we also have this = longEar
this.__proto__.eat.call(this) // (*)
// becomes
longEar.__proto__.eat.call(this)
// or (again)
rabbit.eat.call(this);
…So rabbit.eat calls itself in the endless loop, because it can't ascend any further.
The problem can't be solved by using this alone.
[[HomeObject]]
To provide the solution, JavaScript adds one more special internal property for functions: [[HomeObject]].
When a function is specified as a class or object method, its [[HomeObject]] property becomes that object.
This actually violates the idea of “unbound” functions, because methods remember their objects. And [[HomeObject]] can't be changed, so this bound is forever. So that's a very important change in the language.
But this change is safe. [[HomeObject]] is used only for calling parent methods in super, to resolve the prototype. So it doesn't break compatibility.
Let's see how it works for super – again, using plain objects:
Every method remembers its object in the internal [[HomeObject]] property. Then super uses it to resolve the parent prototype.
[[HomeObject]] is defined for methods defined both in classes and in plain objects. But for objects, methods must be specified exactly the given way: as method(), not as "method: function()".
In the example below a non-method syntax is used for comparison. [[HomeObject]] property is not set and the inheritance doesn't work:
let animal = {
eat: function() { // should be the short syntax: eat() {...}
// ...
}
};
let rabbit = {
__proto__: animal,
eat: function() {
super.eat();
}
};
rabbit.eat(); // Error calling super (because there's no [[HomeObject]])
Static methods and inheritance
The class syntax supports inheritance for static properties too.
For instance:
class Animal {
constructor(name, speed) {
this.speed = speed;
this.name = name;
}
run(speed = 0) {
this.speed += speed;
alert(`${this.name} runs with speed ${this.speed}.`);
}
static compare(animalA, animalB) {
return animalA.speed - animalB.speed;
}
}
// Inherit from Animal
class Rabbit extends Animal {
hide() {
alert(`${this.name} hides!`);
}
}
let rabbits = [
new Rabbit("White Rabbit", 10),
new Rabbit("Black Rabbit", 5)
];
rabbits.sort(Rabbit.compare);
rabbits[0].run(); // Black Rabbit runs with speed 5.
Now we can call Rabbit.compare assuming that the inherited Animal.compare will be called.
How does it work? Again, using prototypes. As you might have already guessed, extends also gives Rabbit the [[Prototype]] reference to Animal.
So, Rabbit function now inherits from Animal function. And Animal function normally has [[Prototype]] referencing Function.prototype, because it doesn't extend anything.
Here, let's check that:
class Animal {}
class Rabbit extends Animal {}
// for static propertites and methods
alert(Rabbit.__proto__ === Animal); // true
// and the next step is Function.prototype
alert(Animal.__proto__ === Function.prototype); // true
// that's in addition to the "normal" prototype chain for object methods
alert(Rabbit.prototype.__proto__ === Animal.prototype);
This way Rabbit has access to all static methods of Animal.
No static inheritance in built-ins
Please note that built-in classes don't have such static [[Prototype]] reference. For instance, Object has Object.defineProperty, Object.keys and so on, but Array, Date etc do not inherit them.
Here's the picture structure for Date and Object:
Note, there's no link between Date and Object. Both Object and Date exist independently. Date.prototype inherits from Object.prototype, but that's all.
Such difference exists for historical reasons: there was no thought about class syntax and inheriting static methods at the dawn of JavaScript language.
Natives are extendable
Built-in classes like Array, Map and others are extendable also.
For instance, here PowerArray inherits from the native Array:
// add one more method to it (can do more)
class PowerArray extends Array {
isEmpty() {
return this.length === 0;
}
}
let arr = new PowerArray(1, 2, 5, 10, 50);
alert(arr.isEmpty()); // false
let filteredArr = arr.filter(item => item >= 10);
alert(filteredArr); // 10, 50
alert(filteredArr.isEmpty()); // false
Please note one very interesting thing. Built-in methods like filter, map and others – return new objects of exactly the inherited type. They rely on the constructor property to do so.
In the example above,
arr.constructor === PowerArray
So when arr.filter() is called, it internally creates the new array of results exactly as new PowerArray. And we can keep using its methods further down the chain.
Even more, we can customize that behavior. The static getter Symbol.species, if exists, returns the constructor to use in such cases.
For example, here due to Symbol.species built-in methods like map, filter will return “normal” arrays:
class PowerArray extends Array {
isEmpty() {
return this.length === 0;
}
// built-in methods will use this as the constructor
static get [Symbol.species]() {
return Array;
}
}
let arr = new PowerArray(1, 2, 5, 10, 50);
alert(arr.isEmpty()); // false
// filter creates new array using arr.constructor[Symbol.species] as constructor
let filteredArr = arr.filter(item => item >= 10);
// filteredArr is not PowerArray, but Array
alert(filteredArr.isEmpty()); // Error: filteredArr.isEmpty is not a function
We can use it in more advanced keys to strip extended functionality from resulting values if not needed. Or, maybe, to extend it even further.
Unfortunately, Rabbit objects can't be created. What's wrong? Fix it.
class Animal {
constructor(name) {
this.name = name;
}
}
class Rabbit extends Animal {
constructor(name) {
this.name = name;
this.created = Date.now();
}
}
let rabbit = new Rabbit("White Rabbit"); // Error: this is not defined
alert(rabbit.name);
That's because the child constructor must call super().
Here's the corrected code:
class Animal {
constructor(name) {
this.name = name;
}
}
class Rabbit extends Animal {
constructor(name) {
super(name);
this.created = Date.now();
}
}
let rabbit = new Rabbit("White Rabbit"); // ok now
alert(rabbit.name); // White Rabbit
We've got a Clock class. As of now, it prints the time every second.
Create a new class ExtendedClock that inherits from Clock and adds the parameter precision – the number of ms between “ticks”. Should be 1000 (1 second) by default.
The first, an easy one is that the inheriting class needs to call super() in the constructor. Otherwise "this" won't be “defined”.
So here's the fix:
class Rabbit extends Object {
constructor(name) {
super(); // need to call the parent constructor when inheriting
this.name = name;
}
}
let rabbit = new Rabbit("Rab");
alert( rabbit.hasOwnProperty('name') ); // true
But that's not all yet.
Even after the fix, there's still important difference in "class Rabbit extends Object" versus class Rabbit.
As we know, the “extends” syntax sets up two prototypes:
Between "prototype" of the constructor functions (for methods).
Between the constructor functions itself (for static methods).
In our case, for class Rabbit extends Object it means:
So we can access static methods of Object via Rabbit, like this:
class Rabbit extends Object {}
// normally we call Object.getOwnPropertyNames
alert ( Rabbit.getOwnPropertyNames({a: 1, b: 2})); // a,b
And if we don't use extends, then class Rabbit does not get the second reference.
Please compare with it:
class Rabbit {}
alert( Rabbit.prototype.__proto__ === Object.prototype ); // (1) true
alert( Rabbit.__proto__ === Object ); // (2) false (!)
// error, no such function in Rabbit
alert ( Rabbit.getOwnPropertyNames({a: 1, b: 2})); // Error
For the simple class Rabbit, the Rabbit function has the same prototype
class Rabbit {}
// instead of (2) that's correct for Rabbit (just like any function):
alert( Rabbit.__proto__ === Function.prototype );
By the way, Function.prototype has “generic” function methods, like call, bind etc. They are ultimately available in both cases, because for the built-in Object constructor, Object.__proto__ === Function.prototype.
The instanceof operator allows to check whether an object belongs to a certain class. It also takes inheritance into account.
Such a check may be necessary in many cases, here we'll use it for building a polymorphic function, the one that treats arguments differently depending on their type.
The instanceof operator
The syntax is:
obj instanceof Class
It returns true if obj belongs to the Class (or a class inheriting from it).
For instance:
class Rabbit {}
let rabbit = new Rabbit();
// is it an object of Rabbit class?
alert( rabbit instanceof Rabbit ); // true
It also works with constructor functions:
// instead of class
function Rabbit() {}
alert( new Rabbit() instanceof Rabbit ); // true
Please note that arr also belongs to the Object class. That's because Array prototypally inherits from Object.
The instanceof operator examines the prototype chain for the check, and is also fine-tunable using the static method Symbol.hasInstance.
The algorithm of obj instanceof Class works roughly as follows:
If there's a static method Symbol.hasInstance, then use it. Like this:
// assume anything that canEat is an animal
class Animal {
static [Symbol.hasInstance](obj) {
if (obj.canEat) return true;
}
}
let obj = { canEat: true };
alert(obj instanceof Animal); // true: Animal[Symbol.hasInstance](obj) is called
Most classes do not have Symbol.hasInstance. In that case, check if Class.prototype equals to one of prototypes in the obj prototype chain.
In the example above Rabbit.prototype === rabbit.__proto__, so that gives the answer immediately.
In the case of an inheritance, rabbit is an instance of the parent class as well:
class Animal {}
class Rabbit extends Animal {}
let rabbit = new Rabbit();
alert(rabbit instanceof Animal); // true
// rabbit.__proto__ === Rabbit.prototype
// rabbit.__proto__.__proto__ === Animal.prototype (match!)
Here's the illustration of what rabbit instanceof Animal compares with Animal.prototype:
By the way, there's also a method
objA.isPrototypeOf(objB), that returns true if objA is somewhere in the chain of prototypes for objB. So the test of obj instanceof Class can be rephrased as Class.prototype.isPrototypeOf(obj).
That's funny, but the Class constructor itself does not participate in the check! Only the chain of prototypes and Class.prototype matters.
That can lead to interesting consequences when prototype is changed.
Like here:
function Rabbit() {}
let rabbit = new Rabbit();
// changed the prototype
Rabbit.prototype = {};
// ...not a rabbit any more!
alert( rabbit instanceof Rabbit ); // false
That's one of the reasons to avoid changing prototype. Just to keep safe.
Bonus: Object toString for the type
We already know that plain objects are converted to string as [object Object]:
let obj = {};
alert(obj); // [object Object]
alert(obj.toString()); // the same
That's their implementation of toString. But there's a hidden feature that makes toString actually much more powerful than that. We can use it as an extended typeof and an alternative for instanceof.
Sounds strange? Indeed. Let's demystify.
By
specification, the built-in toString can be extracted from the object and executed in the context of any other value. And its result depends on that value.
For a number, it will be [object Number]
For a boolean, it will be [object Boolean]
For null: [object Null]
For undefined: [object Undefined]
For arrays: [object Array]
…etc (customizable).
Let's demonstrate:
// copy toString method into a variable for convenience
let objectToString = Object.prototype.toString;
// what type is this?
let arr = [];
alert( objectToString.call(arr) ); // [object Array]
Why instanceof below returns true? We can easily see that a is not created by B().
function A() {}
function B() {}
A.prototype = B.prototype = {};
let a = new A();
alert( a instanceof B ); // true
Yeah, looks strange indeed.
But instanceof does not care about the function, but rather about its prototype, that it matches against the prototype chain.
And here a.__proto__ == B.prototype, so instanceof returns true.
So, by the logic of instanceof, the prototype actually defines the type, not the constructor function.
/**
* Subscribe to event, usage:
* menu.on('select', function(item) { ... }
*/
on(eventName, handler) {
if (!this._eventHandlers) this._eventHandlers = {};
if (!this._eventHandlers[eventName]) {
this._eventHandlers[eventName] = [];
}
this._eventHandlers[eventName].push(handler);
},
/**
* Cancel the subscription, usage:
* menu.off('select', handler)
*/
off(eventName, handler) {
let handlers = this._eventHandlers && this._eventHandlers[eventName];
if (!handlers) return;
for(let i = 0; i < handlers.length; i++) {
if (handlers[i] == handler) {
handlers.splice(i--, 1);
}
}
},
/**
* Generate the event and attach the data to it
* this.trigger('select', data1, data2);
*/
trigger(eventName, ...args) {
if (!this._eventHandlers || !this._eventHandlers[eventName]) {
return; // no handlers for that event name
}
// call the handlers
this._eventHandlers[eventName].forEach(handler => handler.apply(this, args));
}
};
Mixins
In JavaScript we can only inherit from a single object. There can be only one [[Prototype]] for an object. And a class may extend only one other class.
But sometimes that feels limiting. For instance, I have a class StreetSweeper and a class Bicycle, and want to make a StreetSweepingBicycle.
Or, talking about programming, we have a class Renderer that implements templating and a class EventEmitter that implements event handling, and want to merge these functionalities together with a class Page, to make a page that can use templates and emit events.
There's a concept that can help here, called “mixins”.
As defined in Wikipedia, a
mixin is a class that contains methods for use by other classes without having to be the parent class of those other classes.
In other words, a mixin provides methods that implement a certain behavior, but we do not use it alone, we use it to add the behavior to other classes.
A mixin example
The simplest way to make a mixin in JavaScript is to make an object with useful methods, so that we can easily merge them into a prototype of any class.
For instance here the mixin sayHiMixin is used to add some “speech” for User:
// mixin
let sayHiMixin = {
sayHi() {
alert(`Hello ${this.name}`);
},
sayBye() {
alert(`Bye ${this.name}`);
}
};
// usage:
class User {
constructor(name) {
this.name = name;
}
}
// copy the methods
Object.assign(User.prototype, sayHiMixin);
// now User can say hi
new User("Dude").sayHi(); // Hello Dude!
There's no inheritance, but a simple method copying. So User may extend some other class and also include the mixin to “mix-in” the additional methods, like this:
class User extends Person {
// ...
}
Object.assign(User.prototype, sayHiMixin);
Mixins can make use of inheritance inside themselves.
For instance, here sayHiMixin inherits from sayMixin:
let sayMixin = {
say(phrase) {
alert(phrase);
}
};
let sayHiMixin = {
__proto__: sayMixin, // (or we could use Object.create to set the prototype here)
sayHi() {
// call parent method
super.say(`Hello ${this.name}`);
},
sayBye() {
super.say(`Bye ${this.name}`);
}
};
class User {
constructor(name) {
this.name = name;
}
}
// copy the methods
Object.assign(User.prototype, sayHiMixin);
// now User can say hi
new User("Dude").sayHi(); // Hello Dude!
Please note that the call to the parent method super.say() from sayHiMixin looks for the method in the prototype of that mixin, not the class.
That's because methods from sayHiMixin have [[HomeObject]] set to it. So super actually means sayHiMixin.__proto__, not User.__proto__.
EventMixin
Now let's make a mixin for real life.
The important feature of many objects is working with events.
That is: an object should have a method to “generate an event” when something important happens to it, and other objects should be able to “listen” to such events.
An event must have a name and, optionally, bundle some additional data.
For instance, an object user can generate an event "login" when the visitor logs in. And another object calendar may want to receive such events to load the calendar for the logged-in person.
Or, a menu can generate the event "select" when a menu item is selected, and other objects may want to get that information and react on that event.
Events is a way to “share information” with anyone who wants it. They can be useful in any class, so let's make a mixin for them:
let eventMixin = {
/**
* Subscribe to event, usage:
* menu.on('select', function(item) { ... }
*/
on(eventName, handler) {
if (!this._eventHandlers) this._eventHandlers = {};
if (!this._eventHandlers[eventName]) {
this._eventHandlers[eventName] = [];
}
this._eventHandlers[eventName].push(handler);
},
/**
* Cancel the subscription, usage:
* menu.off('select', handler)
*/
off(eventName, handler) {
let handlers = this._eventHandlers && this._eventHandlers[eventName];
if (!handlers) return;
for (let i = 0; i < handlers.length; i++) {
if (handlers[i] === handler) {
handlers.splice(i--, 1);
}
}
},
/**
* Generate the event and attach the data to it
* this.trigger('select', data1, data2);
*/
trigger(eventName, ...args) {
if (!this._eventHandlers || !this._eventHandlers[eventName]) {
return; // no handlers for that event name
}
// call the handlers
this._eventHandlers[eventName].forEach(handler => handler.apply(this, args));
}
};
There are 3 methods here:
.on(eventName, handler) – assigns function handler to run when the event with that name happens. The handlers are stored in the _eventHandlers property.
.off(eventName, handler) – removes the function from the handlers list.
.trigger(eventName, ...args) – generates the event: all assigned handlers are called and args are passed as arguments to them.
Usage:
// Make a class
class Menu {
choose(value) {
this.trigger("select", value);
}
}
// Add the mixin
Object.assign(Menu.prototype, eventMixin);
let menu = new Menu();
// call the handler on selection:
menu.on("select", value => alert(`Value selected: ${value}`));
// triggers the event => shows Value selected: 123
menu.choose("123"); // value selected
Now if we have the code interested to react on user selection, we can bind it with menu.on(...).
And the eventMixin can add such behavior to as many classes as we'd like, without interfering with the inheritance chain.
Summary
Mixin – is a generic object-oriented programming term: a class that contains methods for other classes.
Some other languages like e.g. python allow to create mixins using multiple inheritance. JavaScript does not support multiple inheritance, but mixins can be implemented by copying them into the prototype.
We can use mixins as a way to augment a class by multiple behaviors, like event-handling as we have seen above.
Mixins may become a point of conflict if they occasionally overwrite native class methods. So generally one should think well about the naming for a mixin, to minimize such possibility.
No matter how great we are at programming, sometimes our scripts have errors. They may occur because of our mistakes, an unexpected user input, an erroneous server response and for a thousand of other reasons.
Usually, a script “dies” (immediately stops) in case of an error, printing it to console.
But there's a syntax construct try..catch that allows to “catch” errors and, instead of dying, do something more reasonable.
The “try…catch” syntax
The try..catch construct has two main blocks: try, and then catch:
If there were no errors, then catch(err) is ignored: the execution reaches the end of try and then jumps over catch.
If an error occurs, then try execution is stopped, and the control flows to the beginning of catch(err). The err variable (can use any name for it) contains an error object with details about what's happened.
So, an error inside the try {…} block does not kill the script: we have a chance to handle it in catch.
Let's see more examples.
An errorless example: shows alert(1) and (2):
try {
alert('Start of try runs'); // (1) <--
// ...no errors here
alert('End of try runs'); // (2) <--
} catch(err) {
alert('Catch is ignored, because there are no errors'); // (3)
}
alert("...Then the execution continues");
An example with an error: shows (1) and (3):
try {
alert('Start of try runs'); // (1) <--
lalala; // error, variable is not defined!
alert('End of try (never reached)'); // (2)
} catch(err) {
alert(`Error has occured!`); // (3) <--
}
alert("...Then the execution continues");
try..catch only works for runtime errors
For try..catch to work, the code must be runnable. In other words, it should be valid JavaScript.
It won't work if the code is syntactically wrong, for instance it has unmatched figure brackets:
The JavaScript engine first reads the code, and then runs it. The errors that occur on the reading phrase are called “parse-time” errors and are unrecoverable (from inside that code). That's because the engine can't understand the code.
So, try..catch can only handle errors that occur in the valid code. Such errors are called “runtime errors” or, sometimes, “exceptions”.
try..catch works synchronously
If an exception happens in a “scheduled” code, like in setTimeout, then try..catch won't catch it:
try {
setTimeout(function() {
noSuchVariable; // script will die here
}, 1000);
} catch (e) {
alert( "won't work" );
}
That's because try..catch actually wraps the setTimeout call that schedules the function. But the function itself is executed later, when the engine has already have left the try..catch construct.
To catch an exception inside a scheduled function, try..catch must be inside that function:
When an error occurs, JavaScript generates an object containing the details about it. The object is then passed as an argument to catch:
try {
// ...
} catch(err) { // <-- the "error object", could use another word instead of err
// ...
}
For all built-in errors, the error object inside catch block has two main properties:
name
Error name. For an undefined variable that's "ReferenceError".
message
Textual message about error details.
There are other non-standard properties available in most environments. One of most widely used and supported is:
stack
Current call stack: a string with information about the sequence of nested calls that led to the error. Used for debugging purposes.
For instance:
try {
lalala; // error, variable is not defined!
} catch(err) {
alert(err.name); // ReferenceError
alert(err.message); // lalala is not defined
alert(err.stack); // ReferenceError: lalala is not defined at ...
// Can also show an error as a whole
// The error is converted to string as "name: message"
alert(err); // ReferenceError: lalala is not defined
}
Using “try…catch”
Let's explore a real-life use case of try..catch.
As we already know, JavaScript supports method
JSON.parse(str) to read JSON-encoded values.
Usually it's used to decode the data received over the network, from the server or another source.
We receive it and call JSON.parse, like this:
let json = '{"name":"John", "age": 30}'; // data from the server
let user = JSON.parse(json); // convert the text representation to JS object
// now user is an object with properties from the string
alert( user.name ); // John
alert( user.age ); // 30
More detailed information about JSON you can find in the chapter
JSON methods, toJSON.
If json is malformed, JSON.parse generates an error, so the script “dies”.
Should we be satisfied with that? Of course, not!
This way if something's wrong with the data, the visitor will never know that (unless he opens developer console). And people really really don't like when something “just dies” without any error message.
Let's use try..catch to handle the error:
let json = "{ bad json }";
try {
let user = JSON.parse(json); // <-- when an error occurs...
alert( user.name ); // doesn't work
} catch (e) {
// ...the execution jumps here
alert( "Our apologies, the data has errors, we'll try to request it one more time." );
alert( e.name );
alert( e.message );
}
Here we use catch block only to show the message, but we can do much more: a new network request, suggest an alternative to the visitor, send the information about the error to a logging facility… All much better than just dying.
Throwing our own errors
What if json is syntactically correct… But doesn't have a required "name" property?
Like this:
let json = '{ "age": 30 }'; // incomplete data
try {
let user = JSON.parse(json); // <-- no errors
alert( user.name ); // no name!
} catch (e) {
alert( "doesn't execute" );
}
Here JSON.parse runs normally, but the absence of "name" is actually an error for us.
To unify error handling, we'll use the throw operator.
“Throw” operator
The throw operator generates an error.
The syntax is:
throw <error object>
Technically, we can use anything as an error object. That may be even a primitive, like a number or a string, but it's better to use objects, preferrably with name and message properties (to stay somewhat compatible with built-in errors).
JavaScript has many built-in constructors for standard errors: Error, SyntaxError, ReferenceError, TypeError and others. We can use them to create error objects as well.
Their syntax is:
let error = new Error(message);
// or
let error = new SyntaxError(message);
let error = new ReferenceError(message);
// ...
For built-in errors (not for any objects, just for errors), the name property is exactly the name of the constructor. And message is taken from the argument.
For instance:
let error = new Error("Things happen o_O");
alert(error.name); // Error
alert(error.message); // Things happen o_O
Let's see what kind of error JSON.parse generates:
try {
JSON.parse("{ bad json o_O }");
} catch(e) {
alert(e.name); // SyntaxError
alert(e.message); // Unexpected token o in JSON at position 0
}
As we can see, that's a SyntaxError.
…And in our case, the absense of name could be treated as a syntax error also, assuming that users must have a "name".
So let's throw it:
let json = '{ "age": 30 }'; // incomplete data
try {
let user = JSON.parse(json); // <-- no errors
if (!user.name) {
throw new SyntaxError("Incomplete data: no name"); // (*)
}
alert( user.name );
} catch(e) {
alert( "JSON Error: " + e.message ); // JSON Error: Incomplete data: no name
}
In the line (*) the throw operator generates SyntaxError with the given message, the same way as JavaScript would generate itself. The execution of try immediately stops and the control flow jumps into catch.
Now catch became a single place for all error handling: both for JSON.parse and other cases.
Rethrowing
In the example above we use try..catch to handle incorrect data. But is it possible that another unexpected error occurs within the try {...} block? Like a variable is undefined or something else, not just that “incorrect data” thing.
Like this:
let json = '{ "age": 30 }'; // incomplete data
try {
user = JSON.parse(json); // <-- forgot to put "let" before user
// ...
} catch(err) {
alert("JSON Error: " + err); // JSON Error: ReferenceError: user is not defined
// (not JSON Error actually)
}
Of course, everything's possible! Programmers do make mistakes. Even in open-source utilities used by millions for decades – suddenly a crazy bug may be discovered that leads to terrible hacks (like it happened with the ssh tool).
In our case, try..catch is meant to catch “incorrect data” errors. But by its nature, catch gets all errors from try. Here it gets an unexpected error, but still shows the same "JSON Error" message. That's wrong and also makes the code more difficult to debug.
Fortunately, we can find out which error we get, for instance from its name:
try {
user = { /*...*/ };
} catch(e) {
alert(e.name); // "ReferenceError" for accessing an undefined variable
}
The rule is simple:
Catch should only process errors that it knows and “rethrow” all others.
The “rethrowing” technique can be explained in more detail as:
Catch gets all errors.
In catch(err) {...} block we analyze the error object err.
If we don't know how to handle it, then we do throw err.
In the code below, we use rethrowing so that catch only handles SyntaxError:
let json = '{ "age": 30 }'; // incomplete data
try {
let user = JSON.parse(json);
if (!user.name) {
throw new SyntaxError("Incomplete data: no name");
}
blabla(); // unexpected error
alert( user.name );
} catch(e) {
if (e.name == "SyntaxError") {
alert( "JSON Error: " + e.message );
} else {
throw e; // rethrow (*)
}
}
The error throwing on line (*) from inside catch block “falls out” of try..catch and can be either caught by an outer try..catch construct (if it exists), or it kills the script.
So the catch block actually handles only errors that it knows how to deal with and “skips” all others.
The example below demonstrates how such errors can be caught by one more level of try..catch:
function readData() {
let json = '{ "age": 30 }';
try {
// ...
blabla(); // error!
} catch (e) {
// ...
if (e.name != 'SyntaxError') {
throw e; // rethrow (don't know how to deal with it)
}
}
}
try {
readData();
} catch (e) {
alert( "External catch got: " + e ); // caught it!
}
Here readData only knows how to handle SyntaxError, while the outer try..catch knows how to handle everything.
try…catch…finally
Wait, that's not all.
The try..catch construct may have one more code clause: finally.
If you answer “Yes” to “Make an error?”, then try -> catch -> finally.
If you say “No”, then try -> finally.
The finally clause is often used when we start doing something before try..catch and want to finalize it in any case of outcome.
For instance, we want to measure time that a Fibonacci numbers function fib(n) takes. Naturally, we can start measuring before it runs and finish afterwards. But what if there's an error during the function call? In particular, the implementation of fib(n) in the code below returns an error for negative or non-integer numbers.
The finally clause is a great place to finish the measurements no matter what.
Here finally guarantees that the time will be measured correctly in both situations – in case of a successful execution of fib and in case of an error in it:
let num = +prompt("Enter a positive integer number?", 35)
let diff, result;
function fib(n) {
if (n < 0 || Math.trunc(n) != n) {
throw new Error("Must not be negative, and also an integer.");
}
return n <= 1 ? n : fib(n - 1) + fib(n - 2);
}
let start = Date.now();
try {
result = fib(num);
} catch (e) {
result = 0;
} finally {
diff = Date.now() - start;
}
alert(result || "error occured");
alert( `execution took ${diff}ms` );
You can check by running the code with entering 35 into prompt – it executes normally, finally after try. And then enter -1 – there will be an immediate error, an the execution will take 0ms. Both measurements are done correctly.
In other words, there may be two ways to exit a function: either a return or throw. The finally clause handles them both.
Variables are local inside try..catch..finally
Please note that result and diff variables in the code above are declared beforetry..catch.
Otherwise, if let were made inside the {...} block, it would only be visible inside of it.
finally and return
Finally clause works for any exit from try..catch. That includes an explicit return.
In the example below, there's a return in try. In this case, finally is executed just before the control returns to the outer code.
function func() {
try {
return 1;
} catch (e) {
/* ... */
} finally {
alert( 'finally' );
}
}
alert( func() ); // first works alert from finally, and then this one
try..finally
The try..finally construct, without catch clause, is also useful. We apply it when we don't want to handle errors right here, but want to be sure that processes that we started are finalized.
function func() {
// start doing something that needs completion (like measurements)
try {
// ...
} finally {
// complete that thing even if all dies
}
}
In the code above, an error inside try always falls out, because there's no catch. But finally works before the execution flow jumps outside.
Global catch
Environment-specific
The information from this section is not a part of the core JavaScript.
Let's imagine we've got a fatal error outside of try..catch, and the script died. Like a programming error or something else terrible.
Is there a way to react on such occurrences? We may want to log the error, show something to the user (normally he doesn't see error messages) etc.
There is none in the specification, but environments usually provide it, because it's really useful. For instance, Node.JS has
process.on(‘uncaughtException') for that. And in the browser we can assign a function to special
window.onerror property. It will run in case of an uncaught error.
<script>
window.onerror = function(message, url, line, col, error) {
alert(`${message}\n At ${line}:${col} of ${url}`);
};
function readData() {
badFunc(); // Whoops, something went wrong!
}
readData();
</script>
The role of the global handler window.onerror is usually not to recover the script execution – that's probably impossible in case of programming errors, but to send the error message to developers.
We register at the service and get a piece of JS (or a script URL) from them to insert on pages.
That JS script has a custom window.onerror function.
When an error occurs, it sends a network request about it to the service.
We can log in to the service web interface and see errors.
Summary
The try..catch construct allows to handle runtime errors. It literally allows to try running the code and catch errors that may occur in it.
The syntax is:
try {
// run this code
} catch(err) {
// if an error happened, then jump here
// err is the error object
} finally {
// do in any case after try/catch
}
There may be no catch section or no finally, so try..catch and try..finally are also valid.
Error objects have following properties:
message – the human-readable error message.
name – the string with error name (error constructor name).
stack (non-standard) – the stack at the moment of error creation.
We can also generate our own errors using the throw operator. Technically, the argument of throw can be anything, but usually it's an error object inheriting from the built-in Error class. More on extending errors in the next chapter.
Rethrowing is a basic pattern of error handling: a catch block usually expects and knows how to handle the particular error type, so it should rethrow errors it doesn't know.
Even if we don't have try..catch, most environments allow to setup a “global” error handler to catch errors that “fall out”. In-browser that's window.onerror.
The first one uses finally to execute the code after try..catch:
try {
work work
} catch (e) {
handle errors
} finally {
cleanup the working space
}
The second fragment puts the cleaning right after try..catch:
try {
work work
} catch (e) {
handle errors
}
cleanup the working space
We definitely need the cleanup after the work has started, doesn't matter if there was an error or not.
Is there an advantage here in using finally or both code fragments are equal? If there is such an advantage, then give an example when it matters.
The difference becomes obvious when we look at the code inside a function.
The behavior is different if there's a “jump out” of try..catch.
For instance, when there's a return inside try..catch. The finally clause works in case of any exit from try..catch, even via the return statement: right after try..catch is done, but before the calling code gets the control.
It's finally that guarantees the cleanup here. If we just put the code at the end of f, it wouldn't run.
Custom errors, extending Error
When we develop something, we often need our own error classes to reflect specific things that may go wrong in our tasks. For errors in network operations we may need HttpError, for database operations DbError, for searching operations NotFoundError and so on.
Our errors should support basic error properties like message, name and, preferably, stack. But they also may have other properties of their own, e.g. HttpError objects may have statusCode property with a value like 404 or 403 or 500.
JavaScript allows to use throw with any argument, so technically our custom error classes don't need to inherit from Error. But if we inherit, then it becomes possible to use obj instanceof Error to identify error objects. So it's better to inherit from it.
As we build our application, our own errors naturally form a hierarchy, for instance HttpTimeoutError may inherit from HttpError, and so on.
Extending Error
As an example, let's consider a function readUser(json) that should read JSON with user data.
Here's an example of how a valid json may look:
let json = `{ "name": "John", "age": 30 }`;
Internally, we'll use JSON.parse. If it receives malformed json, then it throws SyntaxError.
But even if json is syntactically correct, that doesn't mean that it's a valid user, right? It may miss the necessary data. For instance, if may not have name and age properties that are essential for our users.
Our function readUser(json) will not only read JSON, but check (“validate”) the data. If there are no required fields, or the format is wrong, then that's an error. And that's not a SyntaxError, because the data is syntactically correct, but another kind of error. We'll call it ValidationError and create a class for it. An error of that kind should also carry the information about the offending field.
Our ValidationError class should inherit from the built-in Error class.
That class is built-in, but we should have its approximate code before our eyes, to understand what we're extending.
So here you are:
// The "pseudocode" for the built-in Error class defined by JavaScript itself
class Error {
constructor(message) {
this.message = message;
this.name = "Error"; // (different names for different built-in error classes)
this.stack = <nested calls>; // non-standard, but most environments support it
}
}
Now let's go on and inherit ValidationError from it:
class ValidationError extends Error {
constructor(message) {
super(message); // (1)
this.name = "ValidationError"; // (2)
}
}
function test() {
throw new ValidationError("Whoops!");
}
try {
test();
} catch(err) {
alert(err.message); // Whoops!
alert(err.name); // ValidationError
alert(err.stack); // a list of nested calls with line numbers for each
}
Please take a look at the constructor:
In the line (1) we call the parent constructor. JavaScript requires us to call super in the child constructor, so that's obligatory. The parent constructor sets the message property.
The parent constructor also sets the name property to "Error", so in the line (2) we reset it to the right value.
Let's try to use it in readUser(json):
class ValidationError extends Error {
constructor(message) {
super(message);
this.name = "ValidationError";
}
}
// Usage
function readUser(json) {
let user = JSON.parse(json);
if (!user.age) {
throw new ValidationError("No field: age");
}
if (!user.name) {
throw new ValidationError("No field: name");
}
return user;
}
// Working example with try..catch
try {
let user = readUser('{ "age": 25 }');
} catch (err) {
if (err instanceof ValidationError) {
alert("Invalid data: " + err.message); // Invalid data: No field: name
} else if (err instanceof SyntaxError) { // (*)
alert("JSON Syntax Error: " + err.message);
} else {
throw err; // unknown error, rethrow it (**)
}
}
The try..catch block in the code above handles both our ValidationError and the built-in SyntaxError from JSON.parse.
Please take a look at how we use instanceof to check for the specific error type in the line (*).
We could also look at err.name, like this:
// ...
// instead of (err instanceof SyntaxError)
} else if (err.name == "SyntaxError") { // (*)
// ...
The instanceof version is much better, because in the future we are going to extend ValidationError, make subtypes of it, like PropertyRequiredError. And instanceof check will continue to work for new inheriting classes. So that's future-proof.
Also it's important that if catch meets an unknown error, then it rethrows it in the line (**). The catch only knows how to handle validation and syntax errors, other kinds (due to a typo in the code or such) should fall through.
Further inheritance
The ValidationError class is very generic. Many things may go wrong. The property may be absent or it may be in a wrong format (like a string value for age). Let's make a more concrete class PropertyRequiredError, exactly for absent properties. It will carry additional information about the property that's missing.
class ValidationError extends Error {
constructor(message) {
super(message);
this.name = "ValidationError";
}
}
class PropertyRequiredError extends ValidationError {
constructor(property) {
super("No property: " + property);
this.name = "PropertyRequiredError";
this.property = property;
}
}
// Usage
function readUser(json) {
let user = JSON.parse(json);
if (!user.age) {
throw new PropertyRequiredError("age");
}
if (!user.name) {
throw new PropertyRequiredError("name");
}
return user;
}
// Working example with try..catch
try {
let user = readUser('{ "age": 25 }');
} catch (err) {
if (err instanceof ValidationError) {
alert("Invalid data: " + err.message); // Invalid data: No property: name
alert(err.name); // PropertyRequiredError
alert(err.property); // name
} else if (err instanceof SyntaxError) {
alert("JSON Syntax Error: " + err.message);
} else {
throw err; // unknown error, rethrow it
}
}
The new class PropertyRequiredError is easy to use: we only need to pass the property name: new PropertyRequiredError(property). The human-readable message is generated by the constructor.
Please note that this.name in PropertyRequiredError constructor is again assigned manually. That may become a bit tedius – to assign this.name = <class name> when creating each custom error. But there's a way out. We can make our own “basic error” class that removes this burden from our shoulders by using this.constructor.name for this.name in the constructor. And then inherit from it.
Let's call it MyError.
Here's the code with MyError and other custom error classes, simplified:
class MyError extends Error {
constructor(message) {
super(message);
this.name = this.constructor.name;
}
}
class ValidationError extends MyError { }
class PropertyRequiredError extends ValidationError {
constructor(property) {
super("No property: " + property);
this.property = property;
}
}
// name is correct
alert( new PropertyRequiredError("field").name ); // PropertyRequiredError
Now custom errors are much shorter, especially ValidationError, as we got rid of the "this.name = ..." line in the constructor.
Wrapping exceptions
The purpose of the function readUser in the code above is “to read the user data”, right? There may occur different kinds of errors in the process. Right now we have SyntaxError and ValidationError, but in the future readUser function may grow: the new code will probably generate other kinds of errors.
The code which calls readUser should handle these errors. Right now it uses multiple if in the catch block to check for different error types and rethrow the unknown ones. But if readUser function generates several kinds of errors – then we should ask ourselves: do we really want to check for all error types one-by-one in every code that calls readUser?
Often the answer is “No”: the outer code wants to be “one level above all that”. It wants to have some kind of “data reading error”. Why exactly it happened – is often irrelevant (the error message describes it). Or, even better if there is a way to get error details, but only if we need to.
So let's make a new class ReadError to represent such errors. If an error occurs inside readUser, we'll catch it there and generate ReadError. We'll also keep the reference to the original error in its cause property. Then the outer code will only have to check for ReadError.
Here's the code that defines ReadError and demonstrates its use in readUser and try..catch:
class ReadError extends Error {
constructor(message, cause) {
super(message);
this.cause = cause;
this.name = 'ReadError';
}
}
class ValidationError extends Error { /*...*/ }
class PropertyRequiredError extends ValidationError { /* ... */ }
function validateUser(user) {
if (!user.age) {
throw new PropertyRequiredError("age");
}
if (!user.name) {
throw new PropertyRequiredError("name");
}
}
function readUser(json) {
let user;
try {
user = JSON.parse(json);
} catch (err) {
if (err instanceof SyntaxError) {
throw new ReadError("Syntax Error", err);
} else {
throw err;
}
}
try {
validateUser(user);
} catch (err) {
if (err instanceof ValidationError) {
throw new ReadError("Validation Error", err);
} else {
throw err;
}
}
}
try {
readUser('{bad json}');
} catch (e) {
if (e instanceof ReadError) {
alert(e);
// Original error: SyntaxError: Unexpected token b in JSON at position 1
alert("Original error: " + e.cause);
} else {
throw e;
}
}
In the code above, readUser works exactly as described – catches syntax and validation errors and throws ReadError errors instead (unknown errors are rethrown as usual).
So the outer code checks instanceof ReadError and that's it. No need to list possible all error types.
The approach is called “wrapping exceptions”, because we take “low level exceptions” and “wrap” them into ReadError that is more abstract and more convenient to use for the calling code. It is widely used in object-oriented programming.
Summary
We can inherit from Error and other built-in error classes normally, just need to take care of name property and don't forget to call super.
Most of the time, we should use instanceof to check for particular errors. It also works with inheritance. But sometimes we have an error object coming from the 3rd-party library and there's no easy way to get the class. Then name property can be used for such checks.
Wrapping exceptions is a widespread technique when a function handles low-level exceptions and makes a higher-level object to report about the errors. Low-level exceptions sometimes become properties of that object like err.cause in the examples above, but that's not strictly required.
The JavaScript language was initially created for web browsers. Since then, it evolved and became a language with many uses and platforms.
A platform may be either a browser or a web-server or a washing machine or another host. Each of them provides platform-specific functionality. The JavaScript specification calls that a host environment.
A host environment provides platform-specific objects and functions additionally to the language core. Web browsers give means to control web pages. Node.JS provides server-side features, and so on.
Here's a bird's-eye view of what we have when JavaScript runs in a web-browser:
There's a “root” object called window. It has two roles:
First, it is a global object for JavaScript code, as described in the chapter
Global object.
Second, it represents the “browser window” and provides methods to control it.
For instance, here we use it as a global object:
function sayHi() {
alert("Hello");
}
// global functions are accessible as properties of window
window.sayHi();
And here we use it as a browser window, to see the window height:
alert(window.innerHeight); // inner window height
There are more window-specific methods and properties, we'll cover them later.
Document Object Model (DOM)
The document object gives access to the page content. We can change or create anything on the page using it.
For instance:
// change the background color to red
document.body.style.background = "red";
// change it back after 1 second
setTimeout(() => document.body.style.background = "", 1000);
Here we used document.body.style, but there's much, much more. Properties and methods are described in the specification. By chance, there are two working groups who develop it:
As it happens, the two groups don't always agree, so we have like 2 sets of standards. But they are in the tight contact and eventually things merge. So the documentation that you can find on the given resources is very similar, there's about 99% match. There are very minor differences, you probably won't notice them.
In the ancient past, there was no standard at all – each browser implemented whatever it wanted. So different browsers had different sets methods and properties for the same thing, and developers had to write different code for each of them. Dark, messy times.
Even now we can sometimes meet old code that uses browser-specific properties and works around incompatibilities. But in this tutorial we'll use modern stuff: there's no need to learn old things until you really need those (chances are high you won't).
Then the DOM standard appeared, in an attempt to bring everyone to an agreement. The first version was “DOM Level 1”, then it was extended by DOM Level 2, then DOM Level 3, and now it's DOM Level 4. People from WhatWG group got tired of version and are calling that just “DOM”, without a number. So will do we.
DOM is not only for browsers
The DOM specification explains the structure of a document and provides objects to manipulate it. There are non-browser instruments that use it too.
For instance, server-side tools that download HTML pages and process them. They may support only a part of the DOM specification though.
CSSOM for styling
CSS rules and stylesheets are structured not like HTML. So there's a separate specification
CSSOM that explains how they are represented as objects, how to read and write them.
CSSOM is used together with DOM when we modify style rules for the document. In practice though, CSSOM is rarely required, because usually CSS rules are static. We rarely need to add/remove CSS rules from JavaScript, so we won't cover it right now.
BOM (part of HTML spec)
Browser Object Model (BOM) are additional objects provided by the browser (host environment) to work with everything except the document.
For instance:
navigator object provides background information about the browser and the operating system. There are many properties, but two most widely known are: navigator.userAgent – about the current browser, and navigator.platform – about the platform (can help to differ between Windows/Linux/Mac etc).
location object allows to read the current URL and redirects the browser to a new one.
Here's how we can use the location object:
alert(location.href); // shows current URL
if (confirm("Go to wikipedia?")) {
location.href = "https://wikipedia.org"; // redirect the browser to another URL
}
Functions alert/confirm/prompt are also a part of BOM: they are directly not related to the document, but represent pure browser methods of communicating with the user.
Yes, you heard that right. The HTML spec at
https://html.spec.whatwg.org is not only about the “HTML language” (tags, attributes), but also covers a bunch of objects, methods and browser-specific DOM extensions. That's “HTML in broad terms”.
Describes stylesheets and style rules, manipulations with them and their binding to documents, see
https://www.w3.org/TR/cssom-1/.
HTML specification
Describes HTML language (tags etc) and also BOM (browser object model) – various browser functions: setTimeout, alert, location and so on, see
https://html.spec.whatwg.org. It takes DOM specification and extends it with many additional properties and methods.
Now we'll get down to learning DOM, because the document plays the central role in the UI, and working with it is the most complex part.
Please note the links above, because there's so much stuff to learn, it's impossible to cover and remember everything.
When you'd like to read about a property or a method – the Mozilla manual at
https://developer.mozilla.org/en-US/search is a nice one, but reading the corresponding spec may be better: more complex and longer to read, but will make your fundamental knowledge sound and complete.
According to Document Object Model (DOM), every HTML-tag is an object. Nested tags are called “children” of the enclosing one.
The text inside a tag it is an object as well.
All these objects are accessible using JavaScript.
An example of DOM
For instance, let's explore the DOM for this document:
<!DOCTYPE HTML>
<html>
<head>
<title>About elks</title>
</head>
<body>
The truth about elks.
</body>
</html>
The DOM represents HTML as a tree structure of tags. Here's how it looks:
On the picture above, you can click on element nodes and their children will open/collapse.
Tags are called element nodes (or just elements). Nested tags become children of the enclosing ones. As a result we have a tree of elements: <html> is at the root, then <head> and <body> are its children etc.
The text inside elements forms text nodes, labelled as #text. A text node contains only a string. It may not have children and is always a leaf of the tree.
For instance, the <title> tag has the text "About elks".
Please note the special characters in text nodes:
a newline: ↵ (in JavaScript known as \n)
a space: ␣
Spaces and newlines – are totally valid characters, they form text nodes and become a part of the DOM. So, for instance, in the example above the <head> tag contains come spaces before <title>, and that text becomes a #text node (it contains a newline and some spaces only).
There are only two top-level exclusions:
Spaces and newlines before <head> are ignored for historical reasons,
If we put something after </body>, then that is automatically moved inside the body, at the end, as HTML spec requires that all content must be inside <body>. So there may be no spaces after </body>.
In other cases everything's honest – if there are spaces (just like any character) in the document, then they become text nodes in DOM, and if we remove them, then there won't be any.
Here are no space-only text nodes:
<!DOCTYPE HTML>
<html><head><title>About elks</title></head><body>The truth about elks.</body></html>
Edge spaces and in-between empty text are usually hidden in tools
Browser tools (to be covered soon) that work with DOM usually do not show spaces at the start/end of the text and empty text nodes (line-breaks) between tags.
That's because they are mainly used to decorate HTML, and do not affect (in most cases) how it is shown.
On further DOM pictures we'll sometimes omit them where they are irrelevant, to keep things short.
Autocorrection
If the browser encounters malformed HTML, it automatically corrects it when making DOM.
For instance, the top tag is always <html>. Even if it doesn't exist in the document – it will be in DOM, the browser will create it. The same about <body>.
As an example, if the HTML file is a single word "Hello", the browser will wrap it into <html> and <body>, add the required <head>, and the DOM will be:
While generating DOM, browser automatically processes errors in the document, closes tags and so on.
Such an “invalid” document:
<p>Hello
<li>Mom
<li>and
<li>Dad
…Will become a normal DOM, as the browser read tags and restores the missing parts:
Tables always have <tbody>
An interesting “special case” is tables. By the DOM specification they must have <tbody>, but HTML text may (officially) omit it. Then the browser creates <tbody> in DOM automatically.
For the HTML:
<table id="table"><tr><td>1</td></tr></table>
DOM-structure will be:
You see? The <tbody> has appeared out of nowhere. Should keep in mind while working with tables to avoid surprises.
Other node types
Let's add more tags and a comment to the page:
<!DOCTYPE HTML>
<html>
<body>
The truth about elks.
<ol>
<li>An elk is a smart</li>
<!-- comment -->
<li>...and cunning animal!</li>
</ol>
</body>
</html>
Here we see a new tree node type – comment node, labeled as #comment.
We may think – why a comment is added to the DOM? It doesn't affect the visual representation in any way. But there's a rule – if something's in HTML, then it also must be in the DOM tree.
Everything in HTML, even comments, becomes a part of DOM.
Even the <!DOCTYPE...> directive at the very beginning of HTML is also a DOM node. It's in the DOM tree right before <html>. We are not going to touch that node, we even don't draw it on diagrams for that reason, but it's there.
The document object that represents the whole document is, formally, a DOM node as well.
There are
12 node types. In practice we usually work with 4 of them:
document – the “entry point” into DOM.
element nodes – HTML-tags, the tree building blocks.
text nodes – contain text.
comments – sometimes we can put the information there, it won't be shown, but JS can read it from DOM.
See it yourself
To see the DOM structure in real-time, try
Live DOM Viewer. Just type in the document, and it will show up DOM at an instant.
In the browser inspector
Another way to explore DOM is to use browser developer tools. Actually, that's what we use when developing.
To do so, open the web-page
elks.html, turn on browser developer tools and switch to Elements tab.
Should look like this:
You can see the DOM, click on elements, see their details and so on.
Please note that the DOM structure in developer tools is simplified. Text nodes are shown just as text. And there are no “blank” (space only) text nodes at all. That's fine, because most of the time we are interested in element nodes.
Clicking the button in the left-upper corner allows to choose a node from the webpage using a mouse (or other pointer devices) and “inspect” it (scroll to it in the elements tab). Works great when we have a huge HTML page and would like to see the DOM of a particular place in it.
Another way to do it would be just right-clicking on a webpage and selecting “Inspect” in the context menu.
At the right part of the tools there are following subtabs:
Styles – we can see CSS applied to the current element rule by rule, including built-in rules (gray). Almost everything can be edited at-place including the dimensions/margins/paddings of the box below.
Computed – to see CSS applied to the element by property: for each property we can see a rule that gives it (including CSS inheritance and such).
Event Listeners – to see event listeners attached to DOM elements (we'll cover them in the next part of the tutorial).
…and so on.
The best way to study them is to click around. Most values are in-place editable.
Interaction with console
As we explore the DOM, we also may want to apply JavaScript to it. Like: get a node and run some code to modify it, to see how it looks. Here are few tips to travel between the Elements tab and the console.
Select the first <li> in the Elements tab.
Press Esc – it will open console right below the Elements tab.
Now the last selected element is available as $0, the previously selected is $1 etc.
We can run commands on them. For instance, $0.style.background = 'red' makes the selected list item red, like this:
From the other side, if we're in console and have a variable referencing a DOM node, then we can use the command inspect(node) to see it in the Elements pane.
Or we can just output it in the console and explore “at-place”, like document.body below:
That's for debugging purposes of course. From the next chapter on we'll access and modify DOM using JavaScript.
The browser developer tools are a great help in development: we can explore DOM, try things and see what goes wrong.
Summary
An HTML/XML document is represented inside the browser as the DOM tree.
Tags become element nodes and form the structure.
Text becomes text nodes.
…etc, everything in HTML has its place in DOM, even comments.
We can use developer tools to inspect DOM and modify it manually.
Here we covered the basics, most used and important actions to start with. There's an extensive documentation about Chrome developer tools at
https://developers.google.com/web/tools/chrome-devtools. The best way to learn the tools is to click here and there, read menus: most options are obvious. Later, when you know them in general, read the docs and pick up the rest.
DOM nodes have properties and methods that allow to travel between them, modify, move around the page and more. We'll get down to them in the next chapters.
DOM allows to do anything with elements and their contents, but first we need to reach the corresponding DOM object, get it into a variable, and then we are able to modify it.
All operations on DOM start with the document object. From it we can access any node.
Here's a picture of links that allow to travel between DOM nodes:
Let's discuss them in more detail.
On top: documentElement and body
The topmost tree nodes are available directly as document properties:
<html> = document.documentElement
The topmost document node is document.documentElement. That's DOM node of <html> tag.
<body> = document.body
Another widely used DOM node is the <body> element – document.body.
<head> = document.head
The <head> tag is available as document.head.
There's a catch: document.body can be null
A script cannot access an element that doesn't exist at the moment of running.
In particular, if a script is inside <head>, then document.body is unavailable, because the browser did not read it yet.
So, in the example below the first alert shows null:
In the DOM, the null value means “doesn't exist” or “no such node”.
Children: childNodes, firstChild, lastChild
There are two terms that we'll use from now on:
Child nodes (or children) – elements that are direct children. In other words, they are nested exactly in the given one. For instance, <head> and <body> are children of <html> element.
Descendants – all elements that are nested in the given one, including children, their children and so on.
For instance, here <body> has children <div> and <ul> (and few blank text nodes):
…And if we ask for all descendants of <body>, then we get direct children <div>, <ul> and also more nested elements like <li> (being a child of <ul>) and <b> (being a child of <li>) – the whole subtree.
The childNodes collection provides access to all child nodes, including text nodes.
The example below shows children of document.body:
Please note an interesting detail here. If we run the example above, the last element shown is <script>. In fact, the document has more stuff below, but at the moment of the script execution the browser did not read it yet, so the script doesn't see it.
Properties firstChild and lastChild give fast access to the first and last children.
They are just shorthands. If there exist child nodes, then the following is always true:
There's also a special function elem.hasChildNodes() to check whether there are any child nodes.
DOM collections
As we can see, childNodes looks like an array. But actually it's not an array, but rather a collection – a special array-like iterable object.
There are two important consequences:
We can use for..of to iterate over it:
for (let node of document.body.childNodes) {
alert(node); // shows all nodes from the collection
}
That's because it's iterable (provides the Symbol.iterator property, as required).
Array methods won't work, because it's not an array:
alert(document.body.childNodes.filter); // undefined (there's no filter method!)
The first thing is nice. The second is tolerable, because we can use Array.from to create a “real” array from the collection, if we want array methods:
alert( Array.from(document.body.childNodes).filter ); // now it's there
DOM collections are read-only
DOM collections, and even more – all navigation properties listed in this chapter are read-only.
We can't replace a child by something else assigning childNodes[i] = ....
Changing DOM needs other methods, we'll see them in the next chapter.
DOM collections are live
Almost all DOM collections with minor exceptions are live. In other words, they reflect the current state of DOM.
If we keep a reference to elem.childNodes, and add/remove nodes into DOM, then they appear in the collection automatically.
Don't use for..in to loop over collections
Collections are iterable using for..of. Sometimes people try to use for..in for that.
Please, don't. The for..in loop iterates over all enumerable properties. And collections have some “extra” rarely used properties that we usually do not want to get:
<body>
<script>
// shows 0, 1, length, item, values and more.
for(let prop in document.body.childNodes) alert(prop);
</script>
</body>
Siblings and the parent
Siblings are nodes that are children of the same parent. For instance, <head> and <body> are siblings:
<body> is said to be the “next” or “right” sibling of <head>,
<head> is said to be the “previous” or “left” sibling of <body>.
The parent is available as parentNode.
The next node in the same parent (next sibling) is nextSibling, and the previous one is previousSibling.
For instance:
<html><head></head><body><script>
// HTML is "dense" to evade extra "blank" text nodes.
// parent of <body> is <html>
alert( document.body.parentNode === document.documentElement ); // true
// after <head> goes <body>
alert( document.head.nextSibling ); // HTMLBodyElement
// before <body> goes <head>
alert( document.body.previousSibling ); // HTMLHeadElement
</script></body></html>
Element-only navigation
Navigation properties listed above refer to all nodes. For instance, in childNodes we can see both text nodes, element nodes, and even comment nodes if there exist.
But for many tasks we don't want text or comment nodes. We want to manipulate element nodes that represent tags and form the structure of the page.
So let's see more navigation links that only take element nodes into account:
The links are similar to those given above, just with Element word inside:
children – only those children that are element nodes.
firstElementChild, lastElementChild – first and last element children.
Why parentElement? Can the parent be not an element?
The parentElement property returns the “element” parent, while parentNode returns “any node” parent. These properties are usually the same: they both get the parent.
With the one exception of document.documentElement:
In other words, the documentElement (<html>) is the root node. Formally, it has document as its parent. But document is not an element node, so parentNode returns it and parentElement does not.
Sometimes that matters when we're walking over the chain of parents and call a method on each of them, but document doesn't have it, so we exclude it.
Let's modify one of examples above: replace childNodes with children. Now it shows only elements:
Till now we described the basic navigation properties.
Certain types of DOM elements may provide additional properties, specific to their type, for convenience.
Tables are a great example and important particular case of that.
<table> element supports (in addition to the given above) these properties:
table.rows – the collection of <tr> elements of the table.
table.caption/tHead/tFoot – references to elements <caption>, <thead>, <tfoot>.
table.tBodies – the collection of <tbody> elements (can be many according to the standard).
<thead>, <tfoot>, <tbody> elements provide the rows property:
tbody.rows – the collection of <tr> inside.
<tr>:
tr.cells – the collection of <td> and <th> cells inside the given <tr>.
tr.sectionRowIndex – the number of the given <tr> inside the enclosing <thead>/<tbody>.
tr.rowIndex – the number of the <tr> in the table.
<td> and <th>:
td.cellIndex – the number of the cell inside the enclosing <tr>.
An example of usage:
<table id="table">
<tr>
<td>one</td><td>two</td>
</tr>
<tr>
<td>three</td><td>four</td>
</tr>
</table>
<script>
// get the content of the first row, second cell
alert( table.rows[0].cells[1].innerHTML ) // "two"
</script>
Is it true that elem.lastChild.nextSibling is always null?
Is it true that elem.children[0].previousSibling is always null ?
Yes, true. The element elem.lastChild is always the last one, it has no nextSibling, so if there are children, then yes.
No, wrong, because elem.children[0] is the first child among elements. But there may be non-element nodes before it. So previousSibling may be a text node.
Please note that for both cases if there are no children, then there will be an error. For instance, if elem.lastChild is null, we can't access elem.lastChild.nextSibling.
DOM navigation properties are great when elements are close to each other. What if they are not? How to get an arbitrary element of the page?
There are additional searching methods for that.
document.getElementById or just id
If an element has the id attribute, then there's a global variable by the name from that id.
We can use it to access the element, like this:
<div id="elem">
<div id="elem-content">Element</div>
</div>
<script>
alert(elem); // DOM-element with id="elem"
alert(window.elem); // accessing global variable like this also works
// for elem-content things are a bit more complex
// that has a dash inside, so it can't be a variable name
alert(window['elem-content']); // ...but accessible using square brackets [...]
</script>
That's unless we declare the same-named variable by our own:
<div id="elem"></div>
<script>
let elem = 5;
alert(elem); // the variable overrides the element
</script>
The behavior is described
in the specification, but it is supported mainly for compatibility. The browser tries to help us by mixing namespaces of JS and DOM. Good for very simple scripts, but there may be name conflicts. Also, when we look in JS and don't have HTML in view, it's not obvious where the variable comes from.
The better alternative is to use a special method document.getElementById(id).
Here in the tutorial we'll often use id to directly reference an element, but that's only to keep things short. In real life document.getElementById is the preferred method.
There can be only one
The id must be unique. There can be only one element in the document with the given id.
If there are multiple elements with the same id, then the behavior of corresponding methods is unpredictable. The browser may return any of them at random. So please stick to the rule and keep id unique.
Only document.getElementById, not anyNode.getElementById
The method getElementById that can be called only on document object. It looks for the given id in the whole document.
getElementsBy*
There are also other methods to look for nodes:
elem.getElementsByTagName(tag) looks for elements with the given tag and returns the collection of them. The tag parameter can also be a star "*" for “any tags”.
For instance:
// get all divs in the document
let divs = document.getElementsByTagName('div');
This method is callable in the context of any DOM element.
Let's find all input inside the table:
<table id="table">
<tr>
<td>Your age:</td>
<td>
<label>
<input type="radio" name="age" value="young" checked> less than 18
</label>
<label>
<input type="radio" name="age" value="mature"> from 18 to 50
</label>
<label>
<input type="radio" name="age" value="senior"> more than 60
</label>
</td>
</tr>
</table>
<script>
let inputs = table.getElementsByTagName('input');
for (let input of inputs) {
alert( input.value + ': ' + input.checked );
}
</script>
Don't forget the "s" letter!
Novice developers sometimes forget the letter "s". That is, they try to call getElementByTagName instead of getElementsByTagName.
The "s" letter is absent in getElementById, because it returns a single element. But getElementsByTagName returns a collection of elements, so there's "s" inside.
It returns a collection, not an element!
Another widespread novice mistake is to write like:
// doesn't work
document.getElementsByTagName('input').value = 5;
That won't work, because it takes a collection of inputs and assigns the value to it, rather to elements inside it.
We should either iterate over the collection or get an element by the number, and then assign, like this:
// should work (if there's an input)
document.getElementsByTagName('input')[0].value = 5;
There are also other rarely used methods of this kind:
elem.getElementsByClassName(className) returns elements that have the given CSS class. Elements may have other classes too.
document.getElementsByName(name) returns elements with the given name attribute, document-wide. Exists for historical reasons, very rarely used, we mention it here only for completeness.
For instance:
<form name="my-form">
<div class="article">Article</div>
<div class="long article">Long article</div>
</form>
<script>
// find by name attribute
let form = document.getElementsByName('my-form')[0];
// find by class inside the form
let articles = form.getElementsByClassName('article');
alert(articles.length); // 2, found two elements with class "article"
</script>
querySelectorAll
Now goes the heavy artillery.
The call to elem.querySelectorAll(css) returns all elements inside elem matching the given CSS selector. That's the most often used and powerful method.
Here we look for all <li> elements that are last children:
<ul>
<li>The</li>
<li>test</li>
</ul>
<ul>
<li>has</li>
<li>passed</li>
</ul>
<script>
let elements = document.querySelectorAll('ul > li:last-child');
for (let elem of elements) {
alert(elem.innerHTML); // "test", "passed"
}
</script>
This method is indeed powerful, because any CSS selector can be used.
Can use pseudo-classes as well
Pseudo-classes in the CSS selector like :hover and :active are also supported. For instance, document.querySelectorAll(':hover') will return the collection with elements that the pointer is over now (in nesting order: from the outermost <html> to the most nested one).
querySelector
The call to elem.querySelector(css) returns the first element for the given CSS selector.
In other words, the result is the same as elem.querySelectorAll(css)[0], but the latter is looking for all elements and picking one, while elem.querySelector just looks for one. So it's faster and shorter to write.
matches
Previous methods were searching the DOM.
The
elem.matches(css) does not look for anything, it merely checks if elem matches the given CSS-selector. It returns true or false.
The method comes handy when we are iterating over elements (like in array or something) and trying to filter those that interest us.
For instance:
<a href="http://example.com/file.zip">...</a>
<a href="http://ya.ru">...</a>
<script>
// can be any collection instead of document.body.children
for (let elem of document.body.children) {
if (elem.matches('a[href$="zip"]')) {
alert("The archive reference: " + elem.href );
}
}
</script>
closest
All elements that are directly above the given one are called its ancestors.
In other words, ancestors are: parent, the parent of parent, its parent and so on. The ancestors together form the chain of parents from the element to the top.
The method elem.closest(css) looks the nearest ancestor that matches the CSS-selector. The elem itself is also included in the search.
In other words, the method closest goes up from the element and checks each of parents. If it matches the selector, then the search stops, and the ancestor is returned.
For instance:
<h1>Contents</h1>
<div class="contents">
<ul class="book">
<li class="chapter">Chapter 1</li>
<li class="chapter">Chapter 1</li>
</ul>
</div>
<script>
let chapter = document.querySelector('.chapter'); // LI
alert(chapter.closest('.book')); // UL
alert(chapter.closest('.contents')); // DIV
alert(chapter.closest('h1')); // null (because h1 is not an ancestor)
</script>
Live collections
All methods "getElementsBy*" return a live collection. Such collections always reflect the current state of the document and “auto-update” when it changes.
In the example below, there are two scripts.
The first one creates a reference to the collection of <div>. As of now, it's length is 1.
The second scripts runs after the browser meets one more <div>, so it's length is 2.
Now we can easily see the difference. The static collection did not increase after the appearance of a new div in the document.
Here we used separate scripts to illustrate how the element addition affects the collection, but any DOM manipulations affect them. Soon we'll see more of them.
Summary
There are 6 main methods to search for nodes in DOM:
Method
Searches by...
Can call on an element?
Live?
getElementById
id
-
-
getElementsByName
name
-
✔
getElementsByTagName
tag or '*'
✔
✔
getElementsByClassName
class
✔
✔
querySelector
CSS-selector
✔
-
querySelectorAll
CSS-selector
✔
-
Please note that methods getElementById and getElementsByName can only be called in the context of the document: document.getElementById(...). But not on an element: elem.getElementById(...) would cause an error.
Other methods can be called on elements too. For instance elem.querySelectorAll(...) will search inside elem (in the DOM subtree).
Besides that:
There is elem.matches(css) to check if elem matches the given CSS selector.
There is elem.closest(css) to look for a nearest ancestor that matches the given CSS-selector. The elem itself is also checked.
And let's mention one more method here to check for the child-parent relationship:
elemA.contains(elemB) returns true if elemB is inside elemA (a descendant of elemA) or when elemA==elemB.
All label elements inside that table (there should be 3 of them).
The first td in that table (with the word “Age”).
The form with the name search.
The first input in that form.
The last input in that form.
Open the page
table.html in a separate window and make use of browser tools for that.
There are many ways to do it.
Here are some of them:
// 1. The table with `id="age-table"`.
let table = document.getElementById('age-table')
// 2. All label elements inside that table
table.getElementsByTagName('label')
// or
document.querySelectorAll('#age-table label')
// 3. The first td in that table (with the word "Age").
table.rows[0].cells[0]
// or
table.getElementsByTagName('td')[0]
// or
table.querySelector('td')
// 4. The form with the name "search".
// assuming there's only one element with name="search"
let form = document.getElementsByName('search')[0]
// or, form specifically
document.querySelector('form[name="search"]')
// 5. The first input in that form.
form.getElementsByTagName('input')
// or
form.querySelector('input')
// 6. The last input in that form.
// there's no direct query for that
let inputs = form.querySelectorAll('input') // search all
inputs[inputs.length-1] // take last
In this chapter we'll see more into what they are and their most used properties.
DOM node classes
DOM nodes have different properties depending on their class. For instance, an element node corresponding to tag <a> has link-related properties, and the one corresponding to <input> has input-related properties and so on. Text nodes are not the same as element nodes. But there are also common properties and methods between all of them, because all classes of DOM nodes form a single hierarchy.
Each DOM node belongs to the corresponding built-in class.
The root of the hierarchy is
EventTarget, that is inherited by
Node, and other DOM nodes inherit from it.
Here's the picture, explanations to follow:
The classes are:
EventTarget – is the root “abstract” class. Objects of that class are never created. It serves as a base, so that all DOM nodes support so-called “events”, we'll study them later.
Node – is also an “abstract” class, serving as a base for DOM nodes. It provides the core tree functionality: parentNode, nextSibling, childNodes and so on (they are getters). Objects of Node class are never created. But there are concrete node classes that inherit from it, namely: Text for text nodes, Element for element nodes and more exotic ones like Comment for comment nodes.
Element – is a base class for DOM elements. It provides element-level navigation like nextElementSibling, children and searching methods like getElementsByTagName, querySelector. In the browser there may be not only HTML, but also XML and SVG documents. The Element class serves as a base for more specific classes: SVGElement, XMLElement and HTMLElement.
HTMLElement – is finally the basic class for all HTML elements. It is inherited by various HTML elements:
…and so on, each tag has its own class that may provide specific properties and methods.
So, the full set of properties and methods of a given node comes as the result of the inheritance.
For example, let's consider the DOM object for an <input> element. It belongs to
HTMLInputElement class. It gets properties and methods as a superposition of:
HTMLInputElement – this class provides input-specific properties, and inherits from…
HTMLElement – it provides common HTML element methods (and getters/setters) and inherits from…
Element – provides generic element methods and inherits from…
Node – provides common DOM node properties and inherits from…
EventTarget – gives the support for events (to be covered),
…and finally it inherits from Object, so “pure object” methods like hasOwnProperty are also available.
To see the DOM node class name, we can recall that an object usually has the constructor property. It references to the class constructor, and constructor.name is its name:
As we can see, DOM nodes are regular JavaScript objects. They use prototype-based classes for inheritance.
That's also easy to see by outputting an element with console.dir(elem) in a browser. There in the console you can see HTMLElement.prototype, Element.prototype and so on.
console.dir(elem) versus console.log(elem)
Most browsers support two commands in their developer tools: console.log and console.dir. They output their arguments to the console. For JavaScript objects these commands usually do the same.
But for DOM elements they are different:
console.log(elem) shows the element DOM tree.
console.dir(elem) shows the element as a DOM object, good to explore its properties.
Try it on document.body.
IDL in the spec
In the specification classes are described using not JavaScript, but a special
Interface description language (IDL), that is usually easy to understand.
In IDL all properties are prepended with their types. For instance, DOMString, boolean and so on.
Here's an excerpt from it, with comments:
// Define HTMLInputElement
// The colon ":" means that HTMLInputElement inherits from HTMLElement
interface HTMLInputElement: HTMLElement {
// here go properties and methods of <input> elements
// "DOMString" means that these properties are strings
attribute DOMString accept;
attribute DOMString alt;
attribute DOMString autocomplete;
attribute DOMString value;
// boolean property (true/false)
attribute boolean autofocus;
...
// now the method: "void" means that that returns no value
void select();
...
}
Other classes are somewhat similar.
The “nodeType” property
The nodeType property provides an old-fashioned way to get the “type” of a DOM node.
<body>
<script>
let elem = document.body;
// let's examine what it is?
alert(elem.nodeType); // 1 => element
// and the first child is...
alert(elem.firstChild.nodeType); // 3 => text
// for the document object, the type is 9
alert( document.nodeType ); // 9
</script>
</body>
In modern scripts, we can use instanceof and other class-based tests to see the node type, but sometimes nodeType may be simpler. We can only read nodeType, not change it.
Tag: nodeName and tagName
Given a DOM node, we can read its tag name from nodeName or tagName properties:
For instance:
alert( document.body.nodeName ); // BODY
alert( document.body.tagName ); // BODY
Is there any difference between tagName and nodeName?
Sure, the difference is reflected in their names, but is indeed a bit subtle.
The tagName property exists only for Element nodes.
The nodeName is defined for any Node:
for elements it means the same as tagName.
for other node types (text, comment etc) it has a string with the node type.
In other words, tagName is only supported by element nodes (as it originates from Element class), while nodeName can say something about other node types.
For instance let's compare tagName and nodeName for the document and a comment node:
If we only deal with elements, then tagName is the only thing we should use.
The tag name is always uppercase except XHTML
The browser has two modes of processing documents: HTML and XML. Usually the HTML-mode is used for webpages. XML-mode is enabled when the browser receives an XML-document with the header: Content-Type: application/xml+xhtml.
In HTML mode tagName/nodeName is always uppercased: it's BODY either for <body> or <BoDy>.
In XML mode the case is kept “as is”. Nowadays XML mode is rarely used.
innerHTML: the contents
The
innerHTML property allows to get the HTML inside the element as a string.
We can also modify it. So it's one of most powerful ways to change the page.
The example shows the contents of document.body and then replaces it completely:
<body>
<p>A paragraph</p>
<div>A div</div>
<script>
alert( document.body.innerHTML ); // read the current contents
document.body.innerHTML = 'The new BODY!'; // replace it
</script>
</body>
We can try to insert an invalid HTML, the browser will fix our errors:
<body>
<script>
document.body.innerHTML = '<b>test'; // forgot to close the tag
alert( document.body.innerHTML ); // <b>test</b> (fixed)
</script>
</body>
Scripts don't execute
If innerHTML inserts a <script> tag into the document – it doesn't execute.
It becomes a part of HTML, just as a script that has already run.
Beware: “innerHTML+=” does a full overwrite
We can append “more HTML” by using elem.innerHTML+="something".
But we should be very careful about doing it, because what's going on is not an addition, but a full overwrite.
Technically, these two lines do the same:
elem.innerHTML += "...";
// is a shorter way to write:
elem.innerHTML = elem.innerHTML + "..."
In other words, innerHTML+= does this:
The old contents is removed.
The new innerHTML is written instead (a concatenation of the old and the new one).
As the content is “zeroed-out” and rewritten from the scratch, all images and other resources will be reloaded.
In the chatDiv example above the line chatDiv.innerHTML+="How goes?" re-creates the HTML content and reloads smile.gif (hope it's cached). If chatDiv has a lot of other text and images, then the reload becomes clearly visible.
There are other side-effects as well. For instance, if the existing text was selected with the mouse, then most browsers will remove the selection upon rewriting innerHTML. And if there was an <input> with a text entered by the visitor, then the text will be removed. And so on.
Luckily, there are other ways to add HTML besides innerHTML, and we'll study them soon.
outerHTML: full HTML of the element
The outerHTML property contains the full HTML of the element. That's like innerHTML plus the element itself.
Beware: unlike innerHTML, writing to outerHTML does not change the element. Instead, it replaces it as a whole in the outer context.
Yeah, sounds strange, and strange it is, that's why we make a separate note about it here. Take a look.
Consider the example:
<div>Hello, world!</div>
<script>
let div = document.querySelector('div');
// replace div.outerHTML with <p>...</p>
div.outerHTML = '<p>A new element!</p>'; // (*)
// Wow! The div is still the same!
alert(div.outerHTML); // <div>Hello, world!</div>
</script>
In the line (*) we take the full HTML of <div>...</div> and replace it by <p>...</p>. In the outer document we can see the new content instead of the <div>. But the old div variable is still the same.
The outerHTML assignment does not modify the DOM element, but extracts it from the outer context and inserts a new piece of HTML instead of it.
Novice developers sometimes make an error here: they modify div.outerHTML and then continue to work with div as if it had the new content in it.
That's possible with innerHTML, but not with outerHTML.
We can write to outerHTML, but should keep in mind that it doesn't change the element we're writing to. It creates the new content on its place instead. We can get a reference to new elements by querying DOM.
nodeValue/data: text node content
The innerHTML property is only valid for element nodes.
Other node types have their counterpart: nodeValue and data properties. These two are almost the same for practical use, there are only minor specification differences. So we'll use data, because it's shorter.
We can read it, like this:
<body>
Hello
<!-- Comment -->
<script>
let text = document.body.firstChild;
alert(text.data); // Hello
let comment = text.nextSibling;
alert(comment.data); // Comment
</script>
</body>
For text nodes we can imagine a reason to read or modify them, but why comments? Usually, they are not interesting at all, but sometimes developers embed information into HTML in them, like this:
<!-- if isAdmin -->
<div>Welcome, Admin!</div>
<!-- /if -->
…Then JavaScript can read it and process embedded instructions.
textContent: pure text
The textContent provides access to the text inside the element: only text, minus all <tags>.
As we can see, only text is returned, as if all <tags> were cut out, but the text in them remained.
In practice, reading such text is rarely needed.
Writing to textContent is much more useful, because it allows to write text the “safe way”.
Let's say we have an arbitrary string, for instance entered by a user, and want to show it.
With innerHTML we'll have it inserted “as HTML”, with all HTML tags.
With textContent we'll have it inserted “as text”, all symbols are treated literally.
Compare the two:
<div id="elem1"></div>
<div id="elem2"></div>
<script>
let name = prompt("What's your name?", "<b>Winnie-the-pooh!</b>");
elem1.innerHTML = name;
elem2.textContent = name;
</script>
The first <div> gets the name “as HTML”: all tags become tags, so we see the bold name.
The second <div> gets the name “as text”, so we literally see <b>Winnie-the-pooh!</b>.
In most cases, we expect the text from a user, and want to treat it as text. We don't want unexpected HTML in our site. An assignment to textContent does exactly that.
The “hidden” property
The “hidden” attribute and the DOM property specifies whether the element is visible or not.
We can use it in HTML or assign using JavaScript, like this:
<div>Both divs below are hidden</div>
<div hidden>With the attribute "hidden"</div>
<div id="elem">JavaScript assigned the property "hidden"</div>
<script>
elem.hidden = true;
</script>
Technically, hidden works the same as style="display:none". But it's shorter to write.
Most standard HTML attributes have the corresponding DOM property, and we can access it like that.
If we want to know the full list of supported properties for a given class, we can find them in the specification. For instance, HTMLInputElement is documented at
https://html.spec.whatwg.org/#htmlinputelement.
Or if we'd like to get them fast or interested in the concrete browser – we can always output the element using console.dir(elem) and read the properties. Or explore “DOM properties” in Elements tab of the browser developer tools.
Summary
Each DOM node belongs to a certain class. The classes form a hierarchy. The full set of properties and methods comes as the result of inheritance.
Main DOM node properties are:
nodeType
Node type. We can get it from the DOM object class, but often we need just to see if it is a text or element node. The nodeType property is good for that. It has numeric values, most important are: 1 – for elements,3 – for text nodes. Read-only.
nodeName/tagName
For elements, tag name (uppercased unless XML-mode). For non-element nodes nodeName describes what is it. Read-only.
innerHTML
The HTML content of the element. Can modify.
outerHTML
The full HTML of the element. A write operation into elem.outerHTML does not touch elem itself. Instead it gets replaced with the new HTML in the outer context.
nodeValue/data
The content of a non-element node (text, comment). These two are almost the same, usually we use data. Can modify.
textContent
The text inside the element, basically HTML minus all <tags>. Writing into it puts the text inside the element, with all special characters and tags treated exactly as text. Can safely insert user-generated text and protect from unwanted HTML insertions.
hidden
When set to true, does the same as CSS display:none.
DOM nodes also have other properties depending on their class. For instance, <input> elements (HTMLInputElement) support value, type, while <a> elements (HTMLAnchorElement) support href etc. Most standard HTML attributes have the corresponding DOM property.
But HTML attributes and DOM properties are not always the same, as we'll see in the next chapter.
<script>
let body = document.body;
body.innerHTML = "<!--" + body.tagName + "-->";
alert( body.firstChild.data ); // what's here?
</script>
The answer: BODY.
<script>
let body = document.body;
body.innerHTML = "<!--" + body.tagName + "-->";
alert( body.firstChild.data ); // BODY
</script>
What's going on step by step:
The content of <body> is replaced with the comment. The comment is <!–BODY–>, because body.tagName == "BODY". As we remember, tagName is always uppercase in HTML.
The comment is now the only child node, so we get it in body.firstChild.
The data property of the comment is its contents (inside <!--...-->): "BODY".
For built-in classes in all prototypes there's a constructor reference, and we can get constructor.name to see the name of the class. Let's do it for all objects in the document prototype chain:
We also could examine the object using console.dir(document) and see these names by opening __proto__. The console takes them from constructor internally.
Attributes and properties
When the browser loads the page, it “reads” (another word: “parses”) HTML text and generates DOM objects from it. For element nodes most standard HTML attributes automatically become properties of DOM objects.
For instance, if the tag is <body id="page">, then the DOM object has body.id="page".
But the attribute-property mapping is not one-to-one! In this chapter we'll pay attention to separate these two notions, to see how to work with them, when they are same, and when they are different.
DOM properties
We've already seen built-in DOM properties. There's a lot. But technically no one limits us, and if it's not enough – we can add our own.
DOM nodes are regular JavaScript objects. We can alter them.
For instance, let's create a new property in document.body:
document.body.sayHi = function() {
alert(this.tagName);
};
document.body.sayHi(); // BODY (the value of "this" in the method is document.body)
We can also modify built-in prototypes like Element.prototype and add new methods to all elements:
Element.prototype.sayHi = function() {
alert(`Hello, I'm ${this.tagName}`);
};
document.documentElement.sayHi(); // Hello, I'm HTML
document.body.sayHi(); // Hello, I'm BODY
So, DOM properties and methods behave just like those of regular JavaScript objects:
They can have any value.
They are case-sensitive (write elem.nodeType, not elem.NoDeTyPe).
HTML attributes
In HTML language, tags may have attributes. When the browser reads HTML text and creates DOM objects for tags, it recognizes standard attributes and creates DOM properties from them.
So when an element has id or another standard attribute, the corresponding property gets created. But that doesn't happen if the attribute is non-standard.
For instance:
<body id="test" something="non-standard">
<script>
alert(document.body.id); // test
// non-standard attribute does not yield a property
alert(document.body.something); // undefined
</script>
</body>
Please note that a standard attribute for one element can be unknown for another one. For instance, "type" is standard for <input> (
HTMLInputElement), but not for <body> (
HTMLBodyElement). Standard attributes are described in the specification for the corresponding element class.
Here we can see it:
<body id="body" type="...">
<input id="input" type="text">
<script>
alert(input.type); // text
alert(body.type); // undefined: DOM property not created, because it's non-standard
</script>
</body>
So, if an attribute is non-standard, there won't be DOM-property for it. Is there a way to access such attributes?
Sure. All attributes are accessible using following methods:
elem.hasAttribute(name) – checks for existence.
elem.getAttribute(name) – gets the value.
elem.setAttribute(name, value) – sets the value.
elem.removeAttribute(name) – removes the attribute.
These methods operate exactly with what's written in HTML.
Also one can read all attributes using elem.attributes: a collection of objects that belong to a built-in
Attr class, with name and value properties.
Their name is case-insensitive (that's HTML: id is same as ID).
They are always strings.
Here's an extended demo of working with attributes:
<body>
<div id="elem" about="Elephant"></div>
<script>
alert( elem.getAttribute('About') ); // (1) 'Elephant', reading
elem.setAttribute('Test', 123); // (2), writing
alert( elem.outerHTML ); // (3), see it's there
for (let attr of elem.attributes) { // (4) list all
alert( attr.name + " = " + attr.value );
}
</script>
</body>
Please note:
getAttribute('About') – the first letter is uppercase here, and in HTML it's all lowercase. But that doesn't matter: attribute names are case-insensitive.
We can assign anything to an attribute, but that becomes a string. So here we have "123" as the value.
All attributes including ones that we set are visible in outerHTML.
The attributes collection is iterable and has all attributes with name and value.
Property-attribute synchronization
When a standard attribute changes, the corresponding property is auto-updated, and (with some exceptions) vise-versa.
In the example below id is modified as an attribute, and we can see the property change too. And then the same backwards:
<input>
<script>
let input = document.querySelector('input');
// attribute => property
input.setAttribute('id', 'id');
alert(input.id); // id (updated)
// property => attribute
input.id = 'newId';
alert(input.getAttribute('id')); // newId (updated)
</script>
But there are exclusions, for instance input.value synchronizes only from attribute → to property, but not back:
<input>
<script>
let input = document.querySelector('input');
// attribute => property
input.setAttribute('value', 'text');
alert(input.value); // text
// NOT property => attribute
input.value = 'newValue';
alert(input.getAttribute('value')); // text (not updated!)
</script>
In the example above:
Changing the attribute value updates the property.
But the property change does not affect the attribute.
That “feature” may actually can come in handy, because the user may modify value, and then after it, if we want to recover the “original” value from HTML, it's in the attribute.
DOM properties are typed
DOM properties are not always strings. For instance, input.checked property (for checkboxes) is boolean:
<input id="input" type="checkbox" checked> checkbox
<script>
alert(input.getAttribute('checked')); // the attribute value is: empty string
alert(input.checked); // the property value is: true
</script>
There are other examples. The style attribute is a string, but style property is an object:
That's an important difference. But even if a DOM property type is a string, it may differ from the attribute!
For instance, the href DOM property is always a full URL, even if the attribute contains a relative URL or just a #hash.
Here's an example:
<a id="a" href="#hello">link</a>
<script>
// attribute
alert(a.getAttribute('href')); // #hello
// property
alert(a.href ); // full URL in the form http://site.com/page#hello
</script>
If we need the value of href or any other attribute exactly as written in the HTML, we can use getAttribute.
Non-standard attributes, dataset
When writing HTML, we use a lot of standard attributes. But what about non-standard, custom ones? First, let's see whether they are useful or not? What for?
Sometimes non-standard attributes are used to pass custom data from HTML to JavaScript, or to “mark” HTML-elements for JavaScript.
Like this:
<!-- mark the div to show "name" here -->
<div show-info="name"></div>
<!-- and age here -->
<div show-info="age"></div>
<script>
// the code finds an element with the mark and shows what's requested
let user = {
name: "Pete",
age: 25
};
for(let div of document.querySelectorAll('[show-info]')) {
// insert the corresponding info into the field
let field = div.getAttribute('show-info');
div.innerHTML = user[field]; // Pete, then age
}
</script>
Also they can be used to style an element.
For instance, here for the order state the attribute order-state is used:
<style>
/* styles rely on the custom attribute "order-state" */
.order[order-state="new"] {
color: green;
}
.order[order-state="pending"] {
color: blue;
}
.order[order-state="canceled"] {
color: red;
}
</style>
<div class="order" order-state="new">
A new order.
</div>
<div class="order" order-state="pending">
A pending order.
</div>
<div class="order" order-state="canceled">
A canceled order.
</div>
Why the attribute may be preferable to classes like .order-state-new, .order-state-pending, order-state-canceled?
That's because an attribute is more convenient to manage. The state can be changed as easy as:
// a bit simpler than removing old/adding a new class
div.setAttribute('order-state', 'canceled');
But there may be a possible problem with custom attributes. What if we use a non-standard attribute for our purposes and later the standard introduces it and makes it do something? The HTML language is alive, it grows, more attributes appear to suit the needs of developers. There may be unexpected effects in such case.
To evade conflicts, there exist
data-* attributes.
All attributes starting with “data-” are reserved for programmers' use. They are available in dataset property.
For instance, if an elem has an attribute named "data-about", it's available as elem.dataset.about.
Using data-* attributes is a valid, safe way to pass custom data.
Please note that we can not only read, but also modify data-attributes. Then CSS updates the view accordingly: in the example above the last line (*) changes the color to blue.
Summary
Attributes – is what's written in HTML.
Properties – is what's in DOM objects.
A small comparison:
Properties
Attributes
Type
Any value, standard properties have types described in the spec
A string
Name
Name is case-sensitive
Name is not case-sensitive
Methods to work with attributes are:
elem.hasAttribute(name) – to check for existence.
elem.getAttribute(name) – to get the value.
elem.setAttribute(name, value) – to set the value.
elem.removeAttribute(name) – to remove the attribute.
elem.attributes is a collection of all attributes.
For most needs DOM properties can serve us well. We should refer to attributes only when DOM properties do not suit us, when we need exactly attributes, for instance:
We need a non-standard attribute. But if it starts with data-, then we should use dataset.
We want to read the value “as written” in HTML. The value of the DOM property may be different, for instance href property is always a full URL, and we may want to get the “original” value.
Write the code to select the element with data-widget-name attribute from the document and to read its value.
<!DOCTYLE HTML>
<html>
<body>
<div data-widget-name="menu">Choose the genre</div>
<script>
/* your code */
</script>
</body>
</html>
<!DOCTYLE HTML>
<html>
<body>
<div data-widget-name="menu">Choose the genre</div>
<script>
// getting it
let elem = document.querySelector('[data-widget-name]');
// reading the value
alert(elem.dataset.widgetName);
// or
alert(elem.getAttribute('data-widget-name'));
</script>
</body>
</html>
The first is to find all links using document.querySelectorAll('a') and then filter out what we need:
let links = document.querySelectorAll('a');
for (let link of links) {
let href = link.getAttribute('href');
if (!href) continue; // no attribute
if (!href.includes('://')) continue; // no protocol
if (href.startsWith('http://internal.com')) continue; // internal
link.style.color = 'orange';
}
Please note: we use link.getAttribute('href'). Not link.href, because we need the value from HTML.
…Another, simpler way would be to add the checks to CSS selector:
// look for all links that have :// in href
// but href doesn't start with http://internal.com
let selector = 'a[href*="://"]:not([href^="http://internal.com"])';
let links = document.querySelectorAll(selector);
links.forEach(link => link.style.color = 'orange');
That was an HTML example. Now let's create the same div with JavaScript (assuming that the styles are still in the HTML or an external CSS).
Creating an element
To create DOM nodes, there are two methods:
document.createElement(tag)
Creates a new element with the given tag:
let div = document.createElement('div');
document.createTextNode(text)
Creates a new text node with the given text:
let textNode = document.createTextNode('Here I am');
Creating the message
In our case we want to make a div with given classes and the message in it:
let div = document.createElement('div');
div.className = "alert alert-success";
div.innerHTML = "<strong>Hi there!</strong> You've read an important message.";
After that, we have a ready DOM element. Right now it's in the variable, but can not be seen, because not inserted into the page yet.
Insertion methods
To make the div show up, we need to insert it somewhere into document. For instance, in document.body.
There's a special method for that: document.body.appendChild(div).
Here's the full code:
<style>
.alert {
padding: 15px;
border: 1px solid #d6e9c6;
border-radius: 4px;
color: #3c763d;
background-color: #dff0d8;
}
</style>
<script>
let div = document.createElement('div');
div.className = "alert alert-success";
div.innerHTML = "<strong>Hi there!</strong> You've read an important message.";
document.body.appendChild(div);
</script>
Here's a brief list of methods to insert a node into a parent element (parentElem for short):
parentElem.appendChild(node)
Appends node as the last child of parentElem.
The following example adds a new <li> to the end of <ol>:
To insert as the first element, we can do like this:
list.insertBefore(newLi, list.firstChild);
parentElem.replaceChild(node, oldChild)
Replaces oldChild with node among children of parentElem.
All these methods return the inserted node. In other words, parentElem.appendChild(node) returns node. But usually the returned value is not used, we just run the method.
These methods are “old school”: they exist from the ancient times and we can meet them in many old scripts. Unfortunately, there are some tasks that are hard to solve with them.
For instance, how to insert html if we have it as a string? Or, given a node, how to insert another node before it? Of course, all that is doable, but not in an elegant way.
So there exists two other sets of insertion methods to handle all cases easily.
prepend/append/before/after
This set of methods provides more flexible insertions:
node.append(...nodes or strings) – append nodes or strings at the end of node,
node.prepend(...nodes or strings) – insert nodes or strings into the beginning of node,
node.before(...nodes or strings) –- insert nodes or strings before the node,
node.after(...nodes or strings) –- insert nodes or strings after the node,
node.replaceWith(...nodes or strings) –- replaces node with the given nodes or strings.
Here's an example of using these methods to add more items to a list and the text before/after it:
That's how we can append an arbitrary HTML to our page.
Here's the picture of insertion variants:
We can easily notice similarities between this and the previous picture. The insertion points are actually the same, but this method inserts HTML.
The method has two brothers:
elem.insertAdjacentText(where, text) – the same syntax, but a string of text in inserted “as text” instead of HTML,
elem.insertAdjacentElement(where, elem) – the same syntax, but inserts an element.
They exist mainly to make the syntax “uniform”. In practice, most of time only insertAdjacentHTML is used, because for elements and text we have methods append/prepend/before/after – they are shorter to write and can insert nodes/text pieces.
So here's an alternative variant of showing a message:
We could do a function and put the code there. But the alternative way would be to clone the existing div and modify the text inside it (if needed).
Sometimes when we have a big element, that may be faster and simpler.
The call elem.cloneNode(true) creates a “deep” clone of the element – with all attributes and subelements. If we call elem.cloneNode(false), then the clone is made without child elements.
An example of copying the message:
<style>
.alert {
padding: 15px;
border: 1px solid #d6e9c6;
border-radius: 4px;
color: #3c763d;
background-color: #dff0d8;
}
</style>
<div class="alert" id="div">
<strong>Hi there!</strong> You've read an important message.
</div>
<script>
let div2 = div.cloneNode(true); // clone the message
div2.querySelector('strong').innerHTML = 'Bye there!'; // change the clone
div.after(div2); // show the clone after the existing div
</script>
Removal methods
To remove nodes, there are following methods:
parentElem.removeChild(node)
Removes elem from parentElem (assuming it's a child).
node.remove()
Removes the node from its place.
We can easily see that the second method is much shorter. The first one exists for historical reasons.
Please note:
If we want to move an element to another place – there's no need to remove it from the old one.
All insertion methods automatically remove the node from the old place.
For instance, let's swap elements:
<div id="first">First</div>
<div id="second">Second</div>
<script>
// no need to call remove
second.after(first); // take #second and after it - insert #first
</script>
Let's make our message disappear after a second:
<style>
.alert {
padding: 15px;
border: 1px solid #d6e9c6;
border-radius: 4px;
color: #3c763d;
background-color: #dff0d8;
}
</style>
<script>
let div = document.createElement('div');
div.className = "alert alert-success";
div.innerHTML = "<strong>Hi there!</strong> You've read an important message.";
document.body.append(div);
setTimeout(() => div.remove(), 1000);
// or setTimeout(() => document.body.removeChild(div), 1000);
</script>
A word about “document.write”
There's one more, very ancient method of adding something to a web-page: document.write.
The syntax:
<p>Somewhere in the page...</p>
<script>
document.write('<b>Hello from JS</b>');
</script>
<p>The end</p>
The call to document.write(html) writes the html into page “right here and now”. The html string can be dynamically generated, so it's kind of flexible. We can use JavaScript to create a full-fledged webpage and write it.
The method comes from times when there were no DOM, no standards… Really old times. It still lives, because there are scripts using it.
In modern scripts we can rarely see it, because of the important limitation.
The call to document.write only works while the page is loading.
If we call it afterwards, the existing document content is erased.
For instance:
<p>After one second the contents of this page will be replaced...</p>
<script>
// document.write after 1 second
// that's after the page loaded, so it erases the existing content
setTimeout(() => document.write('<b>...By this.</b>'), 1000);
</script>
So it's kind of unusable at “after loaded” stage, unlike other DOM methods we covered above.
That was the downside.
Technically, when document.write is called while the browser is still reading HTML, it appends something to it, and the browser consumes it just as it were initially there.
That gives us the upside – it works blazingly fast, because there's no DOM modification. It writes directly into the page text, while the DOM is not yet built, and the browser puts it into DOM at generation-time.
So if we need to add a lot of text into HTML dynamically, and we're at page loading phase, and the speed matters, it may help. But in practice these requirements rarely come together. And usually we can see this method in scripts just because they are old.
Summary
Methods to create new nodes:
document.createElement(tag) – creates an element with the given tag,
document.createTextNode(value) – creates a text node (rarely used),
elem.cloneNode(deep) – clones the element, if deep==true then with all descendants.
Insertion and removal of nodes:
From the parent:
parent.appendChild(node)
parent.insertBefore(node, nextSibling)
parent.removeChild(node)
parent.replaceChild(newElem, node)
All these methods return node.
Given a list of nodes and strings:
node.append(...nodes or strings) – insert into node, at the end,
node.prepend(...nodes or strings) – insert into node, at the beginning,
node.before(...nodes or strings) –- insert right before node,
node.after(...nodes or strings) –- insert right after node,
node.replaceWith(...nodes or strings) –- replace node.
node.remove() –- remove the node.
Text strings are inserted “as text”.
Given a piece of HTML: elem.insertAdjacentHTML(where, html), inserts depending on where:
"beforebegin" – insert html right before elem,
"afterbegin" – insert html into elem, at the beginning,
"beforeend" – insert html into elem, at the end,
"afterend" – insert html right after elem.
Also there are similar methods elem.insertAdjacentText and elem.insertAdjacentElement, they insert text strings and elements, but they are rarely used.
To append HTML to the page before it has finished loading:
document.write(html)
After the page is loaded such call erases the document. Mostly seen in old scripts.
Create a function clear(elem) that removes everything from the element.
<ol id="elem">
<li>Hello</li>
<li>World</li>
</ol>
<script>
function clear(elem) { /* your code */ }
clear(elem); // clears the list
</script>
First, let's see how not to do it:
function clear(elem) {
for (let i=0; i < elem.childNodes.length; i++) {
elem.childNodes[i].remove();
}
}
That won't work, because the call to remove() shifts the collection elem.childNodes, so elements start from the index 0 every time. But i increases, and some elements will be skipped.
The for..of loop also does the same.
The right variant could be:
function clear(elem) {
while (elem.firstChild) {
elem.firstChild.remove();
}
}
Run the example. Why table.remove() does not delete the text "aaa"?
<table id="table">
aaa
<tr>
<td>Test</td>
</tr>
</table>
<script>
alert(table); // the table, as it should be
table.remove();
// why there's still aaa in the document?
</script>
The HTML in the task is incorrect. That's the reason of the odd thing.
The browser has to fix it automatically. But there may be no text inside the <table>: according to the spec only table-specific tags are allowed. So the browser adds "aaa"before the <table>.
Now it's obvious that when we remove the table, it remains.
The question can be easily answered by exploring DOM using the browser tools. They show "aaa" before the <table>.
The HTML standard specifies in detail how to process bad HTML, and such behavior of the browser is correct.
Write a function createCalendar(elem, year, month).
The call should create a calendar for the given year/month and put it inside elem.
The calendar should be a table, where a week is <tr>, and a day is <td>. The table top should be <th> with weekday names: the first day should be Monday, and so on till Sunday.
For instance, createCalendar(cal, 2012, 9) should generate in element cal the following calendar:
P.S. For this task it's enough to generate the calendar, should not yet be clickable.
We'll create the table as a string: "<table>...</table>", and then assign it to innerHTML.
The algorithm:
Create the table header with <th> and weekday names.
Create the date object d = new Date(year, month-1). That's the first day of month (taking into account that months in JavaScript start from 0, not 1).
First few cells till the first day of the month d.getDay() may be empty. Let's fill them in with <td></td>.
Increase the day in d: d.setDate(d.getDate()+1). If d.getMonth() is not yet the next month, then add the new cell <td> to the calendar. If that's a Sunday, then add a newline “</tr><tr>”.
If the month has finished, but the table row is not yet full, add empty <td> into it, to make it square.
The update function will refresh the clock, to be called by setInterval every second:
function update() {
let clock = document.getElementById('clock');
let date = new Date(); // (*)
let hours = date.getHours();
if (hours < 10) hours = '0' + hours;
clock.children[0].innerHTML = hours;
let minutes = date.getMinutes();
if (minutes < 10) minutes = '0' + minutes;
clock.children[1].innerHTML = minutes;
let seconds = date.getSeconds();
if (seconds < 10) seconds = '0' + seconds;
clock.children[2].innerHTML = seconds;
}
In the line (*) we every time check the current date. The calls to setInterval are not reliable: they may happen with delays.
The clock-managing functions:
let timerId;
function clockStart() { // run the clock
timerId = setInterval(update, 1000);
update(); // (*)
}
function clockStop() {
clearInterval(timerId);
timerId = null;
}
Please note that the call to update() is not only scheduled in clockStart(), but immediately run in the line (*). Otherwise the visitor would have to wait till the first execution of setInterval. And the clock would be empty till then.
Before we get to JavaScript ways of dealing with styles and classes – here's an important rule. Hopefully it's obvious enough, but we still have to mention it.
There are generally two ways to style an element:
Create a class in CSS and add it: <div class="...">
Write properties directly into style: <div style="...">.
CSS is always the preferred way – not only for HTML, but in JavaScript as well.
We should only manipulate the style property if classes “can't handle it”.
For instance, style is acceptable if we calculate coordinates of an element dynamically and want to set them from JavaScript, like this:
let top = /* complex calculations */;
let left = /* complex calculations */;
elem.style.left = left; // e.g '123px'
elem.style.top = top; // e.g '456px'
For other cases, like making the text red, adding a background icon – describe that in CSS and then apply the class. That's more flexible and easier to support.
className and classList
Changing a class is one of the most often actions in scripts.
In the ancient time, there was a limitation in JavaScript: a reserved word like "class" could not be an object property. That limitation does not exist now, but at that time it was impossible to have a "class" property, like elem.class.
So for classes the similar-looking property "className" was introduced: the elem.className corresponds to the "class" attribute.
For instance:
<body class="main page">
<script>
alert(document.body.className); // main page
</script>
</body>
If we assign something to elem.className, it replaces the whole strings of classes. Sometimes that's what we need, but often we want to add/remove a single class.
There's another property for that: elem.classList.
The elem.classList is a special object with methods to add/remove/toggle classes.
For instance:
<body class="main page">
<script>
// add a class
document.body.classList.add('article');
alert(document.body.className); // main page article
</script>
</body>
So we can operate both on the full class string using className or on individual classes using classList. What we choose depends on our needs.
Methods of classList:
elem.classList.add/remove("class") – adds/removes the class.
elem.classList.toggle("class") – if the class exists, then removes it, otherwise adds it.
elem.classList.contains("class") – returns true/false, checks for the given class.
Besides that, classList is iterable, so we can list all classes like this:
<body class="main page">
<script>
for(let name of document.body.classList) {
alert(name); // main, and then page
}
</script>
</body>
Element style
The property elem.style is an object that corresponds to what's written in the "style" attribute. Setting elem.style.width="100px" works as if we had in the attribute style="width:100px".
Sometimes we want to assign a style property, and later remove it.
For instance, to hide an element, we can set elem.style.display = "none".
Then later we may want to remove the style.display as if it were not set. Instead of delete elem.style.display we should assign an empty line to it: elem.style.display = "".
// if we run this code, the <body> "blinks"
document.body.style.display = "none"; // hide
setTimeout(() => document.body.style.display = "", 1000); // back to normal
If we set display to an empty string, then the browser applies CSS classes and its built-in styles normally, as if there were no such style property at all.
Full rewrite with style.cssText
Normally, we use style.* to assign individual style properties. We can't set the full style like div.style="color: red; width: 100px", because div.style is an object, and it's read-only.
To set the full style as a string, there's a special property style.cssText:
<div id="div">Button</div>
<script>
// we can set special style flags like "important" here
div.style.cssText=`color: red !important;
background-color: yellow;
width: 100px;
text-align: center;
`;
alert(div.style.cssText);
</script>
We rarely use it, because such assignment removes all existing styles: it does not add, but replaces them. May occasionally delete something needed. But still can be done for new elements when we know we don't delete something important.
The same can be accomplished by setting an attribute: div.setAttribute('style', 'color: red...').
Mind the units
CSS units must be provided in style values.
For instance, we should not set elem.style.top to 10, but rather to 10px. Otherwise it wouldn't work:
<body>
<script>
// doesn't work!
document.body.style.margin = 20;
alert(document.body.style.margin); // '' (empty string, the assignment is ignored)
// now add the CSS unit (px) - and it works
document.body.style.margin = '20px';
alert(document.body.style.margin); // 20px
alert(document.body.style.marginTop); // 20px
alert(document.body.style.marginLeft); // 20px
</script>
</body>
Please note how the browser “unpacks” the property style.margin in the last lines and infers style.marginLeft and style.marginTop (and other partial margins) from it.
Computed styles: getComputedStyle
Modifying a style is easy. But how to read it?
For instance, we want to know the size, margins, the color of an element. How to do it?
The style property operates only on the value of the "style" attribute, without any CSS cascade.
So we can't read anything that comes from CSS classes using elem.style.
For instance, here style doesn't see the margin:
<head>
<style> body { color: red; margin: 5px } </style>
</head>
<body>
The red text
<script>
alert(document.body.style.color); // empty
alert(document.body.style.marginTop); // empty
</script>
</body>
…But what if we need, say, increase the margin by 20px? We want the current value for the start.
There's another method for that: getComputedStyle.
The syntax is:
getComputedStyle(element[, pseudo])
element
Element to read the value for.
pseudo
A pseudo-element if required, for instance ::before. An empty string or no argument mean the element itself.
The result is an object with style properties, like elem.style, but now with respect to all CSS classes.
For instance:
<head>
<style> body { color: red; margin: 5px } </style>
</head>
<body>
<script>
let computedStyle = getComputedStyle(document.body);
// now we can read the margin and the color from it
alert( computedStyle.marginTop ); // 5px
alert( computedStyle.color ); // rgb(255, 0, 0)
</script>
</body>
A computed style value is the value after all CSS rules and CSS inheritance is applied, as the result of the CSS cascade. If can look like height:1em or font-size:125%.
A resolved style value is the one finally applied to the element. Values like 1em or 125% are relative. The browser takes the computed value and makes all units fixed and absolute, for instance: height:20px or font-size:16px. For geometry properties resolved values may have a floating point, like width:50.5px.
Long time ago getComputedStyle was created to get computed values, but it turned out that resolved values are much more convenient, and the standard changed.
So nowadays getComputedStyle actually returns the resolved value of the property.
getComputedStyle requires the full property name
We should always ask for the exact property that we want, like paddingLeft or marginTop or borderTopWidth. Otherwise the correct result is not guaranteed.
For instance, if there are properties paddingLeft/paddingTop, then what should we get for getComputedStyle(elem).padding? Nothing, or maybe a “generated” value from known paddings? There's no standard rule here.
There are other inconsistencies. As an example, some browsers (Chrome) show 10px in the document below, and some of them (Firefox) – do not:
<style>
body {
margin: 10px;
}
</style>
<script>
let style = getComputedStyle(document.body);
alert(style.margin); // empty string in Firefox
</script>
“Visited” links styles are hidden!
Visited links may be colored using :visited CSS pseudoclass.
But getComputedStyle does not give access to that color, because otherwise an arbitrary page could find out whether the user visited a link by creating it on the page and checking the styles.
JavaScript we may not see the styles applied by :visited. And also, there's a limitation in CSS that forbids to apply geometry-changing styles in :visited. That's to guarantee that there's no side way for an evil page to test if a link was visited and hence to break the privacy.
Summary
To manage classes, there are two DOM properties:
className – the string value, good to manage the whole set of classes.
classList – the object with methods add/remove/toggle/contains, good for individual classes.
To change the styles:
The style property is an object with camelCased styles. Reading and writing to it has the same meaning as modifying individual properties in the "style" attribute. To see how to apply important and other rare stuff – there's a list of methods at
MDN.
The style.cssText property corresponds to the whole "style" attribute, the full string of styles.
To read the resolved styles (with respect to all classes, after all CSS is applied and final values are calculated):
The getComputedStyle(elem[, pseudo]) returns the style-like object with them. Read-only.
Write a function showNotification(options) that a notification: <div class="notification"> with the given content. The notification should automatically disappear after 1.5 seconds.
The options are:
// shows an element with the text "Hello" near the right-top of the window
showNotification({
top: 10, // 10px from the top of the window (by default 0px)
right: 10, // 10px from the right edge of the window (by default 0px)
html: "Hello!", // the HTML of notification
className: "welcome" // an additional class for the div (optional)
});
It has the border, padding and scrolling. The full set of features. There are no margins, as they are not the part of the element itself, and there are no special properties for them.
The picture above demonstrates the most complex case when the element has a scrollbar. Some browsers (not all) reserve the space for it by taking it from the content.
So, without scrollbar the content width would be 300px, but if the scrollbar is 16px wide (the width may vary between devices and browsers) then only 300-16 = 284px remains, and we should take it into account. That's why examples from this chapter assume that there's a scrollbar. If there's no scrollbar, then things are just a bit simpler.
The padding-bottom may be filled with text
Usually paddings are shown empty on illustrations, but if there's a lot of text in the element and it overflows, then browsers show the “overflowing” text at padding-bottom, so you can see that in examples. But the padding is still there, unless specified otherwise.
Geometry
Element properties that provide width, height and other geometry are always numbers. They are assumed to be in pixels.
Here's the overall picture:
They are many properties, it's difficult to fit them all in the single picture, but their values are simple and easy to understand.
Let's start exploring them from the outside of the element.
offsetParent, offsetLeft/Top
These properties are rarely needed, but still they are the “most outer” geometry properties, so we'll start with them.
The offsetParent is the nearest ancestor that is:
CSS-positioned (position is absolute, relative or fixed),
or <td>, <th>, <table>,
or <body>.
In most practical cases we can use offsetParent to get the nearest CSS-positioned ancestor. And offsetLeft/offsetTop provide x/y coordinates relative to it's left-upper corner.
In the example below the inner <div> has <main> as offsetParent and offsetLeft/offsetTop are shifts from its left-upper corner (180):
<main style="position: relative" id="main">
<article>
<div id="example" style="position: absolute; left: 180px; top: 180px">...</div>
</article>
</main>
<script>
alert(example.offsetParent.id); // main
alert(example.offsetLeft); // 180 (note: a number, not a string "180px")
alert(example.offsetTop); // 180
</script>
There are several occasions when offsetParent is null:
For not shown elements (display:none or not in the document).
For <body> and <html>.
For elements with position:fixed on them.
offsetWidth/Height
Now let's move to the element itself.
These two properties are the simplest ones. They provide the “outer” width/height of the element. Or, in other words, its full size including borders.
For our sample element:
offsetWidth = 390 – the outer width, can be calculated as inner CSS-width (300px) plus paddings (2*20px) and borders (2*25px).
offsetHeight = 290 – the outer height.
Geometry properties for not shown elements are zero/null
Geometry properties are calculated only for shown elements.
If an element (or any of its ancestors) has display:none or is not in the document, then all geometry properties are zero or null depending on what it is.
For example, offsetParent is null, and offsetWidth, offsetHeight are 0.
We can use this to check if an element is hidden, like this:
function isHidden(elem) {
return !elem.offsetWidth && !elem.offsetHeight;
}
Please note that such isHidden returns true for elements that are on-screen, but have zero sizes (like an empty <div>).
clientTop/Left
Inside the element we have the borders.
To measure them, there are properties clientTop and clientLeft.
In our example:
clientLeft = 25 – left border width
clientTop = 25 – top border width
…But to be precise – they are not borders, but relative coordinates of the inner side from the outer side.
What's the difference?
It becomes visible when the document is right-to-left (the operation system is in arabic or hebrew languages). The scrollbar is then not on the right, but on the left, and then clientLeft also includes the scrollbar width.
In that case clientLeft in our example would be not 25, but with the scrollbar width 25+16=41:
clientWidth/Height
These properties provide the size of the area inside the element borders.
They include the content width together with paddings, but without the scrollbar:
On the picture above let's first consider clientHeight: it's easier to evaluate. There's no horizontal scrollbar, so it's exactly the sum of what's inside the borders: CSS-height 200px plus top and bottom paddings (2*20px) total 240px.
Now clientWidth – here the content width is not 300px, but 284px, because 16px are occupied by the scrollbar. So the sum is 284px plus left and right paddings, total 324px.
If there are no paddings, then clientWidth/Height is exactly the content area, inside the borders and the scrollbar (if any).
So when there's no padding we can use clientWidth/clientHeight to get the content area size.
scrollWidth/Height
Properties clientWidth/clientHeight only account for the visible part of the element.
Properties scrollWidth/scrollHeight also include the scrolled out (hidden) part:
On the picture above:
scrollHeight = 723 – is the full inner height of the content area including the scrolled out part.
scrollWidth = 324 – is the full inner width, here we have no horizontal scroll, so it equals clientWidth.
We can use these properties to expand the element wide to its full width/height.
Like this:
// expand the element to the full content height
element.style.height = element.scrollHeight + 'px';
Click the button to expand the element:
text text text text text text text text text text text text text text text text text text text text text text text text text text text text text text text text text text text text text text text text text text text text text text text text text text text text text text text text text text text text text text text text text text text text text text text text text text text text text text text text text text text text text text text text text text text text text text text text text text text text text text text text text text text text text text text text text text text text text text text text text text text text text text text text text text text text text text text text text text text text
scrollLeft/scrollTop
Properties scrollLeft/scrollTop are the width/height of the hidden, scrolled out part of the element.
On the picture below we can see scrollHeight and scrollTop for a block with a vertical scroll.
In other words, scrollTop is “how much is scrolled up”.
scrollLeft/scrollTop can be modified
Most geometry properties that are read-only, but scrollLeft/scrollTop can be changed, and the browser will scroll the element.
If you click the element below, the code elem.scrollTop+=10 executes. That makes the element content scroll 10px below.
Click Me 1 2 3 4 5 6 7 8 9
Setting scrollTop to 0 or Infinity will make the element scroll to the very top/bottom respectively.
Don't take width/height from CSS
We've just covered geometry properties of DOM elements. They are normally used to get widths, heights and calculate distances.
But as we know from the chapter
Styles and classes, we can read CSS-height and width using getComputedStyle.
So why not to read the width of an element like this?
let elem = document.body;
alert( getComputedStyle(elem).width ); // show CSS width for elem
Why we should use geometry properties instead? There are two reasons:
First, CSS width/height depend on another property: box-sizing that defines “what is” CSS width and height. A change in box-sizing for CSS purposes may break such JavaScript.
Second, CSS width/height may be auto, for instance for an inline element:
<span id="elem">Hello!</span>
<script>
alert( getComputedStyle(elem).width ); // auto
</script>
From the CSS standpoint, width:auto is perfectly normal, but in JavaScript we need an exact size in px that we can use in calculations. So here CSS width is useless at all.
And there's one more reason: a scrollbar. Sometimes the code that works fine without a scrollbar starts to bug with it, because a scrollbar takes the space from the content in some browsers. So the real width available for the content is less than CSS width. And clientWidth/clientHeight take that into account.
…But with getComputedStyle(elem).width the situation is different. Some browsers (e.g. Chrome) return the real inner width, minus the scrollbar, and some of them (e.g. Firefox) – CSS width (ignore the scrollbar). Such cross-browser differences is the reason not to use getComputedStyle, but rather rely on geometry properties.
If your browser reserves the space for a scrollbar (most browsers for Windows do), then you can test it below.
The element with text has CSS width:300px.
On a Desktop Windows OS, Firefox, Chrome, Edge all reserve the space for the scrollbar. But Firefox shows 300px, while Chrome and Edge show less. That's because Firefox returns the CSS width and other browsers return the “real” width.
Please note that the described difference are only about reading getComputedStyle(...).width from JavaScript, visually everything is correct.
Summary
Elements have the following geometry properties:
offsetParent – is the nearest positioned ancestor or td, th, table, body.
offsetLeft/offsetTop – coordinates relative to the left-upper edge of offsetParent.
offsetWidth/offsetHeight – “outer” width/height of an element including borders.
clientLeft/clientTop – the distance from the left-upper outer corner to its left-upper inner corner. For left-to-right OS they are always the widths of left/top borders. For right-to-left OS the vertical scrollbar is on the left so clientLeft includes its width too.
clientWidth/clientHeight – the width/height of the content including paddings, but without the scrollbar.
scrollWidth/scrollHeight – the width/height of the content including the scrolled out part. Also includes paddings, but not the scrollbar.
scrollLeft/scrollTop – width/height of the scrolled out part of the element, starting from its left-upper corner.
All properties are read-only except scrollLeft/scrollTop. They make the browser scroll the element if changed.
Write the code that returns the width of a standard scrollbar.
For Windows it usually varies between 12px and 20px. If the browser doesn't reserves any space for it, then it may be 0px.
P.S. The code should work for any HTML document, do not depend on its content.
To get the scrollbar width, we can create an element with the scroll, but without borders and paddings.
Then the difference between its full width offsetWidth and the inner content area width clientWidth will be exactly the scrollbar:
// create a div with the scroll
let div = document.createElement('div');
div.style.overflowY = 'scroll';
div.style.width = '50px';
div.style.height = '50px';
// must put it in the document, otherwise sizes will be 0
document.body.append(div);
let scrollWidth = div.offsetWidth - div.clientWidth;
div.remove();
alert(scrollWidth);
Calculate them and use to place the ball into the center of the field:
The element should be moved by JavaScript, not CSS.
The code should work with any ball size (10, 20, 30 pixels) and any field size, not be bound to the given values.
P.S. Sure, centering could be done with CSS, but here we want exactly JavaScript. Further we'll meet other topics and more complex situations when JavaScript must be used. Here we do a “warm-up”.
The ball has position:absolute. It means that its left/top coordinates are measured from the nearest positioned element, that is #field (because it has position:relative).
The coordinates start from the inner left-upper corner of the field:
The inner field width/height is clientWidth/clientHeight. So the field center has coordinates (clientWidth/2, clientHeight/2).
…But if we set ball.style.left/top to such values, then not the ball as a whole, but the left-upper edge of the ball would be in the center:
To align the ball center with the center of the field, we should move the ball to the half of its width to the left and to the half of its height to the top:
The code won't work reliably while <img> has no width/height:
<img src="ball.png" id="ball">
When the browser does not know the width/height of an image (from tag attributes or CSS), then it assumes them to equal 0 until the image finishes loading.
In real life after the first load browser usually caches the image, and on next loads it will have the size immediately.
But on the first load the value of ball.offsetWidth is 0. That leads to wrong coordinates.
We should fix that by adding width/height to <img>:
What's the difference between getComputedStyle(elem).width and elem.clientWidth?
Give at least 3 differences. The more the better.
Differences:
clientWidth is numeric, while getComputedStyle(elem).width returns a string with px at the end.
getComputedStyle may return non-numeric width like "auto" for an inline element.
clientWidth is the inner content area of the element plus paddings, while CSS width (with standard box-sizing) is the inner conand sometent area without paddings.
If there's a scrollbar and the browser reserves the space for it, some browser substract that space from CSS width (cause it's not available for content any more), and some do not. The clientWidth property is always the same: scrollbar size is substracted if reserved.
Window sizes and scrolling
How to find out the width of the browser window? How to get the full height of the document, including the scrolled out part? How to scroll the page using JavaScript?
From the DOM point of view, the root document element is document.documentElement. That element corresponds to <html> and has geometry properties described in the
previous chapter. For some cases we can use it, but there are additional methods and peculiarities important enough to consider.
Width/height of the window
Properties clientWidth/clientHeight of document.documentElement is exactly what we want here:
For instance, this button shows the height of your window:
Not window.innerWidth/Height
Browsers also support properties window.innerWidth/innerHeight. They look like what we want. So what's the difference?
If there's a scrollbar occupying some space, clientWidth/clientHeight provide the width/height inside it. In other words, they return width/height of the visible part of the document, available for the content.
And window.innerWidth/innerHeight ignore the scrollbar.
If there's a scrollbar, and it occupies some space, then these two lines show different values:
alert( window.innerWidth ); // full window width
alert( document.documentElement.clientWidth ); // window width minus the scrollbar
In most cases we need the available window width: to draw or position something. That is: inside scrollbars if there are any. So we should use documentElement.clientHeight/Width.
DOCTYPE is important
Please note: top-level geometry properties may work a little bit differently when there's no <!DOCTYPE HTML> in HTML. Odd things are possible.
In modern HTML we should always write DOCTYPE. Generally that's not a JavaScript question, but here it affects JavaScript as well.
Width/height of the document
Theoretically, as the root document element is documentElement.clientWidth/Height, and it encloses all the content, we could measure its full size as documentElement.scrollWidth/scrollHeight.
These properties work well for regular elements. But for the whole page these properties do not work as intended. In Chrome/Safari/Opera if there's no scroll, then documentElement.scrollHeight may be even less than documentElement.clientHeight! For regular elements that's a nonsense.
To have a reliable full window size, we should take the maximum of these properties:
let scrollHeight = Math.max(
document.body.scrollHeight, document.documentElement.scrollHeight,
document.body.offsetHeight, document.documentElement.offsetHeight,
document.body.clientHeight, document.documentElement.clientHeight
);
alert('Full document height, with scrolled out part: ' + scrollHeight);
Why so? Better don't ask. These inconsistencies come from ancient times, not a “smart” logic.
Get the current scroll
Regular elements have their current scroll state in elem.scrollLeft/scrollTop.
What's with the page? Most browsers provide documentElement.scrollLeft/Top for the document scroll, but Chrome/Safari/Opera have bugs (like
157855,
106133) and we should use document.body instead of document.documentElement there.
Luckily, we don't have to remember these peculiarities at all, because of the special properties window.pageXOffset/pageYOffset:
alert('Current scroll from the top: ' + window.pageYOffset);
alert('Current scroll from the left: ' + window.pageXOffset);
These properties are read-only.
Scrolling: scrollTo, scrollBy, scrollIntoView
Important:
To scroll the page from JavaScript, its DOM must be fully built.
For instance, if we try to scroll the page from the script in <head>, it won't work.
Regular elements can be scrolled by changing scrollTop/scrollLeft.
We can do the same for the page:
For all browsers except Chrome/Safari/Opera: modify document.documentElement.scrollTop/Left.
In Chrome/Safari/Opera: use document.body.scrollTop/Left instead.
It should work, but smells like cross-browser incompatibilities. Not good. Fortunately, there's a simpler, more universal solution: special methods
window.scrollBy(x,y) and
window.scrollTo(pageX,pageY).
The method scrollBy(x,y) scrolls the page relative to its current position. For instance, scrollBy(0,10) scrolls the page 10px down.
The button below demonstrates this:
The method scrollTo(pageX,pageY) scrolls the page relative to the document top-left corner. It's like setting scrollLeft/scrollTop.
To scroll to the very beginning, we can use scrollTo(0,0).
The call to elem.scrollIntoView(top) scrolls the page to make elem visible. It has one argument:
if top=true (that's the default), then the page will be scrolled to make elem appear on the top of the window. The upper edge of the element is aligned with the window top.
if top=false, then the page scrolls to make elem appear at the bottom. The bottom edge of the element is aligned with the window bottom.
The button below scrolls the page to make itself show at the window top:
And this button scrolls the page to show it at the bottom:
Forbid the scrolling
Sometimes we need to make the document “unscrollable”. For instance, when we need to cover it with a large message requiring immediate attention, and we want the visitor to interact with that message, not with the document.
To make the document unscrollable, its enough to set document.body.style.overflow = "hidden". The page will freeze on its current scroll.
Try it:
The first button freezes the scroll, the second one resumes it.
We can use the same technique to “freeze” the scroll for other elements, not just for document.body.
The drawback of the method is that the scrollbar disappears. If it occupied some space, then that space is now free, and the content “jumps” to fill it.
That looks a bit odd, but can be worked around if we compare clientWidth before and after the freeze, and if it increased (the scrollbar disappeared) then add padding to document.body in place of the scrollbar, to keep the content width same.
Summary
Geometry:
Width/height of the visible part of the document (content area width/height): document.documentElement.clientWidth/Height
Width/height of the whole document, with the scrolled out part:
To move elements around we should be familiar with coordinates.
Most JavaScript methods deal with one of two coordinate systems:
Relative to the window(or another viewport) top/left.
Relative to the document top/left.
It's important to understand the difference and which type is where.
Window coordinates: getBoundingClientRect
Window coordinates start at the left-upper corner of the window.
The method elem.getBoundingClientRect() returns window coordinates for elem as an object with properties:
top – Y-coordinate for the top element edge,
left – X-coordinate for the left element edge,
right – X-coordinate for the right element edge,
bottom – Y-coordinate for the bottom element edge.
Like this:
Window coordinates do not take the scrolled out part of the document into account, they are calculated from the window left-upper corner.
In other words, when we scroll the page, the element goes up or down, its window coordinates change. That's very important.
Click the button to see its window coordinates:
If you scroll the page, the button position changes, and window coordinates as well.
Also:
Coordinates may be decimal fractions. That's normal, internally browser uses them for calculations. We don't have to round them when setting to style.position.left/top, the browser is fine with fractions.
Coordinates may be negative. For instance, if the page is scrolled down and the elem top is now above the window then elem.getBoundingClientRect().top is negative.
Some browsers (like Chrome) also add to the result getBoundingClientRect properties width and height. We can get them also by subtraction: height=bottom-top, width=right-left.
Coordinates right/bottom are different from CSS properties
If we compare window coordinates versus CSS positioning, then there are obvious similarities to position:fixed – also the position relative to the viewport.
But in CSS the right property means the distance from the right edge, and the bottom – from the bottom edge.
If we just look at the picture below, we can see that in JavaScript it is not so. All window coordinates are counted from the upper-left corner, including these ones.
elementFromPoint(x, y)
The call to document.elementFromPoint(x, y) returns the most nested element at window coordinates (x, y).
The syntax is:
let elem = document.elementFromPoint(x, y);
For instance, the code below highlights and outputs the tag of the element that is now in the middle of the window:
let centerX = document.documentElement.clientWidth / 2;
let centerY = document.documentElement.clientHeight / 2;
let elem = document.elementFromPoint(centerX, centerY);
elem.style.background = "red";
alert(elem.tagName);
As it uses window coordinates, the element may be different depending on the current scroll position.
For out-of-window coordinates the elementFromPoint returns null
The method document.elementFromPoint(x,y) only works if (x,y) are inside the visible area.
If any of the coordinates is negative or exceeds the window width/height, then it returns null.
In most cases such behavior is not a problem, but we should keep that in mind.
Here's a typical error that may occur if we don't check for it:
let elem = document.elementFromPoint(x, y);
// if the coordinates happen to be out of the window, then elem = null
elem.style.background = ''; // Error!
Using for position:fixed
Most of time we need coordinates to position something. In CSS, to position an element relative to the viewport we use position:fixed together with left/top (or right/bottom).
We can use getBoundingClientRect to get coordinates of an element, and then to show something near it.
For instance, the function createMessageUnder(elem, html) below shows the message under elem:
let elem = document.getElementById("coords-show-mark");
function createMessageUnder(elem, html) {
// create message element
let message = document.createElement('div');
// better to use a css class for the style here
message.style.cssText = "position:fixed; color: red";
// assign coordinates, don't forget "px"!
let coords = elem.getBoundingClientRect();
message.style.left = coords.left + "px";
message.style.top = coords.bottom + "px";
message.innerHTML = html;
return message;
}
// Usage:
// add it for 5 seconds in the document
let message = createMessageUnder(elem, 'Hello, world!');
document.body.append(message);
setTimeout(() => message.remove(), 5000);
Click the button to run it:
The code can be modified to show the message at the left, right, below, apply CSS animations to “fade it in” and so on. That's easy, as we have all the coordinates and sizes of the element.
But note the important detail: when the page is scrolled, the message flows away from the button.
The reason is obvious: the message element relies on position:fixed, so it remains at the same place of the window while the page scrolls away.
To change that, we need to use document-based coordinates and position:absolute.
Document coordinates
Document-relative coordinates start from the left-upper corner of the document, not the window.
In CSS, window coordinates correspond to position:fixed, while document coordinates are similar to position:absolute on top.
We can use position:absolute and top/left to put something at a certain place of the document, so that it remains there during a page scroll. But we need the right coordinates first.
For clarity we'll call window coordinates (clientX,clientY) and document coordinates (pageX,pageY).
When the page is not scrolled, then window coordinate and document coordinates are actually the same. Their zero points match too:
And if we scroll it, then (clientX,clientY) change, because they are relative to the window, but (pageX,pageY) remain the same.
Here's the same page after the vertical scroll:
clientY of the header "From today's featured article" became 0, because the element is now on window top.
clientX didn't change, as we didn't scroll horizontally.
pageX and pageY coordinates of the element are still the same, because they are relative to the document.
Getting document coordinates
There's no standard method to get document coordinates of an element. But it's easy to write it.
The two coordinate systems are connected by the formula:
pageY = clientY + height of the scrolled-out vertical part of the document.
pageX = clientX + width of the scrolled-out horizontal part of the document.
The function getCoords(elem) will take window coordinates from elem.getBoundingClientRect() and add the current scroll to them:
// get document coordinates of the element
function getCoords(elem) {
let box = elem.getBoundingClientRect();
return {
top: box.top + pageYOffset,
left: box.left + pageXOffset
};
}
Summary
Any point on the page has coordinates:
Relative to the window – elem.getBoundingClientRect().
Relative to the document – elem.getBoundingClientRect() plus the current page scroll.
Window coordinates are great to use with position:fixed, and document coordinates do well with position:absolute.
Both coordinate systems have their “pro” and “contra”, there are times we need one or the other one, just like CSS positionabsolute and fixed.
Create a function positionAt(anchor, position, elem) that positions elem, depending on position either at the top ("top"), right ("right") or bottom ("bottom") of the element anchor.
Use it to make a function showNote(anchor, position, html) that shows an element with the class "note" and the text html at the given position near the anchor.
Show the notes like here:
P.S. The note should have position:fixed for this task.
In this task we only need to accuracely calculate the coorindates. See the code for details.
Please note: the elements must be in the document to read offsetHeight and other properties.
A hidden (display:none) or out of the document element has no size.
top-out, right-out, bottom-out – work the same as before, they insert the elem over/right/under anchor.
top-in, right-in, bottom-in – insert elem inside the anchor: stick it to the upper/right/bottom edge.
For instance:
// shows the note above blockquote
positionAt(blockquote, "top-out", note);
// shows the note inside blockquote, at the top
positionAt(blockquote, "top-in", note);
An event is a signal that something has happened. All DOM nodes generate such signals (but events are not limited to DOM).
Here's a list of the most useful DOM events, just to take a look at:
Mouse events:
click – when the mouse clicks on an element (touchscreen devices generate it on a tap).
contextmenu – when the mouse right-clicks on an element.
mouseover / mouseout – when the mouse cursor comes over / leaves an element.
mousedown / mouseup – when the mouse button is pressed / released over an element.
mousemove – when the mouse is moved.
Form element events:
submit – when the visitor submits a <form>.
focus – when the visitor focuses on an element, e.g. on an <input>.
Keyboard events:
keydown and keyup – when the visitor presses and then releases the button.
Document events
DOMContentLoaded – when the HTML is loaded and processed, DOM is fully built.
CSS events:
transitionend – when a CSS-animation finishes.
There are many other events. We'll get into more details of particular events in next chapters.
Event handlers
To react on events we can assign a handler – a function that runs in case of an event.
Handlers is a way to run JavaScript code in case of user actions.
There are several ways to assign a handler. Let's see them, starting from the simplest one.
HTML-attribute
A handler can be set in HTML with an attribute named on<event>.
For instance, to assign a click handler for an input, we can use onclick, like here:
<input value="Click me" onclick="alert('Click!')" type="button">
On mouse click, the code inside onclick runs.
Please note that inside onclick we use single quotes, because the attribute itself is in double quotes. If we forget that the code is inside the attribute and use double quotes inside, like this: onclick="alert("Click!")", then it won't work right.
An HTML-attribute is not a convenient place to write a lot of code, so we'd better create a JavaScript function and call it there.
As we know, HTML attribute names are not case-sensitive, so ONCLICK works as well as onClick and onCLICK… But usually attributes are lowercased: onclick.
DOM property
We can assign a handler using a DOM property on<event>.
If the handler is assigned using an HTML-attribute then the browser reads it, creates a new function from the attribute content and writes it to the DOM property.
So this way is actually the same as the previous one.
The handler is always in the DOM property: the HTML-attribute is just one of the ways to initialize it.
As there's only one onclick property, we can't assign more than one event handler.
In the example below adding a handler with JavaScript overwrites the existing handler:
<input type="button" id="elem" onclick="alert('Before')" value="Click me">
<script>
elem.onclick = function() { // overwrites the existing handler
alert('After'); // only this will be shown
};
</script>
By the way, we can assign an existing function as a handler directly:
function sayThanks() {
alert('Thanks!');
}
elem.onclick = sayThanks;
To remove a handler – assign elem.onclick = null.
Accessing the element: this
The value of this inside a handler is the element. The one which has the handler on it.
In the code below button shows its contents using this.innerHTML:
If you're starting to work with event – please note some subtleties.
The function should be assigned as sayThanks, not sayThanks().
// right
button.onclick = sayThanks;
// wrong
button.onclick = sayThanks();
If we add brackets, then sayThanks() – will be the result of the function execution, so onclick in the last code becomes undefined (the function returns nothing). That won't work.
The difference is easy to explain. When the browser reads the attribute, it creates a handler function with the body from its content.
So the last example is the same as:
button.onclick = function() {
sayThanks(); // the attribute content
};
Use functions, not strings.
The assignment elem.onclick = "alert(1)" would work too. It works for compatibility reasons, but strongly not recommended.
Don't use setAttribute for handlers.
Such a call won't work:
// a click on <body> will generate errors,
// because attributes are always strings, function becomes a string
document.body.setAttribute('onclick', function() { alert(1) });
DOM-property case matters.
Assign a handler to elem.onclick, not elem.ONCLICK, because DOM properties are case-sensitive.
addEventListener
The fundamental problem of the aforementioned ways to assign handlers – we can't assign multiple handlers to one event.
For instance, one part of our code wants to highlight a button on click, and another one wants to show a message.
We'd like to assign two event handlers for that. But a new DOM property will overwrite the existing one:
Web-standard developers understood that long ago and suggested an alternative way of managing handlers using special methods addEventListener and removeEventListener. They are free of such a problem.
Please note – if we don't store the function in a variable, then we can't remove it. There's no way to “read back” handlers assigned by addEventListener.
Multiple calls to addEventListener allow to add multiple handlers, like this:
To properly handle an event we'd want to know more about what's happened. Not just a “click” or a “keypress”, but what were the pointer coordinates? Which key was pressed? And so on.
When an event happens, the browser creates an event object, puts details into it and passes it as an argument to the handler.
Here's an example of getting mouse coordinates from the event object:
<input type="button" value="Click me" id="elem">
<script>
elem.onclick = function(event) {
// show event type, element and coordinates of the click
alert(event.type + " at " + event.currentTarget);
alert("Coordinates: " + event.clientX + ":" + event.clientY);
};
</script>
Some properties of event object:
event.type
Event type, here it's "click".
event.currentTarget
Element that handled the event. That's exactly the same as this, unless you bind this to something else, and then event.currentTarget becomes useful.
event.clientX / event.clientY
Window-relative coordinates of the cursor, for mouse events.
There are more properties. They depend on the event type, so we'll study them later when come to different events in details.
The event object is also accessible from HTML
If we assign a handler in HTML, we can also use the event object, like this:
That's possible because when the browser reads the attribute, it creates a handler like this: function(event) { alert(event.type) }. That is: its first argument is called "event", and the body is taken from the attribute.
Object handlers: handleEvent
We can assign an object as an event handler using addEventListener. When an event occurs, its handleEvent method is called with it.
In other words, when addEventListener receives an object as the handler, it calls object.handleEvent(event) in case of an event.
We could also use a class for that:
<button id="elem">Click me</button>
<script>
class Menu {
handleEvent(event) {
switch(event.type) {
case 'mousedown':
elem.innerHTML = "Mouse button pressed";
break;
case 'mouseup':
elem.innerHTML += "...and released.";
break;
}
}
}
let menu = new Menu();
elem.addEventListener('mousedown', menu);
elem.addEventListener('mouseup', menu);
</script>
Here the same object handles both events. Please note that we need to explicitly setup the events to listen using addEventListener. The menu object only gets mousedown and mouseup here, not any other types of events.
The method handleEvent does not have to do all the job by itself. It can call other event-specific methods instead, like this:
<button id="elem">Click me</button>
<script>
class Menu {
handleEvent(event) {
// mousedown -> onMousedown
let method = 'on' + event.type[0].toUpperCase() + event.type.slice(1);
this[method](event);
}
onMousedown() {
elem.innerHTML = "Mouse button pressed";
}
onMouseup() {
elem.innerHTML += "...and released.";
}
}
let menu = new Menu();
elem.addEventListener('mousedown', menu);
elem.addEventListener('mouseup', menu);
</script>
Now event handlers are clearly separated, that may be easier to support.
Summary
There are 3 ways to assign event handlers:
HTML attribute: onclick="...".
DOM property: elem.onclick = function.
Methods: elem.addEventListener(event, handler[, phase]) to add, removeEventListener to remove.
HTML attributes are used sparingly, because JavaScript in the middle of an HTML tag looks a little bit odd and alien. Also can't write lots of code in there.
DOM properties are ok to use, but we can't assign more than one handler of the particular event. In many cases that limitation is not pressing.
The last way is the most flexible, but it is also the longest to write. There are few events that only work with it, for instance transtionend and DOMContentLoaded (to be covered). Also addEventListener supports objects as event handlers. In that case the method handleEvent is called in case of the event.
No matter how you assign the handler – it gets an event object as the first argument. That object contains the details about what's happened.
We'll learn more about events in general and about different types of events in the next chapters.
The first handler triggers, because it's not removed by removeEventListener. To remove the handler we need to pass exactly the function that was assigned. And in the code a new function is passed, that looks the same, but is still another function.
To remove a function object, we need to store a reference to it, like this:
function handler() {
alert(1);
}
button.addEventListener("click", handler);
button.removeEventListener("click", handler);
The handler button.onclick works independantly and in addition to addEventListener.
First we need to choose a method of positioning the ball.
We can't use position:fixed for it, because scrolling the page would move the ball from the field.
So we should use position:absolute and, to make the positioning really solid, make field itself positioned.
Then the ball will be positioned relatively to the field:
#field {
width: 200px;
height: 150px;
position: relative;
}
#ball {
position: absolute;
left: 0; /* relative to the closest positioned ancestor (field) */
top: 0;
transition: 1s all; /* CSS animation for left/top makes the ball fly */
}
Next we need to assign the correct ball.style.position.left/top. They contain field-relative coordinates now.
Here's the picture:
We have event.clientX/clientY – window-relative coordinates of the click.
To get field-relative left coordinate of the click, we can substract the field left edge and the border width:
let left = event.clientX - fieldInnerCoords.left - field.clientLeft;
Normally, ball.style.position.left means the “left edge of the element” (the ball). So if we assign that left, then the ball edge would be under the mouse cursor.
We need to move the ball half-width left and half-height up to make it center.
So the final left would be:
let left = event.clientX - fieldInnerCoords.left - field.clientLeft - ball.offsetWidth/2;
The vertical coordinate is calculated using the same logic.
Please note that the ball width/height must be known at the time we access ball.offsetWidth. Should be specified in HTML or CSS.
To add the button we can use either position:absolute (and make the pane position:relative) or float:right. The float:right has the benefit that the button never overlaps the text, but position:absolute gives more freedom. So the choice is yours.
The images ribbon can be represented as ul/li list of images <img>.
Normally, such a ribbon is wide, but we put a fixed-size <div> around to “cut” it, so that only a part of the ribbon is visibble:
To make the list show horizontally we need to apply correct CSS properties for <li>, like display: inline-block.
For <img> we should also adjust display, because by default it's inline. There's extra space reserved under inline elements for “letter tails”, so we can use display:block to remove it.
To do the scrolling, we can shift <ul>. There are many ways to do it, for instance by changing margin-left or (better performance) use transform: translateX():
The outer <div> has a fixed width, so “extra” images are cut.
The whole carousel is a self-contained “graphical component” on the page, so we'd better wrap it into a single <div class="carousel"> and style things inside it.
So if we click on <p>, then we'll see 3 alerts: p → div → form.
The process is called “bubbling”, because events “bubble” from the inner element up through parents like a bubble in the water.
Almost all events bubble.
The key word in this phrase is “almost”.
For instance, a focus event does not bubble. There are other examples too, we'll meet them. But still it's an exception, rather than a rule, most events do bubble.
event.target
A handler on a parent element can always get the details about where it actually happened.
The most deeply nested element that caused the event is called a target element, accessible as event.target.
Note the differences from this (=event.currentTarget):
event.target – is the “target” element that initiated the event, it doesn't change through the bubbling process.
this – is the “current” element, the one that has a currently running handler on it.
For instance, if we have a single handler form.onclick, then it can “catch” all clicks inside the form. No matter where the click happened, it bubbles up to <form> and runs the handler.
In form.onclick handler:
this (=event.currentTarget) is the <form> element, because the handler runs on it.
event.target is the concrete element inside the form that actually was clicked.
<!DOCTYPE HTML>
<html>
<head>
<meta charset="utf-8">
<link rel="stylesheet" href="example.css">
</head>
<body>
A click shows both <code>event.target</code> and <code>this</code> to compare:
<form id="form">FORM
<div>DIV
<p>P</p>
</div>
</form>
<script src="script.js"></script>
</body>
</html>
It's possible that event.target equals this – when the click is made directly on the <form> element.
Stopping bubbling
A bubbling event goes from the target element straight up. Normally it goes upwards till <html>, and then to document object, and some events even reach window, calling all handlers on the path.
But any handler may decide that the event has been fully processed and stop the bubbling.
The method for it is event.stopPropagation().
For instance, here body.onclick doesn't work if you click on <button>:
If an element has multiple event handlers on a single event, then even if one of them stops the bubbling, the other ones still execute.
In other words, event.stopPropagation() stops the move upwards, but on the current element all other handlers will run.
To stop the bubbling and prevent handlers on the current element from running, there's a method event.stopImmediatePropagation(). After it no other handlers execute.
Don't stop bubbling without a need!
Bubbling is convenient. Don't stop it without a real need: obvious and architecturally well-thought.
Sometimes event.stopPropagation() creates hidden pitfalls that later may become problems.
For instance:
We create a nested menu. Each submenu handles clicks on its elements and calls stopPropagation so that outer menu don't trigger.
Later we decide to catch clicks on the whole window, to track users' behavior (where people click). Some analytic systems do that. Usually the code uses document.addEventListener('click'…) to catch all clicks.
Our analytic won't work over the area where clicks are stopped by stopPropagation. We've got a “dead zone”.
There's usually no real need to prevent the bubbling. A task that seemingly requires that may be solved by other means. One of them is to use custom events, we'll cover them later. Also we can write our data into the event object in one handler and read it in another one, so we can pass to handlers on parents information about the processing below.
Capturing
There's another phase of event processing called “capturing”. It is rarely used in real code, but sometimes can be useful.
The standard
DOM Events describes 3 phases of event propagation:
Capturing phase – the event goes down to the element.
Target phase – the event reached the target element.
Bubbling phase – the event bubbles up from the element.
Here's the picture of a click on <td> inside a table, taken from the specification:
That is: for a click on <td> the event first goes through the ancestors chain down to the element (capturing), then it reaches the target, and then it goes up (bubbles), calling handlers on its way.
Before we only talked about bubbling, because the capturing phase is rarely used. Normally it is invisible to us.
Handlers added using on<event>-property or using HTML attributes or using addEventListener(event, handler) don't know anything about capturing, they only run on the 2nd and 3rd phases.
To catch an event on the capturing phase, we need to set the 3rd argument of addEventListener to true.
There are two possible values for that optional last argument:
If it's false (default), then the handler is set on the bubbling phase.
If it's true, then the handler is set on the capturing phase.
Note that while formally there are 3 phases, the 2nd phase (“target phase”: the event reached the element) is not handled separately: handlers on both capturing and bubbling phases trigger at that phase.
If one puts capturing and bubbling handlers on the target element, the capture handler triggers last in the capturing phase and the bubble handler triggers first in the bubbling phase.
Let's see it in action:
<style>
body * {
margin: 10px;
border: 1px solid blue;
}
</style>
<form>FORM
<div>DIV
<p>P</p>
</div>
</form>
<script>
for(let elem of document.querySelectorAll('*')) {
elem.addEventListener("click", e => alert(`Capturing: ${elem.tagName}`), true);
elem.addEventListener("click", e => alert(`Bubbling: ${elem.tagName}`));
}
</script>
The code sets click handlers on every element in the document to see which ones are working.
If you click on <p>, then the sequence is:
HTML → BODY → FORM → DIV → P (capturing phase, the first listener), and then:
P → DIV → FORM → BODY → HTML (bubbling phase, the second listener).
Please note that P shows up two times: at the end of capturing and at the start of bubbling.
There's a property event.eventPhase that tells us the number of the phase on which the event was caught. But it's rarely used, because we usually know it in the handler.
Summary
The event handling process:
When an event happens – the most nested element where it happens gets labeled as the “target element” (event.target).
Then the event first moves from the document root down the event.target, calling handlers assigned with addEventListener(...., true) on the way.
Then the event moves from event.target up to the root, calling handlers assigned using on<event> and addEventListener without the 3rd argument or with the 3rd argument false.
Each handler can access event object properties:
event.target – the deepest element that originated the event.
event.currentTarget (=this) – the current element that handles the event (the one that has the handler on it)
event.eventPhase – the current phase (capturing=1, bubbling=3).
Any event handler can stop the event by calling event.stopPropagation(), but that's not recommended, because we can't really be sure we won't need it above, maybe for completely different things.
The capturing phase is used very rarely, usually we handle events on bubbling. And there's a logic behind that.
In real world, when an accident happens, local authorities react first. They know best the area where it happened. Then higher-level authorities if needed.
The same for event handlers. The code that set the handler on a particular element knows maximum details about the element and what it does. A handler on a particular <td> may be suited for that exactly <td>, it knows everything about it, so it should get the chance first. Then its immediate parent also knows about the context, but a little bit less, and so on till the very top element that handles general concepts and runs the last.
Bubbling and capturing lay the foundation for “event delegation” – an extremely powerful event handling pattern that we study in the next chapter.
Event delegation
Capturing and bubbling allow to implement one of most powerful event handling patterns called event delegation.
The idea is that if we have a lot of elements handled in a similar way, then instead of assigning a handler to each of them – we put a single handler on their common ancestor.
In the handler we get event.target, see where the event actually happened and handle it.
Let's see an example – the
Ba-Gua diagram reflecting the ancient Chinese philosophy.
Here it is:
The HTML is like this:
<table>
<tr>
<th colspan="3"><em>Bagua</em> Chart: Direction, Element, Color, Meaning</th>
</tr>
<tr>
<td>...<strong>Northwest</strong>...</td>
<td>...</td>
<td>...</td>
</tr>
<tr>...2 more lines of this kind...</tr>
<tr>...2 more lines of this kind...</tr>
</table>
The table has 9 cells, but there could be 99 or 9999, doesn't matter.
Our task is to highlight a cell <td> on click.
Instead of assign an onclick handler to each <td> (can be many) – we'll setup the “catch-all” handler on <table> element.
It will use event.target to get the clicked element and highlight it.
The code:
let selectedTd;
table.onclick = function(event) {
let target = event.target; // where was the click?
if (target.tagName != 'TD') return; // not on TD? Then we're not interested
highlight(target); // highlight it
};
function highlight(td) {
if (selectedTd) { // remove the existing highlight if any
selectedTd.classList.remove('highlight');
}
selectedTd = td;
selectedTd.classList.add('highlight'); // highlight the new td
}
Such a code doesn't care how many cells there are in the table. We can add/remove <td> dynamically at any time and the highlighting will still work.
Still, there's a drawback.
The click may occur not on the <td>, but inside it.
In our case if we take a look inside the HTML, we can see nested tags inside <td>, like <strong>:
<td>
<strong>Northwest</strong>
...
</td>
Naturally, if a click happens on that <strong> then it becomes the value of event.target.
In the handler table.onclick we should take such event.target and find out whether the click was inside <td> or not.
Here's the improved code:
table.onclick = function(event) {
let td = event.target.closest('td'); // (1)
if (!td) return; // (2)
if (!table.contains(td)) return; // (3)
highlight(td); // (4)
};
Explanations:
The method elem.closest(selector) returns the nearest ancestor that matches the selector. In our case we look for <td> on the way up from the source element.
If event.target is not inside any <td>, then the call returns null, and we don't have to do anything.
In case of nested tables, event.target may be a <td> lying outside of the current table. So we check if that's actually our table's<td>.
And, if it's so, then highlight it.
Delegation example: actions in markup
The event delegation may be used to optimize event handling. We use a single handler for similar actions on many elements. Like we did it for highlighting <td>.
But we can also use a single handler as an entry point for many different things.
For instance, we want to make a menu with buttons “Save”, “Load”, “Search” and so on. And there's an object with methods save, load, search….
The first idea may be to assign a separate handler to each button. But there's a more elegant solution. We can add a handler for the whole menu and data-action attributes for buttons that has the method to call:
<button data-action="save">Click to Save</button>
The handler reads the attribute and executes the method. Take a look at the working example:
Please note that this.onClick is bound to this in (*). That's important, because otherwise this inside it would reference the DOM element (elem), not the menu object, and this[action] would not be what we need.
So, what the delegation gives us here?
We don't need to write the code to assign a handler to each button. Just make a method and put it in the markup.
The HTML structure is flexible, we can add/remove buttons at any time.
We could also use classes .action-save, .action-load, but an attribute data-action is better semantically. And we can use it in CSS rules too.
The “behavior” pattern
We can also use event delegation to add “behaviors” to elements declaratively, with special attributes and classes.
The pattern has two parts:
We add a special attribute to an element.
A document-wide handler tracks events, and if an event happens on an attributed element – performs the action.
Counter
For instance, here the attribute data-counter adds a behavior: “increase on click” to buttons:
Counter: <input type="button" value="1" data-counter>
One more counter: <input type="button" value="2" data-counter>
<script>
document.addEventListener('click', function(event) {
if (event.target.dataset.counter != undefined) { // if the attribute exists...
event.target.value++;
}
});
</script>
If we click a button – its value is increased. Not buttons, but the general approach is important here.
There can be as many attributes with data-counter as we want. We can add new ones to HTML at any moment. Using the event delegation we “extended” HTML, added an attribute that describes a new behavior.
For document-level handlers – always addEventListener
When we assign an event handler to the document object, we should always use addEventListener, not document.onclick, because the latter will cause conflicts: new handlers overwrite old ones.
For real projects it's normal that there are many handlers on document set by different parts of the code.
Toggler
One more example. A click on an element with the attribute data-toggle-id will show/hide the element with the given id:
<button data-toggle-id="subscribe-mail">
Show the subscription form
</button>
<form id="subscribe-mail" hidden>
Your mail: <input type="email">
</form>
<script>
document.addEventListener('click', function(event) {
let id = event.target.dataset.toggleId;
if (!id) return;
let elem = document.getElementById(id);
elem.hidden = !elem.hidden;
});
</script>
Let's note once again what we did. Now, to add toggling functionality to an element – there's no need to know JavaScript, just use the attribute data-toggle-id.
That may become really convenient – no need to write JavaScript for every such element. Just use the behavior. The document-level handler makes it work for any element of the page.
We can combine multiple behaviors on a single element as well.
The “behavior” pattern can be an alternative of mini-fragments of JavaScript.
Summary
Event delegation is really cool! It's one of the most helpful patterns for DOM events.
It's often used to add same handling for many similar elements, but not only for that.
The algorithm:
Put a single handler on the container.
In the handler – check the source element event.target.
If the event happened inside an element that interests us, then handle the event.
Benefits:
Simplifies initialization and saves memory: no need to add many handlers.
Less code: when adding or removing elements, no need to add/remove handlers.
DOM modifications: we can mass add/remove elements with innerHTML and alike.
The delegation has its limitations of course:
First, the event must be bubbling. Some events do not bubble. Also, low-level handlers should not use event.stopPropagation().
Second, the delegation may add CPU load, because the container-level handler reacts on events in any place of the container, no matter if they interest us or not. But usually the load is negligible, so we don't take it into account.
Wrap every tree node title into <span>. Then we can CSS-style them on :hover and handle clicks exactly on text, because <span> width is exactly the text width (unlike without it).
Set a handler to the tree root node and handle clicks on that <span> titles.
When a mouse comes over an element with data-tooltip, the tooltip should appear over it, and when it's gone then hide.
An example of annotated HTML:
<button data-tooltip="the tooltip is longer than the element">Short button</button>
<button data-tooltip="HTML<br>tooltip">One more button</button>
Should work like this:
In this task we assume that all elements with data-tooltip have only text inside. No nested tags.
Details:
The tooltip should not cross window edges. Normally it should be above the element, but if the element is at the page top and there's no space for the tooltip, then below it.
The tooltip is given in the data-tooltip attribute. It can be arbitrary HTML.
You'll need two events here:
mouseover triggers when a pointer comes over an element.
mouseout triggers when a pointer leaves an element.
Please use event delegation: set up two handlers on document to track all “overs” and “outs” from elements with data-tooltip and manage tooltips from there.
After the behavior is implemented, even people unfamiliar with JavaScript can add annotated elements.
P.S. To keep things natural and simple: only one tooltip may show up at a time.
Menu items are links <a>, not buttons. There are several benefits, for instance:
Many people like to use “right click” – “open in a new window”. If we use <button> or <span>, that doesn't work.
Search engines follow <a href="..."> links while indexing.
So we use <a> in the markup. But normally we intend to handle clicks in JavaScript. So we should prevent the default browser action.
Like here:
menu.onclick = function(event) {
if (event.target.nodeName != 'A') return;
let href = event.target.getAttribute('href');
alert( href ); // ...can be loading from the server, UI generation etc
return false; // prevent browser action (don't go to the URL)
};
If we omit return false, then after our code executes the browser will do its “default action” – following to the URL in href.
By the way, using event delegation here makes our menu flexible. We can add nested lists and style them using CSS to “slide down”.
Prevent further events
Certain events flow one into another. If we prevent the first event, there will be no second.
For instance, mousedown on an <input> field leads to focusing in it, and the focus event. If we prevent the mousedown event, there's no focus.
Try to click on the first <input> below – the focus event happens. That's normal.
But if you click the second one, there's no focus.
That's because the browser action is canceled on mousedown. The focusing is still possible if we use another way to enter the input. For instance, the Tab key to switch from the 1st input into the 2nd. But not with the mouse click any more.
event.defaultPrevented
The property event.defaultPrevented is true if the default action was prevented, and false otherwise.
There's an interesting use case for it.
You remember in the chapter
Bubbling and capturing we talked about event.stopPropagation() and why stopping bubbling is bad?
Sometimes we can use event.defaultPrevented instead.
Let's see a practical example where stopping the bubbling looks necessary, but actually we can do well without it.
By default the browser on contextmenu event (right mouse click) shows a context menu with standard options. We can prevent it and show our own, like this:
<button>Right-click for browser context menu</button>
<button oncontextmenu="alert('Draw our menu'); return false">
Right-click for our context menu
</button>
Now let's say we want to implement our own document-wide context menu, with our options. And inside the document we may have other elements with their own context menus:
<p>Right-click here for the document context menu</p>
<button id="elem">Right-click here for the button context menu</button>
<script>
elem.oncontextmenu = function(event) {
event.preventDefault();
alert("Button context menu");
};
document.oncontextmenu = function(event) {
event.preventDefault();
alert("Document context menu");
};
</script>
The problem is that when we click on elem, we get two menus: the button-level and (the event bubbles up) the document-level menu.
How to fix it? One of solutions is to think like: “We fully handle the event in the button handler, let's stop it” and use event.stopPropagation():
<p>Right-click for the document menu</p>
<button id="elem">Right-click for the button menu (fixed with event.stopPropagation)</button>
<script>
elem.oncontextmenu = function(event) {
event.preventDefault();
event.stopPropagation();
alert("Button context menu");
};
document.oncontextmenu = function(event) {
event.preventDefault();
alert("Document context menu");
};
</script>
Now the button-level menu works as intended. But the price is high. We forever deny access to information about right-clicks for any outer code, including counters that gather statistics and so on. That's quite unwise.
An alternative solution would be to check in the document handler if the default action was prevented? If it is so, then the event was handled, and we don't need to react on it.
<p>Right-click for the document menu (fixed with event.defaultPrevented)</p>
<button id="elem">Right-click for the button menu</button>
<script>
elem.oncontextmenu = function(event) {
event.preventDefault();
alert("Button context menu");
};
document.oncontextmenu = function(event) {
if (event.defaultPrevented) return;
event.preventDefault();
alert("Document context menu");
};
</script>
Now everything also works correctly. If we have nested elements, and each of them has a context menu of its own, that would also work. Just make sure to check for event.defaultPrevented in each contextmenu handler.
event.stopPropagation() and event.preventDefault()
As we can clearly see, event.stopPropagation() and event.preventDefault() (also known as return false) are two different things. They are not related to each other.
Nested context menus architecture
There are also alternative ways to implement nested context menus. One of them is to have a special global object with a method that handles document.oncontextmenu, and also methods that allow to store various “lower-level” handlers in it.
The object will catch any right-click, look through stored handlers and run the appropriate one.
But then each piece of code that wants a context menu should know about that object and use its help instead of the own contextmenu handler.
Summary
There are many default browser actions:
mousedown – starts the selection (move the mouse to select).
click on <input type="checkbox"> – checks/unchecks the input.
submit – clicking an <input type="submit"> or hitting Enter inside a form field causes this event to happen, and the browser submits the form after it.
wheel – rolling a mouse wheel event has scrolling as the default action.
keydown – pressing a key may lead to adding a character into a field, or other actions.
contextmenu – the event happens on a right-click, the action is to show the browser context menu.
…there are more…
All the default actions can be prevented if we want to handle the event exclusively by JavaScript.
To prevent a default action – use either event.preventDefault() or return false. The second method works only for handlers assigned with on<event>.
If the default action was prevented, the value of event.defaultPrevented becomes true, otherwise it's false.
Stay semantic, don't abuse
Technically, by preventing default actions and adding JavaScript we can customize the behavior of any elements. For instance, we can make a link <a> work like a button, and a button <button> behave as a link (redirect to another URL or so).
But we should generally keep the semantic meaning of HTML elements. For instance, <a> should preform navigation, not a button.
Besides being “just a good thing”, that makes your HTML better in terms of accessibility.
Also if we consider the example with <a>, then please note: a browser allows to open such links in a new window (by right-clicking them and other means). And people like that. But if we make a button behave as a link using JavaScript and even look like a link using CSS, then <a>-specific browser features still won't work for it.
Make all links inside the element with id="contents" ask the user if he really wants to leave. And if he doesn't then don't follow.
Like this:
Details:
HTML inside the element may be loaded or regenerated dynamically at any time, so we can't find all links and put handlers on them. Use the event delegation.
The content may have nested tags. Inside links too, like <a href=".."><i>...</i></a>.
That's a great use of the event delegation pattern.
In real life instead of asking we can send a “logging” request to the server that saves the information about where the visitor left. Or we can load the content and show it right in the page (if allowable).
All we need is to catch the contents.onclick and use confirm to ask the user. A good idea would be to use link.getAttribute('href') instead of link.href for the URL. See the solution for details.
The solution is to assign the handler to the container and track clicks. If a click is on the <a> link, then change src of #largeImg to the href of the thumbnail.
We can not only assign handlers, but also generate events from JavaScript.
Custom events can be used to create “graphical components”. For instance, a root element of the menu may trigger events telling what happens with the menu: open (menu open), select (an item is selected) and so on.
Also we can generate built-in events like click, mousedown etc, that may be good for testing.
Event constructor
Events form a hierarchy, just like DOM element classes. The root is the built-in
Event class.
We can create Event objects like this:
let event = new Event(event type[, options]);
Arguments:
event type – may be any string, like "click" or our own like "hey-ho!".
options – the object with two optional properties:
bubbles: true/false – if true, then the event bubbles.
cancelable: true/false – if true, then the “default action” may be prevented. Later we'll see what it means for custom events.
By default both are false: {bubbles: false, cancelable: false}.
dispatchEvent
After an event object is created, we should “run” it on an element using the call elem.dispatchEvent(event).
Then handlers react on it as if it were a regular built-in event. If the event was created with the bubbles flag, then it bubbles.
In the example below the click event is initiated in JavaScript. The handler works same way as if the button was clicked:
<button id="elem" onclick="alert('Click!');">Autoclick</button>
<script>
let event = new Event("click");
elem.dispatchEvent(event);
</script>
event.isTrusted
There is a way to tell a “real” user event from a script-generated one.
The property event.isTrusted is true for events that come from real user actions and false for script-generated events.
Bubbling example
We can create a bubbling event with the name "hello" and catch it on document.
All we need is to set bubbles to true:
<h1 id="elem">Hello from the script!</h1>
<script>
// catch on document...
document.addEventListener("hello", function(event) { // (1)
alert("Hello from " + event.target.tagName); // Hello from H1
});
// ...dispatch on elem!
let event = new Event("hello", {bubbles: true}); // (2)
elem.dispatchEvent(event);
</script>
Notes:
We should use addEventListener for our custom events, because on<event> only exists for built-in events, document.onhello doesn't work.
Must set bubbles:true, otherwise the event won't bubble up.
The bubbling mechanics is the same for built-in (click) and custom (hello) events. There are also capturing and bubbling stages.
We should use them instead of new Event if we want to create such events. For instance, new MouseEvent("click").
The right constructor allows to specify standard properties for that type of event.
Like clientX/clientY for a mouse event:
let event = new MouseEvent("click", {
bubbles: true,
cancelable: true,
clientX: 100,
clientY: 100
});
alert(event.clientX); // 100
Please note: the generic Event constructor does not allow that.
Let's try:
let event = new Event("click", {
bubbles: true, // only bubbles and cancelable
cancelable: true, // work in the Event constructor
clientX: 100,
clientY: 100
});
alert(event.clientX); // undefined, the unknown property is ignored!
Technically, we can work around that by assigning directly event.clientX=100 after creation. So that's a matter of convenience and following the rules. Browser-generated events always have the right type.
The full list of properties for different UI events is in the specification, for instance
MouseEvent.
Custom events
For our own, custom events like "hello" we should use new CustomEvent. Technically
CustomEvent is the same as Event, with one exception.
In the second argument (object) we can add an additional property detail for any custom information that we want to pass with the event.
For instance:
<h1 id="elem">Hello for John!</h1>
<script>
// additional details come with the event to the handler
elem.addEventListener("hello", function(event) {
alert(event.detail.name);
});
elem.dispatchEvent(new CustomEvent("hello", {
detail: { name: "John" }
});
</script>
The detail property can have any data. Technically we could live without, because we can assign any properties into a regular new Event object after its creation. But CustomEvent provides the special detail field for it to evade conflicts with other event properties.
The event class tells something about “what kind of event” it is, and if the event is custom, then we should use CustomEvent just to be clear about what it is.
event.preventDefault()
We can call event.preventDefault() on a script-generated event if cancelable:true flag is specified.
Of course, if the event has a non-standard name, then it's not known to the browser, and there's no “default browser action” for it.
But the event-generating code may plan some actions after dispatchEvent.
The call of event.preventDefault() is a way for the handler to send a signal that those actions shouldn't be performed.
In that case the call to elem.dispatchEvent(event) returns false. And the event-generating code knows that the processing shouldn't continue.
For instance, in the example below there's a hide() function. It generates the "hide" event on the element #rabbit, notifying all interested parties that the rabbit is going to hide.
A handler set by rabbit.addEventListener('hide',...) will learn about that and, if it wants, can prevent that action by calling event.preventDefault(). Then the rabbit won't hide:
<pre id="rabbit">
|\ /|
\|_|/
/. .\
=\_Y_/=
{>o<}
</pre>
<script>
// hide() will be called automatically in 2 seconds
function hide() {
let event = new CustomEvent("hide", {
cancelable: true // without that flag preventDefault doesn't work
});
if (!rabbit.dispatchEvent(event)) {
alert('the action was prevented by a handler');
} else {
rabbit.hidden = true;
}
}
rabbit.addEventListener('hide', function(event) {
if (confirm("Call preventDefault?")) {
event.preventDefault();
}
});
// hide in 2 seconds
setTimeout(hide, 2000);
</script>
Events-in-events are synchronous
Usually events are processed asynchronously. That is: if the browser is processing onclick and in the process a new event occurs, then it awaits till onclick processing is finished.
The exception is when one event is initiated from within another one.
Then the control jumps to the nested event handler, and after it goes back.
For instance, here the nested menu-open event is processed synchronously, during the onclick:
Please note that the nested event menu-open bubbles up and is handled on the document. The propagation of the nested event is fully finished before the processing gets back to the outer code (onclick).
That's not only about dispatchEvent, there are other cases. JavaScript in an event handler can call methods that lead to other events – they are too processed synchronously.
If we don't like it, we can either put the dispatchEvent (or other event-triggering call) at the end of onclick or, if inconvenient, wrap it in setTimeout(...,0):
To generate an event, we first need to create an event object.
The generic Event(name, options) constructor accepts an arbitrary event name and the options object with two properties:
bubbles: true if the event should bubble.
cancelable: true is the event.preventDefault() should work.
Other constructors of native events like MouseEvent, KeyboardEvent and so on accept properties specific to that event type. For instance, clientX for mouse events.
For custom events we should use CustomEvent constructor. It has an additional option named detail, we should assign the event-specific data to it. Then all handlers can access it as event.detail.
Despite the technical possibility to generate browser events like click or keydown, we should use with the great care.
We shouldn't generate browser events as it's a hacky way to run handlers. That's a bad architecture most of the time.
Native events might be generated:
As a dirty hack to make 3rd-party libraries work the needed way, if they don't provide other means of interaction.
For automated testing, to “click the button” in the script and see if the interface reacts correctly.
Custom events with our own names are often generated for architectural purposes, to signal what happens inside our menus, sliders, carousels etc.
Events in details
Here we cover most important events and details of working with them.
Mouse events come not only from “mouse manipulators”, but are also emulated on touch devices, to make them compatible.
In this chapter we'll get into more details about mouse events and their properties.
Mouse event types
We can split mouse events into two categories: “simple” and “complex”
Simple events
The most used simple events are:
mousedown/mouseup
Mouse button is clicked/released over an element.
mouseover/mouseout
Mouse pointer comes over/out from an element.
mousemove
Every mouse move over an element triggers that event.
…There are several other event types too, we'll cover them later.
Complex events
click
Triggers after mousedown and then mouseup over the same element if the left mouse button was used.
contextmenu
Triggers after mousedown if the right mouse button was used.
dblclick
Triggers after a double click over an element.
Complex events are made of simple ones, so in theory we could live without them. But they exist, and that's good, because they are convenient.
Events order
An action may trigger multiple events.
For instance, a click first triggers mousedown, when the button is pressed, then mouseup and click when it's released.
In cases when a single action initiates multiple events, their order is fixed. That is, the handlers are called in the order mousedown → mouseup → click. Events are handled in the same sequence: onmouseup finishes before onclick runs.
Click the button below and you'll see the events. Try double-click too.
On the teststand below all mouse events are logged, and if there are more than 1 second delay between them, then they are separated by a horizontal ruler.
Also we can see the which property that allows to detect the mouse button.
Getting the button: which
Click-related events always have the which property that allows to get the button.
It is not used for click and contextmenu events, because the former happens only on left-click, and the latter – only on right-click.
But if we track mousedown and mouseup, then we need it, because these events trigger on any button, so which allows to distinguish between “right-mousedown” and “left-mousedown”.
There are the three possible values:
event.which == 1 – the left button
event.which == 2 – the middle button
event.which == 3 – the right button
The middle button is somewhat exotic right now and is very rarely used.
Modifiers: shift, alt, ctrl and meta
All mouse events include the information about pressed modifier keys.
The properties are:
shiftKey
altKey
ctrlKey
metaKey (Cmd for Mac)
For instance, the button below only works on Alt+Shift+click:
<button id="button">Alt+Shift+Click on me!</button>
<script>
button.onclick = function(event) {
if (event.altKey && event.shiftKey) {
alert('Hooray!');
}
};
</script>
Attention: on Mac it's usually Cmd instead of Ctrl
On Windows and Linux there are modifier keys Alt, Shift and Ctrl. On Mac there's one more: Cmd, it corresponds to the property metaKey.
In most cases when Windows/Linux uses Ctrl, on Mac people use Cmd. So where a Windows user presses Ctrl+Enter or Ctrl+A, a Mac user would press Cmd+Enter or Cmd+A, and so on, most apps use Cmd instead of Ctrl.
So if we want to support combinations like Ctrl+click, then for Mac it makes sense to use Cmd+click. That's more comfortable for Mac users.
Even if we'd like to force Mac users to Ctrl+click – that's kind of difficult. The problem is: a left-click with Ctrl is interpreted as a right-click on Mac, and it generates the contextmenu event, not click like Windows/Linux.
So if we want users of all operational systems to feel comfortable, then together with ctrlKey we should use metaKey.
For JS-code it means that we should check if (event.ctrlKey || event.metaKey).
There are also mobile devices
Keyboard combinations are good as an addition to the workflow. So that if the visitor has a
keyboard – it works. And if your device doesn't have it – then there's another way to do the same.
Coordinates: clientX/Y, pageX/Y
All mouse events have coordinates in two flavours:
Window-relative: clientX and clientY.
Document-relative: pageX and pageY.
For instance, if we have a window of the size 500x500, and the mouse is in the left-upper corner, then clientX and clientY are 0. And if the mouse is in the center, then clientX and clientY are 250, no matter what place in the document it is. They are similar to position:fixed.
Move the mouse over the input field to see clientX/clientY (it's in the iframe, so coordinates are relative to that iframe):
<input onmousemove="this.value=event.clientX+':'+event.clientY" value="Mouse over me">
Document-relative coordinates are counted from the left-upper corner of the document, not the window.
Coordinates pageX, pageY are similar to position:absolute on the document level.
You can read more about coordinates in the chapter
Coordinates.
No selection on mousedown
Mouse clicks have a side-effect that may be disturbing. A double click selects the text.
If we want to handle click events ourselves, then the “extra” selection doesn't look good.
For instance, a double-click on the text below selects it in addition to our handler:
Now if you double-click on “Unselectable”, it doesn't get selected. Seems to work.
…But there is a potential problem! The text became truly unselectable. Even if a user starts the selection from “Before” and ends with “After”, the selection skips “Unselectable” part. Do we really want to make our text unselectable?
Most of time, we don't. A user may have valid reasons to select the text, for copying or other needs. That may be disturbing if we don't allow him to do it. So the solution is not that good.
What we want is to prevent the selection on double-click, that's it.
A text selection is the default browser action on mousedown event. So the alternative solution would be to handle mousedown and prevent it, like this:
Before...
<b ondblclick="alert('Click!')" onmousedown="return false">
Double-click me
</b>
...After
Now the bold element is not selected on double clicks.
From the other hand, the text inside it is still selectable. The selection should start not on the text itself, but before or after it. Usually that's fine.
Canceling the selection
Instead of preventing the selection, we can cancel it “post-factum” in the event handler.
Here's how:
Before...
<b ondblclick="getSelection().removeAllRanges()">
Double-click me
</b>
...After
If you double-click on the bold element, then the selection appears and then is immediately removed. That doesn't look nice though.
Preventing copying
If we want to disable selection to protect our content from copy-pasting, then we can use another event: oncopy.
<div oncopy="alert('Copying forbidden!');return false">
Dear user,
The copying is forbidden for you.
If you know JS or HTML, then you can get everything from the page source though.
</div>
If you try to copy a piece of text in the <div>, that won't work, because the default action oncopy is prevented.
Surely that can't stop the user from opening HTML-source, but not everyone knows how to do it.
Summary
Mouse events have following properties:
Button: which.
Modifier keys (true if pressed): altKey, ctrlKey, shiftKey and metaKey (Mac).
If you want to handle Ctrl, then don't forget Mac users, they use Cmd, so it's better to check if (e.metaKey || e.ctrlKey).
Window-relative coordinates: clientX/clientY.
Document-relative coordinates: pageX/clientX.
In the tasks below it's also important to deal with the selection as an unwanted side-effect of clicks.
There are several ways, for instance:
CSS-property user-select:none (with browser prefixes) completely disables it.
Cancel the selection post-factum using getSelection().removeAllRanges().
Handle mousedown and prevent the default action (usually the best).
That's normal and just means that the mouse came not from another element, but from out of the window. Or that it left the window.
We should keep that possibility in mind when using event.relatedTarget in our code. If we access event.relatedTarget.tagName, then there will be an error.
Events frequency
The mousemove event triggers when the mouse moves. But that doesn't mean that every pixel leads to an event.
The browser checks the mouse position from time to time. And if it notices changes then triggers the events.
That means that if the visitor is moving the mouse very fast then DOM-elements may be skipped:
If the mouse moves very fast from #FROM to #TO elements as painted above, then intermediate <div> (or some of them) may be skipped. The mouseout event may trigger on #FROM and then immediately mouseover on #TO.
In practice that's helpful, because if there may be many intermediate elements. We don't really want to process in and out of each one.
From the other side, we should keep in mind that we can't assume that the mouse slowly moves from one event to another. No, it can “jump”.
In particular it's possible that the cursor jumps right inside the middle of the page from out of the window. And relatedTarget=null, because it came from “nowhere”:
In case of a fast move, intermediate elements may trigger no events. But if the mouse enters the element (`mouseover`), when we're guaranteed to have `mouseout` when it leaves it.
Check it out “live” on a teststand below.
The HTML is two nested <div> elements. If you move the mouse fast over them, then there may be no events at all, or maybe only the red div triggers events, or maybe the green one.
Also try to move the pointer over the red div, and then move it out quickly down through the green one. If the movement is fast enough then the parent element is ignored.
Result
script.js
style.css
index.html
green.onmouseover = green.onmouseout = green.onmousemove = handler;
function handler(event) {
let type = event.type;
while (type < 11) type += ' ';
log(type + " target=" + event.target.id)
return false;
}
function clearText() {
text.value = "";
lastMessage = "";
}
let lastMessageTime = 0;
let lastMessage = "";
let repeatCounter = 1;
function log(message) {
if (lastMessageTime == 0) lastMessageTime = new Date();
let time = new Date();
if (time - lastMessageTime > 500) {
message = '------------------------------\n' + message;
}
if (message === lastMessage) {
repeatCounter++;
if (repeatCounter == 2) {
text.value = text.value.trim() + ' x 2\n';
} else {
text.value = text.value.slice(0, text.value.lastIndexOf('x') + 1) + repeatCounter + "\n";
}
} else {
repeatCounter = 1;
text.value += message + "\n";
}
text.scrollTop = text.scrollHeight;
lastMessageTime = time;
lastMessage = message;
}
Imagine – a mouse pointer entered an element. The mouseover triggered. Then the cursor goes into a child element. The interesting fact is that mouseout triggers in that case. The cursor is still in the element, but we have a mouseout from it!
That seems strange, but can be easily explained.
According to the browser logic, the mouse cursor may be only over a single element at any time – the most nested one (and top by z-index).
So if it goes to another element (even a descendant), then it leaves the previous one. That simple.
There's a funny consequence that we can see on the example below.
The red <div> is nested inside the blue one. The blue <div> has mouseover/out handlers that log all events in the textarea below.
Try entering the blue element and then moving the mouse on the red one – and watch the events:
On entering the blue one – we get mouseover [target: blue].
Then after moving from the blue to the red one – we get mouseout [target: blue] (left the parent).
…And immediately mouseover [target: red].
So, for a handler that does not take target into account, it looks like we left the parent in mouseout in (2) and returned back to it by mouseover in (3).
If we perform some actions on entering/leaving the element, then we'll get a lot of extra “false” runs. For simple stuff may be unnoticeable. For complex things that may bring unwanted side-effects.
We can fix it by using mouseenter/mouseleave events instead.
Events mouseenter and mouseleave
Events mouseenter/mouseleave are like mouseover/mouseout. They also trigger when the mouse pointer enters/leaves the element.
But there are two differences:
Transitions inside the element are not counted.
Events mouseenter/mouseleave do not bubble.
These events are intuitively very clear.
When the pointer enters an element – the mouseenter triggers, and then doesn't matter where it goes while inside the element. The mouseleave event only triggers when the cursor leaves it.
If we make the same example, but put mouseenter/mouseleave on the blue <div>, and do the same – we can see that events trigger only on entering and leaving the blue <div>. No extra events when going to the red one and back. Children are ignored.
Events mouseenter/leave are very simple and easy to use. But they do not bubble. So we can't use event delegation with them.
Imagine we want to handle mouse enter/leave for table cells. And there are hundreds of cells.
The natural solution would be – to set the handler on <table> and process events there. But mouseenter/leave don't bubble. So if such event happens on <td>, then only a handler on that <td> can catch it.
Handlers for mouseenter/leave on <table> only trigger on entering/leaving the whole table. It's impossible to get any information about transitions inside it.
Not a problem – let's use mouseover/mouseout.
A simple handler may look like this:
// let's highlight cells under mouse
table.onmouseover = function(event) {
let target = event.target;
target.style.background = 'pink';
};
table.onmouseout = function(event) {
let target = event.target;
target.style.background = '';
};
These handlers work when going from any element to any inside the table.
But we'd like to handle only transitions in and out of <td> as a whole. And highlight the cells as a whole. We don't want to handle transitions that happen between the children of <td>.
One of solutions:
Remember the currently highlighted <td> in a variable.
On mouseover – ignore the event if we're still inside the current <td>.
On mouseout – ignore if we didn't leave the current <td>.
That filters out “extra” events when we are moving between the children of <td>.
Here's the full example with all details:
Result
script.js
style.css
index.html
// <td> under the mouse right now (if any)
let currentElem = null;
table.onmouseover = function(event) {
if (currentElem) {
// before entering a new element, the mouse always leaves the previous one
// if we didn't leave <td> yet, then we're still inside it, so can ignore the event
return;
}
let target = event.target.closest('td');
if (!target || !table.contains(target)) return;
// yeah we're inside <td> now
currentElem = target;
target.style.background = 'pink';
};
table.onmouseout = function(event) {
// if we're outside of any <td> now, then ignore the event
if (!currentElem) return;
// we're leaving the element -- where to? Maybe to a child element?
let relatedTarget = event.relatedTarget;
if (relatedTarget) { // possible: relatedTarget = null
while (relatedTarget) {
// go up the parent chain and check -- if we're still inside currentElem
// then that's an internal transition -- ignore it
if (relatedTarget == currentElem) return;
relatedTarget = relatedTarget.parentNode;
}
}
// we left the element. really.
currentElem.style.background = '';
currentElem = null;
};
Try to move the cursor in and out of table cells and inside them. Fast or slow – doesn't better. Only <td> as a whole is highlighted unlike the example before.
Summary
We covered events mouseover, mouseout, mousemove, mouseenter and mouseleave.
Things that are good to note:
A fast mouse move can make mouseover, mousemove, mouseout to skip intermediate elements.
Events mouseover/out and mouseenter/leave have an additional target: relatedTarget. That's the element that we are coming from/to, complementary to target.
Events mouseover/out trigger even when we go from the parent element to a child element. They assume that the mouse can be only over one element at one time – the deepest one.
Events mouseenter/leave do not bubble and do not trigger when the mouse goes to a child element. They only track whether the mouse comes inside and outside the element as a whole.
Write JavaScript that shows a tooltip over an element with the attribute data-tooltip.
That's like the task
Tooltip behavior, but here the annotated elements can be nested. The most deeply nested tooltip is shown.
For instance:
<div data-tooltip="Here – is the house interior" id="house">
<div data-tooltip="Here – is the roof" id="roof"></div>
...
<a href="https://en.wikipedia.org/wiki/The_Three_Little_Pigs" data-tooltip="Read on…">Hover over me</a>
</div>
The result in iframe:
P.S. Hint: only one tooltip may show up at the same time.
Write a function that shows a tooltip over an element only if the visitor moves the mouse over it, but not through it.
In other words, if the visitor moves the mouse on the element and stopped – show the tooltip. And if he just moved the mouse through fast, then no need, who wants extra blinking?
Technically, we can measure the mouse speed over the element, and if it's slow then we assume that it comes “over the element” and show the tooltip, if it's fast – then we ignore it.
Make a universal object new HoverIntent(options) for it. With options:
elem – element to track.
over – a function to call if the mouse is slowly moving the element.
out – a function to call when the mouse leaves the element (if over was called).
An example of using such object for the tooltip:
// a sample tooltip
let tooltip = document.createElement('div');
tooltip.className = "tooltip";
tooltip.innerHTML = "Tooltip";
// the object will track mouse and call over/out
new HoverIntent({
elem,
over() {
tooltip.style.left = elem.getBoundingClientRect().left + 'px';
tooltip.style.top = elem.getBoundingClientRect().bottom + 5 + 'px';
document.body.append(tooltip);
},
out() {
tooltip.remove();
}
});
The demo:
If you move the mouse over the “clock” fast then nothing happens, and if you do it slow or stop on them, then there will be a tooltip.
Please note: the tooltip doesn't “blink” when the cursor moves between the clock subelements.
Put onmouseover/out handlers on the element. Also can use onmouseenter/leave here, but they are less universal, won't work if we introduce delegation.
When a mouse cursor entered the element, start measuring the speed on mousemove.
If the speed is slow, then run over.
Later if we're out of the element, and over was executed, run out.
The question is: “How to measure the speed?”
The first idea would be: to run our function every 100ms and measure the distance between previous and new coordinates. If it's small, then the speed is small.
Unfortunately, there's no way to get “current mouse coordinates” in JavaScript. There's no function like getCurrentMouseCoordinates().
The only way to get coordinates is to listen to mouse events, like mousemove.
So we can set a handler on mousemove to track coordinates and remember them. Then we can compare them, once per 100ms.
P.S. Please note: the solution tests use dispatchEvent to see if the tooltip works right.
Drag'n'Drop is a great interface solution. Taking something, dragging and dropping is a clear and simple way to do many things, from copying and moving (see file managers) to ordering (drop into cart).
They are interesting, because they allow to solve simple tasks easily, and also allow to handle drag'n'drop of “external” files into the browser. So we can take a file in the OS file-manager and drop it into the browser window. Then JavaScript gains access to its contents.
But native Drag Events also have limitations. For instance, we can limit dragging by a certain area. Also we can't make it “horizontal” or “vertical” only. There are other drag'n'drop tasks that can't be implemented using that API.
So here we'll see how to implement Drag'n'Drop using mouse events. Not that hard either.
Drag'n'Drop algorithm
The basic Drag'n'Drop algorithm looks like this:
Catch mousedown on a draggable element.
Prepare the element to moving (maybe create a copy of it or whatever).
Then on mousemove move it by changing left/top and position:absolute.
On mouseup (button release) – perform all actions related to a finished Drag'n'Drop.
These are the basics. We can extend it, for instance, by highlighting droppable (available for the drop) elements when hovering over them.
Here's the algorithm for drag'n'drop of a ball:
ball.onmousedown = function(event) { // (1) start the process
// (2) prepare to moving: make absolute and on top by z-index
ball.style.position = 'absolute';
ball.style.zIndex = 1000;
// move it out of any current parents directly into body
// to make it positioned relative to the body
document.body.append(ball);
// ...and put that absolutely positioned ball under the cursor
moveAt(event.pageX, event.pageY);
// centers the ball at (pageX, pageY) coordinates
function moveAt(pageX, pageY) {
ball.style.left = pageX - ball.offsetWidth / 2 + 'px';
ball.style.top = pageY - ball.offsetHeight / 2 + 'px';
}
function onMouseMove(event) {
moveAt(event.pageX, event.pageY);
}
// (3) move the ball on mousemove
document.addEventListener('mousemove', onMouseMove);
// (4) drop the ball, remove unneeded handlers
ball.onmouseup = function() {
document.removeEventListener('mousemove', onMouseMove);
ball.onmouseup = null;
};
};
If we run the code, we can notice something strange. On the beginning of the drag'n'drop, the ball “forks”: we start to dragging it's “clone”.
Here's an example in action:
Try to drag'n'drop the mouse and you'll see the strange behavior.
That's because the browser has its own Drag'n'Drop for images and some other elements that runs automatically and conflicts with ours.
To disable it:
ball.ondragstart = function() {
return false;
};
Now everything will be all right.
In action:
Another important aspect – we track mousemove on document, not on ball. From the first sight it may seem that the mouse is always over the ball, and we can put mousemove on it.
But as we remember, mousemove triggers often, but not for every pixel. So after swift move the cursor can jump from the ball somewhere in the middle of document (or even outside of the window).
So we should listen on document to catch it.
Correct positioning
In the examples above the ball is always centered under the pointer:
Not bad, but there's a side-effect. To initiate the drag'n'drop can we mousedown anywhere on the ball. If do it at the edge, then the ball suddenly “jumps” to become centered.
It would be better if we keep the initial shift of the element relative to the pointer.
For instance, if we start dragging by the edge of the ball, then the cursor should remain over the edge while dragging.
When a visitor presses the button (mousedown) – we can remember the distance from the cursor to the left-upper corner of the ball in variables shiftX/shiftY. We should keep that distance while dragging.
To get these shifts we can substract the coordinates:
// onmousedown
let shiftX = event.clientX - ball.getBoundingClientRect().left;
let shiftY = event.clientY - ball.getBoundingClientRect().top;
Please note that there's no method to get document-relative coordinates in JavaScript, so we use window-relative coordinates here.
Then while dragging we position the ball on the same shift relative to the pointer, like this:
ball.onmousedown = function(event) {
let shiftX = event.clientX - ball.getBoundingClientRect().left;
let shiftY = event.clientY - ball.getBoundingClientRect().top;
ball.style.position = 'absolute';
ball.style.zIndex = 1000;
document.body.append(ball);
moveAt(event.pageX, event.pageY);
// centers the ball at (pageX, pageY) coordinates
function moveAt(pageX, pageY) {
ball.style.left = pageX - shiftX + 'px';
ball.style.top = pageY - shiftY + 'px';
}
function onMouseMove(event) {
moveAt(event.pageX, event.pageY);
}
// (3) move the ball on mousemove
document.addEventListener('mousemove', onMouseMove);
// (4) drop the ball, remove unneeded handlers
ball.onmouseup = function() {
document.removeEventListener('mousemove', onMouseMove);
ball.onmouseup = null;
};
};
ball.ondragstart = function() {
return false;
};
In action (inside <iframe>):
The difference is especially noticeable if we drag the ball by it's right-bottom corner. In the previous example the ball “jumps” under the pointer. Now it fluently follows the cursor from the current position.
Detecting droppables
In previous examples the ball could be dropped just “anywhere” to stay. In real-life we usually take one element and drop it onto another. For instance, a file into a folder, or a user into a trash can or whatever.
Abstractly, we take a “draggable” element and drop it onto “droppable” element.
We need to know the target droppable at the end of Drag'n'Drop – to do the corresponding action, and, preferably, during the dragging process, to highlight it.
The solution is kind-of interesting and just a little bit tricky, so let's cover it here.
What's the first idea? Probably to put onmouseover/mouseup handlers on potential droppables and detect when the mouse pointer appears over them. And then we know that we are dragging/dropping on that element.
But that doesn't work.
The problem is that, while we're dragging, the draggable element is always above other elements. And mouse events only happen on the top element, not on those below it.
For instance, below are two <div> elements, red on top of blue. There's no way to catch an event on the blue one, because the red is on top:
The same with a draggable element. The ball in always on top over other elements, so events happen on it. Whatever handlers we set on lower elements, they won't work.
That's why the initial idea to put handlers on potential droppables doesn't work in practice. They won't run.
So, what to do?
There's a method called document.elementFromPoint(clientX, clientY). It returns the most nested element on given window-relative coordinates (or null if coordinates are out of the window).
So in any of our mouse event handlers we can detect the potential droppable under the pointer like this:
// in a mouse event handler
ball.hidden = true; // (*)
let elemBelow = document.elementFromPoint(event.clientX, event.clientY);
ball.hidden = false;
// elemBelow is the element below the ball. If it's droppable, we can handle it.
Please note: we need to hide the ball before the call (*). Otherwise we'll usually have a ball on these coordinates, as it's the top element under the pointer: elemBelow=ball.
We can use that code to check what we're “flying over” at any time. And handle the drop when it happens.
An extended code of onMouseMove to find “droppable” elements:
let currentDroppable = null; // potential droppable that we're flying over right now
function onMouseMove(event) {
moveAt(event.pageX, event.pageY);
ball.hidden = true;
let elemBelow = document.elementFromPoint(event.clientX, event.clientY);
ball.hidden = false;
// mousemove events may trigger out of the window (when the ball is dragged off-screen)
// if clientX/clientY are out of the window, then elementfromPoint returns null
if (!elemBelow) return;
// potential droppables are labeled with the class "droppable" (can be other logic)
let droppableBelow = elemBelow.closest('.droppable');
if (currentDroppable != droppableBelow) { // if there are any changes
// we're flying in or out...
// note: both values can be null
// currentDroppable=null if we were not over a droppable (e.g over an empty space)
// droppableBelow=null if we're not over a droppable now, during this event
if (currentDroppable) {
// the logic to process "flying out" of the droppable (remove highlight)
leaveDroppable(currentDroppable);
}
currentDroppable = droppableBelow;
if (currentDroppable) {
// the logic to process "flying in" of the droppable
enterDroppable(currentDroppable);
}
}
}
In the example below when the ball is dragged over the soccer gate, the gate is highlighted.
At the drag start – remember the initial shift of the pointer relative to the element: shiftX/shiftY and keep it during the dragging.
Detect droppable elements under the pointer using document.elementFromPoint.
We can lay a lot on this foundation.
On mouseup we can finalize the drop: change data, move elements around.
We can highlight the elements we're flying over.
We can limit dragging by a certain area or direction.
We can use event delegation for mousedown/up. A large-area event handler that checks event.target can manage Drag'n'Drop for hundreds of elements.
And so on.
There are frameworks that build architecture over it: DragZone, Droppable, Draggable and other classes. Most of them do the similar stuff to described above, so it should be easy to understand them now. Or roll our own, because you already know how to handle the process, and it may be more flexible than to adapt something else.
Before we get to keyboard, please note that on modern devices there are other ways to “input something”. For instance, people use speech recognition (especially on mobile devices) or copy/paste with the mouse.
So if we want to track any input into an <input> field, then keyboard events are not enough. There's another event named input to handle changes of an <input> field, by any means. And it may be a better choice for such task. We'll cover it later in the chapter
Events: change, input, cut, copy, paste.
Keyboard events should be used when we want to handle keyboard actions (virtual keyboard also counts). For instance, to react on arrow keys ⇧ and ⇩ or hotkeys (including combinations of keys).
Teststand
To better understand keyboard events, you can use the teststand below.
The keydown events happens when a key is pressed down, and then keyup – when it's released.
event.code and event.key
The key property of the event object allows to get the character, while the code property of the event object allows to get the “physical key code”.
For instance, the same key Z can be pressed with or without Shift. That gives us two different characters: lowercase z and uppercase Z.
The event.key is exactly the character, and it will be different. But event.code is the same:
Key
event.key
event.code
Z
z (lowercase)
KeyZ
Shift+Z
Z (uppercase)
KeyZ
If a user works with different languages, then switching to another language would make a totally different character instead of "Z". That will become the value of event.key, while event.code is always the same: "KeyZ".
“KeyZ” and other key codes
Every key has the code that depends on its location on the keyboard. Key codes described in the
UI Events code specification.
For instance:
Letter keys have codes "Key<letter>": "KeyA", "KeyB" etc.
Digit keys have codes: "Digit<number>": "Digit0", "Digit1" etc.
Special keys are coded by their names: "Enter", "Backspace", "Tab" etc.
There are several widespread keyboard layouts, and the specification gives key codes for each of them.
Please evade mistypes: it's KeyZ, not keyZ. The check like event.code=="keyZ" won't work: the first letter of "Key" must be uppercase.
What if a key does not give any character? For instance, Shift or F1 or others. For those keys event.key is approximately the same as event.code:
Key
event.key
event.code
F1
F1
F1
Backspace
Backspace
Backspace
Shift
Shift
ShiftRight or ShiftLeft
Please note that event.code specifies exactly which key is pressed. For instance, most keyboards have two Shift keys: on the left and on the right side. The event.code tells us exactly which one was pressed, and event.key is responsible for the “meaning” of the key: what it is (a “Shift”).
Let's say, we want to handle a hotkey: Ctrl+Z (or Cmd+Z for Mac). Most text editors hook the “Undo” action on it. We can set a listener on keydown and check which key is pressed – to detect when we have the hotkey.
Please answer the question – in such a listener, should we check the value of event.key or event.code?
Please, pause and answer.
Made up your mind?
If you've got an understanding, then the answer is, of course, event.code, as we don't want event.key there. The value of event.key can change depending on the language or CapsLock enabled. The value of event.code is strictly bound to the key, so here we go:
If a key is being pressed for a long enough time, it starts to repeat: the keydown triggers again and again, and then when it's released we finally get keyup. So it's kind of normal to have many keydown and a single keyup.
For all repeating keys the event object has event.repeat property set to true.
Default actions
Default actions vary, as there are many possible things that may be initiated by the keyboard.
For instance:
A character appears on the screen (the most obvious outcome).
A character is deleted (Delete key).
The page is scrolled (PageDown key).
The browser opens the “Save Page” dialog (Ctrl+S)
…and so on.
Preventing the default action on keydown can cancel most of them, with the exception of OS-based special keys. For instance, on Windows Alt+F4 closes the current browser window. And there's no way to stop it by preventing the default action in JavaScript.
For instance, the <input> below expects a phone number, so it does not accept keys except digits, +, () or -:
…But we still can enter anything by using a mouse and right-click + Paste. So the filter is not 100% reliable. We can just let it be like that, because most of time it works. Or an alternative approach would be to track the input event – it triggers after any modification. There we can check the new value and highlight/modify it when it's invalid.
Legacy
In the past, there was a keypress event, and also keyCode, charCode, which properties of the event object.
There were so many browser incompatibilities that developers of the specification decided to deprecate all of them. The old code still works, as the browser keep supporting them, but there's totally no need to use those any more.
There was time when this chapter included their detailed description. But as of now we can forget about those.
Summary
Pressing a key always generates a keyboard event, be it symbol keys or special keys like Shift or Ctrl and so on. The only exception is Fn key that sometimes presents on a laptop keyboard. There's no keyboard event for it, because it's often implemented on lower level than OS.
Keyboard events:
keydown – on pressing the key (auto-repeats if the key is pressed for long),
keyup – on releasing the key.
Main keyboard event properties:
code – the “key code” ("KeyA", "ArrowLeft" and so on), specific to the physical location of the key on keyboard.
key – the character ("A", "a" and so on), for non-character keys usually has the same value as code.
In the past, keyboard events were sometimes used to track user input in form fields. That's not reliable, because the input can come from various sources. We have input and change events to handle any input (covered later in the chapter
Events: change, input, cut, copy, paste). They trigger after any input, including mouse or speech recognition.
We should use keyboard events when we really want keyboard. For example, to react on hotkeys or special keys.
We should use two handlers: document.onkeydown and document.onkeyup.
The set pressed should keep currently pressed keys.
The first handler adds to it, while the second one removes from it. Every time on keydown we check if we have enough keys pressed, and run the function if it is so.
The scroll event works both on the window and on scrollable elements.
Prevent scrolling
How do we make something unscrollable? We can't prevent scrolling by using event.preventDefault() in onscroll listener, because it triggers after the scroll has already happened.
But we can prevent scrolling by event.preventDefault() on an event that causes the scroll.
For instance:
wheel event – a mouse wheel roll (a “scrolling” touchpad action generates it too).
keydown event for pageUp and pageDown.
Sometimes that may help. But there are more ways to scroll, so it's quite hard to handle all of them. So it's more reliable to use CSS to make something unscrollable, like overflow property.
Here are few tasks that you can solve or look through to see the applications on onscroll.
Create an endless page. When a visitor scrolls it to the end, it auto-appends current date-time to the text (so that a visitor can scroll more).
Like this:
Please note two important features of the scroll:
The scroll is “elastic”. We can scroll a little beyond the document start or end in some browsers/devices (empty space below is shown, and then the document will automatically “bounces back” to normal).
The scroll is imprecise. When we scroll to page end, then we may be in fact like 0-50px away from the real document bottom.
So, “scrolling to the end” should mean that the visitor is no more than 100px away from the document end.
P.S. In real life we may want to show “more messages” or “more goods”.
The core of the solution is a function that adds more dates to the page (or loads more stuff in real-life) while we're at the page end.
We can call it immediately and add as a window.onscroll handler.
The most important question is: “How do we detect that the page is scrolled to bottom?”
Let's use window-relative coordinates.
The document is represented (and contained) within <html> tag, that is document.documentElement.
We can get window-relative coordinates of the whole document as document.documentElement.getBoundingClientRect(). And the bottom property will be window-relative coordinate of the document end.
For instance, if the height of the whole HTML document is 2000px, then:
// When we're on the top of the page
// window-relative top = 0
document.documentElement.getBoundingClientRect().top = 0
// window-relative bottom = 2000
// the document is long, so that is probably far beyond the window bottom
document.documentElement.getBoundingClientRect().bottom = 2000
If we scroll 500px below, then:
// document top is above the window 500px
document.documentElement.getBoundingClientRect().top = -500
// document bottom is 500px closer
document.documentElement.getBoundingClientRect().bottom = 1500
When we scroll till the end, assuming that the window height is 600px:
// document top is above the window 500px
document.documentElement.getBoundingClientRect().top = -1400
// document bottom is 500px closer
document.documentElement.getBoundingClientRect().bottom = 600
Please note that the bottom can't be 0, because it never reaches the window top. The lowest limit of the bottom coordinate is the window height, we can't scroll it any more up.
And the window height is document.documentElement.clientHeight.
We want the document bottom be no more than 100px away from it.
So here's the function:
function populate() {
while(true) {
// document bottom
let windowRelativeBottom = document.documentElement.getBoundingClientRect().bottom;
// if it's greater than window height + 100px, then we're not at the page back
// (see examples above, big bottom means we need to scroll more)
if (windowRelativeBottom > document.documentElement.clientHeight + 100) break;
// otherwise let's add more data
document.body.insertAdjacentHTML("beforeend", `<p>Date: ${new Date()}</p>`);
}
}
Create a “to the top” button to help with page scrolling.
It should work like this:
While the page is not scrolled down at least for the window height – it's invisible.
When the page is scrolled down more than the window height – there appears an “upwards” arrow in the left-top corner. If the page is scrolled back, it disappears.
When the arrow is clicked, the page scrolls to the top.
So, initially all images are placeholder.svg. When the page scrolls to the position where the user can see the image – we change src to the one in data-src, and so the image loads.
Here's an example in iframe:
Scroll it to see images load “on-demand”.
Requirements:
When the page loads, those images that are on-screen should load immediately, prior to any scrolling.
Some images may be regular, without data-src. The code should not touch them.
Once an image is loaded, it should not reload any more when scrolled in/out.
P.S. If you can, make a more advanced solution that would “preload” images that are one page below/after the current position.
P.P.S. Only vertical scroll is to be handled, no horizontal scrolling.
The onscroll handler should check which images are visible and show them.
We also may want to run it when the page loads, to detect immediately visible images prior to any scrolling and load them.
If we put it at the <body> bottom, then it runs when the page content is loaded.
// ...the page content is above...
function isVisible(elem) {
let coords = elem.getBoundingClientRect();
let windowHeight = document.documentElement.clientHeight;
// top elem edge is visible OR bottom elem edge is visible
let topVisible = coords.top > 0 && coords.top < windowHeight;
let bottomVisible = coords.bottom < windowHeight && coords.bottom > 0;
return topVisible || bottomVisible;
}
showVisible();
window.onscroll = showVisible;
For visible images we can take img.dataset.src and assign it to img.src (if not did it yet).
P.S. The solution also has a variant of isVisible that “pre-loads” images that are within 1 page above/below (the page height is document.documentElement.clientHeight).
The lifecycle of an HTML page has three important events:
DOMContentLoaded – the browser fully loaded HTML, and the DOM tree is built, but external resources like pictures <img> and stylesheets may be not yet loaded.
load – the browser loaded all resources (images, styles etc).
beforeunload/unload – when the user is leaving the page.
Each event may be useful:
DOMContentLoaded event – DOM is ready, so the handler can lookup DOM nodes, initialize the interface.
load event – additional resources are loaded, we can get image sizes (if not specified in HTML/CSS) etc.
beforeunload/unload event – the user is leaving: we can check if the user saved the changes and ask him whether he really wants to leave.
Let's explore the details of these events.
DOMContentLoaded
The DOMContentLoaded event happens on the document object.
<script>
function ready() {
alert('DOM is ready');
// image is not yet loaded (unless was cached), so the size is 0x0
alert(`Image size: ${img.offsetWidth}x${img.offsetHeight}`);
}
document.addEventListener("DOMContentLoaded", ready);
</script>
<img id="img" src="https://en.js.cx/clipart/train.gif?speed=1&cache=0">
In the example the DOMContentLoaded handler runs when the document is loaded, not waits for the page load. So alert shows zero sizes.
At the first sight DOMContentLoaded event is very simple. The DOM tree is ready – here's the event. But there are few peculiarities.
DOMContentLoaded and scripts
When the browser initially loads HTML and comes across a <script>...</script> in the text, it can't continue building DOM. It must execute the script right now. So DOMContentLoaded may only happen after all such scripts are executed.
External scripts (with src) also put DOM building to pause while the script is loading and executing. So DOMContentLoaded waits for external scripts as well.
The only exception are external scripts with async and defer attributes. They tell the browser to continue processing without waiting for the scripts. So the user can see the page before scripts finish loading, good for performance.
A word about async and defer
Attributes async and defer work only for external scripts. They are ignored if there's no src.
Both of them tell the browser that it may go on working with the page, and load the script “in background”, then run the script when it loads. So the script doesn't block DOM building and page rendering.
There are two differences between them.
async
defer
Order
Scripts with async execute in the load-first order. Their document order doesn't matter – which loads first runs first.
Scripts with defer always execute in the document order (as they go in the document).
DOMContentLoaded
Scripts with async may load and execute while the document has not yet been fully downloaded. That happens if scripts are small or cached, and the document is long enough.
Scripts with defer execute after the document is loaded and parsed (they wait if needed), right before DOMContentLoaded.
So async is used for totally independent scripts.
DOMContentLoaded and styles
External style sheets don't affect DOM, and so DOMContentLoaded does not wait for them.
But there's a pitfall: if we have a script after the style, then that script must wait for the stylesheet to execute:
<link type="text/css" rel="stylesheet" href="style.css">
<script>
// the script doesn't not execute until the stylesheet is loaded
alert(getComputedStyle(document.body).marginTop);
</script>
The reason is that the script may want to get coordinates and other style-dependent properties of elements, like in the example above. Naturally, it has to wait for styles to load.
As DOMContentLoaded waits for scripts, it now waits for styles before them as well.
Built-in browser autofill
Firefox, Chrome and Opera autofill forms on DOMContentLoaded.
For instance, if the page has a form with login and password, and the browser remembered the values, then on DOMContentLoaded it may try to autofill them (if approved by the user).
So if DOMContentLoaded is postponed by long-loading scripts, then autofill also awaits. You probably saw that on some sites (if you use browser autofill) – the login/password fields don't get autofilled immediately, but there's a delay till the page fully loads. That's actually the delay until the DOMContentLoaded event.
One of minor benefits in using async and defer for external scripts – they don't block DOMContentLoaded and don't delay browser autofill.
window.onload
The load event on the window object triggers when the whole page is loaded including styles, images and other resources.
The example below correctly shows image sizes, because window.onload waits for all images:
<script>
window.onload = function() {
alert('Page loaded');
// image is loaded at this time
alert(`Image size: ${img.offsetWidth}x${img.offsetHeight}`);
};
</script>
<img id="img" src="https://en.js.cx/clipart/train.gif?speed=1&cache=0">
window.onunload
When a visitor leaves the page, the unload event triggers on window. We can do something there that doesn't involve a delay, like closing related popup windows. But we can't cancel the transition to another page.
For that we should use another event – onbeforeunload.
window.onbeforeunload
If a visitor initiated leaving the page or tries to close the window, the beforeunload handler can ask for additional confirmation.
It needs to return the string with the question. The browser will show it.
Click on the button in <iframe> below to set the handler, and then click the link to see it in action:
Some browsers ignore the text and show their own message instead
Some browsers like Chrome and Firefox ignore the string and shows its own message instead. That's for sheer safety, to protect the user from potentially misleading and hackish messages.
readyState
What happens if we set the DOMContentLoaded handler after the document is loaded?
Naturally, it never runs.
There are cases when we are not sure whether the document is ready or not, for instance an external script with async attribute loads and runs asynchronously. Depending on the network, it may load and execute before the document is complete or after that, we can't be sure. So we should be able to know the current state of the document.
The document.readyState property gives us information about it. There are 3 possible values:
"loading" – the document is loading.
"interactive" – the document was fully read.
"complete" – the document was fully read and all resources (like images) are loaded too.
So we can check document.readyState and setup a handler or execute the code immediately if it's ready.
Like this:
function work() { /*...*/ }
if (document.readyState == 'loading') {
document.addEventListener('DOMContentLoaded', work);
} else {
work();
}
There's a readystatechange event that triggers when the state changes, so we can print all these states like this:
// current state
console.log(document.readyState);
// print state changes
document.addEventListener('readystatechange', () => console.log(document.readyState));
The readystatechange event is an alternative mechanics of tracking the document loading state, it appeared long ago. Nowadays, it is rarely used, but let's cover it for completeness.
What is the place of readystatechange among other events?
To see the timing, here's a document with <iframe>, <img> and handlers that log events:
The numbers in square brackets denote the approximate time of when it happens. The real time is a bit greater, but events labeled with the same digit happen approximately at the same time (± a few ms).
document.readyState becomes interactive right before DOMContentLoaded. These two events actually mean the same.
document.readyState becomes complete when all resources (iframe and img) are loaded. Here we can see that it happens in about the same time as img.onload (img is the last resource) and window.onload. Switching to complete state means the same as window.onload. The difference is that window.onload always works after all other load handlers.
Summary
Page lifecycle events:
DOMContentLoaded event triggers on document when DOM is ready. We can apply JavaScript to elements at this stage.
All scripts are executed except those that are external with async or defer
Images and other resources may still continue loading.
load event on window triggers when the page and all resources are loaded. We rarely use it, because there's usually no need to wait for so long.
beforeunload event on window triggers when the user wants to leave the page. If it returns a string, the browser shows a question whether the user really wants to leave or not.
unload event on window triggers when the user is finally leaving, in the handler we can only do simple things that do not involve delays or asking a user. Because of that limitation, it's rarely used.
document.readyState is the current state of the document, changes can be tracked in the readystatechange event:
loading – the document is loading.
interactive – the document is parsed, happens at about the same time as DOMContentLoaded, but before it.
complete – the document and resources are loaded, happens at about the same time as window.onload, but before it.
Resource loading: onload and onerror
The browser allows to track the loading of external resources – scripts, iframes, pictures and so on.
There are two events for it:
onload – successful load,
onerror – an error occurred.
Loading a script
Let's say we need to call a function that resides in an external script.
We can load it dynamically, like this:
let script = document.createElement('script');
script.src = "my.js";
document.head.append(script);
…But how to run the function that is declared inside that script? We need to wait until the script loads, and only then we can call it.
script.onload
The main helper is the load event. It triggers after the script was loaded and executed.
For instance:
let script = document.createElement('script');
// can load any script, from any domain
script.src = "https://cdnjs.cloudflare.com/ajax/libs/lodash.js/4.3.0/lodash.js"
document.head.append(script);
script.onload = function() {
// the script creates a helper function "_"
alert(_); // the function is available
};
So in onload we can use script variables, run functions etc.
…And what if the loading failed? For instance, there's no such script (error 404) or the server or the server is down (unavailable).
script.onerror
Errors that occur during the loading (but not execution) of the script can be tracked on error event.
For instance, let's request a script that doesn't exist:
let script = document.createElement('script');
script.src = "https://example.com/404.js"; // no such script
document.head.append(script);
script.onerror = function() {
alert("Error loading " + this.src); // Error loading https://example.com/404.js
};
Please note that we can't get error details here. We don't know was it error 404 or 500 or something else. Just that the loading failed.
Other resources
The load and error events also work for other resources. There may be minor differences though.
For instance:
<img>, <link> (external stylesheets)
Both load and error events work as expected.
<iframe>
Only load event when the iframe loading finished. It triggers both for successful load and in case of an error. That's for historical reasons.
Summary
Pictures <img>, external styles, scripts and other resources provide load and error events to track their loading:
load triggers on a successful load,
error triggers on a failed load.
The only exception is <iframe>: for historical reasons it always triggers load, for any load completion, even if the page is not found.
The readystatechange event also works for resources, but is rarely used, because load/error events are simpler.
Normally, images are loaded when they are created. So i when we add <img> to the page, the user does not see the picture immediately. The browser needs to load it first.
To show an image immediately, we can create it “in advance”, like this:
let img = document.createElement('img');
img.src = 'my.jpg';
The browser starts loading the image and remembers it in the cache. Later, when the same image appears in the document (no matter how), it shows up immediately.
Create a function preloadImages(sources, callback) that loads all images from the array sources and, when ready, runs callback.
For instance, this will show an alert after the images are loaded:
function loaded() {
alert("Images loaded")
}
preloadImages(["1.jpg", "2.jpg", "3.jpg"], loaded);
In case of an error, the function should still assume the picture “loaded”.
In other words, the callback is executed when all images are either loaded or errored out.
The function is useful, for instance, when we plan to show a gallery with many scrollable images, and want to be sure that all images are loaded.
In the source document you can find links to test images, and also the code to check whether they are loaded or not. It should output 300.
Forms and control elements, such as <input> have a lot of special properties and events.
Working with forms can be much more convenient if we know them.
Navigation: form and elements
Document forms are members of the special collection document.forms.
That's a named collection: we can use both the name and the number to get the form.
document.forms.my - the form with name="my"
document.forms[0] - the first form in the document
When we have a form, then any element is available in the named collection form.elements.
For instance:
<form name="my">
<input name="one" value="1">
<input name="two" value="2">
</form>
<script>
// get the form
let form = document.forms.my; // <form name="my"> element
// get the element
let elem = form.elements.one; // <input name="one"> element
alert(elem.value); // 1
</script>
There may be multiple elements with the same name, that's often the case with radio buttons.
In that case form.elements[name] is a collection, for instance:
<form>
<input type="radio" name="age" value="10">
<input type="radio" name="age" value="20">
</form>
<script>
let form = document.forms[0];
let ageElems = form.elements.age;
alert(ageElems[0].value); // 10, the first input value
</script>
These navigation properties do not depend on the tag structure. All elements, no matter how deep they are in the form, are available in form.elements.
Fieldsets as “subforms”
A form may have one or many <fieldset> elements inside it. They also support the elements property.
For instance:
<body>
<form id="form">
<fieldset name="userFields">
<legend>info</legend>
<input name="login" type="text">
</fieldset>
</form>
<script>
alert(form.elements.login); // <input name="login">
let fieldset = form.elements.userFields;
alert(fieldset); // HTMLFieldSetElement
// we can get the input both from the form and from the fieldset
alert(fieldset.elements.login == form.elements.login); // true
</script>
</body>
Shorter notation: form.name
There's a shorter notation: we can access the element as form[index/name].
Instead of form.elements.login we can write form.login.
That also works, but there's a minor issue: if we access an element, and then change its name, then it is still available under the old name (as well as under the new one).
That's easy to see in an example:
<form id="form">
<input name="login">
</form>
<script>
alert(form.elements.login == form.login); // true, the same <input>
form.login.name = "username"; // change the name of the input
// form.elements updated the name:
alert(form.elements.login); // undefined
alert(form.elements.username); // input
// the direct access now can use both names: the new one and the old one
alert(form.username == form.login); // true
</script>
That's usually not a problem, because we rarely change names of form elements.
Backreference: element.form
For any element, the form is available as element.form. So a form references all elements, and elements
reference the form.
Here's the picture:
For instance:
<form id="form">
<input type="text" name="login">
</form>
<script>
// form -> element
let login = form.login;
// element -> form
alert(login.form); // HTMLFormElement
</script>
Form elements
Let's talk about form controls, pay attention to their specific features.
input and textarea
Normally, we can access the value as input.value or input.checked for checkboxes.
Like this:
input.value = "New value";
textarea.value = "New text";
input.checked = true; // for a checkbox or radio button
Use textarea.value, not textarea.innerHTML
Please note that we should never use textarea.innerHTML: it stores only the HTML that was initially on the page, not the current value.
select and option
A <select> element has 3 important properties:
select.options – the collection of <option> elements,
select.value – the value of the chosen option,
select.selectedIndex – the number of the selected option.
So we have three ways to set the value of a <select>:
Find the needed <option> and set option.selected to true.
Set select.value to the value.
Set select.selectedIndex to the number of the option.
The first way is the most obvious, but (2) and (3) are usually more convenient.
Here is an example:
<select id="select">
<option value="apple">Apple</option>
<option value="pear">Pear</option>
<option value="banana">Banana</option>
</select>
<script>
// all three lines do the same thing
select.options[2].selected = true;
select.selectedIndex = 2;
select.value = 'banana';
</script>
Unlike most other controls, <select multiple> allows multiple choice. In that case we need to walk over select.options to get all selected values.
Like this:
<select id="select" multiple>
<option value="blues" selected>Blues</option>
<option value="rock" selected>Rock</option>
<option value="classic">Classic</option>
</select>
<script>
// get all selected values from multi-select
let selected = Array.from(select.options)
.filter(option => option.selected)
.map(option => option.value);
alert(selected); // blues,rock
</script>
In the specification of
the option element there's a nice short syntax to create <option> elements:
option = new Option(text, value, defaultSelected, selected);
Parameters:
text – the text inside the option,
value – the option value,
defaultSelected – if true, then selected attribute is created,
selected – if true, then the option is selected.
For instance:
let option = new Option("Text", "value");
// creates <option value="value">Text</option>
The same element selected:
let option = new Option("Text", "value", true, true);
Additional properties of <option>
Option elements have additional properties:
selected
Is the option selected.
index
The number of the option among the others in its <select>.
text
Text content of the option (seen by what the visitor).
Summary
Form navigation:
document.forms
A form is available as document.forms[name/index].
form.elements
Form elements are available as form.elements[name/index], or can use just form[name/index]. The elements property also works for <fieldset>.
element.form
Elements reference their form in the form property.
Value is available as input.value, textarea.value, select.value etc, or input.checked for checkboxes and radio buttons.
For <select> we can also get the value by the index select.selectedIndex or through the options collection select.options. The full specification of this and other elements is at
https://html.spec.whatwg.org/multipage/forms.html.
These are the basics to start working with forms. In the next chapter we'll cover focus and blur events that may occur on any element, but are mostly handled on forms.
An element receives a focus when the user either clicks on it or uses the Tab key on the keyboard. There's also an autofocus HTML attribute that puts the focus into an element by default when a page loads and other means of getting a focus.
Focusing generally means: “prepare to accept the data here”, so that's the moment when we can run the code to initialize or load something.
The moment of losing the focus (“blur”) can be even more important. That's when a user clicks somewhere else or presses Tab to go to the next form field, or there are other means as well.
Losing the focus generally means: “the data has been entered”, so we can run the code to check it or even to save it to the server and so on.
There are important peculiarities when working with focus events. We'll do the best to cover them here.
Events focus/blur
The focus event is called on focusing, and blur – when the element loses the focus.
Let's use them for validation of an input field.
In the example below:
The blur handler checks if the field the email is entered, and if not – shows an error.
The focus handler hides the error message (on blur it will be checked again):
<style>
.invalid { border-color: red; }
#error { color: red }
</style>
Your email please: <input type="email" id="input">
<div id="error"></div>
<script>
input.onblur = function() {
if (!input.value.includes('@')) { // not email
input.classList.add('invalid');
error.innerHTML = 'Please enter a correct email.'
}
};
input.onfocus = function() {
if (this.classList.contains('invalid')) {
// remove the "error" indication, because the user wants to re-enter something
this.classList.remove('invalid');
error.innerHTML = "";
}
};
</script>
Modern HTML allows to do many validations using input attributes: required, pattern and so on. And sometimes they are just what we need. JavaScript can be used when we want more flexibility. Also we could automatically send the changed value on the server if it's correct.
Methods focus/blur
Methods elem.focus() and elem.blur() set/unset the focus on the element.
For instance, let's make the visitor unable to leave the input if the value is invalid:
<style>
.error {
background: red;
}
</style>
Your email please: <input type="email" id="input">
<input type="text" style="width:220px" placeholder="make email invalid and try to focus here">
<script>
input.onblur = function() {
if (!this.value.includes('@')) { // not email
// show the error
this.classList.add("error");
// ...and put the focus back
input.focus();
} else {
this.classList.remove("error");
}
};
</script>
If we enter something into the input and then try to use Tab or click away from the <input>, then onblur returns the focus back.
Please note that we can't “prevent losing focus” by calling event.preventDefault() in onblur, because onblur works after the element lost the focus.
JavaScript-initiated focus loss
A focus loss can occur for many reasons.
One of them is when the visitor clicks somewhere else. But also JavaScript itself may cause it, for instance:
An alert moves focus to itself, so it causes the focus loss at the element (blur event), and when the alert is dismissed, the focus comes back (focus event).
If an element is removed from DOM, then it also causes the focus loss. If it is reinserted later, then the focus doesn't return.
These features sometimes cause focus/blur handlers to misbehave – to trigger when they are not needed.
The best recipe is to be careful when using these events. If we want to track user-initiated focus-loss, then we should evade causing it by ourselves.
Allow focusing on any element: tabindex
By default many elements do not support focusing.
The list varies between browsers, but one thing is always correct: focus/blur support is guaranteed for elements that a visitor can interact with: <button>, <input>, <select>, <a> and so on.
From the other hand, elements that exist to format something like <div>, <span>, <table> – are unfocusable by default. The method elem.focus() doesn't work on them, and focus/blur events are never triggered.
This can be changed using HTML-attribute tabindex.
The purpose of this attribute is to specify the order number of the element when Tab is used to switch between them.
That is: if we have two elements, the first has tabindex="1", and the second has tabindex="2", then pressing Tab while in the first element – moves us to the second one.
There are two special values:
tabindex="0" makes the element the last one.
tabindex="-1" means that Tab should ignore that element.
Any element supports focusing if it has tabindex.
For instance, here's a list. Click the first item and press Tab:
Click the first item and press Tab. Keep track of the order. Please note that many subsequent Tabs can move the focus out of the iframe with the example.
<ul>
<li tabindex="1">One</li>
<li tabindex="0">Zero</li>
<li tabindex="2">Two</li>
<li tabindex="-1">Minus one</li>
</ul>
<style>
li { cursor: pointer; }
:focus { outline: 1px dashed green; }
</style>
The order is like this: 1 - 2 - 0 (zero is always the last). Normally, <li> does not support focusing, but tabindex full enables it, along with events and styling with :focus.
elem.tabIndex works too
We can add tabindex from JavaScript by using the elem.tabIndex property. That has the same effect.
Delegation: focusin/focusout
Events focus and blur do not bubble.
For instance, we can't put onfocus on the <form> to highlight it, like this:
<!-- on focusing in the form -- add the class -->
<form onfocus="this.className='focused'">
<input type="text" name="name" value="Name">
<input type="text" name="surname" value="Surname">
</form>
<style> .focused { outline: 1px solid red; } </style>
The example above doesn't work, because when user focuses on an <input>, the focus event triggers on that input only. It doesn't bubble up. So form.onfocus never triggers.
There are two solutions.
First, there's a funny historical feature: focus/blur do not bubble up, but propagate down on the capturing phase.
On click – the cell should became “editable” (textarea appears inside), we can change HTML. There should be no resize, all geometry should remain the same.
Buttons OK and CANCEL appear below the cell to finish/cancel the editing.
Only one cell may be editable at a moment. While a <td> is in “edit mode”, clicks on other cells are ignored.
The table may have many cells. Use event delegation.
P.S. Don't put event handlers anywhere except the #mouse element.
P.P.S. Don't modify HTML/CSS, the approach should be generic and work with any element.
We can use mouse.onclick to handle the click and make the mouse “moveable” with position:fixed, then then mouse.onkeydown to handle arrow keys.
The only pitfall is that keydown only triggers on elements with focus. So we need to add tabindex to the element. As we're forbidden to change HTML, we can use mouse.tabIndex property for that.
P.S. We also can replace mouse.onclick with mouse.onfocus.
Let's discuss various events that accompany data updates.
Event: change
The
change event triggers when the element has finished changing.
For text inputs that means that the event occurs when it looses focus.
For instance, while we are typing in the text field below – there's no event. But when we move the focus somewhere else, for instance, click on a button – there will be a change event:
If we want to handle every modification of an <input> then this event is the best choice.
Unlike keyboard events it works on any value change, even those that does not involve keyboard actions: pasting with a mouse or using speech recognition to dictate the text.
Can't prevent anything in oninput
The input event occurs after the value is modified.
So we can't use event.preventDefault() there – it's just too late, there would be no effect.
Events: cut, copy, paste
These events occur on cutting/copying/pasting a value.
They belong to
ClipboardEvent class and provide access to the data that is copied/pasted.
We also can use event.preventDefault() to abort the action.
For instance, the code below prevents all such events and shows what we are trying to cut/copy/paste:
Technically, we can copy/paste everything. For instance, we can copy and file in the OS file manager, and paste it.
There's a list of methods
in the specification to work with different data types, read/write to the clipboard.
But please note that clipboard is a “global” OS-level thing. Most browsers allow read/write access to the clipboard only in the scope of certain user actions for the safety. Also it is forbidden to create “custom” clipboard events in all browsers except Firefox.
Summary
Data change events:
Event
Description
Specials
change
A value was changed.
For text inputs triggers on focus loss.
input
For text inputs on every change.
Triggers immediately unlike change.
cut/copy/paste
Cut/copy/paste actions.
The action can be prevented. The event.clipbordData property gives read/write access to the clipboard.
Create an interface that allows to enter a sum of bank deposit and percentage, then calculates how much it will be after given periods of time.
Here's the demo:
Any input change should be processed immediately.
The formula is:
// initial: the initial money sum
// interest: e.g. 0.05 means 5% per year
// years: how many years to wait
let result = Math.round(initial * (1 + interest * years));
The submit event triggers when the form is submitted, it is usually used to validate the form before sending it to the server or to abort the submission and process it in JavaScript.
The method form.submit() allows to initiate form sending from JavaScript. We can use it to dynamically create and send our own forms to server.
Let's see more details of them.
Event: submit
There are two main ways to submit a form:
The first – to click <input type="submit"> or <input type="image">.
The second – press Enter on an input field.
Both actions lead to submit event on the form. The handler can check the data, and if there are errors, show them and call event.preventDefault(), then the form won't be sent to the server.
In the form below:
Go into the text field and press Enter.
Click <input type="submit">.
Both actions show alert and the form is not sent anywhere due to return false:
<form onsubmit="alert('submit!');return false">
First: Enter in the input field <input type="text" value="text"><br>
Second: Click "submit": <input type="submit" value="Submit">
</form>
Relation between submit and click
When a form is sent using Enter on an input field, a click event triggers on the <input type="submit">.
That's rather funny, because there was no click at all.
Here's the demo:
<form onsubmit="return false">
<input type="text" size="30" value="Focus here and press enter">
<input type="submit" value="Submit" onclick="alert('click')">
</form>
Method: submit
To submit a form to the server manually, we can call form.submit().
Then the submit event is not generated. It is assumed that if the programmer calls form.submit(), then the script already did all related processing.
Sometimes that's used to manually create and send a form, like this:
let form = document.createElement('form');
form.action = 'https://google.com/search';
form.method = 'GET';
form.innerHTML = '<input name="q" value="test">';
// the form must be in the document to submit it
document.body.append(form);
form.submit();
If you look closely at these curves, you can immediately notice:
Points are not always on curve. That's perfectly normal, later we'll see how the curve is built.
The curve order equals the number of points minus one.
For two points we have a linear curve (that's a straight line), for three points – quadratic curve (parabolic), for three points – cubic curve.
A curve is always inside the
convex hull of control points:
Because of that last property, in computer graphics it's possible to optimize intersection tests. If convex hulls do not intersect, then curves do not either. So checking for the convex hulls intersection first can give a very fast “no intersection” result. Checking the intersection or convex hulls is much easier, because they are rectangles, triangles and so on (see the picture above), much simpler figures than the curve.
The main value of Bezier curves for drawing – by moving the points the curve is changing in intuitively obvious way.
Try to move control points using a mouse in the example below:
As you can notice, the curve stretches along the tangential lines 1 → 2 and 3 → 4.
After some practice it becomes obvious how to place points to get the needed curve. And by connecting several curves we can get practically anything.
Here are some examples:
Maths
A Bezier curve can be described using a mathematical formula.
As we'll see soon – there's no need to know it. But for completeness – here it is.
Given the coordinates of control points Pi: the first control point has coordinates P1 = (x1, y1), the second: P2 = (x2, y2), and so on, the curve coordinates are described by the equation that depends on the parameter t from the segment [0,1].
The formula for a 2-points curve:
P = (1-t)P1 + tP2
For three points:
P = (1−t)2P1 + 2(1−t)tP2 + t2P3
For four points:
P = (1−t)3P1 + 3(1−t)2tP2 +3(1−t)t2P3 + t3P4
These are vector equations.
We can rewrite them coordinate-by-coordinate, for instance the 3-point curve:
x = (1−t)2x1 + 2(1−t)tx2 + t2x3
y = (1−t)2y1 + 2(1−t)ty2 + t2y3
Instead of x1, y1, x2, y2, x3, y3 we should put coordinates of 3 control points.
For instance, if control points are (0,0), (0.5, 1) and (1, 0), the equations are:
x = (1−t)2 * 0 + 2(1−t)t * 0.5 + t2 * 1 = (1-t)t + t2 = t
Now as t runs from 0 to 1, the set of values (x,y) for each t forms the curve.
That's probably too scientific, not very obvious why curves look like that, and how they depend on control points.
So here's the drawing algorithm that may be easier to understand.
De Casteljau's algorithm
De Casteljau's algorithm is identical to the mathematical definition of the curve, but visually shows how it is built.
Let's see it on the 3-points example.
Here's the demo, and the explanation follow.
Points can be moved by the mouse. Press the “play” button to run it.
De Casteljau's algorithm of building the 3-point bezier curve:
Draw control points. In the demo above they are labeled: 1, 2, 3.
Build segments between control points 1 → 2 → 3. In the demo above they are brown.
The parameter t moves from 0 to 1. In the example above the step 0.05 is used: the loop goes over 0, 0.05, 0.1, 0.15, ... 0.95, 1.
For each of these values of t:
On each brown segment we take a point located on the distance proportional to t from its beginning. As there are two segments, we have two points.
For instance, for t=0 – both points will be at the beginning of segments, and for t=0.25 – on the 25% of segment length from the beginning, for t=0.5 – 50%(the middle), for t=1 – in the end of segments.
Connect the points. On the picture below the connecting segment is painted blue.
For t=0.25
For t=0.5
Now the blue segment take a point on the distance proportional to the same value of t. That is, for t=0.25 (the left picture) we have a point at the end of the left quarter of the segment, and for t=0.5 (the right picture) – in the middle of the segment. On pictures above that point is red.
As t runs from 0 to 1, every value of t adds a point to the curve. The set of such points forms the Bezier curve. It's red and parabolic on the pictures above.
That was a process for 3 points. But the same is for 4 points.
The demo for 4 points (points can be moved by mouse):
The algorithm:
Control points are connected by segments: 1 → 2, 2 → 3, 3 → 4. We have 3 brown segments.
For each t in the interval from 0 to 1:
We take points on these segments on the distance proportional to t from the beginning. These points are connected, so that we have two green segments.
On these segments we take points proportional to t. We get one blue segment.
On the blue segment we take a point proportional to t. On the example above it's red.
These points together form the curve.
The algorithm is recursive and can be generalized for any number of control points.
Given N of control points, we connect them to get initially N-1 segments.
Then for each t from 0 to 1:
Take a point on each of segment on the distance proportional to t and connect them – there will be N-2 segments.
Take a point on each of these segments on the distance proportional to t and connect – there will be N-3 segments, and so on…
Till we have one point. These points make the curve.
Move examples of curves:
With other points:
Loop form:
Not smooth Bezier curve:
As the algorithm is recursive, we can build Bezier curves of any order: using 5, 6 or more control points. But in practice they are less useful. Usually we take 2-3 points, and for complex lines glue several curves together. That's simpler to develop and calculate.
How to draw a curve through given points?
We use control points for a Bezier curve. As we can see, they are not on the curve. Or, to be precise, the first and the last ones do belong to curve, but others don't.
Sometimes we have another task: to draw a curve through several points, so that all of them are on a single smooth curve. That task is called
interpolation, and here we don't cover it.
There are mathematical formulas for such curves, for instance
Lagrange polynomial.
In computer graphics
spline interpolation is often used to build smooth curves that connect many points.
Summary
Bezier curves are defined by their control points.
We saw two definitions of Bezier curves:
Using a mathematical formulas.
Using a drawing process: De Casteljau's algorithm
Good properties of Bezier curves:
We can draw smooth lines with a mouse by moving around control points.
Complex shapes can be made of several Bezier curves.
Usage:
In computer graphics, modeling, vector graphic editors. Fonts are described by Bezier curves.
In web development – for graphics on Canvas and in the SVG format. By the way, “live” examples above are written in SVG. They are actually a single SVG document that is given different points as parameters. You can open it in a separate window and see the source:
demo.svg.
In CSS animation to describe the path and speed of animation.
CSS-animations
CSS animations allow to do simple animations without JavaScript at all.
JavaScript can be used to control CSS animation and make them even better with a little of code.
CSS transitions
The idea of CSS transitions is simple. We describe a property and how its changes should be animated. When the property changes, the browser paints the animation.
That is: all we need is to change the property. And the fluent transition is made by the browser.
For instance, the CSS below animates changes of background-color for 3 seconds:
There are 5 properties to describe CSS transitions:
transition-property
transition-duration
transition-timing-function
transition-delay
We'll cover them in a moment, for now let's note that the common transition property allows to declare them together in the order: property duration timing-function delay, and also animate multiple properties at once.
For instance, this button animates both color and font-size:
In transition-property we write a list of property to animate, for instance: left, margin-left, height, color.
Not all properties can be animated, but
many of them. The value all means “animate all properties”.
transition-duration
In transition-duration we can specify how long the animation should take. The time should be in
CSS time format: in seconds s or milliseconds ms.
transition-delay
In transition-delay we can specify the delay before the animation. For instance, if transition-delay: 1s, then animation starts after 1 second after the change.
Negative values are also possible. Then the animation starts from the middle. For instance, if transition-duration is 2s, and the delay is -1s, then the animation takes 1 second and starts from the half.
Here's the animation shifts numbers from 0 to 9 using CSS translate property:
stripe.onclick = function() {
let sec = new Date().getSeconds() % 10;
// for instance, -3s here starts the animation from the 3rd second
stripe.style.transitionDelay = '-' + sec + 's';
stripe.classList.add('animate');
};
transition-timing-function
Timing function describes how the animation process is distributed along the time. Will it start slowly and then go fast or vise versa.
That's the most complicated property from the first sight. But it becomes very simple if we devote a bit time to it.
That property accepts two kinds of values: a Bezier curve or steps. Let's start from the curve, as it's used more often.
Bezier curve
The timing function can be set as a
Bezier curve with 4 control points that satisfies the conditions:
First control point: (0,0).
Last control point: (1,1).
For intermediate points values of x must be in the interval 0..1, y can be anything.
The syntax for a Bezier curve in CSS: cubic-bezier(x2, y2, x3, y3). Here we need to specify only 2nd and 3rd control points, because the 1st one is fixed to (0,0) and the 4th one is (1,1).
The timing function describes how fast the animation process goes in time.
The x axis is the time: 0 – the starting moment, 1 – the last moment of transition-duration.
The y axis specifies the completion of the process: 0 – the starting value of the property, 1 – the final value.
The simplest variant is when the animation goes uniformly, with the same linear speed. That can be specified by the curve cubic-bezier(0, 0, 1, 1).
Here's how that curve looks:
…As we can see, it's just a straight line. As the time (x) passes, the completion (y) of the animation steadily goes from 0 to 1.
The train in the example below goes from left to right with the permanent speed (click it):
* – by default, if there's no timing function, ease is used.
So we could use ease-out for our slowing down train:
.train {
left: 0;
transition: left 5s ease-out;
/* transition: left 5s cubic-bezier(0, .5, .5, 1); */
}
But it looks a bit differently.
A Bezier curve can make the animation “jump out” of its range.
The control points on the curve can have any y coordinates: even negative or huge. Then the Bezier curve would also jump very low or high, making the animation go beyond its normal range.
In the example below the animation code is:
.train {
left: 100px;
transition: left 5s cubic-bezier(.5, -1, .5, 2);
/* JavaScript sets left to 400px */
}
The property left should animate from 100px to 400px.
But if you click the train, you'll see that:
First, the train goes back: left becomes less than 100px.
Then it goes forward, a little bit farther than 400px.
Why it happens – pretty obvious if we look at the graph of the given Bezier curve:
We moved the y coordinate of the 2nd point below zero, and for the 3rd point we made put it over 1, so the curve goes out of the “regular” quadrant. The y is out of the “standard” range 0..1.
As we know, y measures “the completion of the animation process”. The value y = 0 corresponds to the starting property value and y = 1 – the ending value. So values y<0 move the property lower than the starting left and y>1 – over the final left.
That's a “soft” variant for sure. If we put y values like -99 and 99 then the train would jump out of the range much more.
But how to make the Bezier curve for a specific task? There are many tools. For instance, we can do it on the site
http://cubic-bezier.com/.
Steps
Timing function steps(number of steps[, start/end]) allows to split animation into steps.
Let's see that in an example with digits. We'll make the digits change not in a smooth, but in a discrete way.
The first argument of steps is the number of steps. The transform will be split into 9 parts (10% each). The time interval is divided as well: 9 seconds split into 1 second intervals.
The second argument is one of two words: start or end.
The start means that in the beginning of animation we need to do make the first step immediately.
We can observe that during the animation: when we click on the digit it changes to 1 (the first step) immediately, and then changes in the beginning of the next second.
The process is progressing like this:
0s – -10% (first change in the beginning of the 1st second, immediately)
1s – -20%
…
8s – -80%
(the last second shows the final value).
The alternative value end would mean that the change should be applied not in the beginning, but at the end of each second.
So the process would go like this:
0s – 0
1s – -10% (first change at the end of the 1st second)
step-start – is the same as steps(1, start). That is, the animation starts immediately and takes 1 step. So it starts and finishes immediately, as if there were no animation.
step-end – the same as steps(1, end): make the animation in a single step at the end of transition-duration.
These values are rarely used, because that's not really animation, but rather a single-step change.
Event transitionend
When the CSS animation finishes the transitionend event triggers.
It is widely used to do an action after the animation is done. Also we can join animations.
For instance, the ship in the example below starts to swim there and back on click, each time farther and farther to the right:
The animation is initiated by the function go that re-runs each time when the transition finishes and flips the direction:
boat.onclick = function() {
//...
let times = 1;
function go() {
if (times % 2) {
// swim to the right
boat.classList.remove('back');
boat.style.marginLeft = 100 * times + 200 + 'px';
} else {
// swim to the left
boat.classList.add('back');
boat.style.marginLeft = 100 * times - 200 + 'px';
}
}
go();
boat.addEventListener('transitionend', function() {
times++;
go();
});
};
The event object for transitionend has few specific properties:
event.propertyName
The property that has finished animating. Can be good if we animate multiple properties simultaneously.
event.elapsedTime
The time (in seconds) that the animation took, without transition-delay.
Keyframes
We can join multiple simple animations together using the @keyframes CSS rule.
It specifies the “name” of the animation and rules: what, when and where to animate. Then using the animation property we attach the animation to the element and specify additional parameters for it.
Here's an example with explanations:
<div class="progress"></div>
<style>
@keyframes go-left-right { /* give it a name: "go-left-right" */
from { left: 0px; } /* animate from left: 0px */
to { left: calc(100% - 50px); } /* animate to left: 100%-50px */
}
.progress {
animation: go-left-right 3s infinite alternate;
/* apply the animation "go-left-right" to the element
duration 3 seconds
number of times: infinite
alternate direction every time
*/
position: relative;
border: 2px solid green;
width: 50px;
height: 20px;
background: lime;
}
</style>
Probably you won't need @keyframes often, unless everything is in the constant move on your sites.
Summary
CSS animations allow to smoothly (or not) animate changes of one or multiple CSS properties.
They are good for most animation tasks. We're also able to use JavaScript for animations, the next chapter is devoted to that.
Limitations of CSS animations compared to JavaScript animations:
CSS animations
Simple things done simply.
Fast and lightweight for CPU.
JavaScript animations
JavaScript animations are flexible. They can implement any animation logic, like an “explosion” of an element.
Not just property changes. We can create new elements in JavaScript for purposes of animation.
The majority of animations can be implemented using CSS as described in this chapter. And transitionend event allows to run JavaScript after the animation, so it integrates fine with the code.
But in the next chapter we'll do some JavaScript animations to cover more complex cases.
/* original class */
#flyjet {
transition: all 3s;
}
/* JS adds .growing */
#flyjet.growing {
width: 400px;
height: 240px;
}
Please note that transitionend triggers two times – once for every property. So if we don't perform an additional check then the message would show up 2 times.
Modify the solution of the previous task
Animate a plane (CSS) to make the plane grow more than it's original size 400x240px (jump out), and then return to that size.
Here's how it should look (click on the plane):
Take the solution of the previous task as the source.
We need to choose the right Bezier curve for that animation. It should have y>1 somewhere for the plane to “jump out”.
For instance, we can take both control points with y>1, like: cubic-bezier(0.25, 1.5, 0.75, 1.5).
JavaScript animations can handle things that CSS can't.
For instance, moving along a complex path, with a timing function different from Bezier curves, or an animation on a canvas.
setInterval
From the HTML/CSS point of view, an animation is a gradual change of the style property. For instance, changing style.left from 0px to 100px moves the element.
And if we increase it in setInterval, by making 50 small changes per second, then it looks smooth. That's the same principle as in the cinema: 24 or more frames per second is enough to make it look smooth.
The pseudo-code can look like this:
let delay = 1000 / 50; // in 1 second 50 frames
let timer = setInterval(function() {
if (animation complete) clearInterval(timer);
else increase style.left
}, delay)
More complete example of the animation:
let start = Date.now(); // remember start time
let timer = setInterval(function() {
// how much time passed from the start?
let timePassed = Date.now() - start;
if (timePassed >= 2000) {
clearInterval(timer); // finish the animation after 2 seconds
return;
}
// draw the animation at the moment timePassed
draw(timePassed);
}, 20);
// as timePassed goes from 0 to 2000
// left gets values from 0px to 400px
function draw(timePassed) {
train.style.left = timePassed / 5 + 'px';
}
There's one more thing to keep in mind. Sometimes when CPU is overloaded, or there are other reasons to redraw less often. For instance, if the browser tab is hidden, then there's totally no point in drawing.
There's a standard
Animation timing that provides the function requestAnimationFrame.
It addresses all these issues and even more.
The syntax:
let requestId = requestAnimationFrame(callback)
That schedules the callback function to run in the closest time when the browser wants to do animation.
If we do changes in elements in callback then they will be grouped together with other requestAnimationFrame callbacks and with CSS animations. So there will be one geometry recalculation and repaint instead of many.
The returned value requestId can be used to cancel the call:
// cancel the scheduled execution of callback
cancelAnimationFrame(requestId);
The callback gets one argument – the time passed from the beginning of the page load in microseconds. This time can also be obtained by calling
performance.now().
Usually callback runs very soon, unless the CPU is overloaded or the laptop battery is almost discharged, or there's another reason.
The code below shows the time between first 20 runs for requestAnimationFrame. Usually it's 10-20ms:
<script>
let prev = performance.now();
let times = 0;
requestAnimationFrame(function measure(time) {
document.body.insertAdjacentHTML("beforeEnd", Math.floor(time - prev) + " ");
prev = time;
if (times++ < 10) requestAnimationFrame(measure);
})
</script>
Structured animation
Now we can make a more universal animation function based on requestAnimationFrame:
function animate({timing, draw, duration}) {
let start = performance.now();
requestAnimationFrame(function animate(time) {
// timeFraction goes from 0 to 1
let timeFraction = (time - start) / duration;
if (timeFraction > 1) timeFraction = 1;
// calculate the current animation state
let progress = timing(timeFraction)
draw(progress); // draw it
if (timeFraction < 1) {
requestAnimationFrame(animate);
}
});
}
Function animate accepts 3 parameters that essentially describes the animation:
duration
Total time of animation. Like, 1000.
timing(timeFraction)
Timing function, like CSS-property transition-timing-function that gets the fraction of time that passed (0 at start, 1 at the end) and returns the animation completion (like y on the Bezier curve).
For instance, a linear function means that the animation goes on uniformly with the same speed:
function linear(timeFraction) {
return timeFraction;
}
It's graph:
That's just like transition-timing-function: linear. There are more interesting variants shown below.
draw(progress)
The function that takes the animation completion state and draws it. The value progress=0 denotes the beginning animation state, and progress=1 – the end state.
This is that function that actually draws out the animation.
It can move the element:
function draw(progress) {
train.style.left = progress + 'px';
}
…Or do anything else, we can animate anything, in any way.
Let's animate the element width from 0 to 100% using our function.
Click on the element for the demo:
Result
animate.js
index.html
function animate({duration, draw, timing}) {
let start = performance.now();
requestAnimationFrame(function animate(time) {
let timeFraction = (time - start) / duration;
if (timeFraction > 1) timeFraction = 1;
let progress = timing(timeFraction)
draw(progress);
if (timeFraction < 1) {
requestAnimationFrame(animate);
}
});
}
Unlike CSS animation, we can make any timing function and any drawing function here. The timing function is not limited by Bezier curves. And draw can go beyond properties, create new elements for like fireworks animation or something.
Timing functions
We saw the simplest, linear timing function above.
Let's see more of them. We'll try movement animations with different timing functions to see how they work.
Power of n
If we want to speed up the animation, we can use progress in the power n.
For instance, a parabolic curve:
function quad(timeFraction) {
return Math.pow(timeFraction, 2)
}
The graph:
See in action (click to activate):
…Or the cubic curve or event greater n. Increasing the power makes it speed up faster.
Here's the graph for progress in the power 5:
In action:
The arc
Function:
function circ(timeFraction) {
return 1 - Math.sin(Math.acos(timeFraction));
}
The graph:
Back: bow shooting
This function does the “bow shooting”. First we “pull the bowstring”, and then “shoot”.
Unlike previous functions, it depends on an additional parameter x, the “elasticity coefficient”. The distance of “bowstring pulling” is defined by it.
The “easeInOut” transform joins two graphs into one: easeIn (regular) for the first half of the animation and easeOut (reversed) – for the second part.
The effect is clearly seen if we compare the graphs of easeIn, easeOut and easeInOut of the circ timing function:
Red is the regular variantof circ (easeIn).
Green – easeOut.
Blue – easeInOut.
As we can see, the graph of the first half of the animation is the scaled down easeIn, and the second half is the scaled down easeOut. As a result, the animation starts and finishes with the same effect.
More interesting “draw”
Instead of moving the element we can do something else. All we need is to write the write the proper draw.
<!DOCTYPE HTML>
<html>
<head>
<meta charset="utf-8">
<link rel="stylesheet" href="style.css">
<script src="https://js.cx/libs/animate.js"></script>
</head>
<body>
<textarea id="textExample" rows="5" cols="60">He took his vorpal sword in hand:
Long time the manxome foe he sought—
So rested he by the Tumtum tree,
And stood awhile in thought.
</textarea>
<button onclick="animateText(textExample)">Run the animated typing!</button>
<script>
function animateText(textArea) {
let text = textArea.value;
let to = text.length,
from = 0;
animate({
duration: 5000,
timing: bounce,
draw: function(progress) {
let result = (to - from) * progress + from;
textArea.value = text.substr(0, Math.ceil(result))
}
});
}
function bounce(timeFraction) {
for (let a = 0, b = 1, result; 1; a += b, b /= 2) {
if (timeFraction >= (7 - 4 * a) / 11) {
return -Math.pow((11 - 6 * a - 11 * timeFraction) / 4, 2) + Math.pow(b, 2)
}
}
}
</script>
</body>
</html>
Summary
JavaScript animation should be implemented via requestAnimationFrame. That built-in method allows to setup a callback function to run when the browser will be preparing a repaint. Usually that's very soon, but the exact time depends on the browser.
When a page is in the background, there are no repaints at all, so the callback won't run: the animation will be suspended and won't consume resources. That's great.
Here's the helper animate function to setup most animations:
function animate({timing, draw, duration}) {
let start = performance.now();
requestAnimationFrame(function animate(time) {
// timeFraction goes from 0 to 1
let timeFraction = (time - start) / duration;
if (timeFraction > 1) timeFraction = 1;
// calculate the current animation state
let progress = timing(timeFraction);
draw(progress); // draw it
if (timeFraction < 1) {
requestAnimationFrame(animate);
}
});
}
Options:
duration – the total animation time in ms.
timing – the function to calculate animation progress. Gets a time fraction from 0 to 1, returns the animation progress, usually from 0 to 1.
draw – the function to draw the animation.
Surely we could improve it, add more bells and whistles, but JavaScript animations are not applied on a daily basis. They are used to do something interesting and non-standard. So you'd want to add the features that you need when you need them.
JavaScript animations can use any timing function. We covered a lot of examples and transformations to make them even more versatile. Unlike CSS, we are not limited to Bezier curves here.
The same is about draw: we can animate anything, not just CSS properties.
To bounce we can use CSS property top and position:absolute for the ball inside the field with position:relative.
The bottom coordinate of the field is field.clientHeight. But the top property gives coordinates for the top of the ball, the edge position is field.clientHeight - ball.clientHeight.
So we animate the top from 0 to field.clientHeight - ball.clientHeight.
Now to get the “bouncing” effect we can use the timing function bounce in easeOut mode.
Here's the final code for the animation:
let to = field.clientHeight - ball.clientHeight;
animate({
duration: 2000,
timing: makeEaseOut(bounce),
draw(progress) {
ball.style.top = to * progress + 'px'
}
});
A popup window is one of the oldest methods to show additional document to user.
Basically, you just run:
window.open('http://javascript.info/')
… And it will open a new window with given URL. Most modern browsers are configured to open new tabs instead of separate windows.
Popup blocking
Popups exist from really ancient times. The initial idea was to show another content without closing the main window. As of now, there are other ways to do that: JavaScript is able to send requests for server, so popups are rarely used. But sometimes they are still handy.
In the past evil sites abused popups a lot. A bad page could open tons of popup windows with ads. So now most browsers try to block popups and protect the user.
Most browsers block popups if they are called outside of user-triggered event handlers like onclick.
If you think about it, that's a bit tricky. If the code is directly in an onclick handler, then that's easy. But what is the popup opens in setTimeout?
Try this code:
// open after 3 seconds
setTimeout(() => window.open('http://google.com'), 3000);
The popup opens in Chrome, but gets blocked in Firefox.
…And this works in Firefox too:
// open after 1 seconds
setTimeout(() => window.open('http://google.com'), 1000);
The difference is that Firefox treats a timeout of 2000ms or less are acceptable, but after it – removes the “trust”, assuming that now it's “outside of the user action”. So the first one is blocked, and the second one is not.
Modern usage
As of now, we have many methods to load and show data on-page with JavaScript. But there are still situations when a popup works best.
For instance, many shops use online chats for consulting people. A visitor clicks on the button, it runs window.open and opens the popup with the chat.
Why a popup is good here, why not in-page?
A popup is a separate window with its own independent JavaScript environment. So a chat service doesn't need to integrate with scripts of the main shop site.
A popup is very simple to attach to a site, little to no overhead. It's only a small button, without additional scripts.
A popup may persist even if the user left the page. For example, a consult advices the user to visit the page of a new “Super-Cooler” goodie. The user goes there in the main window without leaving the chat.
window.open
The syntax to open a popup is: window.open(url, name, params):
url
An URL to load into the new window.
name
A name of the new window. Each window has a window.name, and here we can specify which window to use for the popup. If there's already a window with such name – the given URL opens in it, otherwise a new window is opened.
params
The configuration string for the new window. It contains settings, delimited by a comma. There must be no spaces in params, for instance: width:200,height=100.
Settings for params:
Position:
left/top (numeric) – coordinates of the window top-left corner on the screen. There is a limitation: a new window cannot be positioned offscreen.
width/height (numeric) – width and height of a new window. There is a limit on minimal width/height, so it's impossible to create an invisible window.
Window features:
menubar (yes/no) – shows or hides the browser menu on the new window.
toolbar (yes/no) – shows or hides the browser navigation bar (back, forward, reload etc) on the new window.
location (yes/no) – shows or hides the URL field in the new window. FF and IE don't allow to hide it by default.
status (yes/no) – shows or hides the status bar. Again, most browsers force it to show.
resizable (yes/no) – allows to disable the resize for the new window. Not recommended.
scrollbars (yes/no) – allows to disable the scrollbars for the new window. Not recommended.
There is also a number of less supported browser-specific features, which are usually not used. Check
window.open in MDN for examples.
Example: a minimalistic window
Let's open a window with minimal set of features just to see which of them browser allows to disable:
let params = `scrollbars=no,resizable=no,status=no,location=no,toolbar=no,menubar=no,
width=0,height=0,left=-1000,top=-1000`;
open('/', 'test', params);
Here most “window features” are disabled and window is positioned offscreen. Run it and see what really happens. Most browsers “fix” odd things like zero width/height and offscreen left/top. For instance, Chrome open such a window with full width/height, so that it occupies the full screen.
Let's add normal positioning options and reasonable width, height, left, top coordinates:
let params = `scrollbars=no,resizable=no,status=no,location=no,toolbar=no,menubar=no,
width=600,height=300,left=100,top=100`;
open('/', 'test', params);
Most browsers show the example above as required.
Rules for omitted settings:
If there is no 3rd argument in the open call, or it is empty, then the default window parameters are used.
If there is a string of params, but some yes/no features are omitted, then the omitted features are disabled, if the browser allows that. So if you specify params, make sure you explicitly set all required features to yes.
If there is no left/top in params, then the browser tries to open a new window near the last opened window.
If there is no width/height, then the new window will be the same size as the last opened.
Accessing a popup
The open call returns a reference to the new window. It can be used to manipulate it's properties, change location and even more.
In the example below, the contents of the new window is modified after loading.
let newWindow = open('/', 'example', 'width=300,height=300')
newWindow.focus();
newWindow.onload = function() {
let html = `<div style="font-size:30px">Welcome!</div>`;
newWindow.document.body.insertAdjacentHTML('afterbegin', html);
};
Please note that external document content is only accessible for windows from the same origin (the same protocol://domain:port).
For windows with URLs from another sites, we are able to change the location by assigning newWindow.location=..., but we can't read the location or access the content. That's for user safety, so that an evil page can't open a popup with http://gmail.com and read the data. We'll talk more about it later.
Accessing the opener window
A popup may access the “opener” window as well. A JavaScript in it may use window.opener to access the window that opened it. It is null for all windows except popups.
So both the main window and the popup have a reference to each other. They may modify each other freely assuming that they come from the same origin. If that's not so, then there are still means to communicate, to be covered in the next chapter
Cross-window communication.
Closing a popup
If we don't need a popup any more, we can call newWindow.close() on it.
Technically, the close() method is available for any window, but window.close() is ignored by most browsers if window is not created with window.open().
The newWindow.closed is true if the window is closed. That's useful to check if the popup (or the main window) is still open or not. A user could close it, and our code should take that possibility into account.
Theoretically, there are window.focus() and window.blur() methods to focus/unfocus on a window. Also there are focus/blur events that allow to focus a window and catch the moment when the visitor switches elsewhere.
In the past evil pages abused those. For instance, look at this code:
window.onblur = () => window.focus();
When a user attempts to switch out of the window (blur), it brings it back to focus. The intention is to “lock” the user within the window.
So, there are limitations that forbid the code like that. There are many limitations to protect the user from ads and evils pages. They depend on the browser.
For instance, a mobile browser usually ignores that call completely. Also focusing doesn't work when a popup opens in a separate tab rather than a new window.
Still, there are some things that can be done.
For instance:
When we open a popup, it's might be a good idea to run a newWindow.focus() on it. Just in case, for some OS/browser combinations it ensures that the user is in the new window now.
If we want to track when a visitor actually uses our web-app, we can track window.onfocus/onblur. That allows us to suspend/resume in-page activities, animations etc. But please note that the blur event means that the visitor switched out from the window, but he still may observe it. The window is in the background, but still may be visible.
Summary
A popup can be opened by the open(url, name, params) call. It returns the reference to the newly opened window.
By default, browsers block open calls from the code outside of user actions. Usually a notification appears, so that a user may allow them.
The popup may access the opener window using the window.opener property, so the two are connected.
If the main window and the popup come from the same origin, they can freely read and modify each other. Otherwise, they can change location of each other and communicate using messages (to be covered).
To close the popup: use close() call. Also the user may close them (just like any other windows). The window.closed is true after that.
Methods focus() and blur() allow to focus/unfocus a window. Sometimes.
Events focus and blur allow to track switching in and out of the window. But please note that a window may still be visible even in the background state, after blur.
Also if we open a popup, a good practice is to notify the user about it. An icon with the opening window can help the visitor to survive the focus shift and keep both windows in mind.
Cross-window communication
The “Same Origin” (same site) policy limits access of windows and frame to each other.
The idea is that if we have two windows open: one from john-smith.com, and another one is gmail.com, then we wouldn't want a script from john-smith.com to read our mail.
Same Origin
Two URLs are said to have the “same origin” if they have the same protocol, domain and port.
If we have a reference to another window (a popup or iframe), and that window comes from the same origin, then we can do everything with it.
If it comes from another origin, then we can only change its location. Please note: not read the location, but modify it, redirect it to another place. That's safe, because the URL may contain sensitive parameters, so reading it from another origin is prohibited, but changing is not.
Also such windows may exchange messages. Soon about that later.
Exclusion: subdomains may be same-origin
There's an important exclusion in the same-origin policy.
If windows share the same second-level domain, for instance john.site.com, peter.site.com and site.com, we can use JavaScript to assign to document.domain their common second-level domain site.com. Then these windows are treated as having the same origin.
In other words, all such documents (including the one from site.com) should have the code:
document.domain = 'site.com';
Then they can interact without limitations.
That's only possible for pages with the same second-level domain.
Accessing an iframe contents
An <iframe> is a two-faced beast. From one side it's a tag, just like <script> or <img>. From the other side it's a window-in-window.
The embedded window has a separate document and window objects.
We can access them like using the properties:
iframe.contentWindow is a reference to the window inside the <iframe>.
iframe.contentDocument is a reference to the document inside the <iframe>.
When we access an embedded window, the browser checks if the iframe has the same origin. If that's not so then the access is denied (with exclusions noted above).
For instance, here's an <iframe> from another origin:
<iframe src="https://example.com" id="iframe"></iframe>
<script>
iframe.onload = function() {
// we can get the reference to the inner window
let iframeWindow = iframe.contentWindow;
try {
// ...but not to the document inside it
let doc = iframe.contentDocument;
} catch(e) {
alert(e); // Security Error (another origin)
}
// also we can't read the URL of the page in it
try {
alert(iframe.contentWindow.location);
} catch(e) {
alert(e); // Security Error
}
// ...but we can change it (and thus load something else into the iframe)!
iframe.contentWindow.location = '/'; // works
iframe.onload = null; // clear the handler, to run this code only once
};
</script>
The code above shows errors for any operations except:
Getting the reference to the inner window iframe.contentWindow
Changing its location.
iframe.onload vs iframe.contentWindow.onload
The iframe.onload event is actually the same as iframe.contentWindow.onload. It triggers when the embedded window fully loads with all resources.
…But iframe.onload is always available, while iframe.contentWindow.onload needs the same origin.
And now an example with the same origin. We can do anything with the embedded window:
<iframe src="/" id="iframe"></iframe>
<script>
iframe.onload = function() {
// just do anything
iframe.contentDocument.body.prepend("Hello, world!");
};
</script>
Please wait until the iframe loads
When an iframe is created, it immediately has a document. But that document is different from the one that finally loads into it!
Here, look:
<iframe src="/" id="iframe"></iframe>
<script>
let oldDoc = iframe.contentDocument;
iframe.onload = function() {
let newDoc = iframe.contentDocument;
// the loaded document is not the same as initial!
alert(oldDoc == newDoc); // false
};
</script>
That's actually a well-known pitfall for novice developers. We shouldn't work with the document immediately, because that's the wrong document. If we set any event handlers on it, they will be ignored.
…But the onload event triggers when the whole iframe with all resources is loaded. What if we want to act sooner, on DOMContentLoaded of the embedded document?
That's not possible if the iframe comes from another origin. But for the same origin we can try to catch the moment when a new document appears, and then setup necessary handlers, like this:
<iframe src="/" id="iframe"></iframe>
<script>
let oldDoc = iframe.contentDocument;
// every 100 ms check if the document is the new one
let timer = setInterval(() => {
if (iframe.contentDocument == oldDoc) return;
// new document, let's set handlers
iframe.contentDocument.addEventListener('DOMContentLoaded', () => {
iframe.contentDocument.body.prepend('Hello, world!');
});
clearInterval(timer); // cancel setInterval, don't need it any more
}, 100);
</script>
Let me know in comments if you know a better solution here.
window.frames
An alternative way to get a window object for <iframe> – is to get it from the named collection window.frames:
By number: window.frames[0] – the window object for the first frame in the document.
By name: window.frames.iframeName – the window object for the frame with name="iframeName".
An iframe may have other iframes inside. The corresponding window objects form a hierarchy.
Navigation links are:
window.frames – the collection of “children” windows (for nested frames).
window.parent – the reference to the “parent” (outer) window.
window.top – the reference to the topmost parent window.
For instance:
window.frames[0].parent === window; // true
We can use the top property to check if the current document is open inside a frame or not:
if (window == top) { // current window == window.top?
alert('The script is in the topmost window, not in a frame');
} else {
alert('The script runs in a frame!');
}
The sandbox attribute
The sandbox attribute allows to forbid certain actions inside an <iframe>, to run an untrusted code. It “sandboxes” the iframe by treating it as coming from another origin and/or applying other limitations.
By default, for <iframe sandbox src="..."> the “default set” of restrictions is applied to the iframe. But we can provide a space-separated list of “excluded” limitations as a value of the attribute, like this: <iframe sandbox="allow-forms allow-popups">. The listed limitations are not applied.
In other words, an empty "sandbox" attribute puts the strictest limitations possible, but we can put a space-delimited list of those that we want to lift.
Here's a list of limitations:
allow-same-origin
By default "sandbox" forces the “different origin” policy for the iframe. In other words, it makes the browser to treat the iframe as coming from another origin, even if its src points to the same site. With all implied restrictions for scripts. This option removes that feature.
<!doctype html>
<html>
<head>
<meta charset="UTF-8">
</head>
<body>
<button onclick="alert(123)">Click to run a script (doesn't work)</button>
<form action="http://google.com">
<input type="text">
<input type="submit" value="Submit (doesn't work)">
</form>
</body>
</html>
Please note:
The purpose of the "sandbox" attribute is only to add more restrictions. It cannot remove them. In particular, it can't relax same-origin restrictions if the iframe comes from another origin.
Cross-window messaging
The postMessage interface allows windows to talk to each other no matter which origin they are from.
It has two parts.
postMessage
The window that wants to send a message calls
postMessage method of the receiving window. In other words, if we want to send the message to win, we should call win.postMessage(data, targetOrigin).
Arguments:
data
The data to send. Can be any object, the data is cloned using the “structured cloning algorithm”. IE supports only strings, so we should JSON.stringify complex objects to support that browser.
targetOrigin
Specifies the origin for the target window, so that only a window from the given origin will get the message.
The targetOrigin is a safety measure. Remember, if the target window comes from another origin, we can't read it's location. So we can't be sure which site is open in the intended window right now: the user could navigate away.
Specifying targetOrigin ensures that the window only receives the data if it's still at that site. Good when the data is sensitive.
For instance, here win will only receive the message if it has a document from the origin http://example.com:
To receive a message, the target window should have a handler on the message event. It triggers when postMessage is called (and targetOrigin check is successful).
The event object has special properties:
data
The data from postMessage.
origin
The origin of the sender, for instance http://javascript.info.
source
The reference to the sender window. We can immediately postMessage back if we want.
To assign that handler, we should use addEventListener, a short syntax window.onmessage does not work.
Here's an example:
window.addEventListener("message", function(event) {
if (event.origin != 'http://javascript.info') {
// something from an unknown domain, let's ignore it
return;
}
alert( "received: " + event.data );
});
There's totally no delay between postMessage and the message event. That happens synchronously, even faster than setTimeout(...,0).
Summary
To call methods and access the content of another window, we should first have a reference to it.
For popups we have two properties:
window.open – opens a new window and returns a reference to it,
window.opener – a reference to the opener window from a popup
For iframes, we can access parent/children windows using:
window.frames – a collection of nested window objects,
window.parent, window.top are the references to parent and top windows,
iframe.contentWindow is the window inside an <iframe> tag.
If windows share the same origin (host, port, protocol), then windows can do whatever they want with each other.
Otherwise, only possible actions are:
Change the location of another window (write-only access).
Post a message to it.
Exclusions are:
Windows that share the same second-level domain: a.site.com and b.site.com. Then setting document.domain='site.com' in both of them puts them into the “same origin” state.
If an iframe has a sandbox attribute, it is forcefully put into the “different origin” state, unless the allow-same-origin is specified in the attribute value. That can be used to run untrusted code in iframes from the same site.
The postMessage interface allows two windows to talk with security checks:
The sender calls targetWin.postMessage(data, targetOrigin).
If targetOrigin is not '*', then the browser checks if window targetWin has the URL from targetWin site.
If it is so, then targetWin triggers the message event with special properties:
origin – the origin of the sender window (like http://my.site.com)
source – the reference to the sender window.
data – the data, any object in everywhere except IE that supports only strings.
We should use addEventListener to set the handler for this event inside the target window.
The clickjacking attack
The “clickjacking” attack allows an evil page to click on a “victim site” on behalf of the visitor.
Many sites were hacked this way, including Twitter, Facebook, Paypal and other sites. They are all fixed, of course.
The idea
The idea is very simple.
Here's how clickjacking was done with Facebook:
A visitor is lured to the evil page. No matter how.
The page has a harmlessly-looking link on it (like “get rich now” or “click here, very funny” and so on).
Over that link the evil page positions a transparent <iframe> with src from facebook.com, in such a way that the “Like” button is right above that link. Usually that's done with z-index.
Clicking on that link, the visitor in fact presses that button.
The demo
Here's how the evil page looks like. To make things clear, the <iframe> is half-transparent (in real evil pages it's fully transparent):
<style>
iframe { /* iframe from the victim site */
width: 400px;
height: 100px;
position: absolute;
top:0; left:-20px;
opacity: 0.5; /* in real opacity:0 */
z-index: 1;
}
</style>
<div>Click to get rich now:</div>
<!-- The url from the victim site -->
<iframe src="/clickjacking/facebook.html"></iframe>
<button>Click here!</button>
<div>...And you're cool (I'm a cool hacker actually)!</div>
The full demo of the attack:
Result
facebook.html
index.html
<!DOCTYPE HTML>
<html>
<body style="margin:10px;padding:10px">
<input type="button" onclick="alert('Like pressed on facebook.html!')" value="I LIKE IT !">
</body>
</html>
<!doctype html>
<html>
<head>
<meta charset="UTF-8">
</head>
<body>
<style>
iframe {
width: 400px;
height: 100px;
position: absolute;
top: 5px;
left: -14px;
opacity: 0.5;
z-index: 1;
}
</style>
<div>Click to get rich now:</div>
<!-- The url from the victim site -->
<iframe src="facebook.html"></iframe>
<button>Click here!</button>
<div>...And you're cool (I'm a cool hacker actually)!</div>
</body>
</html>
Here we have a half-transparent <iframe src="facebook.html">, and in the example we can see it hovering over the button. A click on the button actually clicks on the iframe, but that's not visible to the user, because the iframe is transparent.
As a result if the visitor is authorized on facebook (“remember me” is usually turned on), then it adds a “Like”. On Twitter that would be a “Follow” button.
Here's the same example, but closer to reality, with opacity:0 for <iframe>:
Result
facebook.html
index.html
<!DOCTYPE HTML>
<html>
<body style="margin:10px;padding:10px">
<input type="button" onclick="alert('Like pressed on facebook.html!')" value="I LIKE IT !">
</body>
</html>
<!doctype html>
<html>
<head>
<meta charset="UTF-8">
</head>
<body>
<style>
iframe {
width: 400px;
height: 100px;
position: absolute;
top: 5px;
left: -14px;
opacity: 0;
z-index: 1;
}
</style>
<div>Click to get rich now:</div>
<!-- The url from the victim site -->
<iframe src="facebook.html"></iframe>
<button>Click here!</button>
<div>...And you're cool (I'm a cool hacker actually)!</div>
</body>
</html>
All we need to attack – is to position the <iframe> on the evil page in such a way that the button is right over the link. That's usually possible with CSS.
Clickjacking is for clicks, not for keyboard
The attack only affects mouse actions.
Technically, if we have a text field to hack, then we can position an iframe in such a way that text fields overlap each other. So when a visitor tries to focus on the input he sees on the page, he actually focuses on the input inside the iframe.
But then there's a problem. Everything that the visitor types will be hidden, because the iframe is not visible.
So that would look really odd to the user, and he will stop.
Old-school defences (weak)
The oldest defence method is the piece of JavaScript that forbids to open the page in a frame (so-called “framebusting”).
Like this:
if (top != window) {
top.location = window.location;
}
That is: if the window finds out that it's not on the top, then it automatically makes itself the top.
As of now, that's not reliable, because there are many ways to hack around it. Let's cover a few.
Blocking top-navigation
We can block the transition caused by changing top.location in the
beforeunload event.
The top page (that belongs to the hacker) sets a handler to it, and when the iframe tries to change top.location the visitor gets a message asking him whether he wants to leave.
Like this:
window.onbeforeunload = function() {
window.onbeforeunload = null;
return "Want to leave without learning all the secrets (he-he)?";
};
In most cases the visitor would answer negatively, because he doesn't know about the iframe, all he can see is the top page, there's no reason to leave. And so the top.location won't change!
<!doctype html>
<html>
<head>
<meta charset="UTF-8">
<style>
iframe {
width: 400px;
height: 100px;
position: absolute;
top: 0;
left: -20px;
opacity: 0;
z-index: 1;
}
</style>
<script>
function attack() {
window.onbeforeunload = function() {
window.onbeforeunload = null;
return "Want to leave without learning all the secrets (he-he)?";
};
document.body.insertAdjacentHTML('beforeend', '<iframe src="iframe.html">');
}
</script>
</head>
<body>
<p>After a click on the button the visitor gets a "strange" question about whether he wants to leave.</p>
<p>Probably he would respond "No", and the iframe protection is hacked.</p>
<button onclick="attack()">Add a "protected" iframe</button>
</body>
</html>
Sandbox attribute
One of the things restricted by the sandbox attribute is navigation. A sandboxed iframe may not change top.location.
So we can add the iframe with sandbox="allow-scripts allow-forms". That would relax the restrictions allowing scripts and forms. But we don't put allow-top-navigation in the value so that the navigation is still forbidden. And the change of top.location won't work.
There are other ways to work around that simple protection too.
X-Frame-Options
Server-side header X-Frame-Options can allow or forbid showing the page inside a frame.
It must be sent by the server: browser ignore it if found in <meta> tags. So <meta http-equiv="X-Frame-Options"...> won't do anything.
The header may have 3 values:
DENY
Never ever show the page inside an iframe.
SAMEORIGIN
Allow to show inside an iframe if the parent document comes from the same origin.
ALLOW-FROM domain
Allows to show inside an iframe if the parent document is from the given domain.
For instance, Twitter uses X-Frame-Options: SAMEORIGIN. Here's the result:
<iframe src="https://twitter.com"></iframe>
Depending on the browser, iframe above is either empty or it has a message telling that “the browser can't show it”.
Showing with disabled functionality
The protecting X-Frame-Options header has a side-effect. Other sites can't show our page in an iframe, even if they have “legal” reasons to do so.
So there are other solutions. For instance, we can “cover” the page with a <div> with height:100%;width:100%, so that it handles all clicks. That <div> should disappear if window == top or we figure out that we don't need protection.
Like this:
<style>
#protector {
height: 100%;
width: 100%;
position: absolute;
left: 0;
top: 0;
z-index: 99999999;
}
</style>
<div id="protector">
<a href="/" target="_blank">Go to the site</a>
</div>
<script>
// there will be an error if top window is from the different origin
// but that's ok here
if (top.document.domain == document.domain) {
protector.remove();
}
</script>
The demo:
Result
iframe.html
index.html
<!doctype html>
<html>
<head>
<meta charset="UTF-8">
<style>
#protector {
height: 100%;
width: 100%;
position: absolute;
left: 0;
top: 0;
z-index: 99999999;
}
</style>
</head>
<body>
<div id="protector">
<a href="/" target="_blank">Go to the site</a>
</div>
<script>
if (top.document.domain == document.domain) {
protector.remove();
}
</script>
This text is always visible.
But if the page was open inside a document from another domain, the div over it would prevent any actions.
<button onclick="alert(1)">Click wouldn't work in that case</button>
</body>
</html>
Clickjacking is a way to “trick” users into a clicking on a victim site without even knowing what happens. That's dangerous if there are important click-activated actions.
A hacker can post a link to his evil page in a message or lure visitors to his page by other means. There are many variants.
From one side – the attack is “not deep”: all a hacker can do is one click. But from another side, if the hacker knows that after the click another control appears, then it may use cunning messages to make the user to click on it as well.
The attack is quite dangerous, because when we engineer the UI we usually don't think that a hacker can click on behalf of the visitor. So vulnerabilities can be found in totally unexpected places.
It's recommended to use X-Frame-Options: SAMEORIGIN on pages that are totally not meant to be shown inside iframes (or just for the whole site).
Use a covering <div> if we want to allow our pages to be shown in iframes, and still stay safe.
Regular expressions is a powerful way of doing search and replace in strings.
Regular expressions is a powerful way of searching and replacing inside a string.
In JavaScript regular expressions are implemented using objects of a built-in RegExp class and integrated with strings.
Please note that regular expressions vary between programming languages. In this tutorial we concentrate on JavaScript. Of course there's a lot in common, but they are a somewhat different in Perl, Ruby, PHP etc.
Regular expressions
A regular expression (also “regexp”, or just “reg”) consists of a pattern and optional flags.
There are two syntaxes to create a regular expression object.
The long syntax:
regexp = new RegExp("pattern", "flags");
…And the short one, using slashes "/":
regexp = /pattern/; // no flags
regexp = /pattern/gmi; // with flags g,m and i (to be covered soon)
Slashes "/" tell JavaScript that we are creating a regular expression. They play the same role as quotes for strings.
Usage
To search inside a string, we can use method
search.
Here's an example:
let str = "I love JavaScript!"; // will search here
let regexp = /love/;
alert( str.search(regexp) ); // 2
The str.search method looks for the pattern /love/ and returns the position inside the string. As we might guess, /love/ is the simplest possible pattern. What it does is a simple substring search.
The code above is the same as:
let str = "I love JavaScript!"; // will search here
let substr = 'love';
alert( str.search(substr) ); // 2
So searching for /love/ is the same as searching for "love".
But that's only for now. Soon we'll create more complex regular expressions with much searching more power.
Colors
From here on the color scheme is:
regexp – red
string (where we search) – blue
result – green
When to use new RegExp?
Normally we use the short syntax /.../. But it does not allow any variables insertions, so we must know the exact regexp at the time of writing the code.
From the other hand, new RegExp allows to construct a pattern dynamically from a string.
So we can figure out what we need to search and create new RegExp from it:
let search = prompt("What you want to search?", "love");
let regexp = new RegExp(search);
// find whatever the user wants
alert( "I love JavaScript".search(regexp));
Flags
Regular expressions may have flags that affect the search.
There are only 5 of them in JavaScript:
i
With this flag the search is case-insensitive: no difference between A and a (see the example below).
g
With this flag the search looks for all matches, without it – only the first one (we'll see uses in the next chapter).
m
Multiline mode (covered in the chapter Article "regexp-multiline" not found).
u
Enables full unicode support. The flag enables correct processing of surrogate pairs. More about that in the chapter
The unicode flag.
let str = "I love JavaScript!";
alert( str.search(/LOVE/) ); // -1 (not found)
alert( str.search(/LOVE/i) ); // 2
The first search returns -1 (not found), because the search is case-sensitive by default.
With the flag /LOVE/i the search found love at position 2.
So the i flag already makes regular expressions more powerful than a simple substring search. But there's so much more. We'll cover other flags and features in the next chapters.
Summary
A regular expression consists of a pattern and optional flags: g, i, m, u, y.
Without flags and special symbols that we'll study later, the search by a regexp is the same as a substring search.
The method str.search(regexp) returns the index where the match is found or -1 if there's no match.
Methods of RegExp and String
There are two sets of methods to deal with regular expressions.
First, regular expressions are objects of the built-in
RegExp class, it provides many methods.
Besides that, there are methods in regular strings can work with regexps.
The structure is a bit messed up, so we'll first consider methods separately, and then – practical recipes for common tasks.
str.search(reg)
We've seen this method already. It returns the position of the first match or -1 if none found:
let str = "A drop of ink may make a million think";
alert( str.search( /a/i ) ); // 0 (the first position)
The important limitation: search always looks for the first match.
We can't find next positions using search, there's just no syntax for that. But there are other methods that can.
str.match(reg), no “g” flag
The method str.match behavior varies depending on the g flag. First let's see the case without it.
Then str.match(reg) looks for the first match only.
The result is an array with that match and additional properties:
index – the position of the match inside the string,
input – the subject string.
For instance:
let str = "Fame is the thirst of youth";
let result = str.match( /fame/i );
alert( result[0] ); // Fame (the match)
alert( result.index ); // 0 (at the zero position)
alert( result.input ); // "Fame is the thirst of youth" (the string)
The array may have more than one element.
If a part of the pattern is delimited by parentheses (...), then it becomes a separate element of the array.
For instance:
let str = "JavaScript is a programming language";
let result = str.match( /JAVA(SCRIPT)/i );
alert( result[0] ); // JavaScript (the whole match)
alert( result[1] ); // script (the part of the match that corresponds to the parentheses)
alert( result.index ); // 0
alert( result.input ); // JavaScript is a programming language
Due to the i flag the search is case-insensitive, so it finds JavaScript. The part of the match that corresponds to SCRIPT becomes a separate array item.
We'll be back to parentheses later in the chapter
Capturing groups. They are great for search-and-replace.
str.match(reg) with “g” flag
When there's a "g" flag, then str.match returns an array of all matches. There are no additional properties in that array, and parentheses do not create any elements.
For instance:
let str = "HO-Ho-ho!";
let result = str.match( /ho/ig );
alert( result ); // HO, Ho, ho (all matches, case-insensitive)
With parentheses nothing changes, here we go:
let str = "HO-Ho-ho!";
let result = str.match( /h(o)/ig );
alert( result ); // HO, Ho, ho
So, with g flag the result is a simple array of matches. No additional properties.
If we want to get information about match positions and use parentheses then we should use
RegExp#exec method that we'll cover below.
If there are no matches, the call to match returns null
Please note, that's important. If there were no matches, the result is not an empty array, but null.
Keep that in mind to evade pitfalls like this:
let str = "Hey-hey-hey!";
alert( str.match(/ho/gi).length ); // error! there's no length of null
str.split(regexp|substr, limit)
Splits the string using the regexp (or a substring) as a delimiter.
We already used split with strings, like this:
alert('12-34-56'.split('-')) // [12, 34, 56]
But we can also pass a regular expression:
alert('12-34-56'.split(/-/)) // [12, 34, 56]
str.replace(str|reg, str|func)
The swiss army knife for search and replace in strings.
The simplest use – search and replace a substring, like this:
// replace a dash by a colon
alert('12-34-56'.replace("-", ":")) // 12:34-56
When the first argument of replace is a string, it only looks for the first match.
To find all dashes, we need to use not the string "-", but a regexp /-/g, with an obligatory g flag:
// replace all dashes by a colon
alert( '12-34-56'.replace( /-/g, ":" ) ) // 12:34:56
The second argument is a replacement string.
We can use special characters in it:
Symbol
Inserts
$$
"$"
$&
the whole match
$`
a part of the string before the match
$'
a part of the string after the match
$n
if n is a 1-2 digit number, then it means the contents of n-th parentheses counting from left to right
For instance let's use $& to replace all entries of "John" by "Mr.John":
let str = "John Doe, John Smith and John Bull.";
// for each John - replace it with Mr. and then John
alert(str.replace(/John/g, 'Mr.$&'));
// "Mr.John Doe, Mr.John Smith and Mr.John Bull.";
Parentheses are very often used together with $1, $2, like this:
let str = "John Smith";
alert(str.replace(/(John) (Smith)/, '$2, $1')) // Smith, John
For situations that require “smart” replacements, the second argument can be a function.
It will be called for each match, and its result will be inserted as a replacement.
For instance:
let i = 0;
// replace each "ho" by the result of the function
alert("HO-Ho-ho".replace(/ho/gi, function() {
return ++i;
})); // 1-2-3
In the example above the function just returns the next number every time, but usually the result is based on the match.
The function is called with arguments func(str, p1, p2, ..., pn, offset, s):
str – the match,
p1, p2, ..., pn – contents of parentheses (if there are any),
offset – position of the match,
s – the source string.
If there are no parentheses in the regexp, then the function always has 3 arguments: func(str, offset, s).
Let's use it to show full information about matches:
// show and replace all matches
function replacer(str, offset, s) {
alert(`Found ${str} at position ${offset} in string ${s}`);
return str.toLowerCase();
}
let result = "HO-Ho-ho".replace(/ho/gi, replacer);
alert( 'Result: ' + result ); // Result: ho-ho-ho
// shows each match:
// Found HO at position 0 in string HO-Ho-ho
// Found Ho at position 3 in string HO-Ho-ho
// Found ho at position 6 in string HO-Ho-ho
In the example below there are two parentheses, so replacer is called with 5 arguments: str is the full match, then parentheses, and then offset and s:
function replacer(str, name, surname, offset, s) {
// name is the first parentheses, surname is the second one
return surname + ", " + name;
}
let str = "John Smith";
alert(str.replace(/(John) (Smith)/, replacer)) // Smith, John
Using a function gives us the ultimate replacement power, because it gets all the information about the match, has access to outer variables and can do everything.
regexp.test(str)
Let's move on to the methods of RegExp class, that are callable on regexps themselves.
The test method looks for any match and returns true/false whether he found it.
So it's basically the same as str.search(reg) != -1, for instance:
let str = "I love JavaScript";
// these two tests do the same
alert( /love/i.test(str) ); // true
alert( str.search(/love/i) != -1 ); // true
match – if there's no g flag, returns the first match with parentheses,
match – if there's a g flag – returns all matches, without separating parentheses.
The regexp.exec method is a bit harder to use, but it allows to search all matches with parentheses and positions.
It behaves differently depending on whether the regexp has the g flag.
If there's no g, then regexp.exec(str) returns the first match, exactly as str.match(reg).
If there's g, then regexp.exec(str) returns the first match and remembers the position after it in regexp.lastIndex property. The next call starts to search from regexp.lastIndex and returns the next match. If there are no more matches then regexp.exec returns null and regexp.lastIndex is set to 0.
As we can see, the method gives us nothing new if we use it without the g flag, because str.match does exactly the same.
But the g flag allows to get all matches with their positions and parentheses groups.
Here's the example how subsequent regexp.exec calls return matches one by one:
let str = "A lot about JavaScript at https://javascript.info";
let regexp = /JAVA(SCRIPT)/ig;
// Look for the first match
let matchOne = regexp.exec(str);
alert( matchOne[0] ); // JavaScript
alert( matchOne[1] ); // script
alert( matchOne.index ); // 12 (the position of the match)
alert( matchOne.input ); // the same as str
alert( regexp.lastIndex ); // 22 (the position after the match)
// Look for the second match
let matchTwo = regexp.exec(str); // continue searching from regexp.lastIndex
alert( matchTwo[0] ); // javascript
alert( matchTwo[1] ); // script
alert( matchTwo.index ); // 34 (the position of the match)
alert( matchTwo.input ); // the same as str
alert( regexp.lastIndex ); // 44 (the position after the match)
// Look for the third match
let matchThree = regexp.exec(str); // continue searching from regexp.lastIndex
alert( matchThree ); // null (no match)
alert( regexp.lastIndex ); // 0 (reset)
As we can see, each regexp.exec call returns the match in a “full format”: as an array with parentheses, index and input properties.
The main use case for regexp.exec is to find all matches in a loop:
let str = 'A lot about JavaScript at https://javascript.info';
let regexp = /javascript/ig;
let result;
while (result = regexp.exec(str)) {
alert( `Found ${result[0]} at ${result.index}` );
}
The loop continues until regexp.exec returns null that means “no more matches”.
Search from the given position
We can force regexp.exec to start searching from the given position by setting lastIndex manually:
let str = 'A lot about JavaScript at https://javascript.info';
let regexp = /javascript/ig;
regexp.lastIndex = 30;
alert( regexp.exec(str).index ); // 34, the search starts from the 30th position
The "y" flag
The y flag means that the search should find a match exactly at the position specified by the property regexp.lastIndex and only there.
In other words, normally the search is made in the whole string: /javascript/ looks for “javascript” everywhere in the string.
But when a regexp has the y flag, then it only looks for the match at the position specified in regexp.lastIndex (0 by default).
For instance:
let str = "I love JavaScript!";
let reg = /javascript/iy;
alert( reg.lastIndex ); // 0 (default)
alert( str.match(reg) ); // null, not found at position 0
reg.lastIndex = 7;
alert( str.match(reg) ); // JavaScript (right, that word starts at position 7)
// for any other reg.lastIndex the result is null
The regexp /javascript/iy can only be found if we set reg.lastIndex=7, because due to y flag the engine only tries to find it in the single place within a string – from the reg.lastIndex position.
So, what's the point? Where do we apply that?
The reason is performance.
The y flag works great for parsers – programs that need to “read” the text and build in-memory syntax structure or perform actions from it. For that we move along the text and apply regular expressions to see what we have next: a string? A number? Something else?
The y flag allows to apply a regular expression (or many of them one-by-one) exactly at the given position and when we understand what's there, we can move on – step by step examining the text.
Without the flag the regexp engine always searches till the end of the text, that takes time, especially if the text is large. So our parser would be very slow. The y flag is exactly the right thing here.
Summary, recipes
Methods become much easier to understand if we separate them by their use in real-life tasks.
To search for the first match only:
Find the position of the first match – str.search(reg).
Find the full match – str.match(reg).
Check if there's a match – regexp.test(str).
Find the match from the given position – regexp.exec(str), set regexp.lastIndex to position.
To search for all matches:
An array of matches – str.match(reg), the regexp with g flag.
Get all matches with full information about each one – regexp.exec(str) with g flag in the loop.
To search and replace:
Replace with another string or a function result – str.replace(reg, str|func)
To split the string:
str.split(str|reg)
We also covered two flags:
The g flag to find all matches (global search),
The y flag to search at exactly the given position inside the text.
Now we know the methods and can use regular expressions. But we need to learn their syntax, so let's move on.
Character classes
Consider a practical task – we have a phone number "+7(903)-123-45-67", and we need to find all digits in that string. Other characters do not interest us.
A character class is a special notation that matches any symbol from the set.
For instance, there's a “digit” class. It's written as \d. We put it in the pattern, and during the search any digit matches it.
For instance, the regexp /\d/ looks for a single digit:
let str = "+7(903)-123-45-67";
let reg = /\d/;
alert( str.match(reg) ); // 7
The regexp is not global in the example above, so it only looks for the first match.
Let's add the g flag to look for all digits:
let str = "+7(903)-123-45-67";
let reg = /\d/g;
alert( str.match(reg) ); // array of matches: 7,9,0,3,1,2,3,4,5,6,7
Most used classes: \d \s \w
That was a character class for digits. There are other character classes as well.
Most used are:
\d (“d” is from “digit”)
A digit: a character from 0 to 9.
\s (“s” is from “space”)
A space symbol: that includes spaces, tabs, newlines.
\w (“w” is from “word”)
A “wordly” character: either a letter of English alphabet or a digit or an underscore. Non-english letters (like cyrillic or hindi) do not belong to \w.
For instance, \d\s\w means a digit followed by a space character followed by a wordly character, like "1 Z".
A regexp may contain both regular symbols and character classes.
For instance, CSS\d matches a string CSS with a digit after it:
let str = "CSS4 is cool";
let reg = /CSS\d/
alert( str.match(reg) ); // CSS4
Also we can use many character classes:
alert( "I love HTML5!".match(/\s\w\w\w\w\d/) ); // 'HTML5'
The match (each character class corresponds to one result character):
Word boundary: \b
The word boundary \b – is a special character class.
It does not denote a character, but rather a boundary between characters.
For instance, \bJava\b matches Java in the string Hello, Java!, but not in the script Hello, JavaScript!.
The boundary has “zero width” in a sense that usually a character class means a character in the result (like a wordly or a digit), but not in this case.
The boundary is a test.
When regular expression engine is doing the search, it's moving along the string in an attempt to find the match. At each string position it tries to find the pattern.
When the pattern contains \b, it tests that the position in string fits one of the conditions:
String start, and the first string character is \w.
String end, and the last string character is \w.
Inside the string: from one side is \w, from the other side – not \w.
For instance, in the string Hello, Java! the following positions match \b:
So it matches \bHello\b and \bJava\b, but not \bHell\b (because there's no word boundary after l) and not Java!\b (because the exclamation sign is not a wordly character, so there's no word boundary after it).
Once again let's note that \b makes the searching engine to test for the boundary, so that Java\b finds Java only when followed by a word boundary, but it does not add a letter to the result.
Usually we use \b to find standalone English words. So that if we want "Java" language then \bJava\b finds exactly a standalone word and ignores it when it's a part of "JavaScript".
Another example: a regexp \b\d\d\b looks for standalone two-digit numbers. In other words, it requires that before and after \d\d must be a symbol different from \w (or beginning/end of the string).
Word boundary doesn't work for non-English alphabets
The word boundary check \b tests for a boundary between \w and something else. But \w means an English letter (or a digit or an underscore), so the test won't work for other characters (like cyrillic or hieroglyphs).
Reverse classes
For every character class there exists a “reverse class”, denoted with the same letter, but uppercased.
The “reverse” means that it matches all other characters, for instance:
\D
Non-digit: any character except \d, for instance a letter.
\S
Non-space: any character except \s, for instance a letter.
\W
Non-wordly character: anything but \w.
\B
Non-boundary: a test reverse to \b.
In the beginning of the chapter we saw how to get all digits from the phone +7(903)-123-45-67. Let's get a “pure” phone number from the string:
let str = "+7(903)-123-45-67";
alert( str.match(/\d/g).join('') ); // 79031234567
An alternative way would be to find non-digits and remove them from the string:
let str = "+7(903)-123-45-67";
alert( str.replace(/\D/g, "") ); // 79031234567
Spaces are regular characters
Please note that regular expressions may include spaces. They are treated like regular characters.
Usually we pay little attention to spaces. For us strings 1-5 and 1 - 5 are nearly identical.
But if a regexp does not take spaces into account, it won' work.
Let's try to find digits separated by a dash:
alert( "1 - 5".match(/\d-\d/) ); // null, no match!
Here we fix it by adding spaces into the regexp:
alert( "1 - 5".match(/\d - \d/) ); // 1 - 5, now it works
Of course, spaces are needed only if we look for them. Extra spaces (just like any other extra characters) may prevent a match:
alert( "1-5".match(/\d - \d/) ); // null, because the string 1-5 has no spaces
In other words, in a regular expression all characters matter. Spaces too.
A dot is any character
The dot "." is a special character class that matches any character except a newline.
For instance:
alert( "Z".match(/./) ); // Z
Or in the middle of a regexp:
let reg = /CS.4/;
alert( "CSS4".match(reg) ); // CSS4
alert( "CS-4".match(reg) ); // CS-4
alert( "CS 4".match(reg) ); // CS 4 (space is also a character)
Please note that the dot means “any character”, but not the “absense of a character”. There must be a character to match it:
alert( "CS4".match(/CS.4/) ); // null, no match because there's no character for the dot
Summary
We covered character classes:
\d – digits.
\D – non-digits.
\s – space symbols, tabs, newlines.
\S – all but \s.
\w – English letters, digits, underscore '_'.
\W – all but \w.
'.' – any character except a newline.
If we want to search for a character that has a special meaning like a backslash or a dot, then we should escape it with a backslash: \.
Please note that a regexp may also contain string special characters such as a newline \n. There's no conflict with character classes, because other letters are used for them.
The time has a format: hours:minutes. Both hours and minutes has two digits, like 09:00.
Make a regexp to find time in the string: Breakfast at 09:00 in the room 123:456.
P.S. In this task there's no need to check time correctness yet, so 25:99 can also be a valid result.
P.P.S. The regexp shouldn't match 123:456.
The answer: \b\d\d:\d\d\b.
alert( "Breakfast at 09:00 in the room 123:456.".match( /\b\d\d:\d\d\b/ ) ); // 09:00
Escaping, special characters
As we've seen, a backslash "\" is used to denote character classes. So it's a special character.
There are other special characters as well, that have special meaning in a regexp. They are used to do more powerful searches.
Here's a full list of them: [ \ ^ $ . | ? * + ( ).
Don't try to remember it – when we deal with each of them separately, you'll know it by heart automatically.
Escaping
To use a special character as a regular one, prepend it with a backslash.
That's also called “escaping a character”.
For instance, we need to find a dot '.'. In a regular expression a dot means “any character except a newline”, so if we really mean “a dot”, let's put a backslash before it: \..
alert( "Chapter 5.1".match(/\d\.\d/) ); // 5.1
Parentheses are also special characters, so if we want them, we should use \(. The example below looks for a string "g()":
alert( "function g()".match(/g\(\)/) ); // "g()"
If we're looking for a backslash \, then we should double it:
alert( "1\\2".match(/\\/) ); // '\'
A slash
The slash symbol '/' is not a special character, but in JavaScript it is used to open and close the regexp: /...pattern.../, so we should escape it too.
Here's what a search for a slash '/' looks like:
alert( "/".match(/\//) ); // '/'
From the other hand, the alternative new RegExp syntaxes does not require escaping it:
alert( "/".match(new RegExp("/")) ); // '/'
new RegExp
If we are creating a regular expression with new RegExp, then we need to do some more escaping.
For instance, consider this:
let reg = new RegExp("\d\.\d");
alert( "Chapter 5.1".match(reg) ); // null
It doesn't work, but why?
The reason is string escaping rules. Look here:
alert("\d\.\d"); // d.d
Backslashes are used for escaping inside a string and string-specific special characters like \n. The quotes “consume” and interpret them, for instance:
\n – becomes a newline character,
\u1234 – becomes the Unicode character with such code,
…And when there's no special meaning: like \d or \z, then the backslash is simply removed.
So the call to new RegExp gets a string without backslashes.
To fix it, we need to double backslashes, because quotes turn \\ into \:
let regStr = "\\d\\.\\d";
alert(regStr); // \d\.\d (correct now)
let reg = new RegExp(regStr);
alert( "Chapter 5.1".match(reg) ); // 5.1
="main__header-title">Sets and ranges [...]
Several characters or character classes inside square brackets […] mean to “search for any character among given”.
Sets
For instance, [eao] means any of the 3 characters: 'a', 'e', or 'o'.
That's called a set. Sets can be used in a regexp along with regular characters:
// find [t or m], and then "op"
alert( "Mop top".match(/[tm]op/gi) ); // "Mop", "top"
Please note that although there are multiple characters in the set, they correspond to exactly one character in the match.
So the example above gives no matches:
// find "V", then [o or i], then "la"
alert( "Voila".match(/V[oi]la/) ); // null, no matches
The pattern assumes:
V,
then one of the letters [oi],
then la.
So there would be a match for Vola or Vila.
Ranges
Square brackets may also contain character ranges.
For instance, [a-z] is a character in range from a to z, and [0-5] is a digit from 0 to 5.
In the example below we're searching for "x" followed by two digits or letters from A to F:
Please note that in the word Exception there's a substring xce. It didn't match the pattern, because the letters are lowercase, while in the set [0-9A-F] they are uppercase.
If we want to find it too, then we can add a range a-f: [0-9A-Fa-f]. The i flag would allow lowercase too.
Character classes are shorthands for certain character sets.
For instance:
\d – is the same as [0-9],
\w – is the same as [a-zA-Z0-9_],
\s – is the same as [\t\n\v\f\r ] plus few other unicode space characters.
We can use character classes inside […] as well.
For instance, we want to match all wordly characters or a dash, for words like “twenty-third”. We can't do it with \w+, because \w class does not include a dash. But we can use [\w-].
We also can use a combination of classes to cover every possible character, like [\s\S]. That matches spaces or non-spaces – any character. That's wider than a dot ".", because the dot matches any character except a newline.
Excluding ranges
Besides normal ranges, there are “excluding” ranges that look like [^…].
They are denoted by a caret character ^ at the start and match any character except the given ones.
For instance:
[^aeyo] – any character except 'a', 'e', 'y' or 'o'.
[^0-9] – any character except a digit, the same as \D.
[^\s] – any non-space character, same as \S.
The example below looks for any characters except letters, digits and spaces:
alert( "alice15@gmail.com".match(/[^\d\sA-Z]/gi) ); // @ and .
No escaping in […]
Usually when we want to find exactly the dot character, we need to escape it like \.. And if we need a backslash, then we use \\.
In square brackets the vast majority of special characters can be used without escaping:
A dot '.'.
A plus '+'.
Parentheses '( )'.
Dash '-' in the beginning or the end (where it does not define a range).
A caret '^' if not in the beginning (where it means exclusion).
And the opening square bracket '['.
In other words, all special characters are allowed except where they mean something for square brackets.
A dot "." inside square brackets means just a dot. The pattern [.,] would look for one of characters: either a dot or a comma.
In the example below the regexp [-().^+] looks for one of the characters -().^+:
// No need to escape
let reg = /[-().^+]/g;
alert( "1 + 2 - 3".match(reg) ); // Matches +, -
…But if you decide to escape them “just in case”, then there would be no harm:
// Escaped everything
let reg = /[\-\(\)\.\^\+]/g;
alert( "1 + 2 - 3".match(reg) ); // also works: +, -
Does it match anything in the string Java? In the string JavaScript?
Answers: no, yes.
In the script Java it doesn't match anything, because [^script] means “any character except given ones”. So the regexp looks for "Java" followed by one such symbol, but there's a string end, no symbols after it.
alert( "Java".match(/Java[^script]/) ); // null
Yes, because the regexp is case-insensitive, the [^script] part matches the character "S".
The time can be in the format hours:minutes or hours-minutes. Both hours and minutes have 2 digits: 09:00 or 21-30.
Write a regexp to find time:
let reg = /your regexp/g;
alert( "Breakfast at 09:00. Dinner at 21-30".match(reg) ); // 09:00, 21-30
P.S. In this task we assume that the time is always correct, there's no need to filter out bad strings like “45:67”. Later we'll deal with that too.
Answer: \d\d[-:]\d\d.
let reg = /\d\d[-:]\d\d/g;
alert( "Breakfast at 09:00. Dinner at 21-30".match(reg) ); // 09:00, 21-30
Please note that the dash '-' has a special meaning in square brackets, but only between other characters, not when it's in the beginning or at the end, so we don't need to escape it.
The unicode flag
The unicode flag /.../u enables the correct support of surrogate pairs.
Surrogate pairs are explained in the chapter
Strings.
Let's briefly remind them here. In short, normally characters are encoded with 2 bytes. That gives us 65536 characters maximum. But there are more characters in the world.
So certain rare characters are encoded with 4 bytes, like 𝒳 (mathematical X) or 😄 (a smile).
Here are the unicode values to compare:
Character
Unicode
Bytes
a
0x0061
2
≈
0x2248
2
𝒳
0x1d4b3
4
𝒴
0x1d4b4
4
😄
0x1f604
4
So characters like a and ≈ occupy 2 bytes, and those rare ones take 4.
The unicode is made in such a way that the 4-byte characters only have a meaning as a whole.
In the past JavaScript did not know about that, and many string methods still have problems. For instance, length thinks that here are two characters:
alert('😄'.length); // 2
alert('𝒳'.length); // 2
…But we can see that there's only one, right? The point is that length treats 4 bytes as two 2-byte characters. That's incorrect, because they must be considered only together (so-called “surrogate pair”).
Normally, regular expressions also treat “long characters” as two 2-byte ones.
That leads to odd results, for instance let's try to find [𝒳𝒴] in the string 𝒳:
alert( '𝒳'.match(/[𝒳𝒴]/) ); // odd result
The result would be wrong, because by default the regexp engine does not understand surrogate pairs. It thinks that [𝒳𝒴] are not two, but four characters: the left half of 𝒳(1), the right half of 𝒳(2), the left half of 𝒴(3), the right half of 𝒴(4).
So it finds the left half of 𝒳 in the string 𝒳, not the whole symbol.
In other words, the search works like '12'.match(/[1234]/) – the 1 is returned (left half of 𝒳).
The /.../u flag fixes that. It enables surrogate pairs in the regexp engine, so the result is correct:
alert( '𝒳'.match(/[𝒳𝒴]/u) ); // 𝒳
There's an error that may happen if we forget the flag:
'𝒳'.match(/[𝒳-𝒴]/); // SyntaxError: invalid range in character class
Here the regexp [𝒳-𝒴] is treated as [12-34] (where 2 is the right part of 𝒳 and 3 is the left part of 𝒴), and the range between two halves 2 and 3 is unacceptable.
Using the flag would make it work right:
alert( '𝒴'.match(/[𝒳-𝒵]/u) ); // 𝒴
To finalize, let's note that if we do not deal with surrogate pairs, then the flag does nothing for us. But in the modern world we often meet them.
Quantifiers +, *, ? and {n}
Let's say we have a string like +7(903)-123-45-67 and want to find all numbers in it. But unlike before, we are interested in not digits, but full numbers: 7, 903, 123, 45, 67.
A number is a sequence of 1 or more digits \d. The instrument to say how many we need is called quantifiers.
Quantity {n}
The most obvious quantifier is a number in figure quotes: {n}. A quantifier is put after a character (or a character class and so on) and specifies exactly how many we need.
It also has advanced forms, here we go with examples:
Exact count: {5}
\d{5} denotes exactly 5 digits, the same as \d\d\d\d\d.
The example below looks for a 5-digit number:
alert( "I'm 12345 years old".match(/\d{5}/) ); // "12345"
We can add \b to exclude longer numbers: \b\d{5}\b.
The count from-to: {3,5}
To find numbers from 3 to 5 digits we can put the limits into figure brackets: \d{3,5}
alert( "I'm not 12, but 1234 years old".match(/\d{3,5}/) ); // "1234"
We can omit the upper limit. Then a regexp \d{3,} looks for numbers of 3 and more digits:
alert( "I'm not 12, but 345678 years old".match(/\d{3,}/) ); // "345678"
In case with the string +7(903)-123-45-67 we need numbers: one or more digits in a row. That is \d{1,}:
let str = "+7(903)-123-45-67";
let numbers = str.match(/\d{1,}/g);
alert(numbers); // 7,903,123,45,67
Shorthands
Most often needed quantifiers have shorthands:
+
Means “one or more”, the same as {1,}.
For instance, \d+ looks for numbers:
let str = "+7(903)-123-45-67";
alert( str.match(/\d+/g) ); // 7,903,123,45,67
?
Means “zero or one”, the same as {0,1}. In other words, it makes the symbol optional.
For instance, the pattern ou?r looks for o followed by zero or one u, and then r.
So it can find or in the word color and our in colour:
let str = "Should I write color or colour?";
alert( str.match(/colou?r/g) ); // color, colour
*
Means “zero or more”, the same as {0,}. That is, the character may repeat any times or be absent.
The example below looks for a digit followed by any number of zeroes:
alert( "100 10 1".match(/\d0*/g) ); // 100, 10, 1
Compare it with '+' (one or more):
alert( "100 10 1".match(/\d0+/g) ); // 100, 10
More examples
Quantifiers are used very often. They are one of the main “building blocks” for complex regular expressions, so let's see more examples.
Regexp “decimal fraction” (a number with a floating point): \d+\.\d+
We can see one common rule in these examples: the more precise is the regular expression – the longer and more complex it is.
For instance, HTML tags could use a simpler regexp: <\w+>.
Because \w means any English letter or a digit or '_', the regexp also matches non-tags, for instance <_>. But it's much simpler than <[a-z][a-z0-9]*>.
Are we ok with <\w+> or we need <[a-z][a-z0-9]*>?
In real life both variants are acceptable. Depends on how tolerant we can be to “extra” matches and whether it's difficult or not to filter them out by other means.
// color
alert( "#123456".match( /#[a-f0-9]{6}\b/gi ) ); // #123456
// not a color
alert( "#12345678".match( /#[a-f0-9]{6}\b/gi ) ); // null
Greedy and lazy quantifiers
Quantifiers are very simple from the first sight, but in fact they can be tricky.
We should understand how the search works very well if we plan to look for something more complex than /\d+/.
Let's take the following task as an example.
We have a text and need to replace all quotes "..." with guillemet marks: «...». They are preferred for typography in many countries.
For instance: "Hello, world" should become «Hello, world».
Some countries prefer „Witam, świat!” (Polish) or even 「你好,世界」 (Chinese) quotes. For different locales we can choose different replacements, but that all works the same, so let's start with «...».
To make replacements we first need to find all quoted substrings.
The regular expression can look like this: /".+"/g. That is: we look for a quote followed by one or more characters, and then another quote.
…But if we try to apply it, even in such a simple case…
let reg = /".+"/g;
let str = 'a "witch" and her "broom" is one';
alert( str.match(reg) ); // "witch" and her "broom"
…We can see that it works not as intended!
Instead of finding two matches "witch" and "broom", it finds one: "witch" and her "broom".
That can be described as “greediness is the cause of all evil”.
Greedy search
To find a match, the regular expression engine uses the following algorithm:
For every position in the string
Match the pattern at that position.
If there's no match, go to the next position.
These common words do not make it obvious why the regexp fails, so let's elaborate how the search works for the pattern ".+".
The first pattern character is a quote ".
The regular expression engine tries to find it at the zero position of the source string a "witch" and her "broom" is one, but there's a there, so there's immediately no match.
Then it advances: goes to the next positions in the source string and tries to find the first character of the pattern there, and finally finds the quote at the 3rd position:
The quote is detected, and then the engine tries to find a match for the rest of the pattern. It tries to see if the rest of the subject string conforms to .+".
In our case the next pattern character is . (a dot). It denotes “any character except a newline”, so the next string letter 'w' fits:
Then the dot repeats because of the quantifier .+. The regular expression engine builds the match by taking characters one by one while it is possible.
…When it becomes impossible? All characters match the dot, so it only stops when it reaches the end of the string:
Now the engine finished repeating for .+ and tries to find the next character of the pattern. It's the quote ". But there's a problem: the string has finished, there are no more characters!
The regular expression engine understands that it took too many .+ and starts to backtrack.
In other words, it shortens the match for the quantifier by one character:
Now it assumes that .+ ends one character before the end and tries to match the rest of the pattern from that position.
If there were a quote there, then that would be the end, but the last character is 'e', so there's no match.
…So the engine decreases the number of repetitions of .+ by one more character:
The quote '"' does not match 'n'.
The engine keep backtracking: it decreases the count of repetition for '.' until the rest of the pattern (in our case '"') matches:
The match is complete.
So the first match is "witch" and her "broom". The further search starts where the first match ends, but there are no more quotes in the rest of the string is one, so no more results.
That's probably not what we expected, but that's how it works.
In the greedy mode (by default) the quantifier is repeated as many times as possible.
The regexp engine tries to fetch as many characters as it can by .+, and then shortens that one by one.
For our task we want another thing. That's what the lazy quantifier mode is for.
Lazy mode
The lazy mode of quantifier is an opposite to the greedy mode. It means: “repeat minimal number of times”.
We can enable it by putting a question mark '?' after the quantifier, so that it becomes *? or +? or even ?? for '?'.
To make things clear: usually a question mark ? is a quantifier by itself (zero or one), but if added after another quantifier (or even itself) it gets another meaning – it switches the matching mode from greedy to lazy.
The regexp /".+?"/g works as intended: it finds "witch" and "broom":
let reg = /".+?"/g;
let str = 'a "witch" and her "broom" is one';
alert( str.match(reg) ); // witch, broom
To clearly understand the change, let's trace the search step by step.
The first step is the same: it finds the pattern start '"' at the 3rd position:
The next step is also similar: the engine finds a match for the dot '.':
And now the search goes differently. Because we have a lazy mode for +?, the engine doesn't try to match a dot one more time, but stops and tries to match the rest of the pattern '"' right now:
If there were a quote there, then the search would end, but there's 'i', so there's no match.
Then the regular expression engine increases the number of repetitions for the dot and tries one more time:
Failure again. Then the number of repetitions is increased again and again…
…Till the match for the rest of the pattern is found:
The next search starts from the end of the current match and yield one more result:
In this example we saw how the lazy mode works for +?. Quantifiers +? and ?? work the similar way – the regexp engine increases the number of repetitions only if the rest of the pattern can't match on the given position.
Laziness is only enabled for the quantifier with ?.
Other quantifiers remain greedy.
For instance:
alert( "123 456".match(/\d+ \d+?/g) ); // 123 4
The pattern \d+ tries to match as many numbers as it can (greedy mode), so it finds 123 and stops, because the next character is a space ' '.
Then there's a space in pattern, it matches.
Then there's \d+?. The quantifier is in lazy mode, so it finds one digit 4 and tries to check if the rest of the pattern matches from there.
…But there's nothing in the pattern after \d+?.
The lazy mode doesn't repeat anything without a need. The pattern finished, so we're done. We have a match 123 4.
The next search starts from the character 5.
Optimizations
Modern regular expression engines can optimize internal algorithms to work faster. So they may work a bit different from the described algorithm.
But to understand how regular expressions work and to build regular expressions, we don't need to know about that. They are only used internally to optimize things.
Complex regular expressions are hard to optimize, so the search may work exactly as described as well.
Alternative approach
With regexps, there's often more then one way to do the same thing.
In our case we can find quoted strings without lazy mode using the regexp "[^"]+":
let reg = /"[^"]+"/g;
let str = 'a "witch" and her "broom" is one';
alert( str.match(reg) ); // witch, broom
The regexp "[^"]+" gives correct results, because it looks for a quote '"' followed by one or more non-quotes [^"], and then the closing quote.
When the regexp engine looks for [^"]+ it stops the repetitions when it meets the closing quote, and we're done.
Please note, that this logic does not replace lazy quantifiers!
It is just different. There are times when we need one or another.
Let's see one more example where lazy quantifiers fail and this variant works right.
For instance, we want to find links of the form <a href="..." class="doc">, with any href.
Which regular expression to use?
The first idea might be: /<a href=".*" class="doc">/g.
By default the regular expression engine tries to repeat the quantifier as many times as possible. For instance, \d+ consumes all possible digits. When it becomes impossible to consume more (no more digits or string end), then it continues to match the rest of the pattern. If there's no match then it decreases the number of repetitions (backtracks) and tries again.
Lazy
Enabled by the question mark ? after the quantifier. The regexp engine tries to match the rest of the pattern before each repetition of the quantifier.
As we've seen, the lazy mode is not a “panacea” from the greedy search. An alternative is a “fine-tuned” greedy search, with exclusions. Soon we'll see more examples of it.
let reg = /your regexp/g;
let str = `... <!-- My -- comment
test --> .. <!----> ..
`;
alert( str.match(reg) ); // '<!-- My -- comment \n test -->', '<!---->'
We need to find the beginning of the comment <!--, then everything till the end of -->.
The first idea could be <!--.*?--> – the lazy quantifier makes the dot stop right before -->.
But a dot in Javascript means “any symbol except the newline”. So multiline comments won't be found.
We can use [\s\S] instead of the dot to match “anything”:
let reg = /<!--[\s\S]*?-->/g;
let str = `... <!-- My -- comment
test --> .. <!----> ..
`;
alert( str.match(reg) ); // '<!-- My -- comment \n test -->', '<!---->'
Without parentheses, the pattern /go+/ means g, followed by o repeated one or more times. For instance, goooo or gooooooooo.
Parentheses group the word (go) together.
Let's make something more complex – a regexp to match an email.
Examples of emails:
my@mail.com
john.smith@site.com.uk
The pattern: [-.\w]+@([\w-]+\.)+[\w-]{2,20}.
The first part before @ may include wordly characters, a dot and a dash [-.\w]+, like john.smith.
Then @
And then the domain. May be a second-level domain site.com or with subdomains like host.site.com.uk. We can match it as “a word followed by a dot” repeated one or more times for subdomains: mail. or site.com., and then “a word” for the last part: .com or .uk.
The word followed by a dot is (\w+\.)+ (repeated). The last word should not have a dot at the end, so it's just \w{2,20}. The quantifier {2,20} limits the length, because domain zones are like .uk or .com or .museum, but can't be longer than 20 characters.
So the domain pattern is (\w+\.)+\w{2,20}. Now we replace \w with [\w-], because dashes are also allowed in domains, and we get the final result.
That regexp is not perfect, but usually works. It's short and good enough to fix errors or occasional mistypes.
For instance, here we can find all emails in the string:
let reg = /[-.\w]+@([\w-]+\.)+[\w-]{2,20}/g;
alert("my@mail.com @ his@site.com.uk".match(reg)); // my@mail.com,his@site.com.uk
Contents of parentheses
Parentheses are numbered from left to right. The search engine remembers the content of each and allows to reference it in the pattern or in the replacement string.
For instance, we can find an HTML-tag using a (simplified) pattern <.*?>. Usually we'd want to do something with the result after it.
If we enclose the inner contents of <...> into parentheses, then we can access it like this:
let str = '<h1>Hello, world!</h1>';
let reg = /<(.*?)>/;
alert( str.match(reg) ); // Array: ["<h1>", "h1"]
The call to
String#match returns groups only if the regexp has no /.../g flag.
let str = '<h1>Hello, world!</h1>';
// two matches: opening <h1> and closing </h1> tags
let reg = /<(.*?)>/g;
let match;
while (match = reg.exec(str)) {
// first shows the match: <h1>,h1
// then shows the match: </h1>,/h1
alert(match);
}
Here we have two matches for <(.*?)>, each of them is an array with the full match and groups.
Nested groups
Parentheses can be nested. In this case the numbering also goes from left to right.
For instance, when searching a tag in <span class="my"> we may be interested in:
The tag content as a whole: span class="my".
The tag name: span.
The tag attributes: class="my".
Let's add parentheses for them:
let str = '<span class="my">';
let reg = /<(([a-z]+)\s*([^>]*))>/;
let result = str.match(reg);
alert(result); // <span class="my">, span class="my", span, class="my"
Here's how groups look:
At the zero index of the result is always the full match.
Then groups, numbered from left to right. Whichever opens first gives the first group result[1]. Here it encloses the whole tag content.
Then in result[2] goes the group from the second opening ( till the corresponding ) – tag name, then we don't group spaces, but group attributes for result[3].
If a group is optional and doesn't exist in the match, the corresponding result index is present (and equals undefined).
For instance, let's consider the regexp a(z)?(c)?. It looks for "a" optionally followed by "z" optionally followed by "c".
If we run it on the string with a single letter a, then the result is:
let match = 'a'.match(/a(z)?(c)?/);
alert( match.length ); // 3
alert( match[0] ); // a (whole match)
alert( match[1] ); // undefined
alert( match[2] ); // undefined
The array has the length of 3, but all groups are empty.
And here's a more complex match for the string ack:
let match = 'ack'.match(/a(z)?(c)?/)
alert( match.length ); // 3
alert( match[0] ); // ac (whole match)
alert( match[1] ); // undefined, because there's nothing for (z)?
alert( match[2] ); // c
The array length is permanent: 3. But there's nothing for the group (z)?, so the result is ["ac", undefined, "c"].
Non-capturing groups with ?:
Sometimes we need parentheses to correctly apply a quantifier, but we don't want their contents in the array.
A group may be excluded by adding ?: in the beginning.
For instance, if we want to find (go)+, but don't want to put remember the contents (go) in a separate array item, we can write: (?:go)+.
In the example below we only get the name “John” as a separate member of the results array:
let str = "Gogo John!";
// exclude Gogo from capturing
let reg = /(?:go)+ (\w+)/i;
let result = str.match(reg);
alert( result.length ); // 2
alert( result[1] ); // John
A regexp for a number is: -?\d+(\.\d+)?. We created it in previous tasks.
An operator is [-+*/]. We put a dash - the first, because in the middle it would mean a character range, we don't need that.
Note that a slash should be escaped inside a JavaScript regexp /.../.
We need a number, an operator, and then another number. And optional spaces between them.
The full regular expression: -?\d+(\.\d+)?\s*[-+*/]\s*-?\d+(\.\d+)?.
To get a result as an array let's put parentheses around the data that we need: numbers and the operator: (-?\d+(\.\d+)?)\s*([-+*/])\s*(-?\d+(\.\d+)?).
In action:
let reg = /(-?\d+(\.\d+)?)\s*([-+*\/])\s*(-?\d+(\.\d+)?)/;
alert( "1.2 + 12".match(reg) );
The result includes:
result[0] == "1.2 + 12" (full match)
result[1] == "1" (first parentheses)
result[2] == "2" (second parentheses – the decimal part (\.\d+)?)
result[3] == "+" (…)
result[4] == "12" (…)
result[5] == undefined (the last decimal part is absent, so it's undefined)
We need only numbers and the operator. We don't need decimal parts.
So let's remove extra groups from capturing by added ?:, for instance: (?:\.\d+)?.
The final solution:
function parse(expr) {
let reg = /(-?\d+(?:\.\d+)?)\s*([-+*\/])\s*(-?\d+(?:\.\d+)?)/;
let result = expr.match(reg);
if (!result) return;
result.shift();
return result;
}
alert( parse("-1.23 * 3.45") ); // -1.23, *, 3.45
Backreferences: \n and $n
Capturing groups may be accessed not only in the result, but in the replacement string, and in the pattern too.
Group in replacement: $n
When we are using replace method, we can access n-th group in the replacement string using $n.
For instance:
let name = "John Smith";
name = name.replace(/(\w+) (\w+)/i, "$2, $1");
alert( name ); // Smith, John
Here $1 in the replacement string means “substitute the content of the first group here”, and $2 means “substitute the second group here”.
Referencing a group in the replacement string allows us to reuse the existing text during the replacement.
Group in pattern: \n
A group can be referenced in the pattern using \n.
To make things clear let's consider a task. We need to find a quoted string: either a single-quoted '...' or a double-quoted "..." – both variants need to match.
How to look for them?
We can put two kinds of quotes in the pattern: ['"](.*?)['"]. That finds strings like "..." and '...', but it gives incorrect matches when one quote appears inside another one, like the string "She's the one!":
let str = "He said: \"She's the one!\".";
let reg = /['"](.*?)['"]/g;
// The result is not what we expect
alert( str.match(reg) ); // "She'
As we can see, the pattern found an opening quote ", then the text is consumed lazily till the other quote ', that closes the match.
To make sure that the pattern looks for the closing quote exactly the same as the opening one, let's make a group of it and use the backreference:
let str = "He said: \"She's the one!\".";
let reg = /(['"])(.*?)\1/g;
alert( str.match(reg) ); // "She's the one!"
Now everything's correct! The regular expression engine finds the first quote (['"]) and remembers the content of (...), that's the first capturing group.
Further in the pattern \1 means “find the same text as in the first group”.
Please note:
To reference a group inside a replacement string – we use $1, while in the pattern – a backslash \1.
If we use ?: in the group, then we can't reference it. Groups that are excluded from capturing (?:...) are not remembered by the engine.
Alternation (OR) |
Alternation is the term in regular expression that is actually a simple “OR”.
In a regular expression it is denoted with a vertical line character |.
For instance, we need to find programming languages: HTML, PHP, Java or JavaScript.
The corresponding regexp: html|php|java(script)?.
A usage example:
let reg = /html|php|css|java(script)?/gi;
let str = "First HTML appeared, then CSS, then JavaScript";
alert( str.match(reg) ); // 'HTML', 'CSS', 'JavaScript'
We already know a similar thing – square brackets. They allow to choose between multiple character, for instance gr[ae]y matches gray or grey.
Alternation works not on a character level, but on expression level. A regexp A|B|C means one of expressions A, B or C.
For instance:
gr(a|e)y means exactly the same as gr[ae]y.
gra|ey means “gra” or “ey”.
To separate a part of the pattern for alternation we usually enclose it in parentheses, like this: before(XXX|YYY)after.
Regexp for time
In previous chapters there was a task to build a regexp for searching time in the form hh:mm, for instance 12:00. But a simple \d\d:\d\d is too vague. It accepts 25:99 as the time.
How can we make a better one?
We can apply more careful matching:
The first digit must be 0 or 1 followed by any digit.
Or 2 followed by [0-3]
As a regexp: [01]\d|2[0-3].
Then we can add a colon and the minutes part.
The minutes must be from 0 to 59, in the regexp language that means the first digit [0-5] followed by any other digit \d.
Let's glue them together into the pattern: [01]\d|2[0-3]:[0-5]\d.
We're almost done, but there's a problem. The alternation | is between the [01]\d and 2[0-3]:[0-5]\d. That's wrong, because it will match either the left or the right pattern:
let reg = /[01]\d|2[0-3]:[0-5]\d/g;
alert("12".match(reg)); // 12 (matched [01]\d)
That's rather obvious, but still an often mistake when starting to work with regular expressions.
We need to add parentheses to apply alternation exactly to hours: [01]\d OR 2[0-3].
Create a regexp to find all BB-tags with their contents.
For instance:
let reg = /your regexp/g;
let str = "..[url]http://google.com[/url]..";
alert( str.match(reg) ); // [url]http://google.com[/url]
If tags are nested, then we need the outer tag (if we want we can continue the search in its content):
let reg = /your regexp/g;
let str = "..[url][b]http://google.com[/b][/url]..";
alert( str.match(reg) ); // [url][b]http://google.com[/b][/url]
Opening tag is \[(b|url|quote)\].
Then to find everything till the closing tag – let's the pattern [\s\S]*? to match any character including the newline and then a backreference to the closing tag.
The full pattern: \[(b|url|quote)\][\s\S]*?\[/\1\].
In action:
let reg = /\[(b|url|quote)\][\s\S]*?\[\/\1\]/g;
let str = `
[b]hello![/b]
[quote]
[url]http://google.com[/url]
[/quote]
`;
alert( str.match(reg) ); // [b]hello![/b],[quote][url]http://google.com[/url][/quote]
Please note that we had to escape a slash for the closing tag [/\1], because normally the slash closes the pattern.
Create a regexp to find strings in double quotes "...".
The important part is that strings should support escaping, in the same way as JavaScript strings do. For instance, quotes can be inserted as \" a newline as \n, and the slash itself as \\.
let str = "Just like \"here\".";
For us it's important that an escaped quote \" does not end a string.
So we should look from one quote to the other ignoring escaped quotes on the way.
That's the essential part of the task, otherwise it would be trivial.
Examples of strings to match:
.. "test me" ..
.. "Say \"Hello\"!" ... (escaped quotes inside)
.. "\\" .. (double slash inside)
.. "\\ \"" .. (double slash and an escaped quote inside)
In JavaScript we need to double the slashes to pass them right into the string, like this:
let str = ' .. "test me" .. "Say \\"Hello\\"!" .. "\\\\ \\"" .. ';
// the in-memory string
alert(str); // .. "test me" .. "Say \"Hello\"!" .. "\\ \"" ..
The solution: /"(\\.|[^"\\])*"/g.
Step by step:
First we look for an opening quote "
Then if we have a backslash \\ (we technically have to double it in the pattern, because it is a special character, so that's a single backslash in fact), then any character is fine after it (a dot).
Otherwise we take any character except a quote (that would mean the end of the string) and a backslash (to prevent lonely backslashes, the backslash is only used with some other symbol after it): [^"\\]
…And so on till the closing quote.
In action:
let reg = /"(\\.|[^"\\])*"/g;
let str = ' .. "test me" .. "Say \\"Hello\\"!" .. "\\\\ \\"" .. ';
alert( str.match(reg) ); // "test me","Say \"Hello\"!","\\ \""
Write a regexp to find the tag <style...>. It should match the full tag: it may have no attributes <style> or have several of them <style type="..." id="...">.
The caret '^' and dollar '$' characters have special meaning in a regexp. They are called “anchors”.
The caret ^ matches at the beginning of the text, and the dollar $ – in the end.
For instance, let's test if the text starts with Mary:
let str1 = "Mary had a little lamb, it's fleece was white as snow";
let str2 = 'Everywhere Mary went, the lamp was sure to go';
alert( /^Mary/.test(str1) ); // true
alert( /^Mary/.test(str2) ); // false
The pattern ^Mary means: “the string start and then Mary”.
Now let's test whether the text ends with an email.
To match an email, we can use a regexp [-.\w]+@([\w-]+\.)+[\w-]{2,20}. It's not perfect, but mostly works.
To test whether the string ends with the email, let's add $ to the pattern:
let reg = /[-.\w]+@([\w-]+\.)+[\w-]{2,20}$/g;
let str1 = 'My email is mail@site.com';
let str2 = 'Everywhere Mary went, the lamp was sure to go';
alert( reg.test(str1) ); // true
alert( reg.test(str2) ); // false
We can use both anchors together to check whether the string exactly follows the pattern. That's often used for validation.
For instance we want to check that str is exactly a color in the form # plus 6 hex digits. The pattern for the color is #[0-9a-f]{6}.
To check that the whole string exactly matches it, we add ^...$:
let str = "#abcdef";
alert( /^#[0-9a-f]{6}$/i.test(str) ); // true
The regexp engine looks for the text start, then the color, and then immediately the text end. Just what we need.
Anchors have zero length
Anchors just like \b are tests. They have zero-width.
In other words, they do not match a character, but rather force the regexp engine to check the condition (text start/end).
The behavior of anchors changes if there's a flag m (multiline mode). We'll explore it in the next chapter.
The empty string is the only match: it starts and immediately finishes.
The task once again demonstrates that anchors are not characters, but tests.
The string is empty "". The engine first matches the ^ (input start), yes it's there, and then immediately the end $, it's here too. So there's a match.
Here every match is a word plus a newline character.
And one more difference – the newline \n does not match at the string end. That's why Eeyore is not found in the example above.
So, anchors are usually better, they are closer to what we want to get.
Lookahead (in progress)
The article is under development, will be here when it's ready.
Infinite backtracking problem
Some regular expressions are looking simple, but can execute veeeeeery long time, and even “hang” the JavaScript engine.
Sooner or later most developers occasionally face such behavior.
The typical situation – a regular expression works fine sometimes, but for certain strings it “hangs” consuming 100% of CPU.
That may even be a vulnerability. For instance, if JavaScript is on the server, and it uses regular expressions to process user data, then such an input may cause denial of service. The author personally saw and reported such vulnerabilities even for well-known and widely used programs.
So the problem is definitely worth to deal with.
Example
The plan will be like this:
First we see the problem how it may occur.
Then we simplify the situation and see why it occurs.
Then we fix it.
For instance let's consider searching tags in HTML.
We want to find all tags, with or without attributes – like <a href="..." class="doc" ...>. We need the regexp to work reliably, because HTML comes from the internet and can be messy.
In particular, we need it to match tags like <a test="<>" href="#"> – with < and > in attributes. That's allowed by
HTML standard.
Now we can see that a simple regexp like <[^>]+> doesn't work, because it stops at the first >, and we need to ignore <> inside an attribute.
// the match doesn't reach the end of the tag - wrong!
alert( '<a test="<>" href="#">'.match(/<[^>]+>/) ); // <a test="<>
We need the whole tag.
To correctly handle such situations we need a more complex regular expression. It will have the form <tag (key=value)*>.
In the regexp language that is: <\w+(\s*\w+=(\w+|"[^"]*")\s*)*>:
<\w+ – is the tag start,
(\s*\w+=(\w+|"[^"]*")\s*)* – is an arbitrary number of pairs word=value, where the value can be either a word \w+ or a quoted string "[^"]*".
That doesn't yet support few details of HTML grammar, for instance strings in ‘single' quotes, but they can be added later, so that's somewhat close to real life. For now we want the regexp to be simple.
Let's try it in action:
let reg = /<\w+(\s*\w+=(\w+|"[^"]*")\s*)*>/g;
let str='...<a test="<>" href="#">... <b>...';
alert( str.match(reg) ); // <a test="<>" href="#">, <b>
Great, it works! It found both the long tag <a test="<>" href="#"> and the short one <b>.
Now let's see the problem.
If you run the example below, it may hang the browser (or whatever JavaScript engine runs):
let reg = /<\w+(\s*\w+=(\w+|"[^"]*")\s*)*>/g;
let str = `<tag a=b a=b a=b a=b a=b a=b a=b a=b
a=b a=b a=b a=b a=b a=b a=b a=b a=b a=b a=b a=b a=b`;
// The search will take a long long time
alert( str.match(reg) );
Some regexp engines can handle that search, but most of them don't.
What's the matter? Why a simple regular expression on such a small string “hangs”?
Let's simplify the situation by removing the tag and quoted strings.
Here we look only for attributes:
// only search for space-delimited attributes
let reg = /<(\s*\w+=\w+\s*)*>/g;
let str = `<a=b a=b a=b a=b a=b a=b a=b a=b
a=b a=b a=b a=b a=b a=b a=b a=b a=b a=b a=b a=b a=b`;
// the search will take a long, long time
alert( str.match(reg) );
The same problem persists.
Here we end the demo of the problem and start looking into what's going on and why it hangs.
Backtracking
To make an example even simpler, let's consider (\d+)*$.
This regular expression also has the same problem. In most regexp engines that search takes a very long time (careful – can hang):
First, one may notice that the regexp is a little bit strange. The quantifier * looks extraneous. If we want a number, we can use \d+$.
Indeed, the regexp is artificial. But the reason why it is slow is the same as those we saw above. So let's understand it, and then return to the real-life examples.
What happen during the search of (\d+)*$ in the line 123456789z?
First, the regexp engine tries to find a number \d+. The plus + is greedy by default, so it consumes all digits:
\d+.......
(123456789)z
Then it tries to apply the star around the parentheses (\d+)*, but there are no more digits, so it the star doesn't give anything.
Then the pattern has the string end anchor $, and in the text we have z.
X
\d+........$
(123456789)z
No match!
There's no match, so the greedy quantifier + decreases the count of repetitions (backtracks).
Now \d+ is not all digits, but all except the last one:
\d+.......
(12345678)9z
Now the engine tries to continue the search from the new position (9).
The start (\d+)* can now be applied – it gives the number 9:
\d+.......\d+
(12345678)(9)z
The engine tries to match $ again, but fails, because meets z:
X
\d+.......\d+
(12345678)(9)z
There's no match, so the engine will continue backtracking.
Now the first number \d+ will have 7 digits, and the rest of the string 89 becomes the second \d+:
X
\d+......\d+
(1234567)(89)z
…Still no match for $.
The search engine backtracks again. Backtracking generally works like this: the last greedy quantifier decreases the number of repetitions until it can. Then the previous greedy quantifier decreases, and so on. In our case the last greedy quantifier is the second \d+, from 89 to 8, and then the star takes 9:
X
\d+......\d+\d+
(1234567)(8)(9)z
…Fail again. The second and third \d+ backtracked to the end, so the first quantifier shortens the match to 123456, and the star takes the rest:
X
\d+.......\d+
(123456)(789)z
Again no match. The process repeats: the last greedy quantifier releases one character (9):
X
\d+.....\d+ \d+
(123456)(78)(9)z
…And so on.
The regular expression engine goes through all combinations of 123456789 and their subsequences. There are a lot of them, that's why it takes so long.
A smart guy can say here: “Backtracking? Let's turn on the lazy mode – and no more backtracking!”.
Let's replace \d+ with \d+? and see if it works (careful, can hang the browser)
Lazy quantifiers actually do the same, but in the reverse order. Just think about how the search engine would work in this case.
Some regular expression engines have tricky built-in checks to detect infinite backtracking or other means to work around them, but there's no universal solution.
In the example above, when we search <(\s*\w+=\w+\s*)*> in the string <a=b a=b a=b a=b – the similar thing happens.
The string has no > at the end, so the match is impossible, but the regexp engine does not know about it. The search backtracks trying different combinations of (\s*\w+=\w+\s*):
(a=b a=b a=b) (a=b)
(a=b a=b) (a=b a=b)
...
How to fix?
The problem – too many variants in backtracking even if we don't need them.
For instance, in the pattern (\d+)*$ we (people) can easily see that (\d+) does not need to backtrack.
Decreasing the count of \d+ can not help to find a match, there's no matter between these two:
Let's get back to more real-life example: <(\s*\w+=\w+\s*)*>. We want it to find pairs name=value (as many as it can). There's no need in backtracking here.
In other words, if it found many name=value pairs and then can't find >, then there's no need to decrease the count of repetitions. Even if we match one pair less, it won't give us the closing >:
Modern regexp engines support so-called “possessive” quantifiers for that. They are like greedy, but don't backtrack at all. Pretty simple, they capture whatever they can, and the search continues. There's also another tool called “atomic groups” that forbid backtracking inside parentheses.
Unfortunately, but both these features are not supported by JavaScript.
The pattern to take as much repetitions as possible without backtracking is: (?=(a+))\1.
In other words, the lookahead ?= looks for the maximal count a+ from the current position. And then they are “consumed into the result” by the backreference \1.
There will be no backtracking, because lookahead does not backtrack. If it found like 5 times of a+ and the further match failed, then it doesn't go back to 4.
Let's fix the regexp for a tag with attributes from the beginning of the chapter<\w+(\s*\w+=(\w+|"[^"]*")\s*)*>. We'll use lookahead to prevent backtracking of name=value pairs:
// regexp to search name=value
let attrReg = /(\s*\w+=(\w+|"[^"]*")\s*)/
// use it inside the regexp for tag
let reg = new RegExp('<\\w+(?=(' + attrReg.source + '*))\\1>', 'g');
let good = '...<a test="<>" href="#">... <b>...';
let bad = `<tag a=b a=b a=b a=b a=b a=b a=b a=b
a=b a=b a=b a=b a=b a=b a=b a=b a=b a=b a=b a=b a=b`;
alert( good.match(reg) ); // <a test="<>" href="#">, <b>
alert( bad.match(reg) ); // null (no results, fast!)
Great, it works! We found a long tag <a test="<>" href="#"> and a small one <b> and didn't hang the engine.
Please note the attrReg.source property. RegExp objects provide access to their source string in it. That's convenient when we want to insert one regexp into another.
For instance, take a look at the function loadScript(src):
function loadScript(src) {
let script = document.createElement('script');
script.src = src;
document.head.append(script);
}
The purpose of the function is to load a new script. When it adds the <script src="…"> to the document, the browser loads and executes it.
We can use it like this:
// loads and executes the script
loadScript('/my/script.js');
The function is called “asynchronous”, because the action (script loading) finishes not now, but later.
The call initiates the script loading, then the execution continues. While the script is loading, the code below may finish executing, and if the loading takes time, other scripts may run meanwhile too.
loadScript('/my/script.js');
// the code below loadScript doesn't wait for the script loading to finish
// ...
Now let's say we want to use the new script when it loads. It probably declares new functions, so we'd like to run them.
…But if we do that immediately after the loadScript(…) call, that wouldn't work:
loadScript('/my/script.js'); // the script has "function newFunction() {…}"
newFunction(); // no such function!
Naturally, the browser probably didn't have time to load the script. So the immediate call to the new function fails. As of now, loadScript function doesn't provide a way to track the load completion. The script loads and eventually runs, that's all. But we'd like to know when happens, to use new functions and variables from that script.
Let's add a callback function as a second argument to loadScript that should execute when the script loads:
function loadScript(src, callback) {
let script = document.createElement('script');
script.src = src;
script.onload = () => callback(script);
document.head.append(script);
}
Now if we want to call new functions from the script, we should write that in the callback:
loadScript('/my/script.js', function() {
// the callback runs after the script is loaded
newFunction(); // so now it works
...
});
That's the idea: the second argument is a function (usually anonymous) that runs when the action is completed.
Here's a runnable example with a real script:
function loadScript(src, callback) {
let script = document.createElement('script');
script.src = src;
script.onload = () => callback(script);
document.head.append(script);
}
loadScript('https://cdnjs.cloudflare.com/ajax/libs/lodash.js/3.2.0/lodash.js', script => {
alert(`Cool, the ${script.src} is loaded`);
alert( _ ); // function declared in the loaded script
});
That's called a “callback-based” style of asynchronous programming. A function that does something asynchronously should provide a callback argument where we put the function to run after it's complete.
Here we did it in loadScript, but of course it's a general approach.
Callback in callback
How to load two scripts sequentially: the first one, and then the second one after it?
The natural solution would be to put the second loadScript call inside the callback, like this:
loadScript('/my/script.js', function(script) {
alert(`Cool, the ${script.src} is loaded, let's load one more`);
loadScript('/my/script2.js', function(script) {
alert(`Cool, the second script is loaded`);
});
});
After the outer loadScript is complete, the callback initiates the inner one.
…What if we want one more script?
loadScript('/my/script.js', function(script) {
loadScript('/my/script2.js', function(script) {
loadScript('/my/script3.js', function(script) {
// ...continue after all scripts are loaded
});
})
});
So, every new action is inside a callback. That's fine for few actions, but not good for many, so we'll see other variants soon.
Handling errors
In examples above we didn't consider errors. What if the script loading fails? Our callback should be able to react on that.
Here's an improved version of loadScript that tracks loading errors:
function loadScript(src, callback) {
let script = document.createElement('script');
script.src = src;
script.onload = () => callback(null, script);
script.onerror = () => callback(new Error(`Script load error for ${src}`));
document.head.append(script);
}
It calls callback(null, script) for successful load and callback(error) otherwise.
Once again, the recipe that we used for loadScript is actually quite common. It's called the “error-first callback” style.
The convention is:
The first argument of callback is reserved for an error if it occurs. Then callback(err) is called.
The second argument (and the next ones if needed) are for the successful result. Then callback(null, result1, result2…) is called.
So the single callback function is used both for reporting errors and passing back results.
Pyramid of doom
From the first look it's a viable way of asynchronous coding. And indeed it is. For one or maybe two nested calls it looks fine.
But for multiple asynchronous actions that follow one after another we'll have a code like this:
loadScript('1.js', function(error, script) {
if (error) {
handleError(error);
} else {
// ...
loadScript('2.js', function(error, script) {
if (error) {
handleError(error);
} else {
// ...
loadScript('3.js', function(error, script) {
if (error) {
handleError(error);
} else {
// ...continue after all scripts are loaded (*)
}
});
}
})
}
});
In the code above:
We load 1.js, then if there's no error.
We load 2.js, then if there's no error.
We load 3.js, then if there's no error – do something else (*).
As calls become more nested, the code becomes deeper and increasingly more difficult to manage, especially if we have a real code instead of ..., that may include more loops, conditional statements and so on.
That's sometimes called “callback hell” or “pyramid of doom”.
The “pyramid” of nested calls grows to the right with every asynchronous action. Soon it spirals out of control.
So this way of coding isn't very good.
We can try to alleviate the problem by making every action a standalone function, like this:
loadScript('1.js', step1);
function step1(error, script) {
if (error) {
handleError(error);
} else {
// ...
loadScript('2.js', step2);
}
}
function step2(error, script) {
if (error) {
handleError(error);
} else {
// ...
loadScript('3.js', step3);
}
}
function step3(error, script) {
if (error) {
handleError(error);
} else {
// ...continue after all scripts are loaded (*)
}
};
See? It does the same, and there's no deep nesting now, because we made every action a separate top-level function.
It works, but the code looks like a torn apart spreadsheet. It's difficult to read, you probably noticed that. One needs to eye-jump between pieces while reading it. That's inconvenient, especially the reader is not familiar with the code and doesn't know where to eye-jump.
Also the functions named step* are all of a single use, they are created only to evade the “pyramid of doom”. No one is going to reuse them outside of the action chain. So there's a bit of a namespace cluttering here.
We'd like to have a something better.
Luckily, there are other ways to evade such pyramids. One of the best ways is to use “promises”, described in the next chapter.
In the task
Animated circle an animated growing circle is shown.
Now let's say we need not just a circle, but to show a message inside it. The message should appear after the animation is complete (the circle is fully grown), otherwise it would look ugly.
In the solution of the task, the function showCircle(cx, cy, radius) draws the circle, but gives no way to track when it's ready.
Add a callback argument: showCircle(cx, cy, radius, callback) to be called when the animation is complete. The callback should receive the circle <div> as an argument.
Here's the example:
showCircle(150, 150, 100, div => {
div.classList.add('message-ball');
div.append("Hello, world!");
});
Imagine that you're a top singer, and fans ask for your next upcoming single day and night.
To get a relief, you promise to send it to them when it's published. You give your fans a list. They can fill in their coordinates, so that when the song becomes available, all subscribed parties instantly get it. And if something goes very wrong, so that the song won't be published ever, then they are also to be notified.
Everyone is happy: you, because the people don't crowd you any more, and fans, because they won't miss the single.
That was a real-life analogy for things we often have in programming:
A “producing code” that does something and needs time. For instance, it loads a remote script. That's a “singer”.
A “consuming code” wants the result when it's ready. Many functions may need that result. These are “fans”.
A promise is a special JavaScript object that links them together. That's a “list”. The producing code creates it and gives to everyone, so that they can subscribe for the result.
The analogy isn't very accurate, because JavaScript promises are more complex than a simple list: they have additional features and limitations. But still they are alike.
The constructor syntax for a promise object is:
let promise = new Promise(function(resolve, reject) {
// executor (the producing code, "singer")
});
The function passed to new Promise is called executor. When the promise is created, it's called automatically. It contains the producing code, that should eventually finish with a result. In terms of the analogy above, the executor is a “singer”.
The resulting promise object has internal properties:
state – initially is “pending”, then changes to “fulfilled” or “rejected”,
result – an arbitrary value, initially undefined.
When the executor finishes the job, it should call one of:
resolve(value) – to indicate that the job finished successfully:
sets state to "fulfilled",
sets result to value.
reject(error) – to indicate that an error occurred:
sets state to "rejected",
sets result to error.
Here's a simple executor, to gather that all together:
let promise = new Promise(function(resolve, reject) {
// the function is executed automatically when the promise is constructed
alert(resolve); // function () { [native code] }
alert(reject); // function () { [native code] }
// after 1 second signal that the job is done with the result "done!"
setTimeout(() => resolve("done!"), 1000);
});
We can see two things by running the code above:
The executor is called automatically and immediately (by new Promise).
The executor receives two arguments: resolve and reject – these functions come from JavaScript engine. We don't need to create them. Instead the executor should call them when ready.
After one second of thinking the executor calls resolve("done") to produce the result:
That was an example of the “successful job completion”.
And now an example where the executor rejects promise with an error:
let promise = new Promise(function(resolve, reject) {
// after 1 second signal that the job is finished with an error
setTimeout(() => reject(new Error("Whoops!")), 1000);
});
To summarize, the executor should do a job (something that takes time usually) and then call resolve or reject to change the state of the corresponding promise object.
The promise that is either resolved or rejected is called “settled”, as opposed to a “pending” promise.
There can be only one result or an error
The executor should call only one resolve or reject. The promise state change is final.
All further calls of resolve and reject are ignored:
let promise = new Promise(function(resolve, reject) {
resolve("done");
reject(new Error("…")); // ignored
setTimeout(() => resolve("…")); // ignored
});
The idea is that a job done by the executor may have only one result or an error. In programming, there exist other data structures that allow many “flowing” results, for instance streams and queues. They have their own advantages and disadvantages versus promises. They are not supported by JavaScript core and lack certain language features that promises provide, we don't cover them here to concentrate on promises.
Also if we call resolve/reject with more then one argument – only the first argument is used, the next ones are ignored.
Reject with Error objects
Technically we can call reject (just like resolve) with any type of argument. But it's recommended to use Error objects in reject (or inherit from them). The reasoning for that will become obvious soon.
Resolve/reject can be immediate
In practice an executor usually does something asynchronously and calls resolve/reject after some time, but it doesn't have to. We can call resolve or reject immediately, like this:
let promise = new Promise(function(resolve, reject) {
resolve(123); // immediately give the result: 123
});
For instance, it happens when we start to do a job and then see that everything has already been done. Technically that's fine: we have a resolved promise right now.
The state and result are internal
Properties state and result of a promise object are internal. We can't directly access them from our code, but we can use methods .then/catch for that, they are described below.
Consumers: “.then” and “.catch”
A promise object serves as a link between the producing code (executor) and the consuming functions – those that want to receive the result/error. Consuming functions can be registered using methods promise.then and promise.catch.
The syntax of .then is:
promise.then(
function(result) { /* handle a successful result */ },
function(error) { /* handle an error */ }
);
The first function argument runs when the promise is resolved and gets the result, and the second one – when it's rejected and gets the error.
For instance:
let promise = new Promise(function(resolve, reject) {
setTimeout(() => resolve("done!"), 1000);
});
// resolve runs the first function in .then
promise.then(
result => alert(result), // shows "done!" after 1 second
error => alert(error) // doesn't run
);
In case of a rejection:
let promise = new Promise(function(resolve, reject) {
setTimeout(() => reject(new Error("Whoops!")), 1000);
});
// reject runs the second function in .then
promise.then(
result => alert(result), // doesn't run
error => alert(error) // shows "Error: Whoops!" after 1 second
);
If we're interested only in successful completions, then we can provide only one argument to .then:
let promise = new Promise(resolve => {
setTimeout(() => resolve("done!"), 1000);
});
promise.then(alert); // shows "done!" after 1 second
If we're interested only in errors, then we can use .then(null, function) or an “alias” to it: .catch(function)
let promise = new Promise((resolve, reject) => {
setTimeout(() => reject(new Error("Whoops!")), 1000);
});
// .catch(f) is the same as promise.then(null, f)
promise.catch(alert); // shows "Error: Whoops!" after 1 second
The call .catch(f) is a complete analog of .then(null, f), it's just a shorthand.
On settled promises then runs immediately
If a promise is pending, .then/catch handlers wait for the result. Otherwise, if a promise has already settled, they execute immediately:
// an immediately resolved promise
let promise = new Promise(resolve => resolve("done!"));
promise.then(alert); // done! (shows up right now)
That's handy for jobs that may sometimes require time and sometimes finish immediately. The handler is guaranteed to run in both cases.
Handlers of .then/catch are always asynchronous
To be even more precise, when .then/catch handler should execute, it first gets into an internal queue. The JavaScript engine takes handlers from the queue and executes when the current code finishes, similar to setTimeout(..., 0).
In other words, when .then(handler) is going to trigger, it does something like setTimeout(handler, 0) instead.
In the example below the promise is immediately resolved, so .then(alert) triggers right now: the alert call is queued and runs immediately after the code finishes.
// an immediately resolved promise
let promise = new Promise(resolve => resolve("done!"));
promise.then(alert); // done! (right after the current code finishes)
alert("code finished"); // this alert shows first
So the code after .then always executes before the handler (even in the case of a pre-resolved promise). Usually that's unimportant, in some scenarios may matter.
Now let's see more practical examples how promises can help us in writing asynchronous code.
Example: loadScript
We've got the loadScript function for loading a script from the previous chapter.
Here's the callback-based variant, just to remind it:
The new function loadScript will not require a callback. Instead it will create and return a promise object that settles when the loading is complete. The outer code can add handlers to it using .then:
let promise = loadScript("https://cdnjs.cloudflare.com/ajax/libs/lodash.js/3.2.0/lodash.js");
promise.then(
script => alert(`${script.src} is loaded!`),
error => alert(`Error: ${error.message}`)
);
promise.then(script => alert('One more handler to do something else!'));
We can immediately see few benefits over the callback-based syntax:
Callbacks
We must have a ready callback function when calling loadScript. In other words, we must know what to do with the result beforeloadScript is called.
There can be only one callback.
Promises
Promises allow us to code things in the natural order. First we run loadScript, and .then write what to do with the result.
We can call .then on a promise as many times as we want, at any time later.
So promises already give us better code flow and flexibility. But there's more. We'll see that in the next chapters.
Rewrite the showCircle function in the solution of the task
Animated circle with callback so that it returns a promise instead of accepting a callback.
The value returned by .then is a promise, that's why we are able to add another .then at (2). When the value is returned in (1), that promise becomes resolved, so the next handler runs with the value.
Unlike the chaining, technically we can also add many .then to a single promise, like this:
let promise = new Promise(function(resolve, reject) {
setTimeout(() => resolve(1), 1000);
});
promise.then(function(result) {
alert(result); // 1
return result * 2;
});
promise.then(function(result) {
alert(result); // 1
return result * 2;
});
promise.then(function(result) {
alert(result); // 1
return result * 2;
});
…But that's a totally different thing. Here's the picture (compare it with the chaining above):
All .then on the same promise get the same result – the result of that promise. So in the code above all alert show the same: 1. There is no result-passing between them.
In practice we rarely need multiple handlers for one promise. Chaining is used much more often.
Returning promises
Normally, a value returned by a .then handler is immediately passed to the next handler. But there's an exception.
If the returned value is a promise, then the further execution is suspended until it settles. After that, the result of that promise is given to the next .then handler.
Here the first .then shows 1 returns new Promise(…) in the line (*). After one second it resolves, and the result (the argument of resolve, here it's result*2) is passed on to handler of the second .then in the line (**). It shows 2 and does the same thing.
So the output is again 1 → 2 > 4, but now with 1 second delay between alert calls.
Returning promises allows us to build chains of asynchronous actions.
Example: loadScript
Let's use this feature with loadScript to load scripts one by one, in sequence:
loadScript("/article/promise-chaining/one.js")
.then(function(script) {
return loadScript("/article/promise-chaining/two.js");
})
.then(function(script) {
return loadScript("/article/promise-chaining/three.js");
})
.then(function(script) {
// use functions declared in scripts
// to show that they indeed loaded
one();
two();
three();
});
Here each loadScript call returns a promise, and the next .then runs when it resolves. Then it initiates the loading of the next script. So scripts are loaded one after another.
We can add more asynchronous actions to the chain. Please note that code is still “flat”, it grows down, not to the right. There are no signs of “pyramid of doom”.
Please note that technically it is also possible to write .then directly after each promise, without returning them, like this:
loadScript("/article/promise-chaining/one.js").then(function(script1) {
loadScript("/article/promise-chaining/two.js").then(function(script2) {
loadScript("/article/promise-chaining/three.js").then(function(script3) {
// this function has access to variables script1, script2 and script3
one();
two();
three();
});
});
});
This code does the same: loads 3 scripts in sequence. But it “grows to the right”. So we have the same problem as with callbacks. Use chaining (return promises from .then) to evade it.
Sometimes it's ok to write .then directly, because the nested function has access to the outer scope (here the most nested callback has access to all variables scriptX), but that's an exception rather than a rule.
Thenables
To be precise, .then may return an arbitrary “thenable” object, and it will be treated the same way as a promise.
A “thenable” object is any object with a method .then.
The idea is that 3rd-party libraries may implement “promise-compatible” objects of their own. They can have extended set of methods, but also be compatible with native promises, because they implement .then.
Here's an example of a thenable object:
class Thenable {
constructor(num) {
this.num = num;
}
then(resolve, reject) {
alert(resolve); // function() { native code }
// resolve with this.num*2 after the 1 second
setTimeout(() => resolve(this.num * 2), 1000); // (**)
}
}
new Promise(resolve => resolve(1))
.then(result => {
return new Thenable(result); // (*)
})
.then(alert); // shows 2 after 1000ms
JavaScript checks the object returned by .then handler in the line (*): if it has a callable method named then, then it calls that method providing native functions resolve, reject as arguments (similar to executor) and waits until one of them is called. In the example above resolve(2) is called after 1 second (**). Then the result is passed further down the chain.
This feature allows to integrate custom objects with promise chains without having to inherit from Promise.
Bigger example: fetch
In frontend programming promises are often used for network requests. So let's see an extended example of that.
We'll use the
fetch method to load the information about the user from the remote server. The method is quite complex, it has many optional parameters, but the basic usage is quite simple:
let promise = fetch(url);
This makes a network request to the url and returns a promise. The promise resolves with a response object when the remote server responds with headers, but before the full response is downloaded.
To read the full response, we should call a method response.text(): it returns a promise that resolves when the full text downloaded from the remote server, with that text as a result.
The code below makes a request to user.json and loads its text from the server:
fetch('/article/promise-chaining/user.json')
// .then below runs when the remote server responds
.then(function(response) {
// response.text() returns a new promise that resolves with the full response text
// when we finish downloading it
return response.text();
})
.then(function(text) {
// ...and here's the content of the remote file
alert(text); // {"name": "iliakan", isAdmin: true}
});
There is also a method response.json() that reads the remote data and parses it as JSON. In our case that's even more convenient, so let's switch to it.
We'll also use arrow functions for brevity:
// same as above, but response.json() parses the remote content as JSON
fetch('/article/promise-chaining/user.json')
.then(response => response.json())
.then(user => alert(user.name)); // iliakan
Now let's do something with the loaded user.
For instance, we can make one more request to github, load the user profile and show the avatar:
// Make a request for user.json
fetch('/article/promise-chaining/user.json')
// Load it as json
.then(response => response.json())
// Make a request to github
.then(user => fetch(`https://api.github.com/users/${user.name}`))
// Load the response as json
.then(response => response.json())
// Show the avatar image (githubUser.avatar_url) for 3 seconds (maybe animate it)
.then(githubUser => {
let img = document.createElement('img');
img.src = githubUser.avatar_url;
img.className = "promise-avatar-example";
document.body.append(img);
setTimeout(() => img.remove(), 3000); // (*)
});
The code works, see comments about the details, but it should be quite self-descriptive. Although, there's a potential problem in it, a typical error of those who begin to use promises.
Look at the line (*): how can we do something after the avatar has finished showing and gets removed? For instance, we'd like to show a form for editing that user or something else. As of now, there's no way.
To make the chain extendable, we need to return a promise that resolves when the avatar finishes showing.
Now right after setTimeout runs img.remove(), it calls resolve(githubUser), thus passing the control to the next .then in the chain and passing forward the user data.
As a rule, an asynchronous action should always return a promise.
That makes possible to plan actions after it. Even if we don't plan to extend the chain now, we may need it later.
Finally, we can split the code into reusable functions:
Asynchronous actions may sometimes fail: in case of an error the corresponding promise becomes rejected. For instance, fetch fails if the remote server is not available. We can use .catch to handle errors (rejections).
Promise chaining is great at that aspect. When a promise rejects, the control jumps to the closest rejection handler down the chain. That's very convenient in practice.
For instance, in the code below the URL is wrong (no such server) and .catch handles the error:
fetch('https://no-such-server.blabla') // rejects
.then(response => response.json())
.catch(err => alert(err)) // TypeError: failed to fetch (the text may vary)
Or, maybe, everything is all right with the server, but the response is not a valid JSON:
fetch('/') // fetch works fine now, the server responds successfully
.then(response => response.json()) // rejects: the page is HTML, not a valid json
.catch(err => alert(err)) // SyntaxError: Unexpected token < in JSON at position 0
In the example below we append .catch to handle all errors in the avatar-loading-and-showing chain:
Here .catch doesn't trigger at all, because there are no errors. But if any of the promises above rejects, then it would execute.
Implicit try…catch
The code of the executor and promise handlers has an "invisible try..catch" around it. If an error happens, it gets caught and treated as a rejection.
For instance, this code:
new Promise(function(resolve, reject) {
throw new Error("Whoops!");
}).catch(alert); // Error: Whoops!
…Works the same way as this:
new Promise(function(resolve, reject) {
reject(new Error("Whoops!"));
}).catch(alert); // Error: Whoops!
The "invisible try..catch" around the executor automatically catches the error and treats it as a rejection.
That's so not only in the executor, but in handlers as well. If we throw inside .then handler, that means a rejected promise, so the control jumps to the nearest error handler.
Here's an example:
new Promise(function(resolve, reject) {
resolve("ok");
}).then(function(result) {
throw new Error("Whoops!"); // rejects the promise
}).catch(alert); // Error: Whoops!
That's so not only for throw, but for any errors, including programming errors as well:
new Promise(function(resolve, reject) {
resolve("ok");
}).then(function(result) {
blabla(); // no such function
}).catch(alert); // ReferenceError: blabla is not defined
As a side effect, the final .catch not only catches explicit rejections, but also occasional errors in the handlers above.
Rethrowing
As we already noticed, .catch behaves like try..catch. We may have as many .then as we want, and then use a single .catch at the end to handle errors in all of them.
In a regular try..catch we can analyze the error and maybe rethrow it if can't handle. The same thing is possible for promises. If we throw inside .catch, then the control goes to the next closest error handler. And if we handle the error and finish normally, then it continues to the closest successful .then handler.
In the example below the .catch successfully handles the error:
// the execution: catch -> then
new Promise(function(resolve, reject) {
throw new Error("Whoops!");
}).catch(function(error) {
alert("The error is handled, continue normally");
}).then(() => alert("Next successful handler runs"));
Here the .catch block finishes normally. So the next successful handler is called. Or it could return something, that would be the same.
…And here the .catch block analyzes the error and throws it again:
// the execution: catch -> catch -> then
new Promise(function(resolve, reject) {
throw new Error("Whoops!");
}).catch(function(error) { // (*)
if (error instanceof URIError) {
// handle it
} else {
alert("Can't handle such error");
throw error; // throwing this or another error jumps to the next catch
}
}).then(function() {
/* never runs here */
}).catch(error => { // (**)
alert(`The unknown error has occurred: ${error}`);
// don't return anything => execution goes the normal way
});
The handler (*) catches the error and just can't handle it, because it's not URIError, so it throws it again. Then the execution jumps to the next .catch down the chain (**).
In the section below we'll see a practical example of rethrowing.
Fetch error handling example
Let's improve error handling for the user-loading example.
The promise returned by
fetch rejects when it's impossible to make a request. For instance, a remote server is not available, or the URL is malformed. But if the remote server responds with error 404, or even error 500, then it's considered a valid response.
What if the server returns a non-JSON page with error 500 in the line (*)? What if there's no such user, and github returns a page with error 404 at (**)?
fetch('no-such-user.json') // (*)
.then(response => response.json())
.then(user => fetch(`https://api.github.com/users/${user.name}`)) // (**)
.then(response => response.json())
.catch(alert); // SyntaxError: Unexpected token < in JSON at position 0
// ...
As of now, the code tries to load the response as JSON no matter what and dies with a syntax error. You can see that by running the example above, as the file no-such-user.json doesn't exist.
That's not good, because the error just falls through the chain, without details: what failed and where.
So let's add one more step: we should check the response.status property that has HTTP status, and if it's not 200, then throw an error.
class HttpError extends Error { // (1)
constructor(response) {
super(`${response.status} for ${response.url}`);
this.name = 'HttpError';
this.response = response;
}
}
function loadJson(url) { // (2)
return fetch(url)
.then(response => {
if (response.status == 200) {
return response.json();
} else {
throw new HttpError(response);
}
})
}
loadJson('no-such-user.json') // (3)
.catch(alert); // HttpError: 404 for .../no-such-user.json
We make a custom class for HTTP Errors to distinguish them from other types of errors. Besides, the new class has a constructor that accepts the response object and saves it in the error. So error-handling code will be able to access it.
Then we put together the requesting and error-handling code into a function that fetches the urland treats any non-200 status as an error. That's convenient, because we often need such logic.
Now alert shows better message.
The great thing about having our own class for errors is that we can easily check for it in error-handling code.
For instance, we can make a request, and then if we get 404 – ask the user to modify the information.
The code below loads a user with the given name from github. If there's no such user, then it asks for the correct name:
function demoGithubUser() {
let name = prompt("Enter a name?", "iliakan");
return loadJson(`https://api.github.com/users/${name}`)
.then(user => {
alert(`Full name: ${user.name}.`); // (1)
return user;
})
.catch(err => {
if (err instanceof HttpError && err.response.status == 404) { // (2)
alert("No such user, please reenter.");
return demoGithubUser();
} else {
throw err;
}
});
}
demoGithubUser();
Here:
If loadJson returns a valid user object, then the name is shown (1), and the user is returned, so that we can add more user-related actions to the chain. In that case the .catch below is ignored, everything's very simple and fine.
Otherwise, in case of an error, we check it in the line (2). Only if it's indeed the HTTP error, and the status is 404 (Not found), we ask the user to reenter. For other errors – we don't know how to handle, so we just rethrow them.
Unhandled rejections
What happens when an error is not handled? For instance, after the rethrow as in the example above. Or if we forget to append an error handler to the end of the chain, like here:
new Promise(function() {
noSuchFunction(); // Error here (no such function)
}); // no .catch attached
Or here:
// a chain of promises without .catch at the end
new Promise(function() {
throw new Error("Whoops!");
}).then(function() {
// ...something...
}).then(function() {
// ...something else...
}).then(function() {
// ...but no catch after it!
});
In case of an error, the promise state becomes “rejected”, and the execution should jump to the closest rejection handler. But there is no such handler in the examples above. So the error gets “stuck”.
In practice, that's usually because of the bad code. Indeed, how come that there's no error handling?
Most JavaScript engines track such situations and generate a global error in that case. We can see it in the console.
In the browser we can catch it using the event unhandledrejection:
window.addEventListener('unhandledrejection', function(event) {
// the event object has two special properties:
alert(event.promise); // [object Promise] - the promise that generated the error
alert(event.reason); // Error: Whoops! - the unhandled error object
});
new Promise(function() {
throw new Error("Whoops!");
}); // no catch to handle the error
The event is the part of the
HTML standard. Now if an error occurs, and there's no .catch, the unhandledrejection handler triggers: the event object has the information about the error, so we can do something with it.
Usually such errors are unrecoverable, so our best way out is to inform the user about the problem and probably report about the incident to the server.
In non-browser environments like Node.JS there are other similar ways to track unhandled errors.
Summary
To summarize, .then/catch(handler) returns a new promise that changes depending on what handler does:
If it returns a value or finishes without a return (same as return undefined), then the new promise becomes resolved, and the closest resolve handler (the first argument of .then) is called with that value.
If it throws an error, then the new promise becomes rejected, and the closest rejection handler (second argument of .then or .catch) is called with it.
If it returns a promise, then JavaScript waits until it settles and then acts on its outcome the same way.
The picture of how the promise returned by .then/catch changes:
The smaller picture of how handlers are called:
In the examples of error handling above the .catch was always the last in the chain. In practice though, not every promise chain has a .catch. Just like regular code is not always wrapped in try..catch.
We should place .catch exactly in the places where we want to handle errors and know how to handle them. Using custom error classes can help to analyze errors and rethrow those that we can't handle.
For errors that fall outside of our scope we should have the unhandledrejection event handler (for browsers, and analogs for other environments). Such unknown errors are usually unrecoverable, so all we should do is to inform the user and probably report to our server about the incident.
Are these code fragments equal? In other words, do they behave the same way in any circumstances, for any handler functions?
promise.then(f1, f2);
Versus;
promise.then(f1).catch(f2);
The short answer is: no, they are not the equal:
The difference is that if an error happens in f1, then it is handled by .catch here:
promise
.then(f1)
.catch(f2);
…But not here:
promise
.then(f1, f2);
That's because an error is passed down the chain, and in the second code piece there's no chain below f1.
In other words, .then passes results/errors to the next .then/catch. So in the first example, there's a catch below, and in the second one – there isn't, so the error is unhandled.
How do you think, does the .catch trigger? Explain your answer?
new Promise(function(resolve, reject) {
setTimeout(() => {
throw new Error("Whoops!");
}, 1000);
}).catch(alert);
The answer is: no, it won't:
new Promise(function(resolve, reject) {
setTimeout(() => {
throw new Error("Whoops!");
}, 1000);
}).catch(alert);
As said in the chapter, there's an "implicit try..catch" around the function code. So all synchronous errors are handled.
But here the error is generated not while the executor is running, but later. So the promise can't handle it.
Promise API
There are 4 static methods in the Promise class. We'll quickly cover their use cases here.
Promise.resolve
The syntax:
let promise = Promise.resolve(value);
Returns a resolved promise with the given value.
Same as:
let promise = new Promise(resolve => resolve(value));
The method is used when we already have a value, but would like to have it “wrapped” into a promise.
For instance, the loadCached function below fetches the url and remembers the result, so that future calls on the same URL return it immediately:
function loadCached(url) {
let cache = loadCached.cache || (loadCached.cache = new Map());
if (cache.has(url)) {
return Promise.resolve(cache.get(url)); // (*)
}
return fetch(url)
.then(response => response.text())
.then(text => {
cache[url] = text;
return text;
});
}
We can use loadCached(url).then(…), because the function is guaranteed to return a promise. That's the purpose Promise.resolve in the line (*): it makes sure the interface unified. We can always use .then after loadCached.
Promise.reject
The syntax:
let promise = Promise.reject(error);
Create a rejected promise with the error.
Same as:
let promise = new Promise((resolve, reject) => reject(error));
We cover it here for completeness, rarely used in real code.
Promise.all
The method to run many promises in parallel and wait till all of them are ready.
The syntax is:
let promise = Promise.all(iterable);
It takes an iterable object with promises, technically it can be any iterable, but usually it's an array, and returns a new promise. The new promise resolves with when all of them are settled and has an array of their results.
For instance, the Promise.all below settles after 3 seconds, and then its result is an array [1, 2, 3]:
Promise.all([
new Promise((resolve, reject) => setTimeout(() => resolve(1), 3000)), // 1
new Promise((resolve, reject) => setTimeout(() => resolve(2), 2000)), // 2
new Promise((resolve, reject) => setTimeout(() => resolve(3), 1000)) // 3
]).then(alert); // 1,2,3 when promises are ready: each promise contributes an array member
Please note that the relative order is the same. Even though the first promise takes the longest time to resolve, it is still first in the array of results.
A common trick is to map an array of job data into an array of promises, and then wrap that into Promise.all.
For instance, if we have an array of URLs, we can fetch them all like this:
let urls = [
'https://api.github.com/users/iliakan',
'https://api.github.com/users/remy',
'https://api.github.com/users/jeresig'
];
// map every url to the promise fetch(github url)
let requests = urls.map(url => fetch(url));
// Promise.all waits until all jobs are resolved
Promise.all(requests)
.then(responses => responses.forEach(
response => alert(`${response.url}: ${response.status}`)
));
A more real-life example with fetching user information for an array of github users by their names (or we could fetch an array of goods by their ids, the logic is same):
let names = ['iliakan', 'remy', 'jeresig'];
let requests = names.map(name => fetch(`https://api.github.com/users/${name}`));
Promise.all(requests)
.then(responses => {
// all responses are ready, we can show HTTP status codes
for(let response of responses) {
alert(`${response.url}: ${response.status}`); // shows 200 for every url
}
return responses;
})
// map array of responses into array of response.json() to read their content
.then(responses => Promise.all(responses.map(r => r.json())))
// all JSON answers are parsed: "users" is the array of them
.then(users => users.forEach(user => alert(user.name)));
If any of the promises is rejected, Promise.all immediately rejects with that error.
For instance:
Promise.all([
new Promise((resolve, reject) => setTimeout(() => resolve(1), 1000)),
new Promise((resolve, reject) => setTimeout(() => reject(new Error("Whoops!")), 2000)),
new Promise((resolve, reject) => setTimeout(() => resolve(3), 3000))
]).catch(alert); // Error: Whoops!
Here the second promise rejects in two seconds. That leads to immediate rejection of Promise.all, so .catch executes: the rejection error becomes the outcome of the whole Promise.all.
The important detail is that promises provide no way to “cancel” or “abort” their execution. So other promises continue to execute, and the eventually settle, but all their results are ignored.
There are ways to avoid this: we can either write additional code to clearTimeout (or otherwise cancel) the promises in case of an error, or we can make errors show up as members in the resulting array (see the task below this chapter about it).
Promise.all(iterable) allows non-promise items in iterable
Normally, Promise.all(iterable) accepts an iterable (in most cases an array) of promises. But if any of those objects is not a promise, it's wrapped in Promise.resolve.
For instance, here the results are [1, 2, 3]:
Promise.all([
new Promise((resolve, reject) => {
setTimeout(() => resolve(1), 1000)
}),
2, // treated as Promise.resolve(2)
3 // treated as Promise.resolve(3)
]).then(alert); // 1, 2, 3
So we are able to pass non-promise values to Promise.all where convenient.
Promise.race
Similar to Promise.all takes an iterable of promises, but instead of waiting for all of them to finish – waits for the first result (or error), and goes on with it.
The syntax is:
let promise = Promise.race(iterable);
For instance, here the result will be 1:
Promise.race([
new Promise((resolve, reject) => setTimeout(() => resolve(1), 1000)),
new Promise((resolve, reject) => setTimeout(() => reject(new Error("Whoops!")), 2000)),
new Promise((resolve, reject) => setTimeout(() => resolve(3), 3000))
]).then(alert); // 1
So, the first result/error becomes the result of the whole Promise.race. After the first settled promise “wins the race”, all further results/errors are ignored.
Summary
There are 4 static methods of Promise class:
Promise.resolve(value) – makes a resolved promise with the given value,
Promise.reject(error) – makes a rejected promise with the given error,
Promise.all(promises) – waits for all promises to resolve and returns an array of their results. If any of the given promises rejects, then it becomes the error of Promise.all, and all other results are ignored.
Promise.race(promises) – waits for the first promise to settle, and its result/error becomes the outcome.
Of these four, Promise.all is the most common in practice.
let urls = [
'https://api.github.com/users/iliakan',
'https://api.github.com/users/remy',
'https://api.github.com/users/jeresig'
];
Promise.all(urls.map(url => fetch(url)))
// for each response show its status
.then(responses => { // (*)
for(let response of responses) {
alert(`${response.url}: ${response.status}`);
}
));
The problem is that if any of requests fails, then Promise.all rejects with the error, and we loose results of all the other requests.
That's not good.
Modify the code so that the array responses in the line (*) would include the response objects for successful fetches and error objects for failed ones.
For instance, if one of URLs is bad, then it should be like:
let urls = [
'https://api.github.com/users/iliakan',
'https://api.github.com/users/remy',
'http://no-such-url'
];
Promise.all(...) // your code to fetch URLs...
// ...and pass fetch errors as members of the resulting array...
.then(responses => {
// 3 urls => 3 array members
alert(responses[0].status); // 200
alert(responses[1].status); // 200
alert(responses[2]); // TypeError: failed to fetch (text may vary)
});
P.S. In this task you don't have to load the full response using response.text() or response.json(). Just handle fetch errors the right way.
Here we have an array of fetch(...) promises that goes to Promise.all.
We can't change the way Promise.all works: if it detects an error, then it rejects with it. So we need to prevent any error from occuring. Instead, if a fetch error happens, we need to treat it as a “normal” result.
In other words, the .catch takes an error for all of the promises and returns it normally. By the rules of how promises work, if a .then/catch handler returns a value (doesn't matter if it's an error object or something else), then the execution continues the “normal” flow.
So the .catch returns the error as a “normal” result into the outer Promise.all.
Improve the solution of the previous task
Fault-tolerant Promise.all. Now we need not just to call fetch, but to load the JSON objects from given URLs.
Here's the example code to do that:
let urls = [
'https://api.github.com/users/iliakan',
'https://api.github.com/users/remy',
'https://api.github.com/users/jeresig'
];
// make fetch requests
Promise.all(urls.map(url => fetch(url)))
// map each response to response.json()
.then(responses => Promise.all(
responses.map(r => r.json())
))
// show name of each user
.then(users => { // (*)
for(let user of users) {
alert(user.name);
}
});
The problem is that if any of requests fails, then Promise.all rejects with the error, and we loose results of all the other requests. So the code above is not fault-tolerant, just like the one in the previous task.
Modify the code so that the array in the line (*) would include parsed JSON for successful requests and error for errored ones.
Please note that the error may occur both in fetch (if the network request fails) and in response.json() (if the response is invalid JSON). In both cases the error should become a member of the results object.
There's a special syntax to work with promises in a more comfort fashion, called “async/await”. It's surprisingly easy to understand and use.
Async functions
Let's start with the async keyword. It can be placed before function, like this:
async function f() {
return 1;
}
The word “async” before a function means one simple thing: a function always returns a promise. If the code has return <non-promise> in it, then JavaScript automatically wraps it into a resolved promise with that value.
For instance, the code above returns a resolved promise with the result of 1, let's test it:
async function f() {
return 1;
}
f().then(alert); // 1
…We could explicitly return a promise, that would be the same:
async function f() {
return Promise.resolve(1);
}
f().then(alert); // 1
So, async ensures that the function returns a promise, wraps non-promises in it. Simple enough, right? But not only that. There's another keyword await that works only inside async functions, and it's pretty cool.
Await
The syntax:
// works only inside async functions
let value = await promise;
The keyword await makes JavaScript wait until that promise settles and returns its result.
Here's example with a promise that resolves in 1 second:
async function f() {
let promise = new Promise((resolve, reject) => {
setTimeout(() => resolve("done!"), 1000)
});
let result = await promise; // wait till the promise resolves (*)
alert(result); // "done!"
}
f();
The function execution “pauses” at the line (*) and resumes when the promise settles, with result becoming its result. So the code above shows “done!” in one second.
Let's emphasize: await literally makes JavaScript wait until the promise settles, and then go on with the result. That doesn't cost any CPU resources, because the engine can do other jobs meanwhile: execute other scripts, handle events etc.
It's just a more elegant syntax of getting the promise result than promise.then, easier to read and write.
Can't use await in regular functions
If we try to use await in non-async function, that would be a syntax error:
function f() {
let promise = Promise.resolve(1);
let result = await promise; // Syntax error
}
We can get such error in case if we forget to put async before a function. As said, await only works inside async function.
Let's take showAvatar() example from the chapter
Promises chaining and rewrite it using async/await:
We'll need to replace .then calls by await.
Also we should make the function async for them to work.
async function showAvatar() {
// read our JSON
let response = await fetch('/article/promise-chaining/user.json');
let user = await response.json();
// read github user
let githubResponse = await fetch(`https://api.github.com/users/${user.name}`);
let githubUser = await githubResponse.json();
// show the avatar
let img = document.createElement('img');
img.src = githubUser.avatar_url;
img.className = "promise-avatar-example";
document.body.append(img);
// wait 3 seconds
await new Promise((resolve, reject) => setTimeout(resolve, 3000));
img.remove();
return githubUser;
}
showAvatar();
Pretty clean and easy to read, right? Much better than before.
await won't work in the top-level code
People who are just starting to use await tend to forget that, but we can't write await in the top-level code. That wouldn't work:
// syntax error in top-level code
let response = await fetch('/article/promise-chaining/user.json');
let user = await response.json();
So we need to have a wrapping async function for the code that awaits. Just as in the example above.
await accepts thenables
Like promise.then, await allows to use thenable objects (those with a callable then method). Again, the idea is that a 3rd-party object may be not a promise, but promise-compatible: if it supports .then, that's enough to use with await.
For instance, here await accepts new Thenable(1):
class Thenable {
constructor(num) {
this.num = num;
}
then(resolve, reject) {
alert(resolve); // function() { native code }
// resolve with this.num*2 after 1000ms
setTimeout(() => resolve(this.num * 2), 1000); // (*)
}
};
async function f() {
// waits for 1 second, then result becomes 2
let result = await new Thenable(1);
alert(result);
}
f();
If await gets a non-promise object with .then, it calls that method providing native functions resolve, reject as arguments. Then await waits until one of them is called (in the example above it happens in the line (*)) and then proceeds with the result.
Async methods
A class method can also be async, just put async before it.
Like here:
class Waiter {
async wait() {
return await Promise.resolve(1);
}
}
new Waiter()
.wait()
.then(alert); // 1
The meaning is the same: it ensures that the returned value is a promise and enables await.
Error handling
If a promise resolves normally, then await promise returns the result. But in case of a rejection it throws the error, just if there were a throw statement at that line.
This code:
async function f() {
await Promise.reject(new Error("Whoops!"));
}
…Is the same as this:
async function f() {
throw new Error("Whoops!");
}
In real situations the promise may take some time before it rejects. So await will wait, and then throw an error.
We can catch that error using try..catch, the same way as a regular throw:
async function f() {
try {
let response = await fetch('http://no-such-url');
} catch(err) {
alert(err); // TypeError: failed to fetch
}
}
f();
In case of an error, the control jumps to the catch block. We can also wrap multiple lines:
async function f() {
try {
let response = await fetch('/no-user-here');
let user = await response.json();
} catch(err) {
// catches errors both in fetch and response.json
alert(err);
}
}
f();
If we don't have try..catch, then the promise generated by the call of the async function f() becomes rejected. We can append .catch to handle it:
async function f() {
let response = await fetch('http://no-such-url');
}
// f() becomes a rejected promise
f().catch(alert); // TypeError: failed to fetch // (*)
If we forget to add .catch there, then we get an unhandled promise error (and can see it in the console). We can catch such errors using a global event handler as described in the chapter
Promises chaining.
async/await and promise.then/catch
When we use async/await, we rarely need .then, because await handles the waiting for us. And we can use a regular try..catch instead of .catch. That's usually (not always) more convenient.
But at the top level of the code, when we're outside of any async function, we're syntactically unable to use await, so it's a normal practice to add .then/catch to handle the final result or falling-through errors.
Like in the line (*) of the example above.
async/await works well with Promise.all
When we need to wait for multiple promises, we can wrap them in Promise.all and then await:
// wait for the array of results
let results = await Promise.all([
fetch(url1),
fetch(url2),
...
]);
In case of an error, it propagates as usual: from the failed promise to Promise.all, and then becomes an exception that we can catch using try..catch around the call.
Summary
The async keyword before a function has two effects:
Makes it always return a promise.
Allows to use await in it.
The await keyword before a promise makes JavaScript wait until that promise settles, and then:
If it's an error, the exception is generated, same as if throw error were called at that very place.
Otherwise, it returns the result, so we can assign it to a value.
Together they provide a great framework to write asynchronous code that is easy both to read and write.
With async/await we rarely need to write promise.then/catch, but we still shouldn't forget that they are based on promises, because sometimes (e.g. in the outermost scope) we have to use these methods. Also Promise.all is a nice thing to wait for many tasks simultaneously.

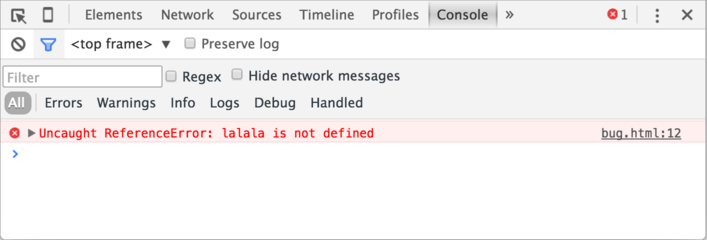


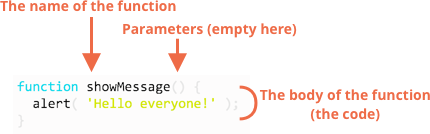


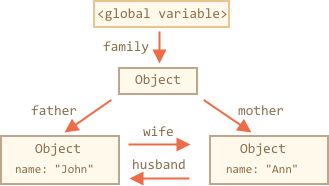
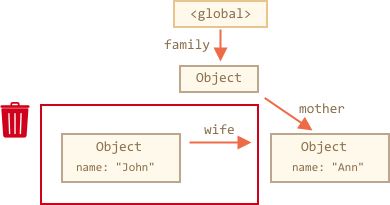
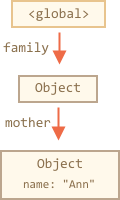


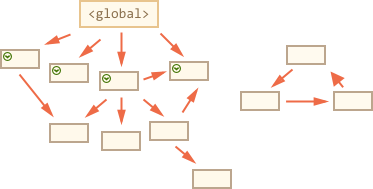
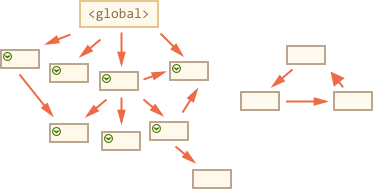

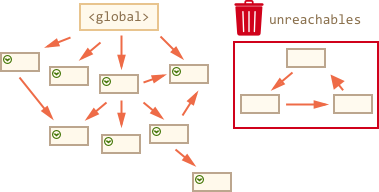


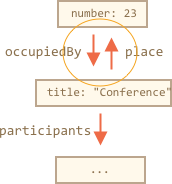


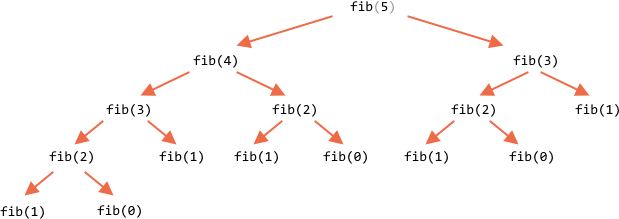


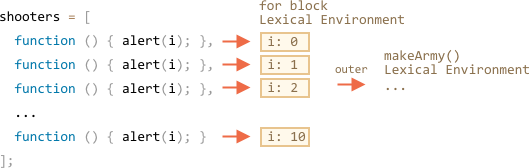


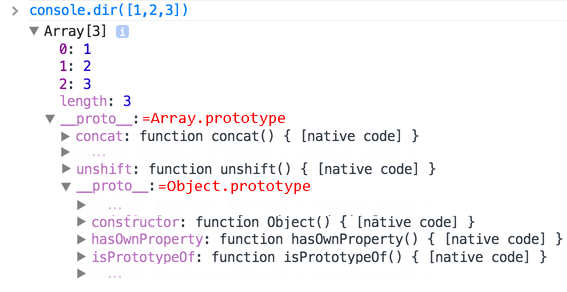


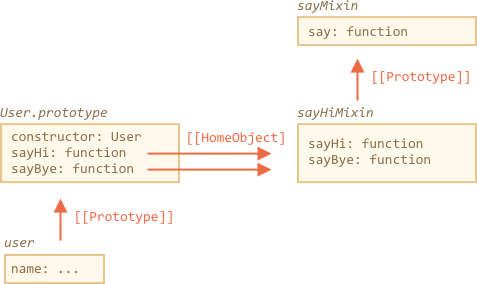
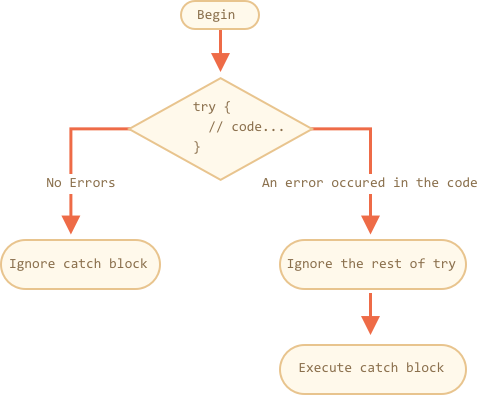
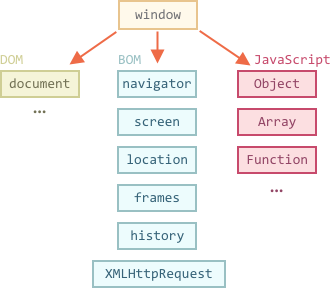


